Couldn’t decide wich version to get, so i ordered one of each ![]()
Hopefully I can spare one to my parents, when I decided wich tint I like the best…
The code worked perfect. Thanks again Hirsh
Couldn’t decide wich version to get, so i ordered one of each ![]()
Hopefully I can spare one to my parents, when I decided wich tint I like the best…
The code worked perfect. Thanks again Hirsh
Does the side switch power on/off and mode change? Is the switch “sensitive”, like slight touch changing modes? Which tint do you prefer?
[EDIT]
On/off is by the tailcap switch.
Placed my order tuesday…. Last order from Banggood(Convoy C8) arrived a couple of days ago. Approximately 1 month shipping time… With the Eagle Eye i chose “priority direct mail”, so hopefully it will get here sooner. Will then post wich one I prefere…
Sorry forgot to include “please post back your tint preference when you get them”.
On/off is also available by the side switch (double click to turn off and single click to turn back on). However, when using the side switch memory is off, so you’ll come back on at low.
Thanks for forcing me to read the review more carefully. According to the review, “Double” click does both on/off.
ahirshy’s code is confirmed to still work at june 10th 00:30 (UTC+01:00).
Thanks man ![]() Just ordered one.
Just ordered one.
Ordered 7th. Paid 0.86 usd extra for “priority direct mail” to Sweden. Uncredible fast…
But not all perfect… Regarding to the label on the box it is tint 3A ![]() ordered 3C…
ordered 3C…
I will test and compare the lights later, and then contact Banggood
By the way, no gift box as in Kronos review
Got mine today - sure does feel great in the hand. Should be easy to add power with stacked 7135's, but really if you go much higher, it should be upgraded to a DTP MCPCB anyway. The UI isn't bad, but not that great either, compared to higher end lights. Double click on the e-switch turns it OFF, but I find clicking through modes triggers a double-click, and the light goes OFF when you don't want it off. Also, if you are on low mode and want to turn it OFF, you double-click, but the first click displays the next brighter mode, so you get flashed with a brighter mode in order to turn the light OFF. This is why I hate double-clicks on e-switch's, unless you can get the timing 100% perfect.
The tailcap power switch has memory, while the side switch will always start on lowest mode. Modes are from lo to high, double click turns the light OFF when ON, and single click turns it ON to low when OFF. I'm real happy with how they kept the overall length very close to the original X6 - usually the length would be extended when the full tailcap button is retained. The SolarStorm SC02 and Roche/Convoy F6 are two examples of small length e-switch 18650 lights, but both don't have tail switch's, so it saves a lot on length, but they heat up quickly big time with little mass or cooling in the design.
I confirmed with or without a tailcap spring bypass, the light will do 2.8A with a fresh battery. Mine does roughly 1,000 lumens with the claimed U2 3C - nice output, and match's the advertised specs - amazing!
I also got the cheap squashy white box with mine, and I have one small nick on the bezel's edge, probably a direct result of the poor packaging.
I would still prefer my own UI for e-switch's, with a FET+1 driver, but probably would lose the charging ability - will have to look more closely at the driver. It's possible the charging circuitry is totally independent from the MCU, and if so, might be possible to piggyback in one of our drivers and retain the charging capability.
How’s the charging? In mine, I have to switch on the tailcap, double press the side switch, then plug in the cable.
This is exactly as a reviewer described it on the BG site. I never used USB charging on a flashlight - it’s not really why I bought it, but I’d like to retain the capability because it appears to be a good (quality) one. I’d like to try it eventually.
What you describe makes the most sense, because you have to have the battery in the circuit to charge it, and if the tailcap switch is OFF, you are breaking the circuit for the cell, so it would be impossible to charge. Most charging e-switch lights don't have a tailcap switch, so its not a problem on those.
The flashlight “marked” 3A also turned out to have a bad reflector… When I turned it on it looked like it was moisture on the reflector, of course it was not but that is the easiest way to explaine how it looked. My 1A was perfect. I contacted Banggood and finally got a relply… Regarding the 3A tint they assured me that they had just written wrong on the sticker…. I sent many pictures on the reflector, but they told me that the supplier claimed that nothing was wrong with it. Like I wrote before I ordered two lights so it was very easy for me to se the fault…So after plenty of mail they agreed to send me a new reflector. Of course first they must get it from the supplier…
Tom E, did your box also say 3A? Does it also have a white plastic retainer ring on the led?(have not seen this on X6R or the originally X6 before)
My 1A looks just like the picture on the site…and as the review pictures at the beginning of the thread.
Yes, mine says U2-3A, but I'm thinking it's a true 3C - I have lots of 3C's.
Yes, mine has a white plastic retainer as well - never saw this in any X6.
Here's the stock #'s I measured, using a LG HE2 at 4.10+v:
moon - 0.03A: 13.6 lumens
lo - 0.45A: 190 lumens
mid - 1.19A: 455 lumens
hi - 2.96A: 1027 @start, 986 lumens @30 secs
throw: 23.8 kcd, 308 meters (measured at 5m)
This driver uses 380 mA 7135's, not 350's, so in theory it should get 3.04A, but 380's always read a little lower. The results are darn close to what is stated for the X6R.
I have two extra X6 reflectors - I built a triple and quad X6, so the reflectors became spare parts. Anyone who did this probably has extra reflectors.
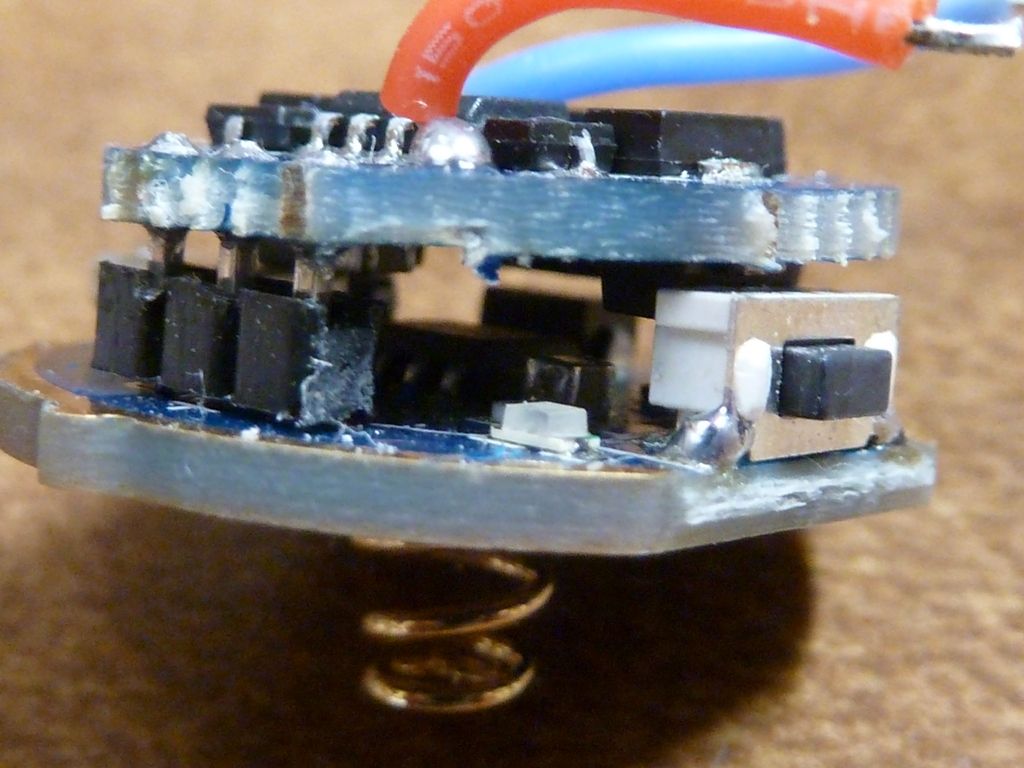
The real good news is the driver and charging circuit are completely separate, isolated on two different PCB's in fact. Only 3 pins connect the two, from the charger base board to the driver: ground (Batt -), Batt +, and the switch.
Here's detailed pics of the top view:
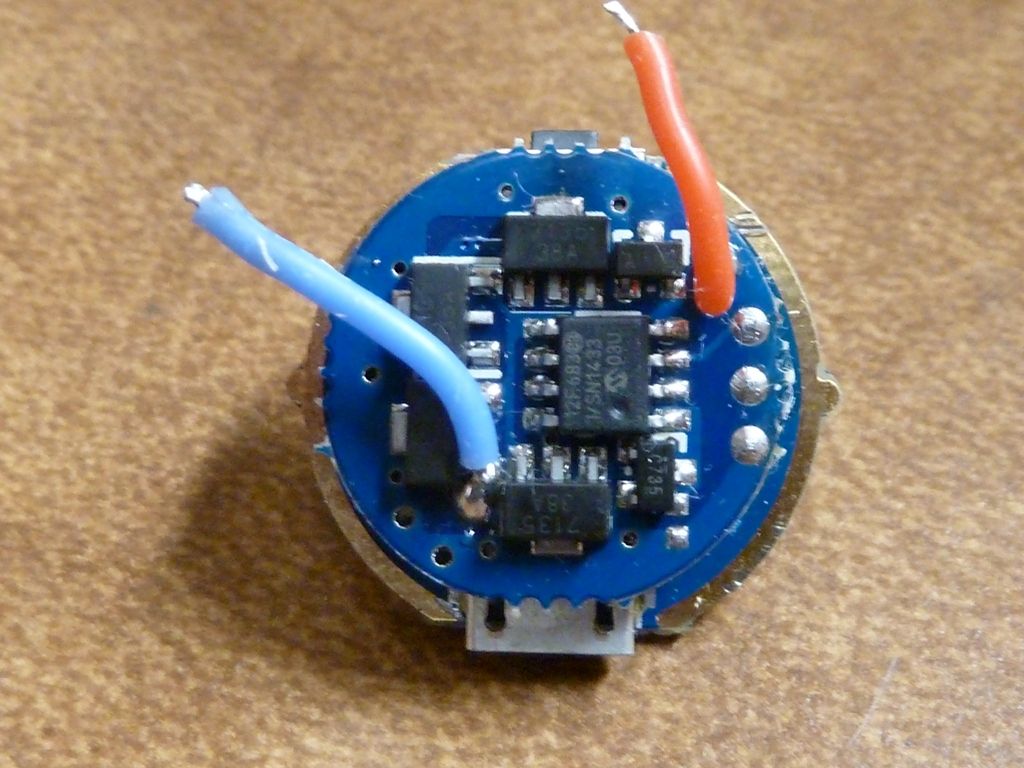
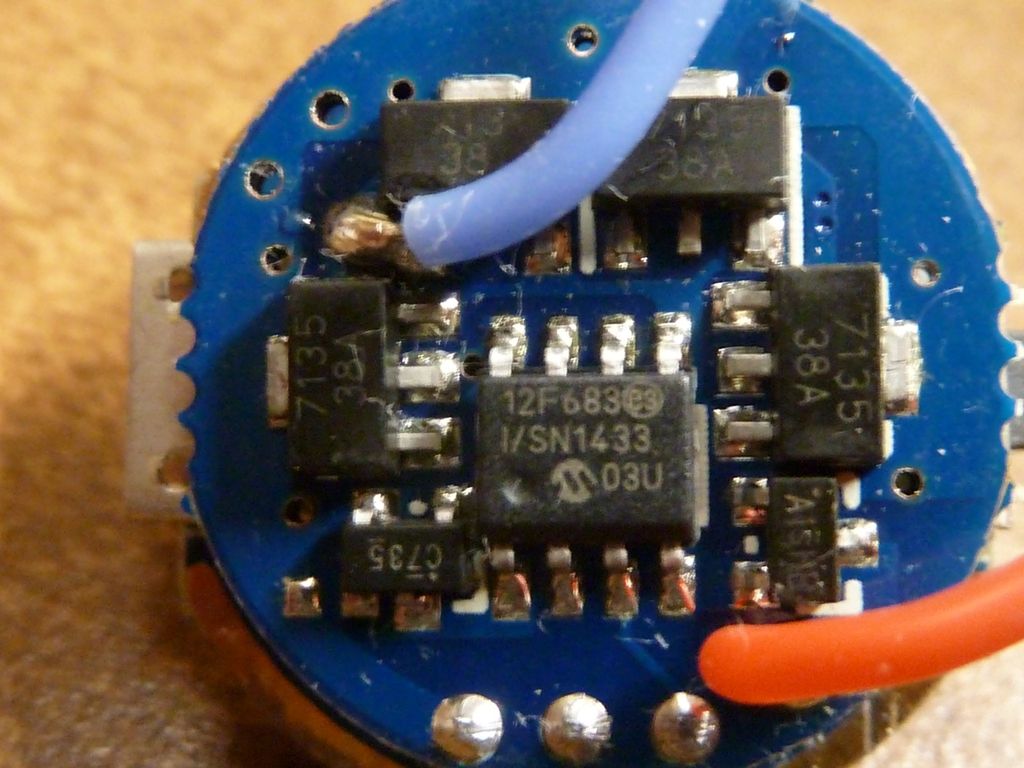
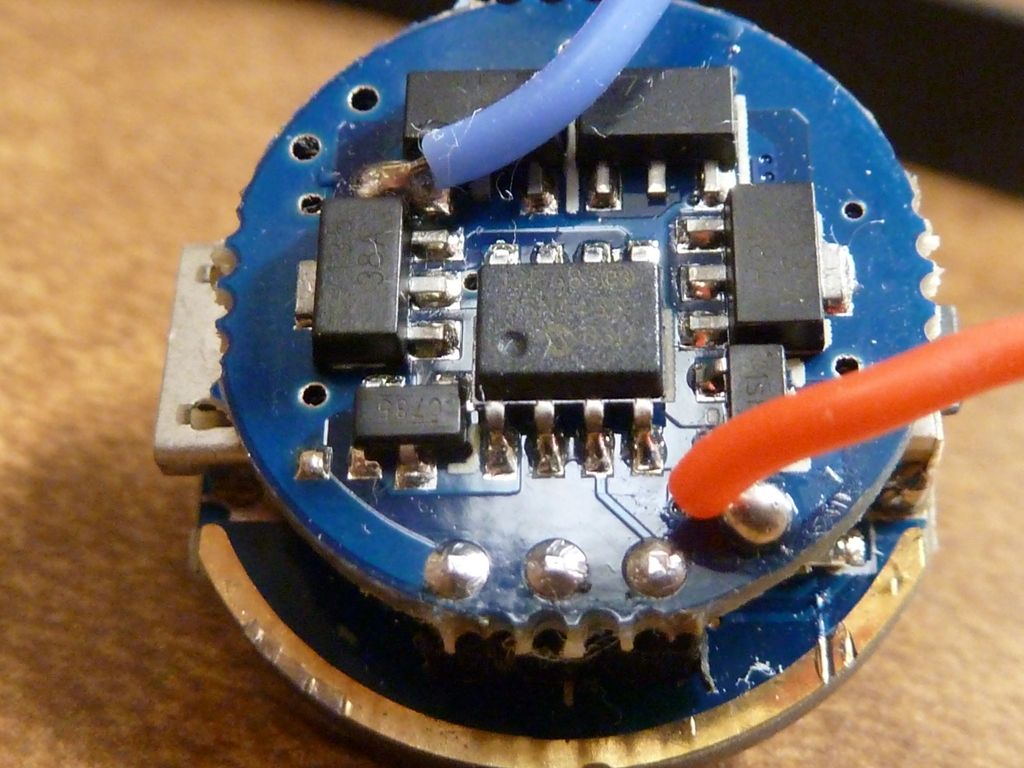
Hers you can see the 3 posts carrying the 3 signals. It got a little marked up from attempt to disconnect the board - apparently it's not a plug connector, posts are probably soldered:
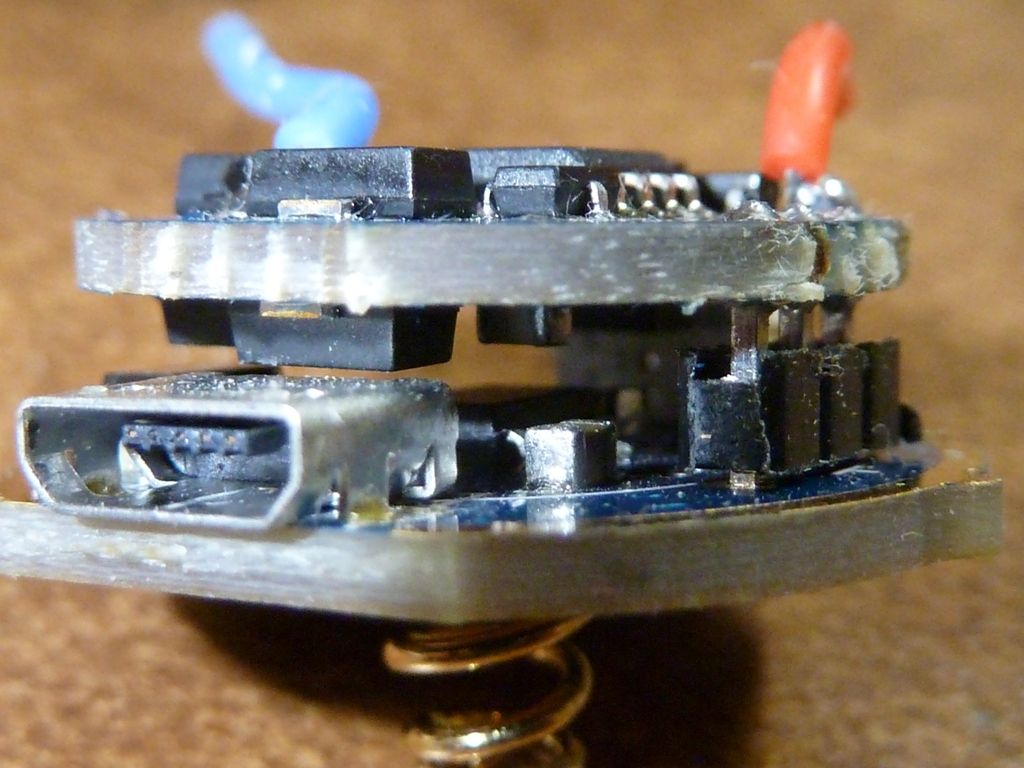
The top driver board is about 20mm. There is very little clearance above it, so stacking extra 7135's might not fit - very close. Pill cavity doesn't have much vertical space. They could fit, maybe, then you may have them touching the pill top.
A 1mm one sided FET based driver would be perfect for this, just have to tap into the pins, maybe remove them or trim them down, and add maybe some extra support on the opposite side, like an extra ground line.
Code still works, thanks for sharing ![]()
I was able to separate the top driver from the bottom by putting the iron on the top of the 3 posts - came off relatively easily. Now it's just a regular piggyback job - usually things: 22 AWG grnd wires (3 could fit), 20 AWG LED+ straight through the FET+1 driver and through the contact board direct to the spring pad, and 20 AWG LED- wire from the FET/7135 output to the LED.
I did some continuity tests, and poking around. The main charging circuit goes through a 8 pin lead surface mount (same basic format as a ATTiny13A), and the chip is labeled:
5056
1418
It's got a red LED and blue LED by the switch, outputs from this part lights them up, and the USB+ goes into pin #4 (via a protection diode), and batt+ goes to pin #5. Pins #6 and #7 control the LED's. This will be awesome if it works out like I suspect!!
Full blown FET+1 driver, modes/firmware I want, plus the fully blown USB charging in tact! Dunno, not sure if anyone else has done a mod like this -- probably, I just missed it  .
.
Let me know if anyone is following this, has interest in it, etc...
Thanks TomE! I’ve been waiting for this info for a long time. Would be really interesting to have a fet+1 piggyback on this.
Btw, I'm using a 20K 0805 resistor across the FET input now on these FET+1 drivers. Seems to take care of the flicker when changing modes or when turning the light ON. With a 22K, it still happens but very intermittently. You don't want to go lower in value because it could effect power (amps).
I’m following…very nice work Tom. The “downside” is that I probably need to buy more. My first goal was to test them firmly(mostly the charging) and if they meet my requirement give one to my father and one to my brother. The charging ability saves me from giving chargers…
After following this I will probably need to buy one for me ![]()