I would have tried it a few days sooner but I had an odd problem at first. It was freaking out, changing brightness modes randomly, no response to clicks. It was most odd in that reflashing didn’t help and even my v177 bistro.hex (which had been working fine during a brief test the other day) was freaking out the same. Went back to blf-a6 and the driver worked fine.
Haven’t used all the options much yet. The configuration method (blink current option then stutter) does work nice. And I would think click off during stutter will be easier to understand for people. Imo the stutter brightness seemed a bit too low.
Code wise, that you’ve simplified how hidden modes are specified is really great. I could see a lot of people getting a bit stuck there.
You could throw in an SOS. I’m sure it’s very rarely needed but some people do like having it available.
Maybe a reserve power option? If left running without interaction it could give a flicker warning when it gets close to ~20% battery left, wait a minute and if it receives no click in acknowledgement from the user it would ramp down slow and turn off. The warning might be useful in some situations like when being used as a tent light or if you’re taking a walk, happily using med-high burning through all your juice too fast to have enough for the walk back.
How about a runtime config option to toggle into a simple mode set / second mode set. Say you want to loan your light to someone. Wife / gf / partner going for a walk, child going camping or treat-or-treating. Toggle over a 2nd mode set (like a simple L-M-H, no memory, no medium press, no hidden modes) in one step. When you get the light back toggle back to all your normal settings in one step again.
It can be hard to follow incremental threads, so here’s a summary of . . .
I agree. Is there anything I can do to help? Perhaps a link in the OP to a post that has a summary of your latest developments? I'll post link to the above post. If you prefer a different post to be your status post (or if you what any other info put in the OP), please let me know. I have renamed the thread.
If you’re going to do that specifically for “loaning out” the light, maybe the top mode in that set should be somewhere among 60% - 80% of what the light is capable of. Or, better yet, let the top mode be configurable, and the other modes be a fixed spacing based on that top mode now being considered 100%! Could that be done?
Edit: To get out of that special mode set should be something that is not easily discoverable. Any kid “playing” with the light and pushing the button for the fun of it shouldn’t be able to accidentally leave the mode set.
Yea, with L-M-H, I did mean not 100 since that’s more of a turbo with our fet + 7135 drivers.
The current 15 quick clicks to get into config mode doesn’t feel to easy to stumble into accidentally. Toggle mode set could just be another config option. Maybe the 1st option to make it quicker the switch over to it.
An anti-theft feature! |(
Friends, coworkers can’t be trusted? The light plays dead when you pop in a fresh battery. Something like 3 mediums clicks then 3 quick clicks unlocks it. Light keeps a general running track of the battery voltage, just enough to know when a battery with significantly more charge has been switched in. Too much to be just from battery self recovery.
Be sure to add a lanyard tag or slip of paper in the battery tube that reads “If found (working or dead) please call 555-LITE-MINE”
I don’t mean to enter config mode, I mean to exit back to the “normal” mode set. I wouldn’t find it useful if I had to enter config mode in order to switch between “normal” and “loaner-friendly” mode sets. So, a config mode to set it up, but then it works from any mode group directly, like a hidden mode that isn’t simple to get out of. Besides, I can believe a child pushing buttons 15, 20, or 30 times in a row, just switching modes for the fun of it.
I for one would love to see a mode that would allow me to turn on ML, tailstand the light and then have it just fade out in 4 or 5 minutes. Stop motion strobe sounds fun, but not really useful since fine control over pulse speed and width would not be possible. If it were, it would make a great visual tachometer.
Who has a good source for the 25? I am getting ready to build a few drivers and would like to put one together as a test fixture on the bench.
I’ve though of some of these and have implemented them in my dual switch firmware, but I have not started with a power switch only version.
What I’ve got running in my dual switch firmware, or am currently developing:
Safety lock. Won’t turn on in backpack or pocket unless a certain startup sequence is excecuted (learned that I need it on my BMF light the hard way).
Three modes, user configurable output ranging from moonlight off one 7135, to all 7135s fully on. Boost/turbo also configurable if not a FET on PB5.
Four different user interfaces for different ways I like to use dual switch lights.
User configurable temperature for thermal protection (using Toykeeper’s method).
Configurable action on critical voltage/temperature: Turn off or low output (with periodic warning flash). Being a mine explorer I want the option to have light as long as I can.
Voltage readout routine that reads out both the voltage saved under load and the current voltage. If they are same, skip the second readout.
The voltage readout can display predefined levels (1 to 5 blinks), real voltage (X.X volts) or raw voltage value from ADC (testing/debugging).
User configurable voltage levels for low step down and critical mode (true voltage value entred in two digits : X.X volts).
Voltage calibration. If the voltage of the cell is known, insert into light and run calibration by “telling” the light what voltage the cell has in three digits (X.XX volts).
Boost/turbo timer configurable in 15 second steps.
Enable/disable voltage and/or temperature monitoring.
Three digit programming lockout code. Set a code on programming mode. Without entering it no one can reprogram anything.
Enable / disable noob mode. Noob mode levels and settings are all defined in the code, I will not make them user programmable.
Reset all settings back to default.
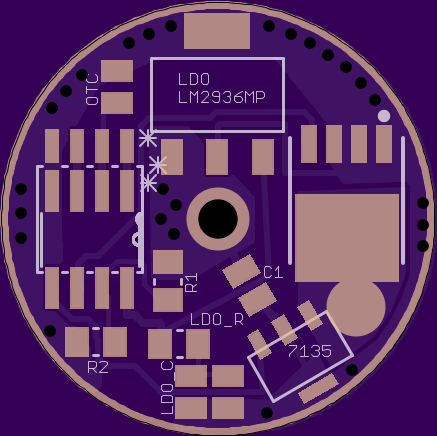
All this stuff is pretty easy to configure with a dual switch setup, but it’s all specific to my driver that uses all pins for 0.35/0.38A constant current steps with PWM between, and the off time cap, voltage divider and E-switch on same pin. It won’t be compatible with any existing driver, so I’m not sure how useful it will be for others. My drivers are a little different, no springs, components on all sides, cut off tabs of some components to fit, and the MCU on the cell side so flashing access is easy… I don’t think they will appeal to many… In any case, people seem to be moving forward with the 85 so there’s no need to rush with mine.
I’ll be making a single power switch based version of this firmware for my driver, but I don’t know how much user configurable settings I will be able to maintain. For example, adjusting the output of a mode is done by entering programming mode, then holding the E-switch until your happy (press & hold increases, double-press & hold decreases). A short off time press goes to the next mode, long goes to previous, making it easy to see differences between each mode and adjust them before leaving the programming mode. I can’t think of a non annoying way to have all of these configurable options without a dual switch setup, so I’ll probably strip out a lot of this stuff for the off time only version.
Anyhow, leaving on Sunday for a few weeks of traveling with work. It’s all on hold from now until I get back…
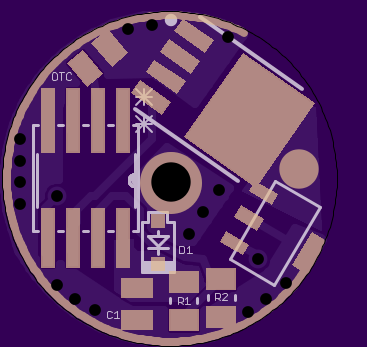
I’m trying to make a 17mm single side FET + 1 board that will take these larger chips. It’s a very tight fit. I’ve managed to get it all on but I’m not comfortable with how close some parts are so I’ll keep playing.
20mm and bigger is easy I’ve done a few already.
I’ve seen it do that right after a flash, but re-flashing has always fixed it. I haven’t seen it work and then fail though. One thing I’d try if it keeps happening is to switch the fuse for clock speed and tell it to use the longer startup delay. IIRC there was an option for 4us vs 64us, or maybe it was ms… I forget. I haven’t tried though, because it has only failed like once every 20 times I flashed it… and not since several revisions ago.
Fixed, I think. It was using 16/64 for the blinks and 8/64 for the stutter… I just bumped the stutter up to 12/64.
I hadn’t really thought about it, but since 10/64 is “low”, I should probably keep everything except moon at or above that level.
I think it might be an important option. It could, for example, set the thermal step-down back to the original value (without the need to re-calibrate it after turning this option off). It could also quickly reset from “easy mode” back to a regular UI. Assuming the default is close to what you actually want, anyway, which might not be the case.
I suppose, but this is the first time anyone indicated an interest.
Perhaps, though I suspect some would find it annoying to have a second level of LVP which stops early. OTOH, it also sounds similar to one of the timer options I considered, except it’d be trigger by voltage instead of time.
That sounds nice, but I doubt there’s room. It would probably need to be configured at compile-time in order to fit. Might be possible, but I’m not counting on it. If it’s implemented, do you think it should really be first in config mode?
Also, for “simple mode”, does this sound about right?
L/M/H (in that order) at 10/64, 30/64, 50/64. (~10 lm, ~180 lm, ~690 lm)
No memory.
No moon.
No medium-press (so no hidden modes).
Medium-press is now a configurable option.
Currently, disabled-med-press acts like long-press, but maybe it’d be better to make it act like a short-press?
Unfortunately, not much. Less than 100 bytes.
I’m pretty sure that would bite people when it’s not supposed to.
I have no idea how it would tell the difference between a child pushing buttons a lot and the owner of the light trying to reset it to normal operation. It only has the power switch as input… and on that note:
Exactly. A lot of more advanced features really require an e-switch or a dual switch in order to be usable without sacrificing a goat. The power-switch-only interface is pretty limiting.
That first one sounds like the timer option which was already requested. I’ve been trying to better understand what people would use it for, so thanks for the extra detail. A smooth fade from moon won’t be possible though, since the control resolution is very coarse at the low end.
Stop-motion strobes would have to be fixed speeds for now. I normally have 12 Hz, 24 Hz, and 60 Hz on my EDC. Plus two self-ramping strobes which ping-pong across some fun ranges. But to make it truly adjustable I’d need an e-switch. The attiny clock is also not the most accurate, so it won’t be exactly the speed it’s intended to be. I think they’re still fun though, and they’re really small so I could fit several different speeds.
I know I’ve said it before, but there is no need to wait until it’s “done”. Even unfinished code can be helpful. One of the most educational things I ever read was a leaked copy of an alpha version of Quake’s source code. It was full of TODOs and FIXMEs, but I think that may have actually made it a better learning tool.
It sounds like you’ve got all sorts of neat features. Maybe some of them require special hardware, but some sound pretty useful for more general purposes too.
Thanks, that should help new readers. Of course, it’s your thread so you can do as you like with it.
The repository’s INDEX file will also list projects by which MCU they use, to help people find relevant projects.
I’m getting close to a release-able state with this project, so I’ll soon refer to the project manual and UI diagram instead of the thread. I wonder how to make a diagram for this thing…
I originally made it act like a long press, because that’s how I personally like it when I don’t have medium-press. It lets me reset to the first mode faster. But I realized that feature isn’t really for me, it’s for people who don’t like medium-press. Like DavidEF pointed out, some people have trouble clicking fast enough to be “short”, so I made disabled-medium act like a short press instead.
Also, I think RMM published a 17mm FET+1 board modified to fit the tiny45/85, but I don’t recall where the post was… I’ve been sticking with tiny25 only because it doesn’t need any board layout changes, and because it’s the only model I have for testing.
I’m trying to make a 17mm single side FET + 1 board that will take these larger chips. It’s a very tight fit. I’ve managed to get it all on but I’m not comfortable with how close some parts are so I’ll keep playing.
It's so easy to bend the pins in that you may want to consider sticking with the SSU footprint on 17mm boards. I generally bend the pins regardless because it's so much easier to attach a programming clip.
FWIW, the new “muggle mode” is working. I’m not totally sure what to think of it, but it certainly does make things simple, and it’s easy to enter or exit. It doesn’t overwrite other config settings.