Yesterday I got my replacement head. The moonlight works perfect also do the other modes. Hopefully this one lasts longer ![]()
Ok, I love your forum!
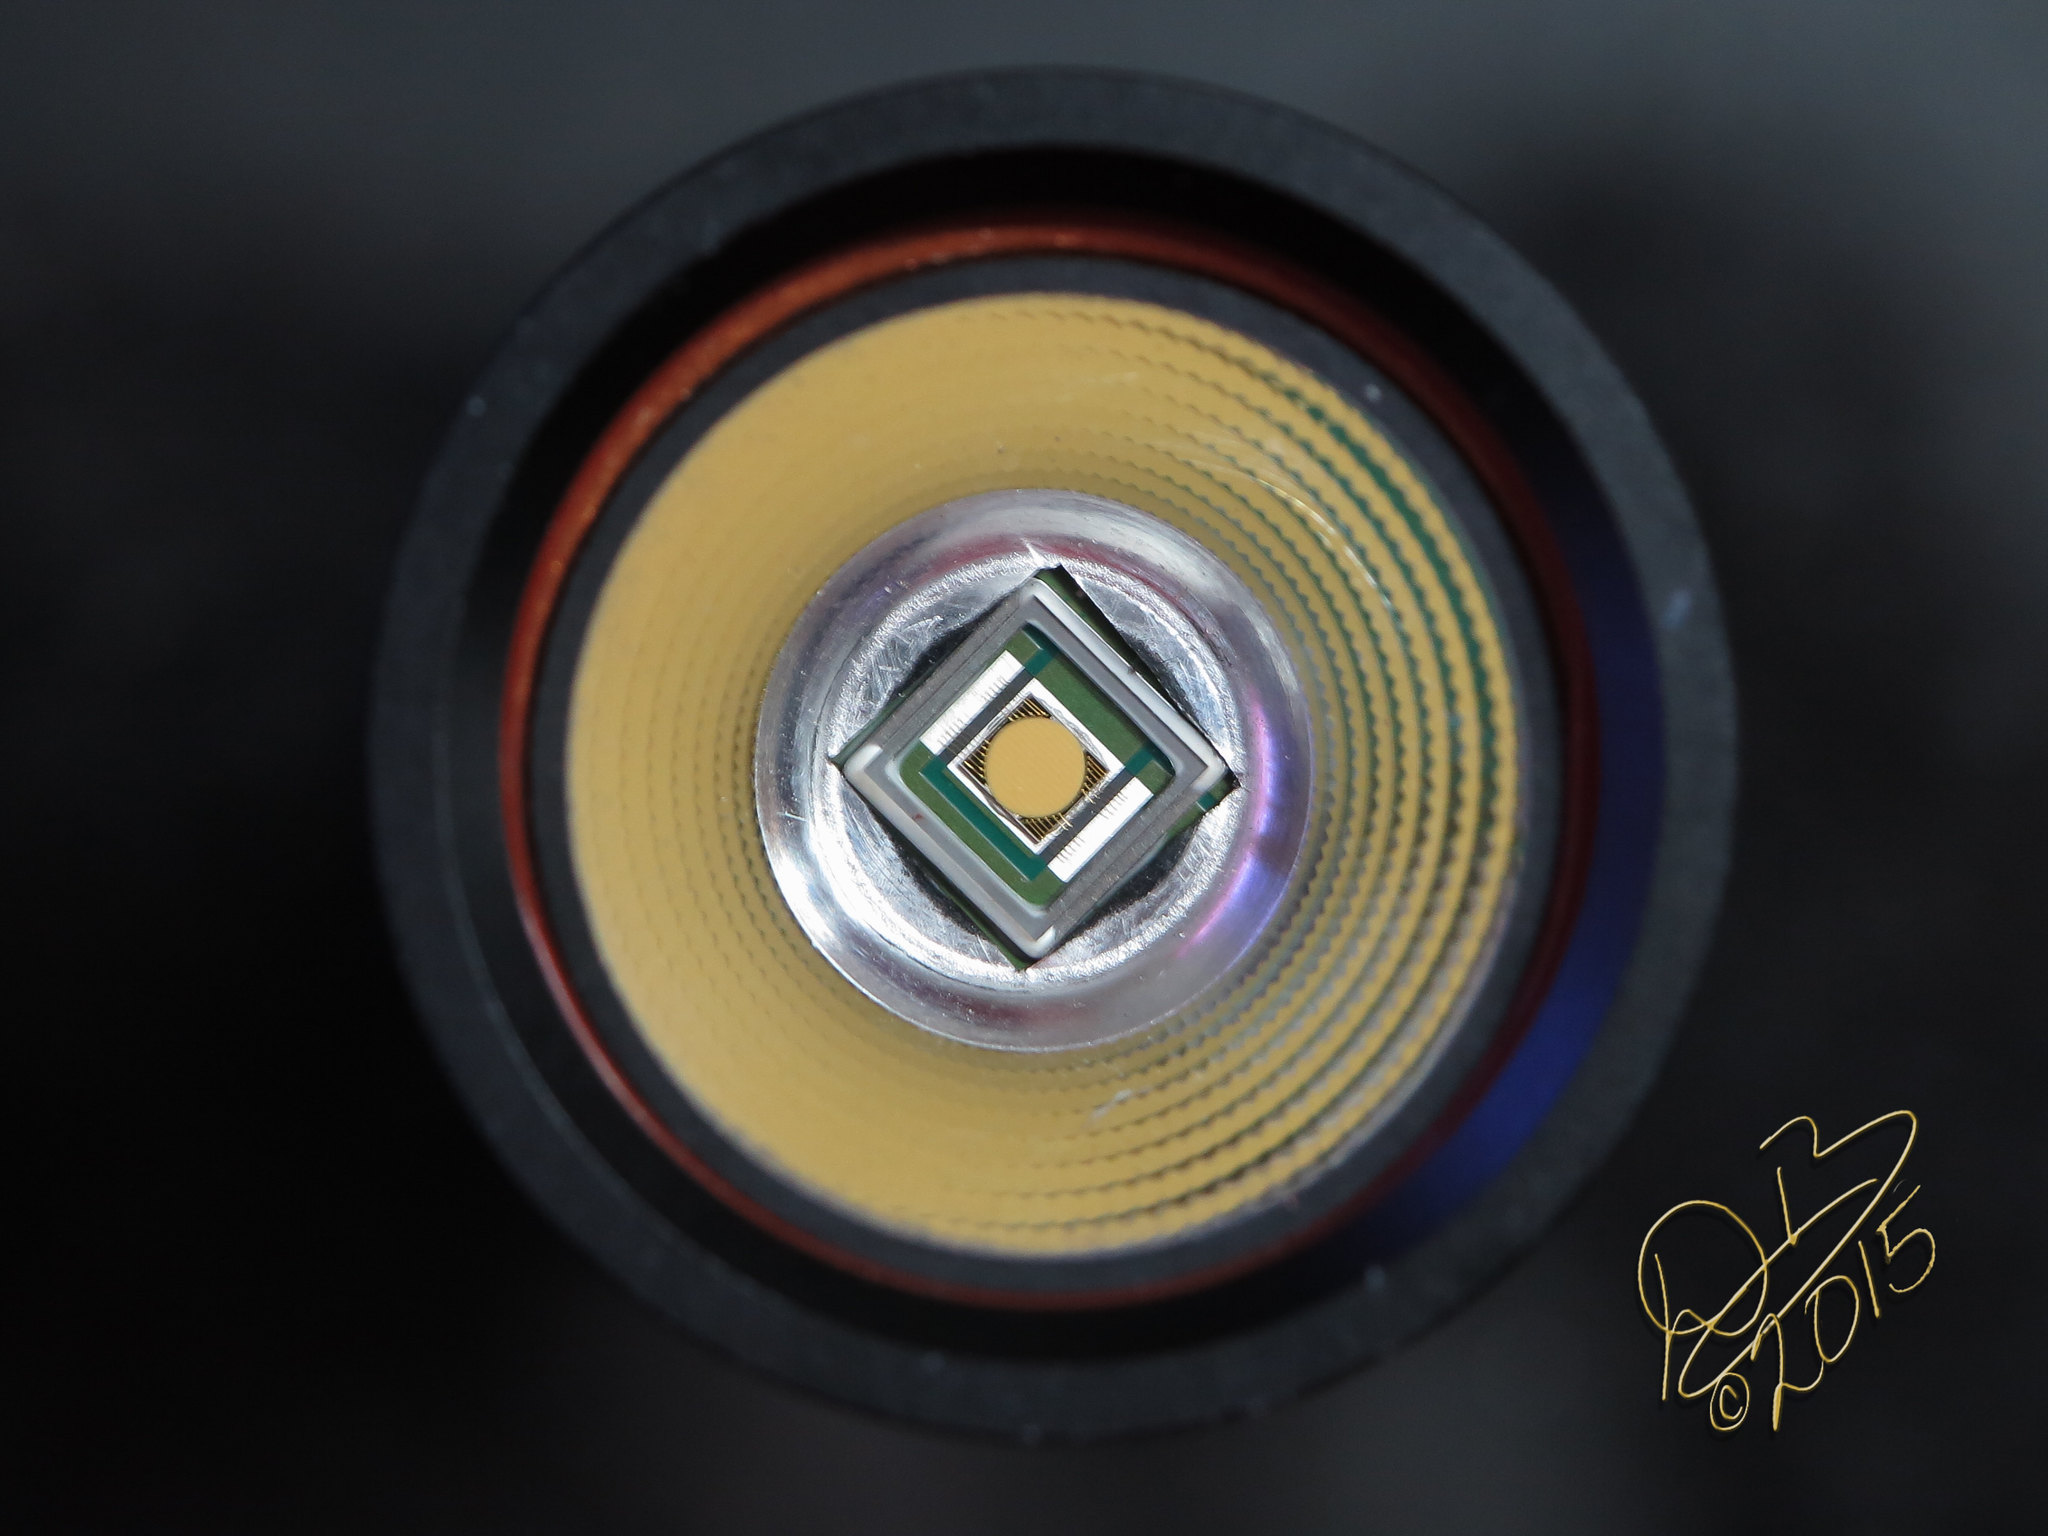
Please forgive me for my ignorance, but I’ve spent some time looking for my problem and couldn’t find anything. I just received my BLF A6 today. I put my nitecore 3400mah 18650 battery in and turned it on. WOW, what a beam. However, this is where things went south. While still on, I proceeded to screw off the top lens portion. (Not sure what I was trying to accomplish) Anyway, it came off and that’s when I saw a very little stream off thick smoke come from the LED and then it went out. And now it won’t come back on. Does anyone know what I did? The reflector portion didn’t come off as cleanly as it could have, and now that I think about it, I guess I could have shorted something on that little board… any ideas? Any help would be much appreciated. Thank you.
By taking the bezel off, you put pressure on the silicone dome and broke a bond wire. The emitter is toast.
Purchase a new emitter on a 16mm Noctigon and replace that one. Most basic of soldering skills, remove a wire, re-solder it on the new star. DON’T touch the dome with the iron!
As far as group changes go, it is said to half press 16 times OR UNTIL THE LIGHT STOPS RESPONDING, then the first 2 blinks will set group and the second 2 blinks will set memory. Should be pretty obvious, the light has to be on to respond.
So for clarity, yes, turn the light on, then rapidly half press 16 times (the light will cycle through the levels repeatedly during this process) When the light quits producing light (stops responding) watch for the set of 2 blinks and click off during this time to set group mode, or wait for a second set of 2 blinks to set memory mode by clicking off within the 2 blink time frame.
I am very very forgetful, but this UI sticks in my mind easily for some reason. I’ve found it easy and pleasurable to use since it was first introduced to me months and months ago.
i got my flashlight yesterday as well. i haven’t seen anything about the issue I’m having.
the flashlight cycles through all the modes perfectly, but it will not turn off. full clicks just cycle through the modes as if it is a half click. any thoughts?
Did you try to do a spring bypass and toast the switch?
i haven’t done anything to it yet.
Agree with Dale’s assessment.
If his repair recommendation is beyond your skill knowledge set, I’d suggest you post a new topic - something like “Need help fixing my BLF A6”. Explain the situation and what you need help for. Include a copy of (or a link to) DB’s post. You may find someone willing to do the work for no cost/low cost in your immediate area.
AFAIK, what happened to you is rare. What’s been reported by others is shearing off of the dome. The flashlights still worked, albeit with a more tightly focused beam and a slight shift in tint.
I think that if you read this discussion thread from start to finish, you’ll find some admonishments to be VERY careful when unscrewing the head. Not that this is your fault, it was just an unfortunate manufacturing choice to use a square die and a square centering ring. I understand that some of the later models had this flaw corrected by using a circular die and a circular centering ring. Here was my solution: Bare BLF A6 Interest List (coupon now public)
I only ask because a friend of a friend may or may not have done that to his and had the same result. Light wouldn’t true off it would just cycle modes.
Sorry to hear about the busted flashlight.
For future reference, you should not unscrew the bezel while the flashlight head is hot. Turn it off, and let it cool down first. It is much easier to damage the emitter when it is hot.
I like to press the eraser of a pencil against the lens when I screw or unscrew the bezel. That way the lens does not rotate when the bezel turns. And it's not just the lens. The reflector and the white plastic centering ring are also prevented from rotating when you push down on the lens.
Go to an Art supply store and ask for a “Mars” eraser. These are very soft and ‘grabby’ on glass, much better than the usual kind.
Phil
If the light won’t turn off it’s probably due to the little nub in the center of the rubber boot being too long. You can click the light on, but the nub won’t let it come back out far enough to disengage.
Take the retaining ring out of the tail cap, pull out the switch board and the boot/spacer assembly and try them outside the light to see if that’s the issue. Easy enough to trim a slice off this nub, just don’t get carried away or the boot actuation will be mushy. The rubber boot should sit on top of the switch cleanly, not be held up above it. Cut off the nub as much as it’s being held high. This might not make sense reading it, but if you’re holding the switch in your hand and see it, you’ll understand. Just remember that the piece that looks like a washer is a spacer, the switch sits against this with the switch post going through the middle. So the boot should sit flat on the washer.
This is really easy, no soldering involved. Simply use tweezers or needle nose pliers to unscrew the brass retaining ring, then pull the parts out or push the rubber boot through with your finger from back to front.
1dash1, one thing there that’s not accurate… “later models had this flaw corrected by using a circular die and a circular centering ring”
They use a circular centering ring hole that completely clears the square die substrate, the die is still square. The only circular die in this industry is the Luminous SBT-70, SBT-140. The SBT-70 is discontinued and the SBT-140 cost’s ~$100 for the emitter.
Just wanted to avoid confusion. The reason the dome get’s stripped is multi-fold. As has been said, if it’s hot the dome comes off fairly easy. When the bezel is loosened, the downward pressure is released and the reflector can float, allowing the centering ring to rise and not stay mated square hole to square die substrate, thus hitting the hot silicone dome and bumping it off. This is usually done with the light held sideways while loosening the die, but not always. Part of the problem is that the plastic centering ring is not a snug fit on the square substrate, or it’s still hot and soft from our over-clocking the emitter. (Remember, the emitter has a 3A max rating and we’re taking it to 5A and over, over-clocking produces much more heat)
Primarily, all it takes is paying attention and some tender loving care. We have members here that simply will not open a light, we have other’s that insist on cracking it open right off the top, allowing humidity and dust to get in (and oftimes fingerprints). Should be fairly obvious that the light really shouldn’t be opened in other than ideal situations, at the bench, in a more controlled environment. This especially holds true to custom lights. Many times it’s very difficult to get a de-domed emitter sitting perfectly in the reflector for maximum throw. Loosening the bezel could kill an hours worth of tweaking and make the light never really work right again.
Also, if the light is on when the bezel is loosened, the driver wires can lift the mcpcb off the emitter shelf, eliminating the heat sink. The emitter will overheat quickly, smoke, and die. AND, if the dome is bumped off, the reflector can easily damage bond wires that are now exposed.
Caveat Emptor!
The XP-L is really succeptible to damage because of it’s construction. Because it uses the XM-L2 die on a XP-G2 substrate the dome is all the way out to the edges of the substrate, so bumping it with the centering ring or reflector is probably more likely to cause damage…

This is from CRX’s thread here on emitters. Sorry it’s so big, it’s a single picture of the build of a lot of emitters, can’t trim it down to the specific XP-L or XP-L HI. But seeing some of these other’s gives a great perspective to what we’re dealing with in our lights.
Ton’s of great information in his thread!
A truly round die in a square hole, the SBT-70 in a Mirella reflector modified to fit this emitter and the Eagle Eye X6. ![]()
Don’t see the dome? It doesn’t have one, they put an AR coated glass window on a metal frame for protection. The silvery edges are the metal frame, the glass lens is glued onto this frame which is likewise glued to the substrate. I like pulling them off, leaving the bare round die exposed with it’s bridgework of bond wires. (I have also slipped and crashed that bridgework, killing a $70 emitter!)
+1, even if it works it can be too sensitive or not tail stand if the rubber is too tall.
Dale, Thank you Very Much for the SUPERB explanation. 
And for your Always Valuable posts. 
Could not have explained that any better. Thanks D.B.!
![]() He’s gonna hit that 10k mark faster than we originally thought!
He’s gonna hit that 10k mark faster than we originally thought!
thanks for the reply. i tried this, but it did not solve my problem. i cut a very small amount from the nub, which did not work. i proceeded to cut small sections off and testing, but it never worked. i eventually ended up with the boot actuation becoming mushy like you mentioned. still nothing. below is a picture of the trimmed nub next to the untrimmed nub from my extra boot.

Does the switch work properly (click in and out) when it’s out of the light?