Have you read the tailcap thread OP in the month or two? I tried to consolidate most of the basic knowledge there. If you would like some more info added, I can take more pictures or something, just let me know. I just don’t want the OP to get too cluttered. There are a million different options now, and sometimes it works best if you post what light you want to put it in and people can chime in with tips/suggestions
I started reading the thread, but the pictures were blurry and I wasn’t sure what I was looking at. Then the discussion favours electronically minded people who already understand what going on. I’m a “see spot run” guy when it comes to the technical parts. I need simple instructions with clear easy to follow pictures. I catch on fast, but a concise uncluttered primer deploying the KISS methodology is needed for my aging brain to understand.
Ouchyfoot, I have been thinking about doing a build thread on the dumb tailcap boards, with pics or videos. Still waiting on parts… May give it a go soon.
I’ll be watching for it. Thanks from me and others.
Built up a C8 XP-G2. Baked a M2
This has by far been the most involved mod I’ve ever done. I spent 5 or 6 hours last night tweaking, test fitting, tweaking, test fitting, filing, and more test fitting but I think I am finally done with the bulk of the tough stuff. I got the driver all set up and potted (after quadruple checking everything was working). Switch is set in place and the leads are ready to be attached to that beautiful MTG2 board. I’m just waiting for the thermal glue to thoroughly set up before making the (hopefully) final 2 solder joints.
Nice. I’ve never even attempted a mag build because it just seemed like so much work! So kudos.
I spent part of my evening in Eagle designing 14mm single-sided FET+1 board, before I realized wight had already done basically the same thing. Doh! I will say I like mine better though haha
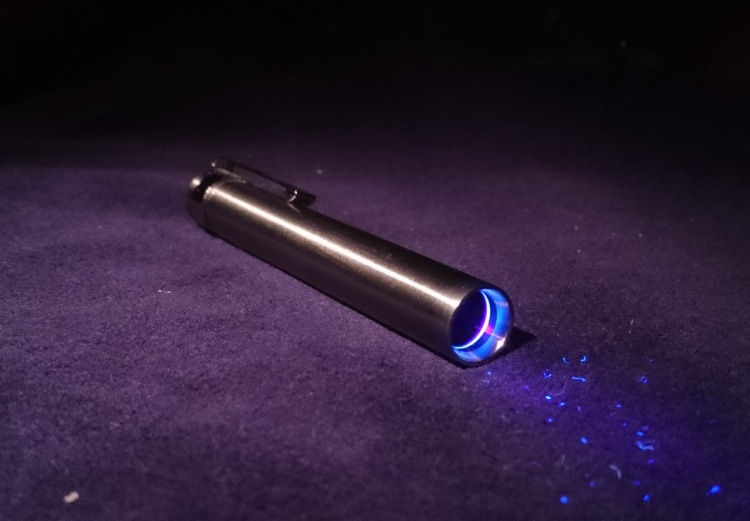
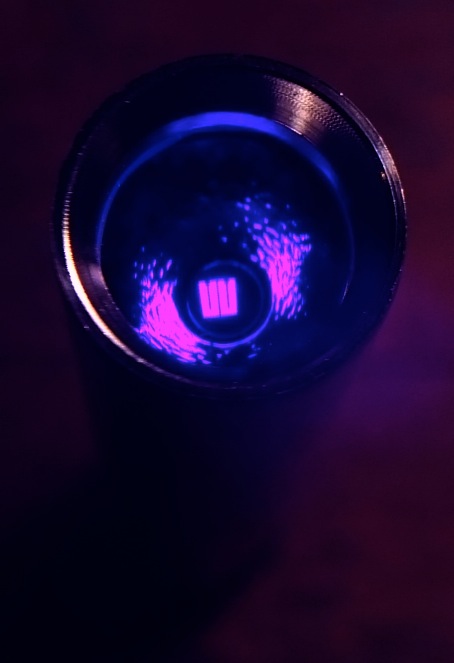
A short mod, but one that I wanted to do for a long time already: replacing the led of a AAA cheapy (brand-less, from Fasttech, but it is exactly the same build as the Singfire/BLF 348) with a ‘led4power’ 365nm led and replace the lens with a 10mm ZWB2 UV-pass filter. I thought it would be great for banknotes, but it is actually too bright for that without protecting glasses, unless it is for checking for a brief moment. It is not as innocent as it looks…
Nice.
That’s why i used the Thrunite Ti, it’s good to have a lower mode. The high mode on mine is quite powerful too.
You’ve got me thinking about modding my BLF CQG S1 now. ![]()
![]()
Well, I’m thinking about gutting my Tom E. BTU Shocker. By todays standards it is a little long in the tooth if you will. So, I’m thinking maybe some XP-L HI’s? Then what would I drive them with? All three parallel to a 17DD +1? Or maybe, One driver per led? What would you do with it if you wanted to change it up to something a little newer. Right now it has some dedomed XM-L2 God knows what. I’m afraid to look at the existing driver which I have not done yet.
Sweet! It turned out nicely. You could change out the sense resistor on that flashlight to reduce output. Based on these pictures I’d say it should be the one marked R50.
I don’t think you’ll see any improvement switching to XPL Hi except maybe tint improvement. Maybe a driver upgrade might see a marginal increase.
I recently upgraded my stock dd xml btu shocker to a 3S FET, Xpl-hi. Based on my calculations at 6amps should see around 400kcd. I am unfortunately only seeing 4.8A and 257kcd with 30Q’s. My 20awg lead run from driver to mcpcb may be a tad long for 20awg. Not much else I could improve.
Dedomed XP-G2 2b LOVING the tint. Having issues with the driver.
Is your battery carrier holding you back?
It shouldn’t be. I bypassed all springs with high quality braid or 22awg wire and beefed up all traces with 30ga copper sheet.
Here’s the data measured at different stages:
Stock BTU Shocker (XML alu mcpcb & DRY Driver):
108kcd @ 7ft
405lux Ceiling Bounce
FET & 3x XPL HI on noctigon
Installed
4.3A tailcap
197kcd
464lux
Spring Bypass, traces beefed
4.8A
247kcd
515lux
257kcd @ 35ft converted back to 1m.
I got the parts together for my second RoMiSen RC-A8 mod., boost driver and Nichia 219C for CR123A. Next is to take it apart and shorten the pill.
Click for full size:

Fought my fet+1 most of the day. Took a break to bake some Convoys
Overhauled one of my first 3up X6’s and played around with GITD stuff applied to some optics,
This X6 had a glued Al-Heatsink, 3 badly dedomed 219B on a FET driver and additinal glass lens. Board was also glued down. I managed to force the board out. Heatsink was left in place but I drilled and tapped two holes into it to secure the board. Sanded down the 32mm board and soldered it under the new one. LEDs are 219B-V1 R9050 sw57, by the way. Sanded down the bezel a bit and now it’s a perfect fit without additional glass lens. While the optics are curing, I prepared a 105C based driver. It’s a dual channel 11+2 AMC7135 driver now, 4.67 A max, running BLF-A6 firmware with BATTCHECK_VpT (EDIT: doesn’t work), 6- and 4-mode-groups, where in the 6-mode-group, 4 modes are running solely on the 2nd 2x7135-channel, in the 4-mode-group, 2 modes are 2nd channel only. Didn’t dare to touch the optics yet, hope they’ll turn out nice.
PICS!!!