One of my DQG Tiny III triples has a 3.8 amp (10x7135) 105c driver with DrJones Mokkadrv firmware. A quick press from off starts on high. A long press starts on low.
My other one has a FET driver with Moppydrv firmware. That one will remember the mode it was last turned off in, but also has shortcuts too moonlight (long press) and turbo (double-click).
The hold for turbo from off is a little long. I think you have to hold for 2 seconds. Would have been better if they made it 1 second.
Also there is a turbo timer (I think 1 minute). When the turbo timer times out you end up in whatever your last non-turbo mode was, or in low if you used the shortcut to turbo from off.
this one with the grey metal tailcap is the older version?or?
i bought the last version,but the modes type is not good.too confusing…anyway,neutral version i bought is beatiful.now lets change the driver.
That one you linked is the Tiny III. You can tell because it has knurling on the tailcap and a metal switch button.
The latest model, the Tiny IV, has a black rubber switch boot and no knurling on the tailcap.
The Tiny IV is superior due to higher output, internal heatsinking, a better UI (it has a shortcut to turbo from off), is less likely to accidentally turn on in the pocket, and is easier to mod.
helou.i want to change the driver in this flashlite.which could be good?thanks.i want maximum,maybe turbo timer.something,like our fet.but this is side switch…
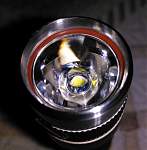
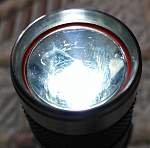
The light uses a single board that contains both the driver and the LED. There is no separate star. Merely changing the driver isn’t an option since typical replacement drivers do not have the LED on them and there isn’t room to mount a star in front of the driver and still have room for the optic.
However, it is possible to convert this light to a triple. The shorter optic on a triple frees up enough space to mount a platform for the triple star ahead of the driver.
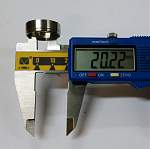
I’ve converted a couple DQG Tiny IIIs into triples. Both of them also had the 20mm bezel, just like the Tiny IV.
Fortunately, it is not necessary to make a new bezel. Both of these solutions work:
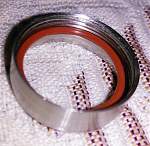
Place a fat o-ring on top of the bezel. Just thick enough to project over the edge of the bezel onto the optic; or
Buy a 22mm AR coated plastic lens from flashlightlens.com. Then file part of the edge of the lens so just the edge is much flatter and fits under the bezel (this is the option I preferred for my lights). The lens sits on top of the optic and holds it all together.
Be very careful if you’re using a thin glass lens to hold in the optic. I tried that and the lens cracked. Too much pressure against the edges of the lens. Glass lenses are great at resisting pressure when supported on both sides (as in most flashlights). They aren’t so good at resisting torquing action (only one side of the glass is supported while pressure tries to bends the glass (in this case around the edges of the optic). Also if you ever drop the light and it hits bezel down the impact will likely drive the optic through the lens.
To avoid this I recommend using an acrylic lens or an o-ring.