You mean the led centering ring ?
It’s in there , the white ring around the led .
Hi giorgoskok,
I noticed in most other pics of the BLF A6, the rings cover the red driver board like the one below.
Any ideas why?
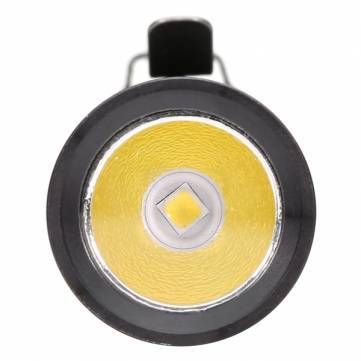
Your flashlight is normal.
In later production , they changed the Led mcpcb (pcb the led is on) , from white to red .
They changed the plastic centering ring too, the new one is actually better, it will less likely twist the dome off the led when the flashlight head is being removed.
I have 3 , and all these 3 have the “new” one . i didn’t know it
Wow guys. Thanks a bunch.
Great knowing all that information.
Puts my mind at ease.
Anyone know where to get the new ones? I’ve done enough accidental de-doming for now.
Yeah, I know, if it’s working why try taking it apart … well, just because.
Not sure this is the place for this qc issue… Just in case someone else has seen this.
I received a bare aluminum A6 two weeks ago and the head section is very slightly skewed. It is hard to notice, but i can feel it with my fingers. On one side there is a slightly wider gap between the head and the body and i can feel the head is not perfectly aligned with the body too.
The threads look fine - no cross threading, and the head screws in and out smoothly… I can’t really tell what’s wrong. It would seem the inner threads in the head have been done with a slight angle… No idea really.
I’m a bit disappointed of course, but i can live with it. I won’t go into playing customer service game with BG for that. Still… it is a surprising qc mishap for a BLF light… I don’t think i have ever seen a skewed part like that, even in the cheapest chinese lights i’v bought over the years.
Did anybody have some similar (machining?) issue?
I bought quite a few anodised & bare BLF A6's, & none of them have that "misalignment" issue (I just checked them in case I had missed it).
I don't think it will help, but check the O-ring & make sure it is in its proper position, & not skewed.
Best Regards,
George
Sounds like they cut the threads with the head or tube not correctly centered(runout not close to zero). Sounds like something I would do had I the opportunity to make that mistake. Magnification might show which is the faulty part and you could ask for a replacement. If it’s the pill section and not the bezel or tube make sure to request it with driver and emitter installed if you cannot do that yourself. Exchanging parts with another host might also identify the culprit.
While troubleshooting the switch in my A6 I notice it works perfect while not installed in the tail cap. It’s when the retaining ring is starting to tighten down that the switch turns on, (shows continuity) through the circuit. There are no solder blobs on the switch legs that could touch the side of the tail cap.
I’m not sure what else to check, any help could be appreciated.
Check the flexible colored plastic switch cap. Does it seem to stick up and feel firm when the switch ring is tight?
Does it have a little cylindrical bump on the inside, that transfers your push down onto the actual switch?
If so that might be a bit too long, and you can shave it a bit at a time.
My bare BLF-A6 is very loose between the bezel threads, I have build it into a triple and had the spacer a tiny bit too thick so that the bezel part did not close fully, and when screwed tight the head pulled itself in an angle. Then I made the spacer a bit thinner and now the bezel part closes right against the head and that aligned the bezel.
I tried swapping the front part between the faulty bare and an anodized and the bare head is wrong somewhere.
I get the idea… i think. I’ll look into that. Thanks.
Edit: i removed the white centering ring at the bottom of the reflector (is that the spacer?) on the bare head and it seems to fix the small angle. However the bezel still does not align with the body. It’s OD is a tad larger then the body which is not the case on the ano i think…
Update to my initial problem as described over pages 24 and 25:
After some back and forth Banggood is now sending out another head unit, with no further service beyond that (which sounds reasonable for a budget provider).
And I bought a second one, which arrived today - pop the battery in, and it just works, all the modes - how life is meant to be. I guess it’s hit and miss with these lights.
UPDATE: After charging the battery and putting it back in, the new torch now doesn’t appear to work again… sigh, more debugging.
UPDATE 2: Putting another battery in, it worked again. All my batteries (two types) are protected cells. Is is possible partially discharged protected cells might work but a fully charged one wouldn’t because it trips something?
Will see if the new head fixes the problem with the original.
M
Debugging is a process. The first thing to try varies with the problem. On a light that doesn’t come on the first thing I sound do is remove the tail cap and put a paper clip from the bare metal of the tube to B-. If you get light then the problem is in the tail cap. Loose retainer, bad switch, rubber button pressing on the switch and opening the contact(remember, a reverse clicky turns off with a half press which is just what happens when there’s no play under the button). A light that comes on when the switch retainer is tightened is could have a short somewhere on the switch pcb. Pics would help.
Thanks - yep having done that entire process on the previous light was going to go through it again.
However happy news - it just seems like it in turbo mode it cuts out on one protected battery but not the other. One can go to 7 and hold it, one goes to 7 but cuts out after half a second - I assume it’s tripping something. I can step back to 6 and it’s fine.
Probably the protection circuit of the cell.
+1
You want unprotected high drain to run turbo.
Or batteries with a known quality Seiko Protection IC. 
Best Regards,
George