01-13 2013
The FandyFire Rook, did we all get Rooked?
You know there has to be a video title now, for every build. Well do you know how hard it is to find a song about Rooks?
I always thought the Rook looked like it might be interesting, but I didn't want to spend the bucks for it. Well a few days ago, I received a package and in that package were several gifts from a BLF member. One of them was a FandyFire Rook.
I decided to mod this light into a 3AA in series light (the way it should be) and to do something to get rid of the parasitic drain (well maybe not). Anyhow, here's the start of the mod thread. It's going to take some time.
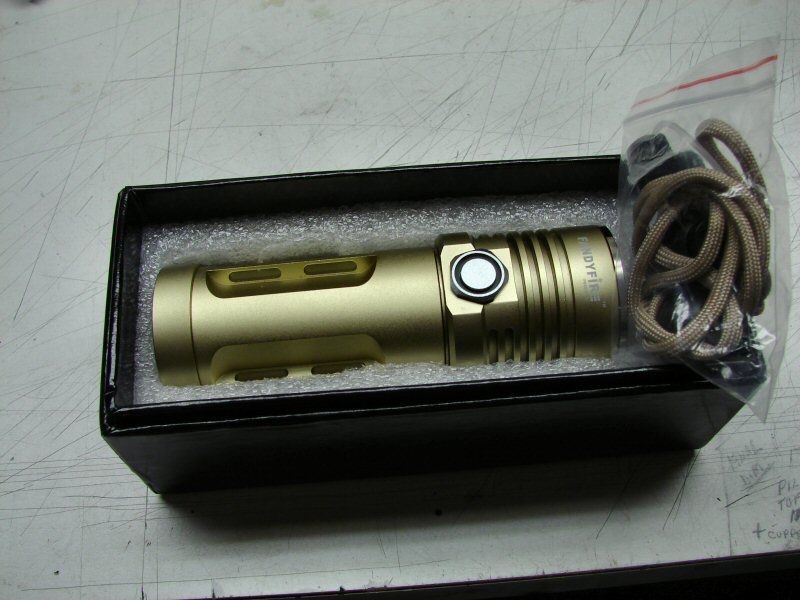
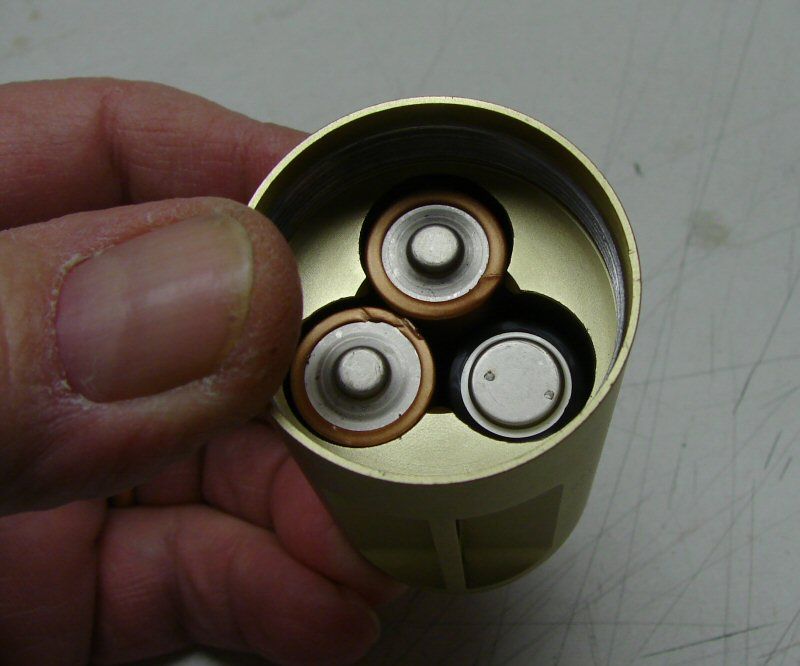
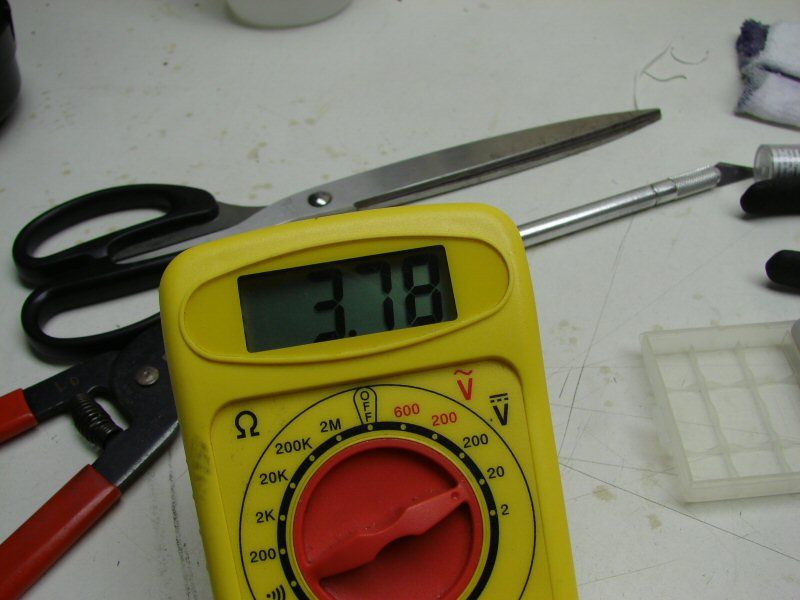
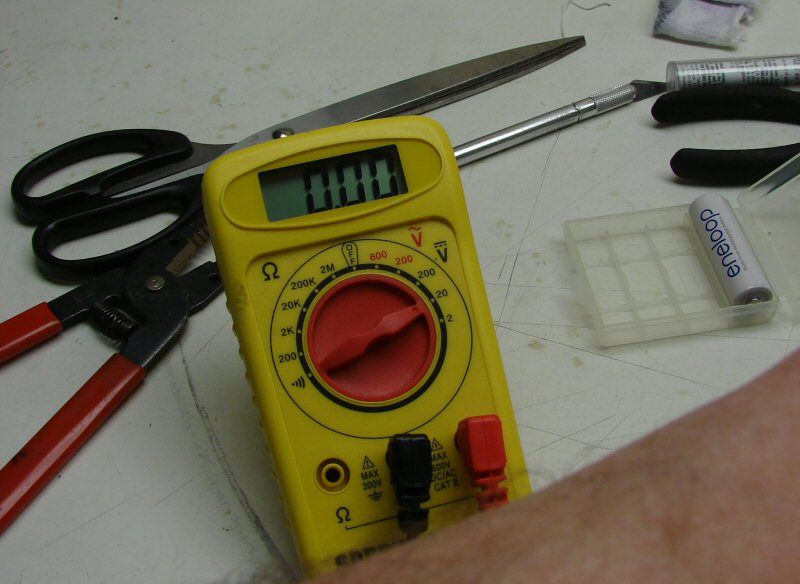
First of all, here's what I got in the mail.
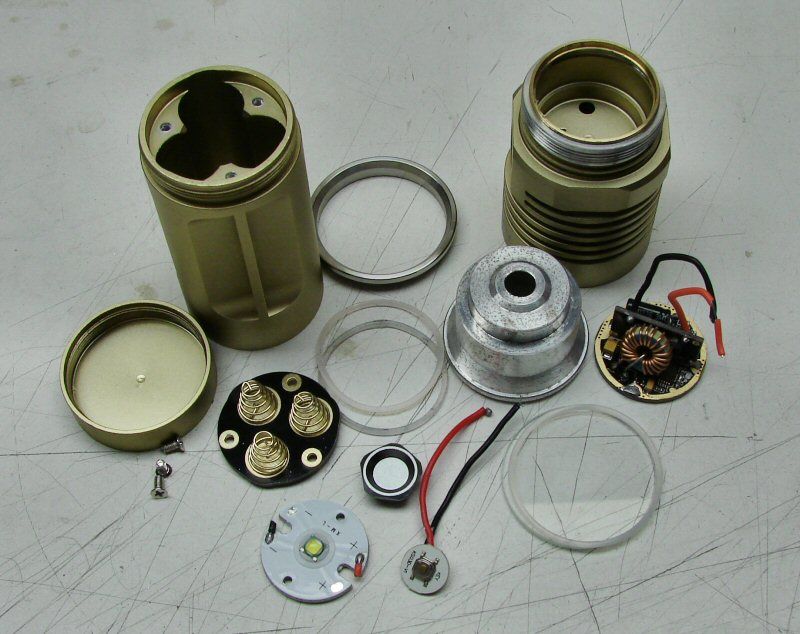
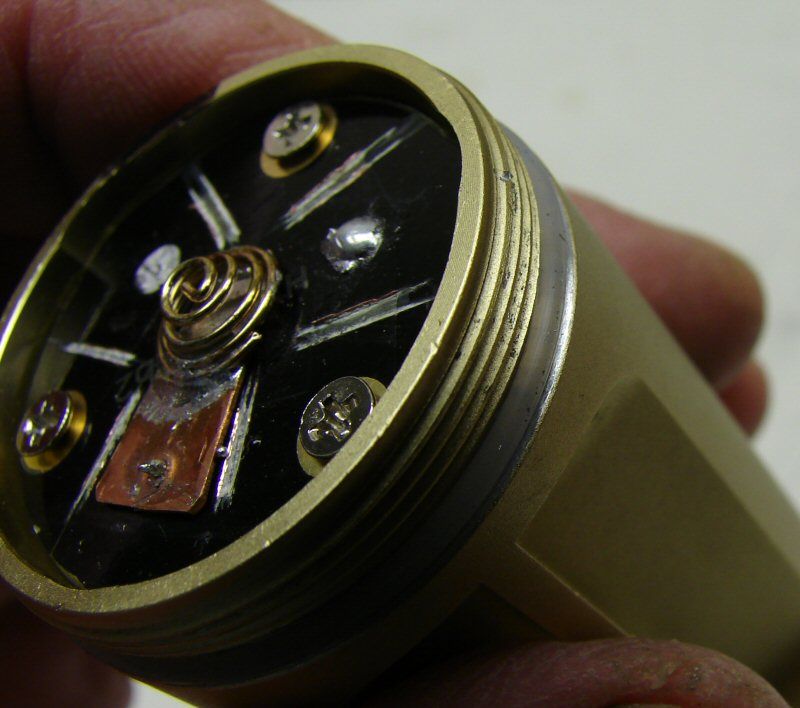
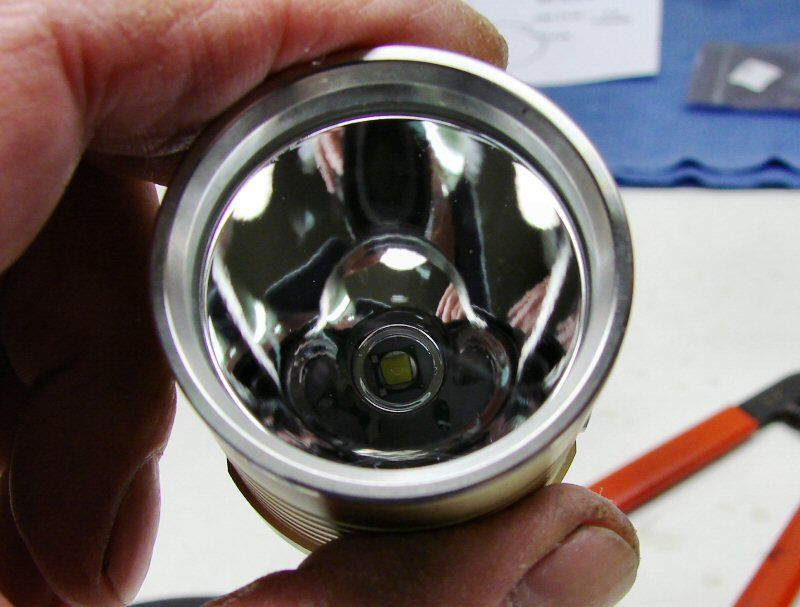
This is always the most fun, the tear down!
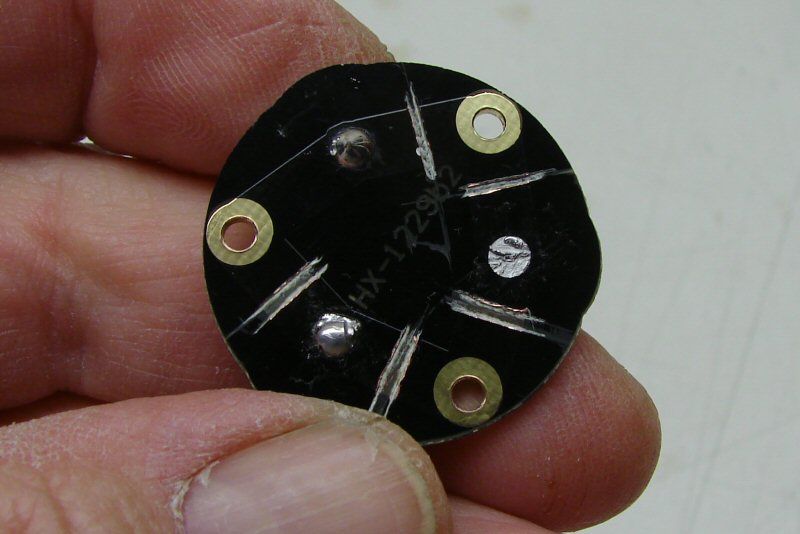
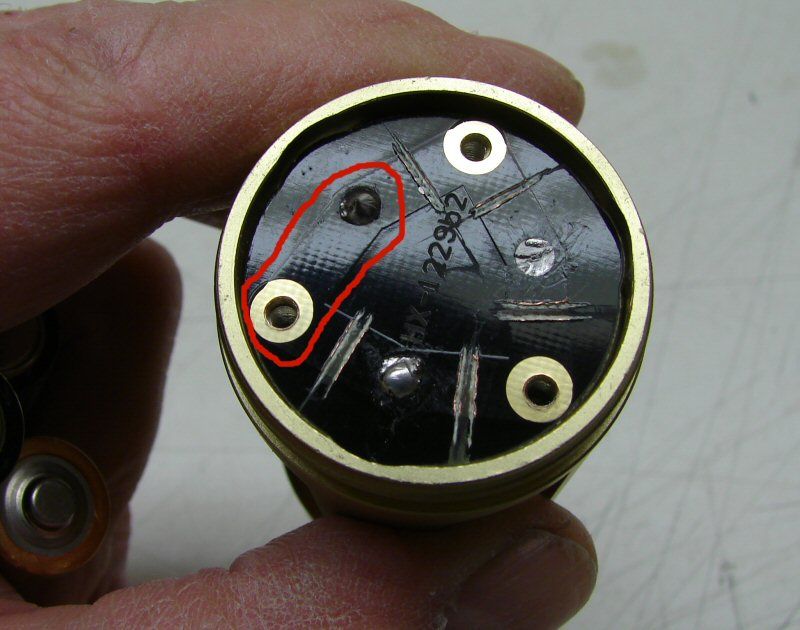
If I am going to change to series, the bottom battery contact plate can't be in parallel, so I have cut the contact strips on the back side, so that each terminal can be independent on the back and so that only one will be the new ground.
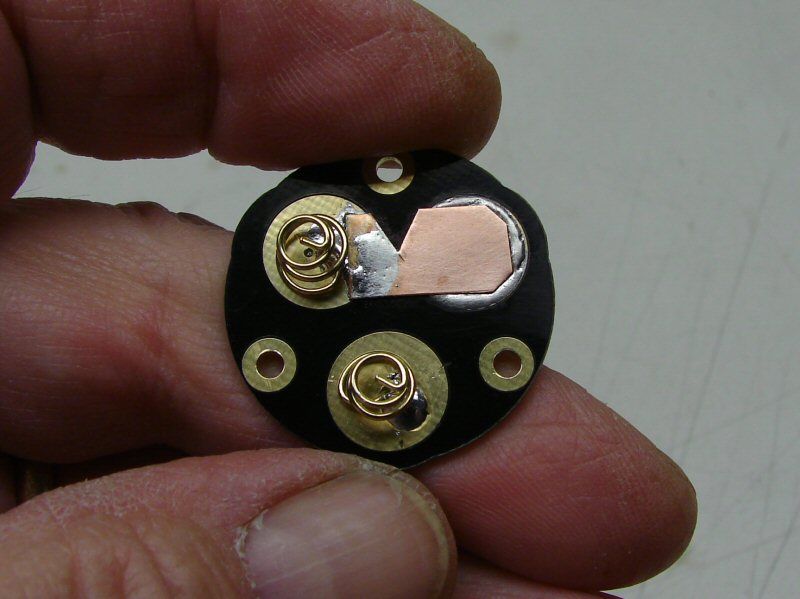
On the front side, I cut the springs short and put them back on the plate. Then I made one of the contacts positive and bridged it to one negative contact. The springs are shortened to give a couple mm room on the front side, as I will be making the top contact plate for series, from scratch.
Now you can see how the ground to body path works for the Series mod.
On the top side, I will be making another plate, to create the rest of the series circuit and create the positive contact.
This will take some time, as I question the ability of the stock driver/switch to do what I want to do, so I have asked others to give me a hand. Mr. Electronics I am not, but other members here are. This mod may be dormant for a little while, but it's not over till the --- lady sings. I will post again, when I make some more progress.
---------------------------------------------------------------------------------------------------------------------
UPDATE 02-02-13
It is Finished!! The drivers from DrJones came in today and I worked on getting the light up and running.
I had to make several changes to the way I was going about it. Since I wanted to do series, I made that bottom contact plate with two springs for negatives and one flat for positive, so the batteries could face the right way for series. Well, when it came to the top plate, it was a mess. I could not figure out how to have a spring up top and still take the light apart or put it together, to put batteries in it, without having two plates up top. One stationary over the batteries and the other in the head.
It was too complicated, so I dropped that line of attach and went back to having three batteries in the bottom. No problem, just have one positive rest on a spring. That way the top could be three flat plates that would rotate with the head.
Photos are better than words.
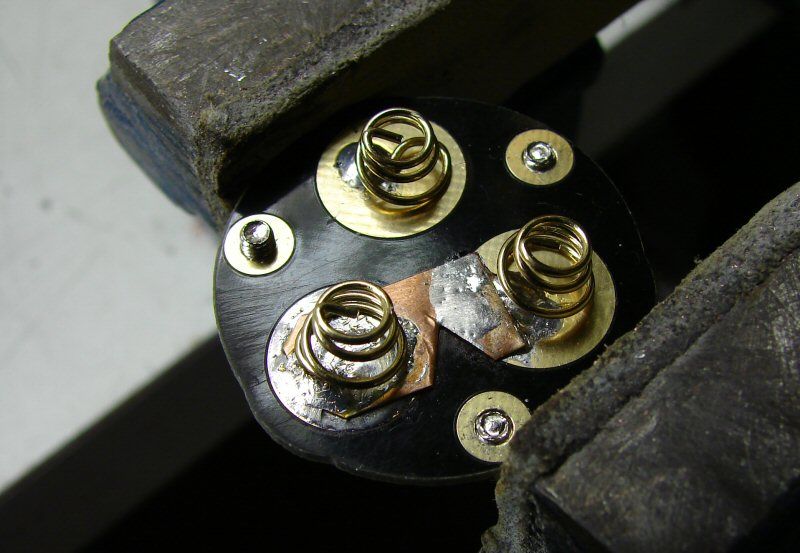
So, I had two springs for negative contacts and a flat, for positive. I just put the third spring back in. It will still be a positive contact.
On the back side of that plate, I cut the rest of the back traces, to isolate everything and I ran copper from the negative, to the center and added a spring. This way, the tail cap will not be touching the ground and it can be a lockout.
I removed the ano from the body, where the tail cap seats.
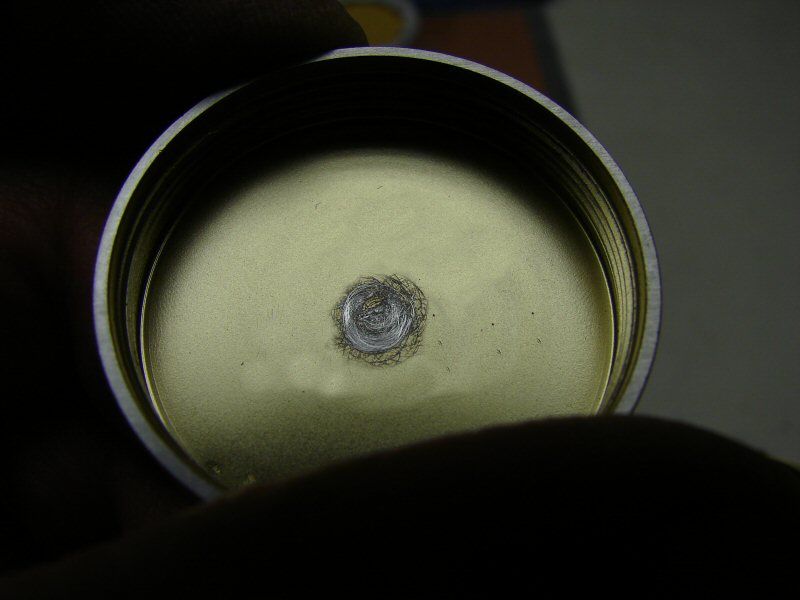
I also removed the ano from the outer rim of the tail cap and scratched the center, so the spring has contact. Yes it looks ugly, but it was a test.
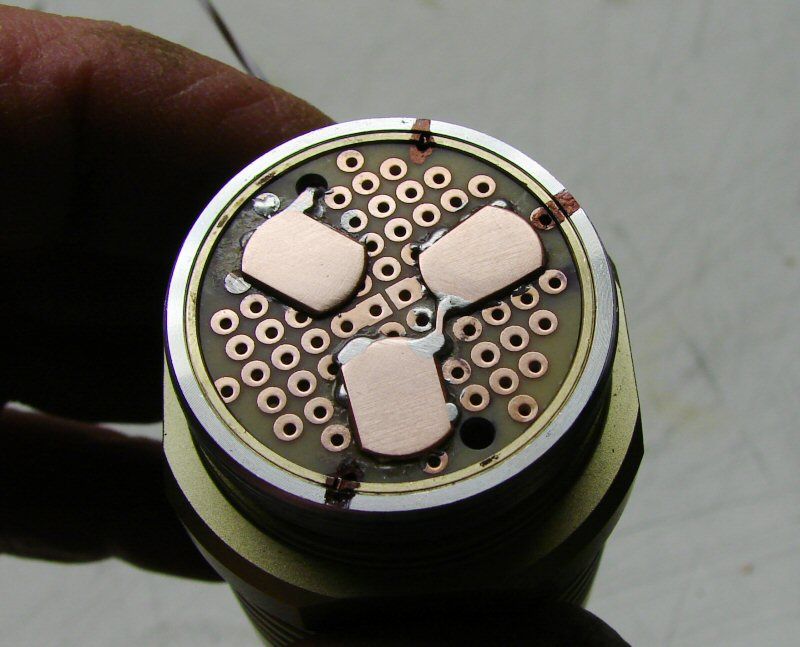
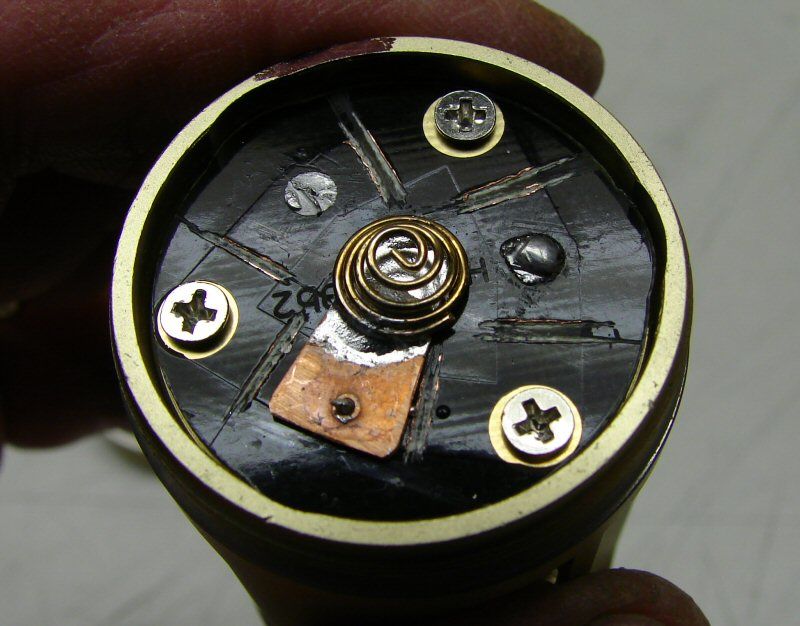
For the top plate I got a package of the round bread boards and found one that fit perfectly! I made the three contact plates out of 3/8"x24ga copper rounds and flattened two sides on each. I soldered them on and attached a positive wire on one contact. The other two are bridged to complete the series circuit. This board was a tight fit into the brass ring in the head and worked great.
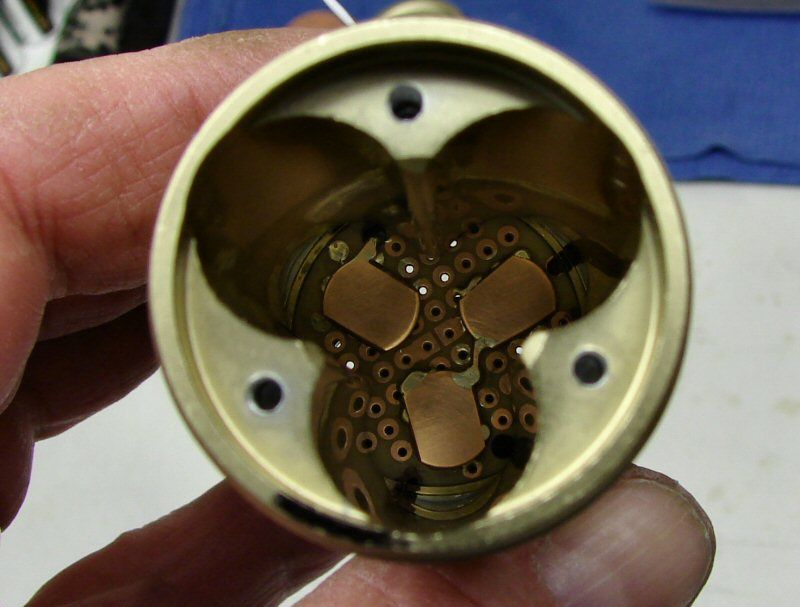
Looking down in, when the body and head are screwed together.
With the Tail cap tight, It works!
And with a half turn of the tail cap, it's locked out, no juice.
I put everything back in the head. DrJones driver is wired in along with the electronic switch.
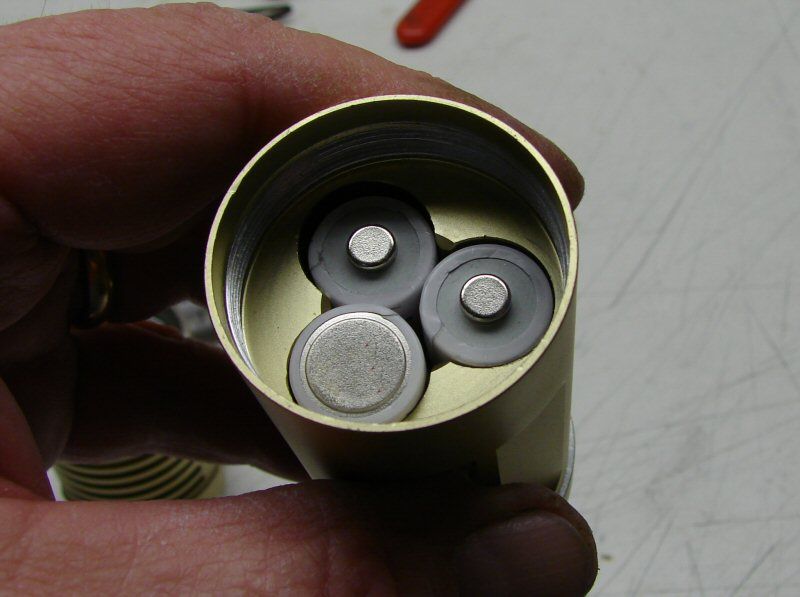
Three Eneloops in place and it's time to screw the head on and go take some Beam Shots!!
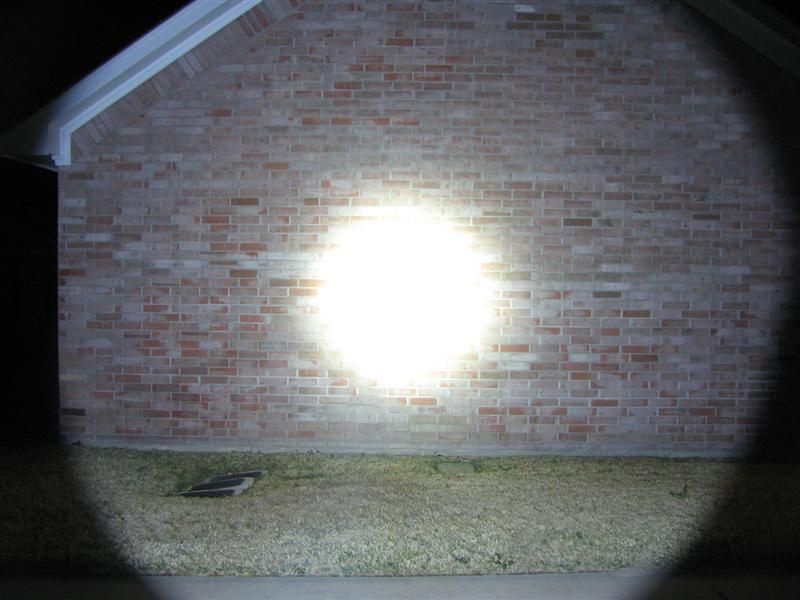
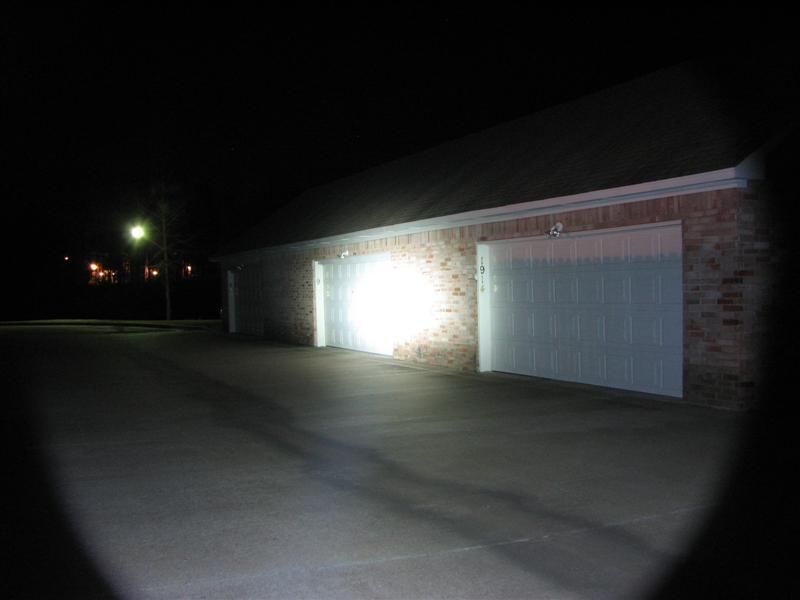
Beam Shots. - I am using the Defiant Thrower as a light to compare with, against the Rook.
I have done mouse overs here. The Defiant is MOUSE OUT. The Rook is MOUSE OVER.
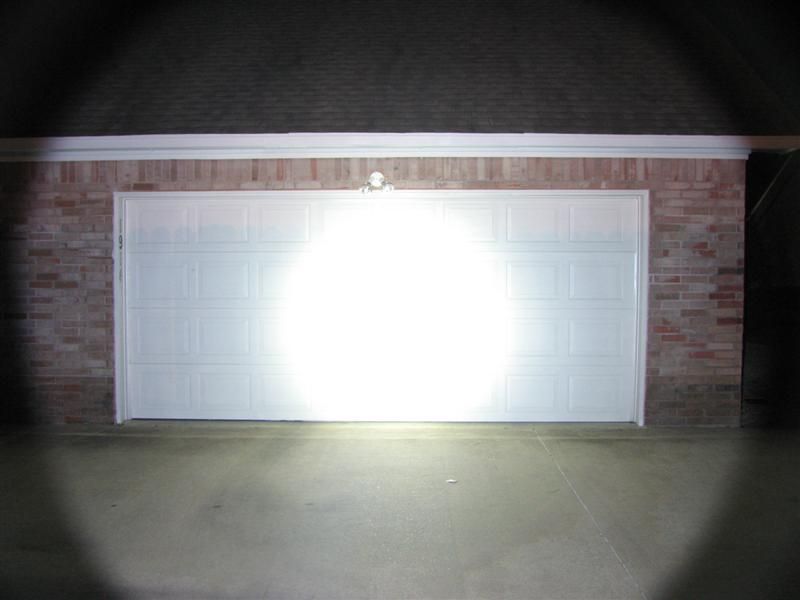
Looks like the Rook is brighter. It does have a larger hot spot and a larger spill.
I still like the Rook better!
Now you can see how the Defiant throws, where the rook is more floody.
Same here, the Rook is more floody
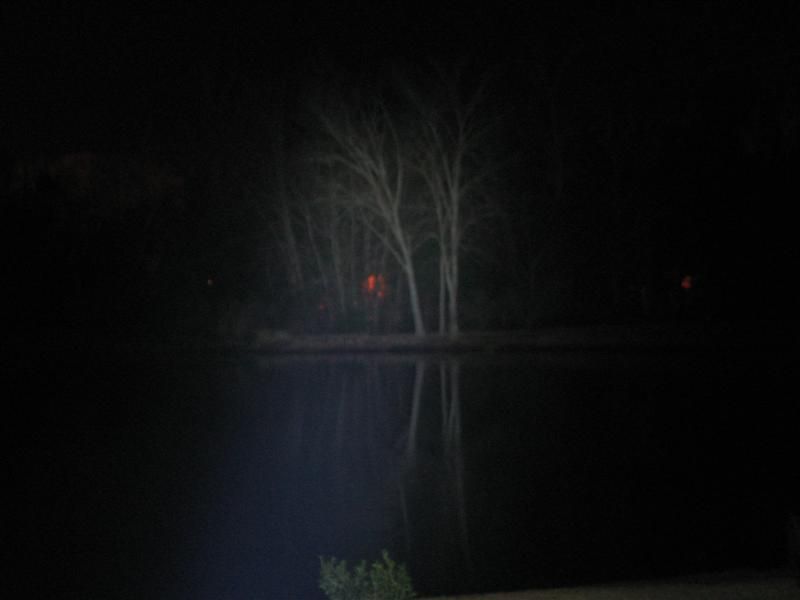
Big difference here. The defiant is lighting up that tree, where the Rook is just barely touching it.
Well, that's all folks. Thanks for looking at the build.
Now you need to go sign up for the Giveaway!
My PayPal address: oldlumens (insert the @ sign here) gmail.com
My YouTube Flashlight Video Channel
Am I the only one that my head starts spinning when OL starts talking like he does in the above. It all looks interesting.
djozz quotes, "it came with chinese lettering that is chinese to me".
"My man mousehole needs one too"
old4570 said "I'm not an expert , so don't suffer from any such technical restrictions".
Old-Lumens. Highly admired and cherished member of Budget Light Forum. 11.5.2011 - 20.12.16. RIP.
Just curious… besides the parasitic drain, were you displeased with the output? Could you lockout the light with a twist or did it remain grounded?
It looks like a risky mod considering the lack of driver options. I guess you could always do a 7135 driver soldered to a contact board with a small clicky to replace the momentary.
Review: 150 Million Candlepower Military Xenon Arc Battlefield Illuminator (AN/VSS-3A)
My new collection of 50+ Chinese knives
I think it is a great idea to post some music to play at the beginning of a new mod.
I never heard of the group Shearwater, they are an indie group (Independent label) and they are pretty good. Here is a YouTube link of a playlist of some of their stuff.
http://www.youtube.com/watch?v=9pM64F2MEEk&list=AL94UKMTqg-9AmyXYChzQkOh...
As for OL’s mod, everytime I re-check how things are going, I will start the playlist at a new spot and read on!
Sometimes you can find the most interesting stuff when you’re not looking for it.
My PayPal address: oldlumens (insert the @ sign here) gmail.com
My YouTube Flashlight Video Channel
The BLF Modding Links Thread
My PayPal address: oldlumens (insert the @ sign here) gmail.com
My YouTube Flashlight Video Channel
The BLF Modding Links Thread
I have not forgotten about this mod. DrJones is sending me drivers with his program, so I can get this mod going again. I got some of the double sided copper clad board from Radio Shack and a pack of those round boards, to make/replace the contact plate/driver that was in the head.
My PayPal address: oldlumens (insert the @ sign here) gmail.com
My YouTube Flashlight Video Channel
The BLF Modding Links Thread
Good luck with the mod. I hope it works out for you. I have only used mine with 14500’s and I think it rocks. It’s very bright, nice flood not too ringy decent throw as well. It’s one of my most favorite lights. I use it fairly often in fact I don’t even know if it does have parasitic drain. I haven’t noticed if it does. I suppose if I put it away for a week or two with the batteries in it I might have a problem but I don’t do that with any of my lights.
Well anyway, good luck and have fun.
I’m a junky, I mod lights so I can sell lights so I can buy more light to mod so I can sell lights to buy more lights to mod.
Looks like another very interesting OL build.
Just making sure you know you need to hold the power button down for two seconds to turn the stock rook on.
I had to search before I figured it out too.
Oops! Too late now, though I expect anyone sending him a light knows what’s in store for it.
Three Tanna leaves to give him life, nine to give him movement. But what if he eats the whole bag?
Scott
It's DONE. See all the photos in the OP.
Have fun and look for the giveaway now.
My PayPal address: oldlumens (insert the @ sign here) gmail.com
My YouTube Flashlight Video Channel
The BLF Modding Links Thread
Nothing has changed. More confused than ever. To top it off the thing (for want off a better word) works like a charm. Back to the Bex and another Nanna nap for me. Well done.
djozz quotes, "it came with chinese lettering that is chinese to me".
"My man mousehole needs one too"
old4570 said "I'm not an expert , so don't suffer from any such technical restrictions".
Old-Lumens. Highly admired and cherished member of Budget Light Forum. 11.5.2011 - 20.12.16. RIP.
Congratulation for this impressive and useful mod, O-L, i really enjoyed the whole (photo) process!!!
Great mod, Justin! Just wondering : if the stock voltage input was 1.5~4.2V for 3xAA in parallel, then won’t 3xAA in series be 4.5v?
“It is a far, far better thing that I do, than I have ever done; it is a far, far better rest that I go to than I have ever known.” – Sydney Carton in ‘A Tale of Two Cities’ by Charles Dickens (1812-1870).
Each
This space intentionally left blank…..
Nanjg drivers will work at 4.5v if need be, just alkaleaks won’t last too long I guess. Nice work o-l I like this a lot.
http://theflashlightforum.com/index.php
http://www.thevapingforum.com/index.php
Beautiful work and a fairly simple solution to lockout parasitic drain. You da man!
+1
Nice mod, I dont know how I missed this one.
I added a video explaining Parallel to Series on this Rook mod. It's laughable, but maybe it will be useful to someone out there.
EDIT: "The Driver Contact Plate"
I stripped all components from that driver plate, so it was a bare contact plate. Since the plate is bare now, I can use a meter and see where the one area is, that makes the contact, from one side of the plate to the other side. I just metered the plate and there was one location, where it went through to the other side. Then I cut the plate, so that area was the positive contact.
My PayPal address: oldlumens (insert the @ sign here) gmail.com
My YouTube Flashlight Video Channel
The BLF Modding Links Thread
Thanks Mr Lumens. I'm probably speaking for .1% off people on this forum. I think that just leaves me? I know about parallel and series no problem. Its just the way you went about making it work. If a pictures worth a thousand words your video is worth 10,000 words. From all the .1%off people here, thanks for going to the effort off explaining it further.
djozz quotes, "it came with chinese lettering that is chinese to me".
"My man mousehole needs one too"
old4570 said "I'm not an expert , so don't suffer from any such technical restrictions".
Old-Lumens. Highly admired and cherished member of Budget Light Forum. 11.5.2011 - 20.12.16. RIP.
Are you giving away another?
djozz quotes, "it came with chinese lettering that is chinese to me".
"My man mousehole needs one too"
old4570 said "I'm not an expert , so don't suffer from any such technical restrictions".
Old-Lumens. Highly admired and cherished member of Budget Light Forum. 11.5.2011 - 20.12.16. RIP.
My PayPal address: oldlumens (insert the @ sign here) gmail.com
My YouTube Flashlight Video Channel
The BLF Modding Links Thread
My PayPal address: oldlumens (insert the @ sign here) gmail.com
My YouTube Flashlight Video Channel
The BLF Modding Links Thread
Great mod OL your a creature of lumens
Olds, I loved that revision in series and parallel batteries. Esp that part when a cig popped in and out quickly! Me not smarter than a 5th grader in this. Just to be sure, its 6v total for a double stack of 3xCR123s in an M6…yes?
“It is a far, far better thing that I do, than I have ever done; it is a far, far better rest that I go to than I have ever known.” – Sydney Carton in ‘A Tale of Two Cities’ by Charles Dickens (1812-1870).
My PayPal address: oldlumens (insert the @ sign here) gmail.com
My YouTube Flashlight Video Channel
The BLF Modding Links Thread
That’s amazing! I really like that mod. Is there a black or non-gold version of the Rook? I have a NiteCore EA4W on the way, so I don’t think it makes sense to get one of these. But one in slate grey would be nice to mod like this. I’m not a fan of the gold colour.
Welcome the night.
My Reviews My Mods http://budgetlightforum.com/search?
For the absolute newbies (like me), can you explain what will be different to your modded version compared to a normal one?
I always see you guys doing crazy- and probably awesome stuff, but I have no idea what´s really happening. Can you explain it for the non-Tony-Starks?
Thanks : )
With it being a dual battery light (14500 or Alkalines/NiMHs), if you use the NiMHs, then the driver is only getting 1.2V (nominal again), input, so to create 3.6 V to the led, it is less efficient and has less output. Basically, it's like having two drivers in one and on the side where it's only getting 1.2V in, it's not putting as much power out.
I am a NiMH guy, so I just wanted to create better output with the NiMH batteries. I also wanted to make it into a light with a lockout to kill unwanted parasitic drain when the light wasn't being used. With the electronic (smt), switch system, there was some drain from the batteries all the time and on some of these, it was much more drain than it should have been. My understanding is that the electronic switch has to have power to it all the time, so there is some drain because of that.
So the mod gives 3.6V, by using the NiMH in series and the mod also gives a positive lockout, by using the tail cap to break the circuit entirely. Loosening the tail cap breaks the ground through the light, thereby stopping any possible drain from the batteries, when not in use.
Basically, a different driver and battery set-up makes it a different light. It is now very bright on NiMH batteries and Alkalines could be used in a pinch. For me, that's more reasonable, since Alkalines could be purchased just about anywhere in the US and even NiMHs are readily available, but 14500 Li-ions can't be found in your local drug store or Wal-Mart.
I don't know if all this really answers the question...
My PayPal address: oldlumens (insert the @ sign here) gmail.com
My YouTube Flashlight Video Channel
The BLF Modding Links Thread
Pages