Hey, guys! My B8+ charger just arrived from HobbyKing yesterday and I hope to have my power supply ready for it tonight or tomorrow. I know how to parallel charge cells with it, that's crazy easy. What I don't know is what I need for series balance charging. Can one of you provide a good photo or wiring diagram of what the setup looks like? I'm sure each cell needs to be connected to the charger somehow in order for the B8+ to know what each cell is doing.
Even a good link to a page that will help out a hobby charger noob like me would be appreciated. Thanks guys! 8)
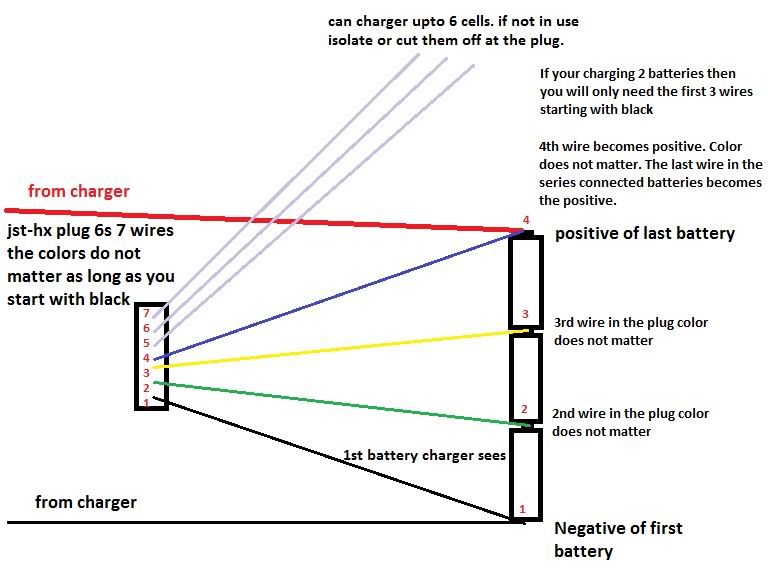
as I understand it you need a balance lead to suit the number of cells you wish to charge, the leads on the balance lead start at + then go between cells till you get to the negative.
I’ve still not attemted using my hobby charger but I see I’m going to try it at some point, I just want to come up with a good cradle set up so the + - and balance lead are just plugged in and the cells placed in the cradle.
Ah I have myself just gone through this in great and embarrassing ignorance and detail.
There is so much contradictory info out there in the wild but with help from this neck of the woods I managed to get things working, so from my limited experience!
JohnnyMac that wiring diagram from moderator007 is definitely the definitive way to get a series balance charge to work. It should be a sticky IMO
That cradle looks like it would do the job ok. The first one not the second. Just wire it to match diagram
Two things to note, If you buy a balance lead dont do as I did and copy the pin out on the non charger end (even for two cells) even though it matches some web sites diagrams, just cut it off for simplicity and go with the diagram from moderator007.
Gords1001 the NEG (Black) end is constant not the Red wire. Always start from that end and each successive wire from there. Again as in the diagram.
Thank you, kind sir! I had a feeling the first setup I found was going to be the answer. In the mean time, until I get that holder from Fasttech I will parallel charge.
I made a two cell and a three cell harness similar to the one above (mine do not have a seven wire connector at the charger end).
They work well if you have a good way to connect the wires to the cells. The wires can be soldered to magnets, but that can be a little tricky 'cause if you overheat the magnet it will lose its magnetism. Instead, I just soldered ring connectors to the wires and used an unsoldered magnet on both sides of the ring connecter between two cells. I started with ready-made two-cell and three-cell harness extensions available at HobbyKing and just cut off the non-charger plug.
In a two cell configuration there would be no blue wire and the red wire would connected to the yellow wire at the cell. It may be obvious, but in a three cell (four connections) configuation care must be taken to connect the green and the yellow wires in the right order. Your charger will proably complain if you don't! A properly wired cradle would avoid this concern.
Note that inexpensive B6 clones often do not have very good balancing tolerance. For that reason it would be a good idea to use a DMM to verify how well your charger is balancing your cells. My X-charger B6 clone had lousy balancing tolerance and often considered a 150mV difference to be balanced. I upgraded to an iCharger 208B to solve that problem. If you want to do balance charging and don't yet have a charger, I recommend that you verify the balancing tolerance of the charger before you buy one.