The following information is from Vinh's K50 thread. It has helpful information on modding the light and is definitely recommended.
I'll try to distill the load of information.
Driver tuning:
Current can drain up to 9A if desired. I will likely set current less than 9A...Will see which current tune the best brightness.
Reflector focus tuning:
I tried getting the led closer in which usually work well but in this case the led has to be moved down away from the reflector a bit. The reflector is so big that a tiny horizontal drift could throw the beam out of focus.
I haven’t done it on the K50 V2 yet, but I have dedomed my Supbeam K40 and ThruNite TN31.
I think dedoming does throw the focus out a little bit, but I didn’t mind the beam profile in my lights so all I did was some reflector tuning (with my tongue at the right angle) so that the “flower” around the hotspot was evenly spaced.
Others shave a couple of mm off the base of the reflector so that the reflector will be deeper in.
The review SelfBuilt breifly touches on what Vinh does on his modded lights about focusing the reflector.
This will be interesting. If someone decides to push their XM-L2 above 8.5A they sacrifice reliability and longevity. Note that he didn’t drive the LED for 20 minutes at each interval, but only a few seconds. So while it may survive 8A for more than 30 seconds, who knows when you leave it on for longer.
With that being said, I love his crash tests and have it bookmarked and I want to see people breaking records! What’s the highest amps in an XM-L2 or even XP-G2 light that someone has ever gone? I mean I think 7A would be the highest with ryan here going to push his K50 to that level.
I don’t think it would be hard to beat with active cooling! Even submerge the heatsink in iced water will keep the temps down easily. Purely for experimental purposes!
I will say that I’ve used the gasoline de-doming method quite a lot. But I’ve recently started hot de-doming in the light. I use a welders plate designed for a welders mask to view the emitter while it’s on in Turbo mode. Before turning the light on, I use a scalpel to cut around the base of the dome, very carefully of course. Then with the welders plate I view the emitter while in Turbo and use the tip of the scalpel to apply light upward pressure on the side of the dome opposite the bond wires. After about 30 seconds you can see the dome release and start to lift. Gently continuing the pressure the dome comes off clean in about 1 1/2 seconds after it starts that initial release. The remaining silicone can be left on the substrate, leaving a circle of clean substrate surrounding the emitter. This process really actually takes about 60 seconds all told. Put the reflector back on, replace the bezel and enjoy. This method seems to have a benefit in that the green hue so often associated with de-doming is greatly reduced or simply not present at all. The 6 or 8 I’ve done in the past few days have been very nice…warmer, but in a pleasing way.
Now, that being said, sometimes the reflector needs to be repositioned to gain accurate focus for the newly doubled throw. This has to be accomplished in whatever way the actual light in hand demands. This might mean that the emitter needs to come further into the reflector. In my TK61, it had to be pulled back actually. So each one will have it’s own requirement. Vinh states that the K50 V2 is a tough one to figure out, and calls himself a genius when he get’s it right. So it must be especially difficult to get right in this particular light, as it is in the TK61.
This remains to be seen and of course I’ll share my own findings when I get my K50 V2, even as y’all are doing yours.
I’m running my TK61 at 7.15A with the de-domed XM-L2 U2 1A. I don’t have it properly focused, got tired of working on it to be truthful, and it’s doing 541 Kcd.
Interesting Dale… Looks like 7.15A is the new highest… do you think that by leaving a small layer of the dome on it increases the throw less than fully de-doming in petrol? Vinh’s lights were tested by rdrfronty to be ~620kcd at only 5.75A. But then again, the difference between 541 and 620 is definitely within the margin of error especially with the inconsistencies with light meters. I know mine reads a little on the high side.
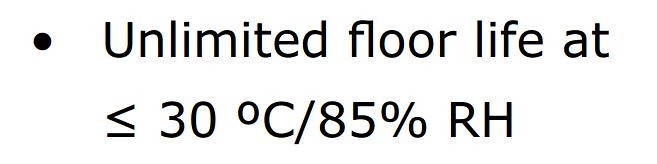
Yup, according to Cree’s datasheet for the XM-L2, it supposedly has an unlimited life span at its rated specs:
We all know that’s not true when we push our LED’s to 3x their rated current, and the previous gen LED’s are rated for 50,000 hours, which translates to 5.70 years.
Hopefully we can find a sweet spot between 5.70 years and insta-poof.
What I have in my mind is setting up the K50 to a ridiculously high level 7-8A but only use it for bragging rights. Even with my modded K40 or TN31, Level 3 out of 6 is bright enough for me for “normal” uses.
Thanks for chiming in Dale. I’m not sure if a K50 can beat the TK61 when both modded to their max potential (7.0 - 7.5A) because the TK61 has a slightly bigger reflector. I couldn’t make up my mind but I decided on the K50 because if its superior build and stunning fins. Should definitely help with the heat.
You’re one of the people who say that the hot-knife deodming method yields better tints than the gasoline method. Interesting, I’d love to get to the bottom of this.
And I test at 5M, probably not ideal for this kind of thrower. I need to try a 15M test.
That said, I got an Olight SR90 from rdrfronty that I put an XM-L2 in, de-domed, at 6.62A I’m measuring 612Kcd interpolated from the 5M test. My new Courui big head has a beautiful beam profile, doesn’t seem to have convergence but appears to have a tubular hot spot that goes on forever…341.25Kcd. So each reflector is going to have it’s own anomalies.
And he claimed 670Kcd from his. That would indicate he’s gotten more throw from the K50 than the TK61. Not sure if he’s redone the TK61 though, as I understand he’s been working on raising the power output.
rdrfronty’s TK61 is making, they suspect, in the 6.5A range at the emitter.
Oh, by the way, that 7.15A is an emitter amp reading, taken off the negative lead about an inch away from the emitter with a clamp meter while in the light.
I’ve even got a little Eagle Eye X6 doing 6.77A to a de-domed XM-L2 for 1556 OTF lumens. Even that little light is doing 82Kcd! :bigsmile:
I wonder what the max voltage of the driver output is.
If it’s higher than the K40/TN31 we’re used to, then the soldier bridging method won’t work and will likely fry XM-L2’s. Precisely calculated SMD resistors (1206 sized?) would be necessary.
If not, it’s going to be almost impossible to drive a MT-G2 with the stock driver.
There are TK61's out there doing ~8A, at least tested in that realm - just fyi, probably the soon-to-be TK61vn V2.
Also, the 5 meter to 15 meter throw measurements will make a difference for some, maybe most lights, not all though. I measured a TN31 at 435 kcd or so at 5m, then rdrfronty measured the same light at 5m - about dead-on with me, then measured it at 15m and got ~580-585 kcd, so with that light, 15m does help. According to rdrfronty, once you get to 15m, further out distances don't make much of a difference, so he sort of standardized to measure his throw at 15m because of his numerous test trials at various distances.
Not sure what the stock amps is for a K50 V2, but must be up there to produce 1,600 OTF lumens. I'd be guessing at 4-4.5A.

 flashlight review, by selfbuilt")