I spoke with bugsy36 about opening this thread to keep the original g.b. thread clear of questions and answers. Somewhere the op could be edited over time to include some basic flashlight operation, overview/troubleshooting and some mods and pictures. Of course I agree the darn thing should work when it reaches your door. ![]() But this will give some beginners (myself included) a chance to learn. Let’s do our best not to trash this thread with rants.
But this will give some beginners (myself included) a chance to learn. Let’s do our best not to trash this thread with rants. ![]() I will ask that this op be deleted if it becomes a place to knock the q.c. of our friends at the manufacturer.
I will ask that this op be deleted if it becomes a place to knock the q.c. of our friends at the manufacturer.
bugsy36 also mentioned “If everyone remained helpful and positive it would show lots to the Chinese vendors and manufacturers and actually further our causes, wants, and of course needs.” 8)
That being said this will be a work in progress as all of your helpful suggestions and sweet mods ![]() will end up here. Please if you think of anything from the gb thread that should be in this op let me know!
will end up here. Please if you think of anything from the gb thread that should be in this op let me know!
Please keep in mind my links to blf pages are for 30 comments per page settings.
- TK’s infinite wisdom Everything she has compiled throughout the duration of the BLF a6 Group Buy. How the modes run through the driver, tint comparisons, paperclip mod
 , lumen output by mode.
- Neals assistant: heyanqing1@banggood.com
- Link to text instructions: http://bazaar.launchpad.net/~toykeeper/flashlight-firmware/trunk/view/head%3A/ToyKeeper/blf-a6/blf-a6.txt
- ToyKeeper’s ui diagram

- tir lense:
https://m.fasttech.com/products/1187501
- Clip for light that will not require drilling and tapping if you use existing lanyard holes. Found by member vinte77.
http://www.banggood.com/Titanium-Alloy-LED-Flashlight-Clip-For-Nitecore-Jetbeam-Niteye-p-89414.html
- Runtime and mode lumens (rough estimate depends on battery and any mods) from toykeepers post in gb thread #1870
Mode group 1:
1: 0.45 lm / 2.66 mA / 39 days
2: 10.1 lm / 11.87 mA / 8.7 days
3: 64.5 lm / 139 mA / 18 hours
4: 187 lm / 385 mA ? / 6.5 hours
5: 417 lm / 1.48 A ? / 100 minutes
6: 798 lm / 2.96 A ? / 50 minutes
7: 1386 lm / 5.65 A ? / 26 minutes
Mode group 2:
1: 9.72 lm / 11.87 mA / 8.7 days
2: 139 lm / ? / ?
3: 578 lm / ? / ?
4: 1386 lm / 5.65 A ? / 26 minutes
- Link for Samsung (Best battery for Lumen output) 30q Banggood 30q
Some beam shots from left to right: 1a, 3d, 5a. I kinda like having that desk in the pic because you can see what the tints do to natural objects. The 5a beam is probably the most accurate tint for the wood grain. Taken with a Nikon D3100 in auto seemed the most accurate but the 1a is probably not that blue to the eye.


- I highly recommend checking this page out especially the “terminology” under “getting started” section for newcomers.
Flashlight wiki
- Okay I’m gonna throw this in here because I’m seeing that Banggood really is honest and highly appreciative of our business. I know that some people may disagree but at this point they are stuck in the middle of a q.c. battle that is not they’re fault. So let’s show them our gratefulness as they work to stock the second batch. Check this out of you want a deal on products. Aff and non aff for your consideration.
M4D M4X deals - Astrolux WP1 and WP2 LEP
Some flashlight basics:
The negative power flowing through your light must run out of the led and board through the tube into the tail cap and then into the switch and up through the spring. Kind of like the negative of a car battery. So in effect you are “breaking” or cutting the negative when you push the switch. Your tube connects at the outer area of the tailcap (outer arrow). This is the spot where I think we had some doa’s. The switchboard connects to the tailcap and the retaining ring (the little brass part) and completes the circuit into the center of the board into the spring (inner arrow). So in effect with the tailcap off you can “short” or connect the negative from the battery to the tube. It just so happens that while doing some work on my light I had to tighten this retaining ring to get it to work. It stumped me for a minute but I had just “shorted” the tube and battery to check for function before I put the cap on so I knew something was up with the switch.

The other end of the light is a bit different. I’m still wondering if some tubes were backwards. You may notice that the threads near the pocket clip slot are longer. Your light will not work if the tube is reversed because the head threads will not reach into the tailcap far enough. But inside the head your tube connection for negative is the retaining ring. Your light must have these connections from the tube at either end in order to work. Your battery positive touches the spring bringing power up in to the board and it’s components - led included and back out to the retaining ring and tube.

You can see the end of the tube is shiny. When you have a battery in you can connect the battery to this part to take amperage readings or simply connect it with a wire to check operation. The black anodized parts do not conduct electricity hence why you can back of the cap a little and lock out the light from accidentally coming on. Refered to as a “Tail cap lockout”

Here is how to check for function with a trusty leatherman. ![]() As I said you could also put your meter in dc amps mode and place one lead on the tube and one on the battery but be careful! Not all meters can handle a lot of amperage. Mine is only good up to 10a. If your light is not functioning and you try this and get it to work then you may check out ToyKeepers post for a paperclip fix. Code now public! BLF A6 FET+7135 Light. Short 18350 tubes and Unanodized Lights Available
As I said you could also put your meter in dc amps mode and place one lead on the tube and one on the battery but be careful! Not all meters can handle a lot of amperage. Mine is only good up to 10a. If your light is not functioning and you try this and get it to work then you may check out ToyKeepers post for a paperclip fix. Code now public! BLF A6 FET+7135 Light. Short 18350 tubes and Unanodized Lights Available
Notice under my thumb the light is operating correctly.

Tube must touch ring (red arrow) green arrow is board negative.

Ok so we know how power flows through the light I hope. Some things could be shimmed with something conductive to make these points gain contact. Now onto some of the other issues. First off you’d be amazed at how easy it is to solder. That being said this next part is for intermediate users. I don’t want anyone being mad at me because they trashed their brand new light. Some of the things I read about were smoothing down the star on the corners and the spots where it touches the shelf.
Here is the tool I used for my retaining rings. The pegs could be ground smaller but I was able to get them to bite the holes in the rings. Purchased at autozone. I’ve also used a very small pair of wire cutters spread out all the way.

You can see where the star was forced in and peeled up the corners. I took it off by heating the solder points and removing the wires from the star and then did some sanding. I clipped off the bent corners and sanded the star until it fit in there without force. I also touched up the shelf with sand paper to remove any bumps as some users had mentioned. The better the contact of the star to the shelf the better it will shed heat into the body. They recommend putting some thermal compound between the two here.

Star fixed up and smoothed out.

Once you get that dealt with you can check out another issue. The solder joint at the negative on the board.
Weird solder joint.

Solder removed and reflowed.

At this point you may want to lightly touch up and reflow any other questionable joints. Here’s the whole board. We’ll have to pull those wires back up through the shelf and get them soldered back to the star. Watch your positive and negative!

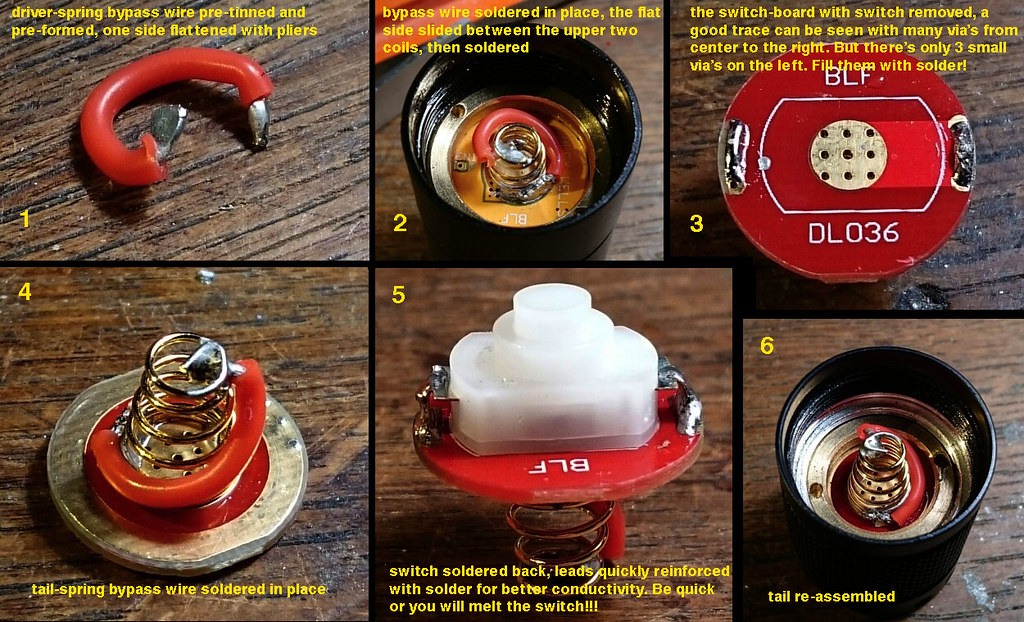
You may also want to do a spring bypass. This will reduce over all resistance in the light. Your light will produce more lumens, pull more amps and it will give your springs a longer life. Here is a proper spring bypass done with silicone insulated wire. Very flexible as to help installation and to not inhibit the spring. Courtesy of djozz. Check out some of the numbers after performing this simple mod! These are from a 5a tint. The other tints may produce higher numbers.
7-mode group for the flashlights resp. without/with wire bypasses:
moon 0.66lm/0.55lm
2 11lm/10lm
3 70lm/70lm
4 190lm/205lm
5 395lm/475lm
6 750lm/920lm
7 1240lm/1495lm at start
7 1215lm/1410lm after 30 seconds
Update 9/23/15: It’s been discussed that performing a “through pcb bypass” is a safer alternative as with the other method there is a chance your wire could eventually come loose and cause a short. Also note that you will need to pick the correct side of the switch to join your wire to. Courtesy of DB Custom
- Best case scenario for a direct short: It happens on the negative side, your battery gets pretty drained and your light has low voltage protection.
- Worst case scenario for a direct short: It’s on the positive side, your battery gets super hot, starts smoking and God only knows….

Here is the head with star re-installed and the centering ring put on. As far as I can tell this ring helps hold the star against the shelf. Important! Be very careful at this point some people have accidentally de-domed their flashlight putting the reflector and bezel back on. The effect is not always bad - some people do it on purpose but normally on thower lights .

If you want to get rid of the “wings” on your pocket clip the metal is generally pretty brittle. You can simply try to squeeze them flat with pliers or bench vise and most likely they will snap at a good location. After snapping the wings off I took it to my bench grinder to round off the corners then a file and finally some sand paper.

Thanks for looking! ![]()