Review - ThruNite Archer 1A V3 (Pic Heavy)

There is some updated info and pictures in posts 7 & 8. I will hopefully be doing more measurements and have more info to report in a day or two. I will update this OP for the new information as soon as possible.

This light is the next version in the Archer 1A line (succeeding the Archer 1A V2). It's a beauty with excellent mode spacing and lots of power. The light is turned On and Off by the tailcap. The side switch controls modes (Firefly, Low, Medium, High). Strobe is accessed from any mode with a long click. The driver has last mode memory that can be used for any of the 4 levels, but not for Strobe. I really like the UI on this light. After disassembling this light, I have to report that this light really does not need any mods. Its truly one of the best built light I have ever put my hands on.

The light has serious output on both Ni-MH and Li-ion. Product page says 200 lumens and that seems reasonable to me. I would guess high on Li-ion will be around 500 to 600 lumens. I, however, don't feel that I'm a good judge of lumen output. I have started to using a light box, but don't have a conversion factor established. When outside, I am surprised every time I put this light into high mode. The light box readings I got in my one brief output test were as follows:

Mode Ni-Mh 14500

Firefly 0 0

Low 36 36

Medium 146 162

High * 415 1130

* The numbers for High mode are approximate starting numbers. They steadily decrease over time. The numbers fluctuated a bit with Ni-Mh (Eneloop 3rd Gen), but were quite steady with a 14500 (Except High as it steadily decreases over time).

The light has awesome deep texture that kind of grabs you back. The tailcap helps protect its switch from unintentional activation, but has openings that make it easy to operating the tailcap switch. The light will tail stand, but is a bit wobbly if disturbed. The Pocket clip is strong and holds well.

I should disclose that this light was provided to me by ThruNite to review. I have done my best to not allow this review to be biased due to ThruNite providing the light to me at no charge. ThruNite has not tried to influence this review. Here are links to the their sited if anyone should like to contact them:

Official Website: http://www.thrunite.com (link is external)
Amazon US: https://www.amazon.com/dp/B01FCTD9PG/ (link is external)

Pros:

  • Nicely spaced modes
  • High kicks out bright smooth, floody beam.
  • Hansom light
  • Great texture, grippy
  • Very nice Finish (Type III anodized)
  • Beautiful OP reflector that renders smooth beam pattern
  • Excellent thermal path for the emitter as follows:
    • Copper Direct Thermal Path ("DTP") base under the emitter
    • Integrated emitter shelf is well machined and flat
    • The emitter base has an appropriate amount of thermal paste under it
    • The emitter base is firmly screwed down onto a integrated shelf
  • All threads are square cut and the battery tube is thick walled
  • The driver looks sophisticated and has what appear to be high-quality components
  • Ultra clear tempered glass lens with anti-reflective coating
  • Side clicky (Momentary Switch)
  • Can take Ni-MH and Li-ion
  • Nice Clip
  • Power switch in tail is protected to help reduce chance of accidental turn on
  • Tail stands
  • Spare Tail cap boot, O-rings, side-switch boot
  • Well packaged with sturdy, good-looking box
  • Threads/o-rings well lubed
  • Strong, reversible and removable pocket clip
  • Battery tube does not scratch when removing, installing, or rotating pocket clip
  • Reversed polarity protection
  • Strike bezel for emergency applications that isn't aggressive looking

Cons:

  • Head and Battery Tube are glued.
  • Tail stand can be disrupted by bumps, etc.
  • Finish on the clip chips easily
  • Bar code label should be slapped onto the bottom of the box for better gift presentation

Specifications (From ThruNite's website):

  • LED: CREE XP-L V6 LED with a lifespan of 20+ years of run time.
  • Modes & Run-time:
    -Firefly: 0.1lumen(17days);
    -Low: 17lumen(22hours);

    -Medium: 75lumen(5hours)
    -High: 200lumen(115minutes);
    -Strobe: 200lumen(3.5hours).
  • Max output: 200lumens using one Ni-Mh AA battery.
  • Max run time: 17days (Firefly mode)
  • Working voltage: 0.9v to 5.0v.
  • Battery: 1 AA
  • Max beam distance: 66 meters.
  • Peak beam intensity: 1088cd.
  • Impact resistant: 1.5 meters.
  • Waterproof to IPX-8 Standard (1.5meters)
  • Weight: 42g without battery
  • Dimensions: 110mm in length, 23mm bezel diameter.
  • Accessories: Pocket clip x1, Spare O-ring x1, Lanyard x1.

Operation (From ThruNite's website):

  • To turn on/off the light:
    Press the tail cap halfway to momentarily ACTIVATE the light. Click the tail switch to turn the light on and off.
  • To change modes:
    Five modes in total: firefly, low, medium, high, and strobe.

    When the light is on, single press the side switch to rotate among firefly, low, medium and high.
    Long press to get strobe and then single press to end it.
    Memory function: The light will turn on in the last mode accessed, except for strobe.
  • Battery replacement:
    Take off the tail cap, insert the battery with positive polarity toward the LED assembly(head of the light)

    INSTALL the tail cap and tighten all the way to operate the light.

The package arrived 3 days after ordered via Amazon fulfillment in a letter sized bubble wrap envelop. Inside was a very sturdy and attractive box had a bar code sticker not been slapped on the top of it. Would be nice if they put it on the bottom for gifting purposes.

Contents included a manual in 6 different languages and ____ card (also in 6 different languages), a lanyard, spare tailcap cover, spare o-rings, and what appears to be a side-switch boot. The contents was nicely packed and didn't rattle.

Clip had a few chips. One on the end of each arm (Only one side shown as they both look the same) and very small chips on both sided of the top portion of the clip (Only one side shown again).

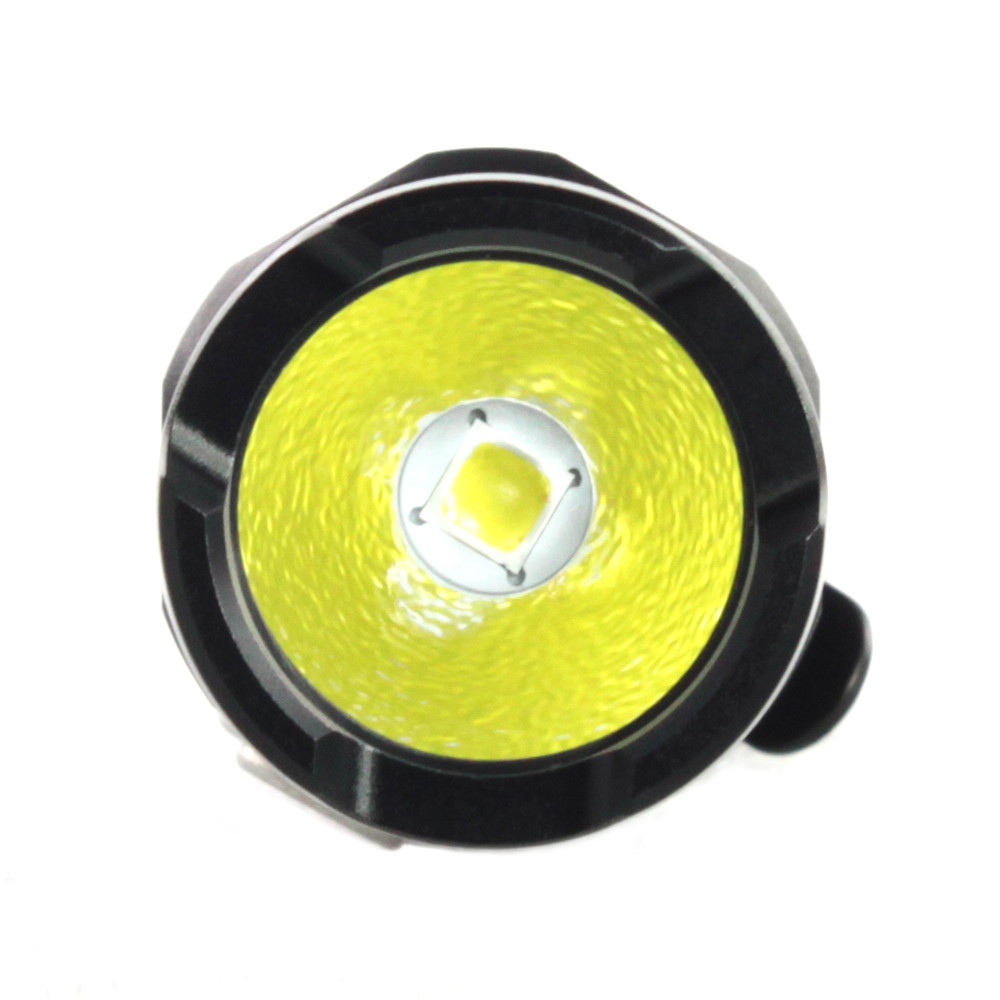
Really gorgeous reflector and super clear A/R lens. Here are a couple shots.

A few objects to give a size perspective.

Tail cap and switch assembly is nicely constructed:

Side-switch is protected with a rubber boot. Should be water proof to some extent.

Some bad news as to far further internal shots and as far as throw and efficiency measurements. I attempted to disassemble the head as I was very curious about the heat sinking and also wanted to measure voltage and current going into and out of the driver at Ni-Mh voltage levels and Li-ion voltage levels. Since the head was glued shut, I used a heat gun to soften the glue. I couldn't get the threads to budge one bit. I believe I kept the heat level reasonable, but apparently, something must have melted in the head and the light no longer works. I've opened up many glued lights before and never had a light quit working on me. Unfortunately, I also will not be able to get better beam shots. I will work on getting some comparison shots using a S15R Baton, Jetbeam-1-MK, and Odepro ED30. I did compare the Jetbeam side by side and the Archer 1A V3 is markedly brighter and floodier.

Here are the preliminary beam shots I got. Medium and High on Ni-MH (I need to measure the distance to the palm tree (Guessing at least 30ft). Firefly and Low are too dark to bother posting.

High on an aged Li-ion. Sorry, I didn't get medium shot. Medium on Li-ion and Ni-MH are that same.

Conclusion:

This is a sweet light. Truly, the best built light I have ever put my hands on. It needs no mods in my book. Well, maybe a lighted tailcap if one is going to use Li-ion cells.

1 Thank

Thanks for the review, and I’m sorry for you that this nice light died while trying to open it.

The newest Archer is still huge, and that is the only drawback of this great light, but a very important one IMO.

Thanks. It it is a bummer to lose the light. I wish I would have sequenced my testing diffrently. Got too confident in my in what I thought my skill level was.

Size is the price to be paid for dual switch and good knurling. I think the size is great. Much more capacity than a AAA, but much slimmer than a 18650. Length isn't an issue in my pockets. Diameter is, but I still want shape and knurl. I would have no problem with even my wife carrying this in her purse with a Li-ion cell. What light out there do you propose as an option that performs like this one, has dual switches, great knurling and shape, has a really nice UI, and doesn't need mods?

Try a blow dryer to remove the sticky bar code sticker. It worked for me when Banggood sent out the BLF X6SE packages with the sticky sticker across the tops of the nice boxes.

^

That may do the trick. The texture of the box seems like it will hold a stain from the glue, but I will give it a shot and report back. Thanks for the tip.

just make sure you get it hot enough before trying to peel sticker off. If it tears, keep heating. Good luck.

Got some great news. I took some heat to the light and used some seriously big-jawed, long-handled pliers (with leather protecting the finish) and got the head unscrewed. Have some really great news:

  • Emitter is on a copper DTP star
  • The star has thermal paste under it and is screwed down to a integrated shelf.
  • The shelf is well machined and flat
  • All threads are square cut and the battery tube is thick walled
  • The driver looks sophisticated and has what appear to be high-quality components
  • I think I may have caused an LED lead to unsoldered an emitter lead. I hope to get the driver up and running and get some measurements in a night or two.

I can now say without qualification that this light really does not need any mods. This is truly the best built light I have ever put my hands on. Will post some pics shortly.

Appears to be Red Locktite. I believe red Locktite needs 400 degrees F to melt. Why do manufactures to do this?

Very nice thermal path:

Direct Thermal Path! Yay! :)

Very nice looking driver. Shelded inductor, nice looking components, was partially potted. I picked off the potting material for these pics.

Reflector is aluminum and screws into the bezel.

I'm hoping the driver still works and will be running tests on it in the next day or two. Will also get better beam shots if all goes well too.

Wow ! Nice to know it’s put together so well. And I like that it is a bit oversized than the norm. Something in the hand that hefts and points so much better than a mini version.

Great Work ! Thanks for the tear down.

Well, I did want one of these but I don’t really want to mess with the Loctite.

Looks pretty long comparing to standard AA…but anyway - nice one! Where I could get one? And the code. :wink:

I would like to buy ThruNite Archer 2A V3.
Is there any code for better price?

Thanks for the feedback guys. I think it would be too much of a conflict of interest for me to negotiate a deal for this light given I have reviewed it. Hopefully, one of our deal makers can get us a special price on these Archer line lights. I would hope they would include having the lights not glued as part of the deal.

EDIT: I'll post a couple ThruNite links for those that would like to contact ThruNite or purchase a light. I have no idea how to tell if they affiliated or not. I have no deal with ThruNite for such an arrangement. So let me know if they are affiliated.

Official Website: http://www.thrunite.com (link is external)
Amazon US: https://www.amazon.com/dp/B01FCTD9PG/ (link is external)

EDIT2: Fixed a few typos

Yay! It's still alive! Still has all the modes and great UI.

So it turns out I apparently caused the LED leads to unsolder from the MCPCB when I first attempted to open the light. Now to hook up the driver proper and get some measurements. No intentions to mod it as I think it is perfect stock. Just want to see how it is performs.

To celebrate not losing my Archer 1A V3, swapped the switch and installed a PD68 taillight PCB. My wife said I should put Orange emitters. Sounds like I may be losing the light again, but I do love it when my wife avails herself to the benefits of being married to a flashaholic.

Could have kept the stock switch, but I want to see if a reverse clickie makes any difference in this light. Probably will end up switching back to the stock switch.

I have a Archer 1A V3 that took a spill about a week ago. The fall scraped and deformed on end at the bezel. The light kept working just fine for the past week. Today it fell about 18” to the floor. Now it will not work properly with Nimh batteries. I put a new alkaline in it and it works totally fine.

Here is how it functions:
Firefly, Light on, unscrew tail cap. tighten tail cap, firefly level comes on.
Low, Light on, unscrew tail cap. tighten tail cap, low level comes on. Summary here is firefly and low seem to work normal
Transition to medium, light sort of flickers, both on/off and in light intensity. High, same sort of thing. Strobe, light strobes with full brightness for a short time (single digit seconds), then starts looking like medium/high.

Medium, Light on , unscrew tail cap, tighten tail cap, light does not come on most of the time. If I push the mode select button, light comes on in the next higher mode, behaviour as above.

It seems to slowly be improving a bit. When this first happened, I cleaned the tail cap with alcohol. It was definitely a bit dirty. Just realized I did not clean the body. So I cleaned the body and the tail cap again, no change.

I would just return it, as it is in the 30 day window still, but I doubt it would be refunded due to the damage in the first fall.

I feel like this is some sort of loose connection, or dirty connection somewhere. I tried a fully charged Nimh cell at 1.45 V, and while it is a bit improved with that, nothing works as well as the new alkaline at 1.57V. Actually, upon further inspection, the new alkaline does not work perfectly either it does seem a bit better than the Nimh cells.

Suggestions?

I am thinking of disassembling it to find the loose connection. I have a solder iron, but the tip is sort of big. At my work I have access to smaller iron tips if necessary.

For disassembly, I have the fireplace going, which is a nice hot plate. would this be an appropriate way to heat the light to loosen the glue? Then how does disassembly proceed from there?

thanks, Matt

Crisis averted. I decided to try to remove the body from the head. Set it on my heatplate (fireplace) for about 30 minutes, head and body separated fairly easily with pliers. screwed it all back together, now it works properly. I knew there was a loose connection somewhere.

Any recommendations on how to reassemble it so that I won’t need to clean the body head connection?

Hi sbslider. Congrats on diagnosing and fixing your light. I'm not sure I understand your question about not having to clean the connection. I just picked off the thread lock material, lubed the threads, and reassembled. I would recommend getting that thread lock material out of the threads as it is solidified now and may interfere with fully screwing the head back together.

Thanks for reporting your incidents and repair. That could help future 1A V3 owners.

Thank you for your insight ImA4Wheelr. I see now my post was unclear. I did manage to just pick off the old thread locker. Now I find that when I reassemble it with the head on tightly, it still behaves funny. But if I back off the head slightly, it works properly. So I think I don’t so much want to lubricate those threads, but maybe put some sort of thread locker back in to keep the head in place. I am guessing the connection between the body and head is not happy when the body tube is tightened all the way. Not sure how this connection is made, as I don’t have a magnifying glass or microscope handy at home.

I was considering just some silicone or seam grip that I have, but am open to other options and insights.

many thanks, Matt

^

Hmmm, maybe one of your leads is getting pinched between the top of the driver and the bottom of the LED shelf when you tighten the tube down. The LED leads attach to the top of the driver and maybe there's a cold solder joint (weak connection that can disconnect under pressure).

If not that, your idea to "lock" the head but with something weaker like silicone sounds like a good idea. Keep in mind that the most popular type of silicone is acid cure which is corrosive to copper and certain polycarbonate plastics. There are two types of cures that are more nuetral to electronics. They are Alkoxy cure and Oxime cure. IIRC, Alkoxy cures are better than Oxime cures for copper and certain polycarbonate plastics. I don't know any commonly available Alkoxy cure products. GE Silicone II's product line are Oxime cure and are readily available. Here is one of those products:

http://www.homedepot.com/p/GE-Silicone-II-10-1-oz-Clear-Kitchen-and-Bath-Caulk-HD5040-24C/100663319#.UlbxcBBr3KE

I wonder how good hot glue would work.

As far as using silicone goes, I would try to put it just on the aluminum body tube and aluminum heat case, so I wonder if the fact that it is acid would be a problem there. I have also read about folks using nail polish in other applications, or also super glue. No current flows through this connection, so it seems like anything that would not damage aluminum and is somewhat removable would work. By the way,thanks for the recommendation on the silicone, might have to try that when next time I need some around the bathroom. Then I could use it for the light head too :slight_smile:

I am not excited about further disassembly of the head to see about pinched wires or cold solder joints, as my eyes are not the best and I don’t know how to take it apart any further. I have been wondering what materials are used for the connection between the body tube and the head piece for the cell negative connection. I can tell most of the contact area in the head appears gold plated (as all good connector pins are) but it is hard to see what is going on at the edge where the body tube connects. Did you by chance look at that when you had yours apart? I am tempted to take a look tomorrow at this under a microscope while I am at work.