Faulty UTorch UT01 tail-cap/spring

I'd been reading up about more flashlights here (mostly budget-level ones), and since I don't have a working AA/14500 flashlight yet (actually I had an UltraFire UK68, but it worked on AA the first time I got it, but subsequently it doesn't work with AA, it now only works on 14500), I got the UTorch UT01 when it was on flash sale sometime back. The lights just arrived (I got 2pcs - CW and NW).

Now, upon checking the UT01 NW, the tailcap spring PCB fell off (is it supposed to be glued?), but apart from that, it seems to work.

I then checked the UT01 CW, and it does not turn on -- nothing at all.

Since I have 2 versions, I decided to mix and match the body tube and tailcaps. I find that when I use the tailcap/spring of the UT01 NW on the UT01 CW, then I can get the flashlight to work properly. So for some reason, the tailcap spring of my UT01 CW does not function (and it's glued on the cap; unlike the one on my UT01 NW which fell off immediately the first time I inserted battery.

What might be the problem?

~~~~~~

Update:

So I decide to test continuity of the tailcap with a multitester, and both seem to be working....

But when I screw the tailcap to the body tube (I tested both body tubes, and even flipped them over and tested again), and test for continuity with multimeter, then there's a difference:

Connecting the tail cap (from UT01 NW) to the body tube (any), there is continuity.

Connecting the tail cap (from UT01 CW) to the body tube (any), shows no continuity.

What's wrong with the UT01 CW's tailcap, I can't seem to notice defect. And strangely, the tailcap from the UT01 NW which immediately fell off on first use, it works properly.

if the whole board fell of no problem just glue it in
if just the spring fell off need to be soldered again

If tail cap is not working short it with a wire and look if the light is working

it is really strange that the tail PCB is not working its just full copper layer for full diameter

The only thing I can think of is something is preventing the CW tailcap from fully (electrically) making body-tube contact with the tail cap circuit board.

My guess is the top of the tail cap is stopping at the body before the board contacts tube end.
Put a thin piece of cardboard inside the cap, under the board to raise it a bit.

you can also strip a bit of solid 1.5mm² wire and bend a ring in the Tail cap, so you can gain over 1mm battery length, do it on both sides and protected batteries fit

Since the spring pcb already fell off, you can put spacer at the back of it in the tailcap, just to push it up a bit. I think 0.5mm or 1mm should be enough for this small light.

Thanks to your suggestions.

I don’t have a 1.5mm² wire (I’m not really a modder… and don’t have many parts lying around), so I just scrounged for a piece of wire, stripped it and formed a ring so it looks like this, inserted it into the tailcap:

and now the flashlight works.

However, it’s not elegant (did I mention I’m not a modder?).

I bought 2 new UT01 flashlights from GearBest, I planned to keep one and the other one as a gift.

But the working one has a tailcap board that falls off the first time I inserted battery (do I just use ordinary glue to glue it? Won’t it make it too thick to accept batteries?), while the other one has to have an inelegant solution (my copper wire will also fall off).

It would have been nice if I can ask GearBest to just send me 2 replacement UT01 tailcaps that really work, instead of me having to waste a few hours to “fix” a brand-new flashlight that should have been working in the first place?) Any idea how to go about doing that for GearBest?

(I made a video to show that the UT01 I just received did not work [before my ‘fix’]:

would that be proof enough?)

Looks like the UT-01 OEM manufacturer is getting Lumintop warranty paperwork mixed in with Utorch production.

I wonder if a similar miss-match thing happened here… They used the “cap” from an EDC05, but constructed it without the magnet inside for the UT01. End result would be a taller cap, by which would result in an open circuit and a tailcap board that does not contact the UT01 body tube.

After I “fixed” my non-working UT01 CW flashlight, I did some more tests, also tested the UT01 NW.

With the UT01 NW (aside from the tailcap PCB that falls off), it worked with all batteries I tested it (3pcs of PKCell flat-top 14500, a couple of “UltraFire 1200mAh” button-top 14500s, an a couple of Fujitsu AA LSD NiMh. Doesn’t seem to have any problem so far.

Then I also tested the UT01 CW with the same set of batteries. With the Fujitsu AA LSD NiMh and the button-top 14500s, there was no problem (I notice they are all “button-tops”.
However, with the flat-top PKCell 14500s: there’s one that always works, then the second one which intermittently works, and the third PKCell 14500, it never works at all.

At first, I couldn’t notice what the problem is, the PKCell 14500s look practically similar to me (raised flat-top). But I figure the problem was likely the head (I’m not sure what’s the correct flashlight terminology) where the “+” side makes contact with the batteries, have a slight contact issue. Which is making the “non-working” PKCell 14500 not making contact. To test this theory, I attached a tiny magnet (fortunately I have one) to the flat-top of the 14500 that didn’t work with the UT01 CW flashlight. Then I inserted the said 14500 into the flashlight, and now it worked. So the problem IS the UT01 CW head — it doesn’t seem to contact with “flat-top” batteries well. So, is there some way of again “fixing” this problem? I’d hate to use a flashlight that is very picky with the batteries (I don’t want to attach a tiny magnet to my “flat-top” 14500s as a solution).

The specific flat-top 14500 that didn’t work at all (without a tiny magnet) on the UT01 CW, worked perfectly on the UT01 NW (I tested that battery multiple times, inserting, removing again); so I would say the “problem” is the UT01 CW head… Looks like very poor quality control on the UTorch.

I am having problems getting my 14500 battery to work on both my CW and NW UT01 too. The same 14500 battery works fine on my Klarus Mi7 without any problem.

I stumbled across thread when googling for this.

The 14500 battery I am using is this one here, that I initially bought from banggood for my Subotech RC car last December. It is no longer for sale on the banggood website but you can sort of see the batteries on the right hand pane of the page.

So is this a contact issue??

Thats really strange. Maybe add a solder blob to the B+ contact? Is it dirty?, maybe clean it with some isopropyl and a q tip?
How are the 5 little solder pins?… if they are not trimmed properly they could interfere with +B contact.

First, I notice some differences with the font on the tailcap

smaller font on the left belongs to the NW tint (tailcap PCB that falls off, but otherwise works)
bigger font on the right belongs to the CW tint (tailcap does not touch the body tube, which is why it originally doesn’t work)

When I tighten the head glass lens (sorry I’m not sure of the correct term), the UTorch label does not align properly with the side button switch. (the UT01 NW sort of aligns with the button switch, the CW does not really align) — this is not really an issue, but I suppose it reflects on the attention to detail/design of the flashlight.

The one on the left is from the CW tint, the one on the right is the NW tint.
It’s not clear from this angle, but if I look/feel the “button”, it seems the one from the UT01 CW is depressed at an angle (I made a simple sketch of how it feels like), which is likely causing the flat-top 14500 to not make proper contact.

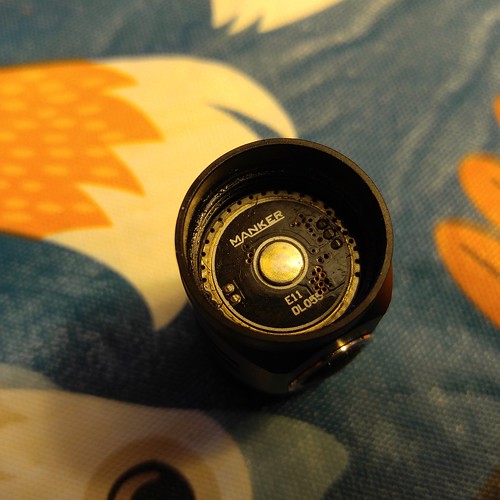
They are not labeled “Manker” (unlike yours)

I got these 2 UT01s just a few days ago and testing/solving the problems/issues is already so time-consuming… I haven’t posted feedback review in GearBest’s UT01 webpage yet, perhaps I’ll just show them these problems?

If it was me I’d put a solder blob on the head of the battery.