Hi all,
The switch boot on my H51F is torn, so I would like to replace it.
It seems the switch bezel is press-fit, any suggestion on how to remove it without damaging the underneath switch and board is welcome.
Thanks in advance
On a H600 II I slipped a thin flat screwdriver between the rubber cap and the retention ring and pried it out.
Send it back for repair if they are still doing that.
Chris
Last time I checked it cost 25€ to ship to China, plus the 15$ repair fee.
removing bezels isn’t a problem, will they stay in place firmly and provide any water resistance after reinstalling is a different question.
Thanks thefreeman (merci Gaston  ), I was able to pry it out, but only after carefully removing the remaining edges of the former boot with an X-acto knife. Only at this stage was I able to insert the tip of a screwdriver, and remove the bezel.
Then (@alpg88) I was able to replace it with a GITD switch boot which fits quite well under the bezel, and should ensure proper water resistance since it has a lower surrounding ring, see pictures and sketch here.
BTW, I was surprised to see how good these cheap GITD switch boots are. After charging them in direct sunlight (I don't have an UV light), they are still visible after 12 hours in the dark if my eyes are dark-adapted. I compared them side-by-side with the - excellent in this regard - Zebralight GITD headlamp holder, and they perform almost as well.
Therefore I have performed a similar switch boot replacement on my other ZL headlamp (an old H501R, the most compact and lightest ever in the ZL range).
Pictures would be helpful to see how you did this. I’ve often wondered how to remove the bezel of my ZebraLights without causing damage. I would be more concerned about visible damage than water resistance since I rarely use my flashlights in the rain.
Here you are:
First you have to remove the switch boot, which will be destroyed in the process. I grabbed it with my nails, pulled, and it tore leaving its outer rim stuck between the light body and the bezel.
Then you need to carefully remove all rubber leftovers, because they prevent you from inserting a tool to pry the bezel. I did so using a very sharp X-acto knife, and small tweezers. Once the (very narrow) gap between the light body and the bezel is free of rubber, insert a very thin flat screwdriver and twist it to gently lift the bezel up (red arrow on the following picture).
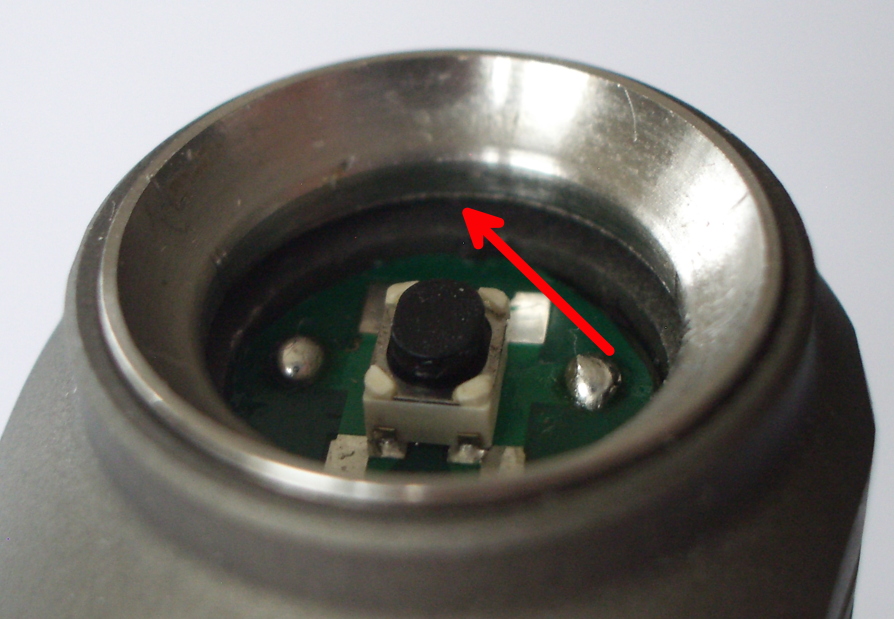
Please note that I took this picture after removing the bezel, and putting it back in place but without force-inserting it completely, so the actual gap you will see is even more narrow.
When working with your screwdriver, #1 be careful not to touch the switch as you may damage it and #2 don't try to pry it out in one go, but work all around the bezel little by little.
This is what it will look like once removed:

You can see there is a rim which is part of the light body, around the switch PCB: your screwdriver leaned on it at the former step, therefore not risking to damage the switch PCB.
This is what the bezel looks like (under side up):

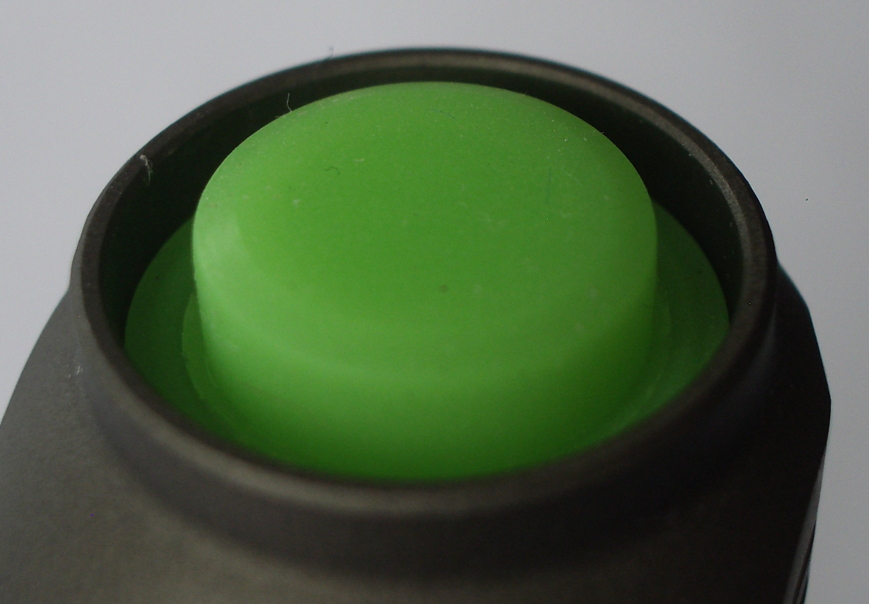
And here is the GITD switch boot I will use, which fits perfectly on top of the light. Its rim is a bit too thick so I'm not sure the bezel will stay on once press-fit, but I don't know how to make this rim thinner, not sure sandpaper will work on soft silicone (any suggestion folks?).
But before "closing" the light I want to paint the bezel with some ultra-green GITD paint I have ordered from glowinc.com.
I'll let you know how it worked when I'm done.
Thanks for the pics and instructions - very helpful!
Good question about making your new switch boot rim thinner. It seems the only way to work with silicone is by cutting it, but that would be hard to do consistently all around the rim. Maybe just try to find a different switch boot that would fit better. How about this one from Kaidomain? It has a 1.5mm rim thickness.
True, it looks impossible to get a constant thickness. Even using a lathe (which I don’t have) might not work because the silicone is so soft.
Very similar to mine, whose rim thickness is 1.7mm so it wont’ make any difference. I might still order some because I’m curious to test their “light green” GITD.
In fact there is a tiny groove all around the booth, near the base of the raised part. It matches the very narrow protruding edge at the bottom of the bezel, but it is not deep enough. I've tried pressing both parts together in a vice, which caused the silicone to be slightly "cut" by the metal edge, hence allowing the bezel to go deeper into the silicone. But I feel that if I press any further this will eventually cut the silicone, leaving the outer ring apart, hence a lower water protection. I'll try and see how it goes once I have done my GITD paint job on the bezel.
Razor blade, spacer/washer as a guide and lubricant (silicone tends to stick to the blade)

Impressive result thefreeman, bravo!
What kind of lubricant?
Anything, cooking oil for example, but even just water helps (improved with soap most likely).
Fascinating thread. I don’t know that I’ve ever seen a pic of zebralight’s microswitch before.
I wonder how different the side switches are?
Very clever thefreeman! I guess if washers can be used to precisely slice silicone LED domes, they can also be used for tailcaps. And I’m sure lubricant is just as important as a very sharp razor blade.
Hi all,
After successfully removing/replacing the switch booth and bezel, I would like to insert a magnet inside the tailcap.
The spring is apparently soldered on a thin metal plate, which may well be glued to the bottom of the tailcap. No way to pry it out, or to unscrew it. Any clue on how to remove it?
The current gen headlamps use the same switch as the regular lights. In the H53 they don’t have the extra little PCB though.


Ah I thought it was the was the same switch from MKII onwards, I shouldn’t have assumed…
By the way do you have a reference ? I tested a bunch of switches like this and they are more noisy than the ones in ZLs.