Hello everyone...
today we will see the Lumintop GT Nano:
a very small thrower flashlight with 10180 battery.
Here the link of the company and here the link of the product.
.jpg)
.jpg)
.jpg)
.jpg)
- Packaging and Content -
The Lumintop GT Nano comes in a small rigid cardboard box with a thick layer of foam packaging inside that holds and protects the flashlight and accessories during transport. The equipment includes:
- Lumintop GT Nano
- Wrist strap
- 2x spare O-rings
- Micro USB cable
- Battery 10180
- Charger
- Keychain hook + ring
- User manual
.jpg)
.jpg)
.jpg)
.jpg)
.jpg)
.jpg)
.jpg)
.jpg)
.jpg)
- Main features -
- Emitter: Osram KW CSLNM1.TG on DTP MCPCB base
- Max Output: 450 lm
- Maximum Luminous Intensity: 23,400 cd (ANSI shot> 300m)
- Firmware: NarsilM v1.3
- Battery: 1x 10180 80mA
- Driver: Texas Avenger FET driver
- Reflector: 20.8 mm in aluminum with smooth finish
- Lens: Glass with Anti Reflection treatment
- Body: Type III hard anodized aluminum
- Switch: Side, Electronic with rubber coating and equipped with status LED
- Water resistance: IPX8, submersible up to 2 meters deep
- Weight: 17g (without battery)
- Dimensions: 24 mm Ø Head x 55.5 mm Length
- The body and materials -
The GT Nano is the latest Lumintop torch from the GT series. A small and nice shooting torch that recalls with its shapes the big sisters BLF GT*, GT Mini and GT Micro.
.jpg)
.jpg)
.jpg)
.jpg)
The GT Nano is capable of delivering 450 lm to the Turbo with a light intensity of 23400 cd (i.e. a throw of over 300m) and is powered by an 80mAh 10180 cell. The interface is fully programmable and customizable thanks to the NarsilM v1.3 firmware.
The electronic button on the side of the flashlight allows you to access all the different functions of the GT Nano. This is rubbered, slightly protruding and single stroke. A bit uncomfortable to activate even if it is particularly large when compared to the size of the flashlight. It happened to me a couple of times that during the quick clicks to access some functions, a few clicks were lost along the way but after a while this problem did not manifest itself: probably the switch only needed to be softened with the use.
.jpg)
.jpg)
.jpg)
.jpg)
.jpg)
.jpg)
.jpg)
The head is about 25mm wide, and has small and deep dissipation fins. Other dissipation fins, thicker than the previous ones, are present near the switch.
The heat, even at the Turbo, never reaches too high temperatures. However, there is a thermal stepdown when using the Turbo several times consecutively.
.jpg)
The body also features a knurled part
.jpg)
.jpg)
The lens is of quality, thick and with the classic anti-reflective treatment.
.jpg)
.jpg)
The reflector is wide, very deep and highly polished. In the center, the LED in the Cool White version, well centered thanks to a white central unit.
.jpg)
.jpg)
.jpg)
The lettering is well done and present only on the central part of the body, near the switch, with the model and serial number.
.jpg)
.jpg)
The threads are sliding, well lubricated, anodized on both sides and therefore the physical lock-out of the interface is allowed. An O-ring placed near the thread prevents water from penetrating inside the battery compartment.
.jpg)
The tailcap is flat and allows the use of the flashlight in tailstanding. The presence of a small hole allows the attachment of a wrist strap.
.jpg)
.jpg)
.jpg)
The battery is recharged through the use of an additional accessory supplied, a sort of brass charging head. This is screwed directly onto the body of the GT Nano and thanks to the presence of the micro USB port it allows the small cell 10180 to be recharged. In the upper part there is a status LED that lights up green when charging is complete or red during the charging phase. . It takes about 1 hour to fully charge the battery. The charging current is approximately 100mA.
.jpg)
.jpg)
.jpg)
.jpg)
.jpg)
.jpg)
.jpg)
.jpg)
.jpg)
.jpg)
.jpg)
.jpg)
The small 10180 has the capacity of 80mAh.
.jpg)
.jpg)
.jpg)
.jpg)
.jpg)
.jpg)
.jpg)
.jpg)
.jpg)
.jpg)
.jpg)
.jpg)
At the negative pole we have a small spring, at the positive pole there is a protruding button
.jpg)
The GT Nano is really very small !! And it's especially fun to use too..XD
In the hand it practically disappears, and can be easily attached to the set of keys.
.jpg)
.jpg)
.jpg)
.jpg)
.jpg)
.jpg)
.jpg)
.jpg)
.jpg)
.jpg)
.jpg)
.jpg)
Also included with the GT Nano comes a steel key ring.
.jpg)
.jpg)
.jpg)
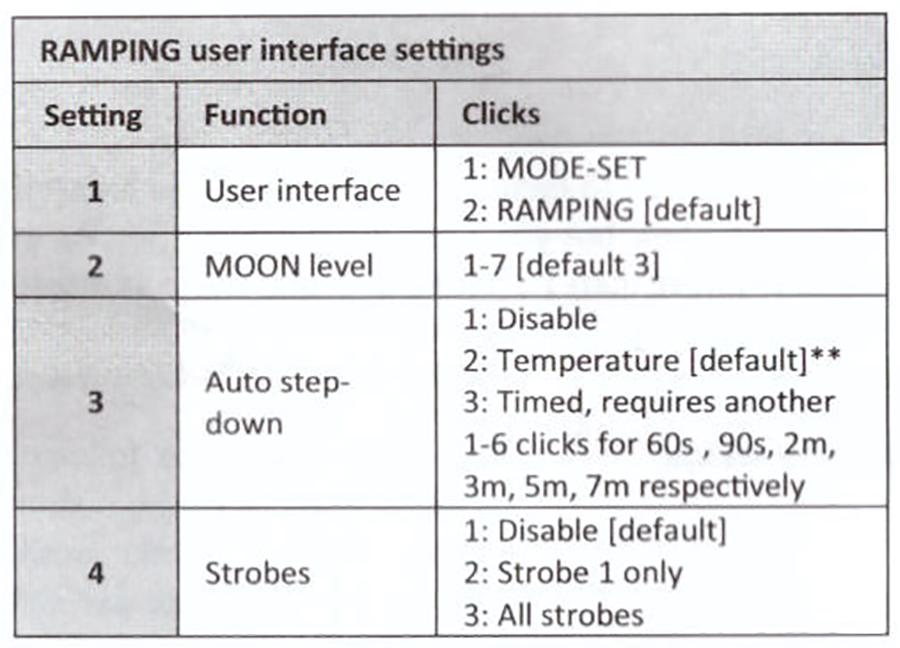
- Default User Interface: "Ramping" -
This user interface allows the variation of the output in a uniform manner from 0% to 80%. Turbo (100%) is always available and can be activated
- Power on: single click to enter the last stored level
- Ramping: press and hold the power button to have an increasing Ramping
- Reverse ramping: while ramping in one direction, release the button, press and hold the button again to activate reverse ramping
- Instant Turbo: double click (both with flashlight on and off)
- Power off: single click
- Ultra-Low Mode: From OFF, press the button and release it as soon as the GT Nano turns on.
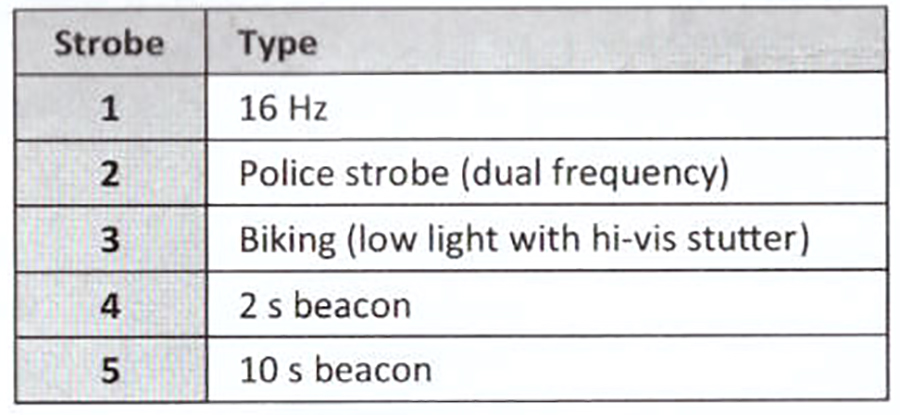
- Strobe: First access the Turbo with a double click and double click again to access the Strobe (use single clicks to scroll forward between the different types of Strobes, but you need to be quick: if you remain on a Strobo level for more than 1.2 seconds, the next click will switch the GT to OFF. Press and hold the button at any time to go back through the various Strobo levels.)
- Battery status: triple click (for example if the cell has a voltage of 4.2V, the flashlight will first flash 4 times and, after a pause, it will flash 2 more times)
- Electronic lock: 4 clicks to electronically lock the interface and another 4 clicks to unlock it.
- Momentary On Mode: 5 clicks to enter this mode. The flashlight will remain on as long as the button is pressed. To disable this function, just unscrew and screw the tailcap back on
- Factory reset: triple click (battery status mode), then double click (driver temperature mode), double click again (firmware version mode), then press and hold for about 2 seconds the button. Four flashes will confirm the correct reset of the interface and the restoration of default settings.
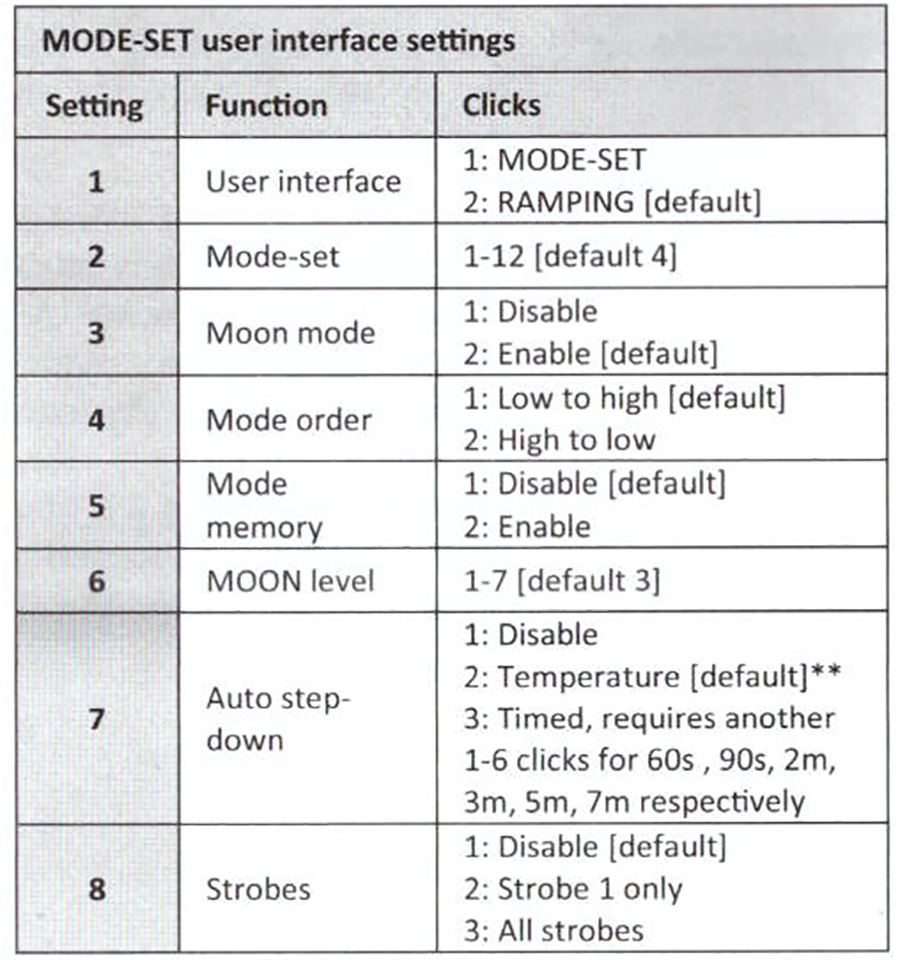
- Alternative User Interface: "Mode-Set" -
The "Mode-Set" user interface provides for switching from one level to another simply by clicking the power button. In this case the "ramping" function cannot be used.
- Power on: Single Click
- Next Mode: Single click (within 1.2 seconds)
- Previous mode: Press and hold the button
- Turbo: from off, press and hold the button
- Power off: Single click (after waiting 1.2 seconds)
- Strobe: press and hold. Single click to cycle through all strobe modes. Press and hold to go back in Strobe modes.
- Battery status: from OFF, single click followed by a long press.
- Electronic lock: from OFF: double click followed by a long press. Same procedure to re-enable the interface again.
- Factory reset: from OFF, single click followed by a long press (battery status mode), then double click (driver temperature mode), double click again (firmware version mode), then press and hold the power button for about 2 seconds. Four flashes confirm the correct reset of the interface to the default settings
Backlight of switch
The switch backlight is turned on by default when the flashlight is turned off. If you don't want to use this backlight, simply turn the flashlight on and off quickly. The status LED in this case will remain disabled until the next use (only under "RAMPING UI")
Momentary On:
It is a hidden option that needs activation. Just press the power button 5 consecutive times to activate Momentary On. This function is only available if you are in "RAMPING" mode. To disable Momentary On just unscrew and screw the tailcap back on
"RAMPING" and "SET MODE": User Interface Setting
To switch from one interface to another or to configure the current one, just hold down the power button for 16 seconds if you are in the "RAMPING UI" or for 3 seconds if you are in the "MODE SET UI". A double flash followed by a single flash will indicate that we have entered the "User Interface Setting".
At this point (assuming that the current UI is "RAMPING") the GT Nano, with a series of flashes, will sequentially indicate the functions that can be configured:
- 2 quick flashes followed by 1 flash indicate function 1 "User Interface": click once to choose to use the "MODE-SET UI" or two times to stay in the “RAMPING UI”). Once this configuration has been completed, it will automatically pass to the configuration of the next function.
- 2 quick flashes followed by 2 slow flashes indicate the "Moon Level" function : it is possible to choose one of the 7 available outputs (default is 3)
- 2 quick flashes followed by 3 slow flashes indicate the “Auto Step Down” function , which is the function that allows you to pass from the Turbo output level to a lower level. The options in this case are 3: "Disable" (disabled), "Temperature (default)" or thermal stepdown, "Timed" or timed with the possibility of selecting a time equal to 60s, 90s, 2m, 3m, 5m, and 7m.
- 2 quick flashes followed by 4 slow flashes indicate the "Strobes" function: in this case it is possible to choose the "Disable" option or disable the Strobo, " Strobe 1 only "or leave only one strobe level active or" All strobes "to have all 5 different stroboscopic levels available.
Similarly to the previous example, the "MODE SET UI" interface can be configured with the following functions:
- "User Interface" to change interface mode and go to "RAMPING UI"
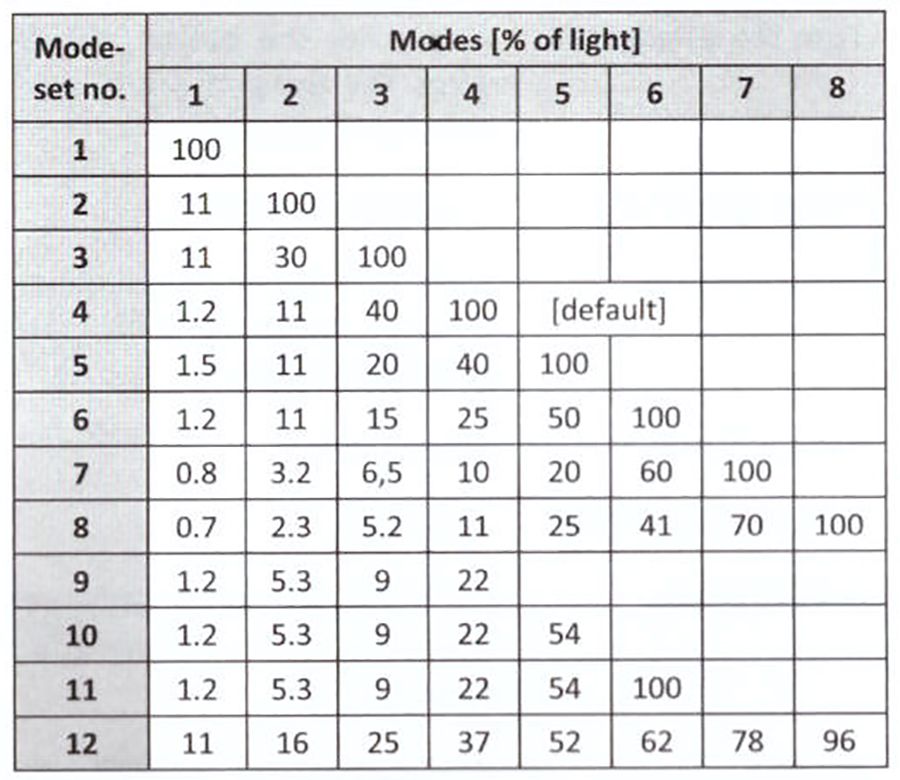
- "Mode Set" to choose the preferred output set among 12 predefined
- "Moon Mode" to enable or disable the Moon level
- "Mode Order" to choose whether to vary the levels starting from the highest or lowest level
- "Mode Memory" to activate or deactivate the memorization function of the last level used
- “Moon Level” to choose the Moon level
- "Auto Step Down" to choose whether to disable or how to activate the stepdown from the Turbo level
- “Strobes” to disable or enable the various stroboscopic levels.
Advanced interface settings
There are also advanced interface settings that can be configured to suit your tastes. In particular, it is possible to configure the function:
- "Button Led on while GT Nano is OFF" that allows you to set the activation or deactivation of the LED under the power button when the flashlight is in OFF.
- "Battery Level Blink on Button LED only" : If set to "Enable", the cell voltage will be signaled by a series of flashes of the LED under the power button and not the main LED as set by default.
- "Button LED" that allows you to disable the LED under the power button
- Beam, Tint, Beamshots and Runtime -
Thanks to the “large and deep” reflector and the small LED with which it is equipped (OSRAM CSLNM1.TG with an emission surface of 1mm square), the GT Nano is a torch designed for shooting and therefore with a narrow and particularly directional light beam.
The color is cold, around 6500K, the beam is clean and regular. There is no lack of the spill even if rather weak but which still allows you to see discreetly in the immediate vicinity when for example you hold the torch parallel to the ground.
.jpg)
.jpg)
.jpg)
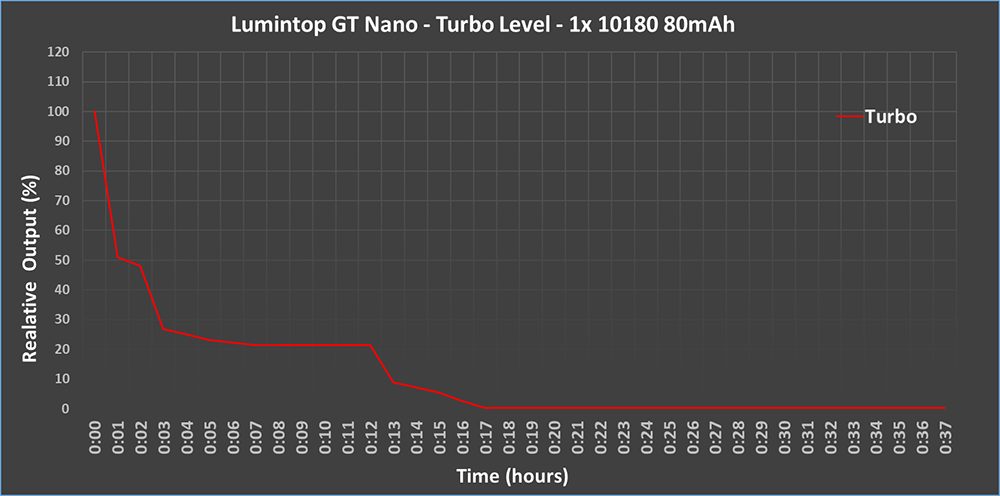
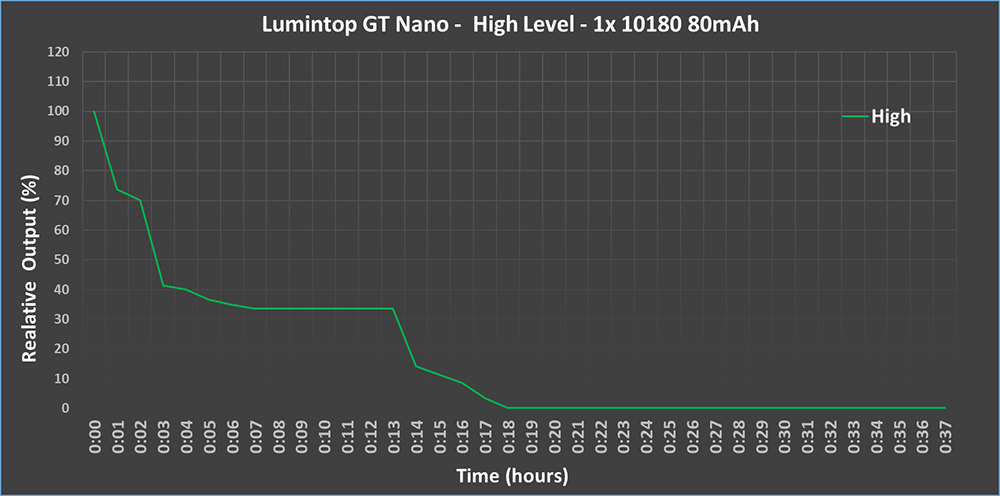
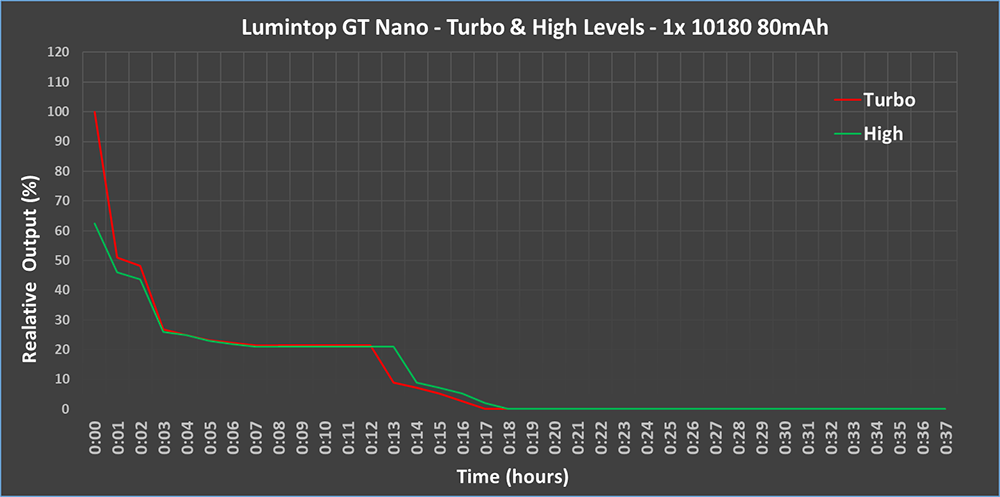
The measured Turbo output is about 500 lumens at start-up, 300 lumens after 30 seconds and about 150 lumens after 1 minute. The discharge curve of the High level is practically identical to that of the Turbo except for the very first initial moments in which the maximum output is about 300 lumens, 250 lumens after the first 30 seconds.
The runtime guaranteed by a cell of only 80mA of capacity is obviously very low on high levels. In fact, the GT Nano, switched on at the Turbo and at the High level, passes a series of stepdowns for the first 15 minutes and then settles on the lowest level of about 1 lumen until it is completely switched off.
I tried to use the turbo consecutively with a series of ignitions of about 5 seconds each with an interval of 15 seconds between one and the other. After about twenty times it was no longer possible to recall the Turbo but only to access the High mode.
If by chance you want to use the GT Nano on the Low level, the maximum runtime in this case will be about 17 hours before the complete discharge of the cell
Below are the runtime graphs for the High and Turbo level
and to follow some shots in the dark ...
Beamshot #1
.gif)
Beamshot #2
.gif)
Beamshot #3
.gif)
Beamshot #4
.gif)
- Final Considerations -
The Lumintop GT Nano is a tasty and fun product. There was not even a person who after seeing it did not ask me where to buy it ... to be honest most of my friends asked me: "You give me this, right?" .. Well the answer obviously was NO! XD ... also because I, like them, have been particularly fascinated by this little gem.
The GT Nano in the eyes of the less experienced may seem simply a small flashlight, but in reality it is a real concentrate of technology. Just mention the firmware that gives life to its user interface or NarsilM v1.3 which, in my opinion, is one of the most complete (together with Anduril) firmware available. The most interesting functions implemented in the GT Nano UI are the following:
- Possibility to choose between two completely different interfaces, one based on the "Ramping" and a more conventional one based on the "Mode Set".
- Direct access to the turbo
- Direct access to Moon mode
- Select your favorite Moon level [1–7]
- 5 different stroboscopic levels that can be deactivated at will
- Memory Mode
- Momentary On
- Electronic Lock-Out
- Battery Status
- Driver Temperature Mode
- Firmware Version Mode
- Factory Reset
- Possibility to choose (in “MODE SET” mode) among 12 sets of predefined levels
- Advanced functions of the status LED
- Thermal or timed Auto Step Down function (optionally 60s, 90s, 2m, 3m 5m, 7m)
.
In hand, the GT Nano practically disappears, you can easily attach it to a set of keys and always carry it with you. Its length is about 5cm for a weight of only 17g !!
Nothing to say about the build quality, good materials, precise and smooth threads, well done lettering, knurling and anodizing.
The switch is responsive and needs a good pressure to activate. Every now and then he loses a few hits but nothing transcendental. After a while of use it softens and no longer gives problems. Given the very small size of the flashlight, using the switch for those with very large hands may not be so easy.
The charging solution does not excite me too much because it forces me to always have the charging accessory at hand, I would have preferred a micro-USB port directly on the flashlight, giving up a few millimeters in terms of length.
The shot is truly exceptional for a torch of this size, it is possible to illuminate well even at a distance of a hundred meters.
Cold color, 6500K and uniform throughout the beam.
Perhaps the only sore point is the price which at the moment is practically the same as the GT Micro and slightly lower than that of the GT Mini. We hope in the future to see a GT Nano also with Neutral color as it was done for the GT Mini.
Quality product, aesthetically very beautiful, almost tenderness, definitely to be recommended!
Thanks for reading!!! XD