Seems like they havent learn about the switch issues.
Same thing happen with their older models. Lucky i stay out of the way ![]()
Seems like they havent learn about the switch issues.
Same thing happen with their older models. Lucky i stay out of the way ![]()
Yes, updated above. Also the 1 click from OFF is delayed - probably to wait on possible dbl-click. I don't like doin a UI like that because of this reason. The delay just doesn't feel right - it's slow and stupid or something... These things should work in sub msec's - I hate delays! 
Which is why I ordered a new computer today: 6 core i7, overclocked, liquid cooling, Samsung Pro 512GB solid state drive, crazy $400 graphics card, etc...
Should mention though I really like this light - super small, weighs like nothing without a battery - all the weight is in the cell. It makes my single 26650 40 mm head lights look like oversized old tech, generations gone by. Very stable tailstander, for sure.
While you’re on a buying spree you could order up a new Canon 1D X and send it my way… ![]() It’s Really Fast as well, dual Digic 5+ processors with a third Digic 4 for the metering alone. 14 frames per second at 20MP.
It’s Really Fast as well, dual Digic 5+ processors with a third Digic 4 for the metering alone. 14 frames per second at 20MP. ![]() It’s pretty cheap, really…
It’s pretty cheap, really…
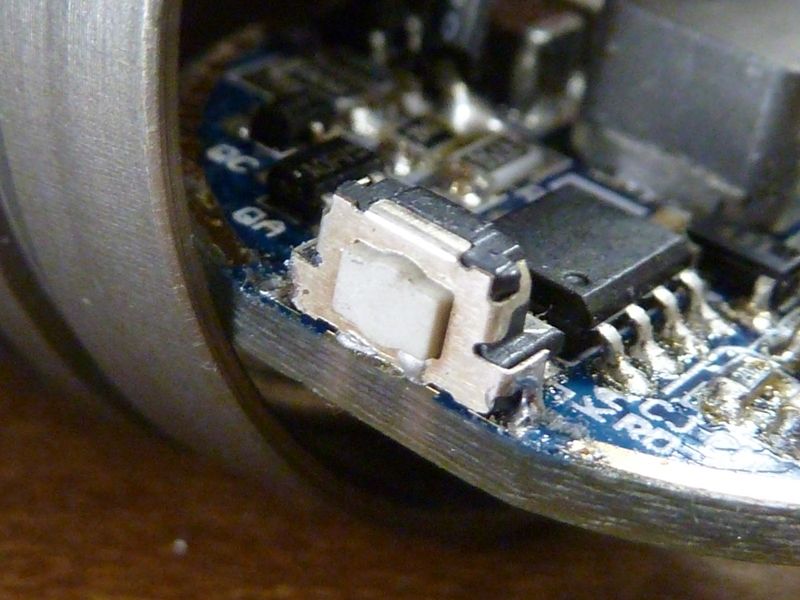
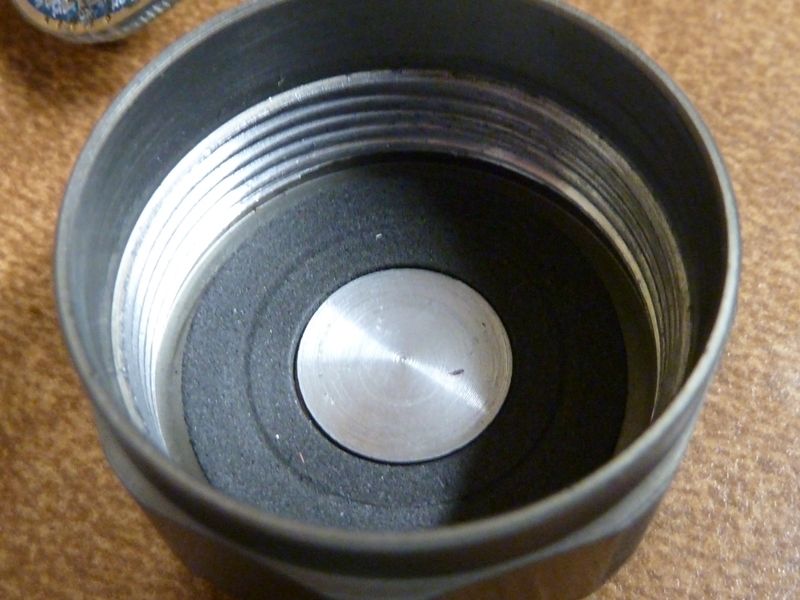
Yes Dale, that mangled mess is where the switch is supposed to be. The driver is held in place by the tube body. It looks like they screwed the tube down tight without aligning the switch into the slot under the button. All I did was unscrew the tail cap, slid a non-protected 26650 in there. No click on the button. Removed the tube from the head, and the driver was loose with the switch sheered off. There were no pieces floating around inside, which makes me think it was done on the assembly floor in the factory.
So what mods are you going to do to turn that into a flashlight? :)
Well I can write off the gaming/development computer to my biz. Gotta figure out how to do that with a camera...
Ohh - had to order it with a case having nice red LED's in it all over the place. My old one from 2010 had blue LED's - time for a change.
Oops edit again: think I figured out the UI. read about the DQG tiny 18650 here: http://www.cnqualitygoods.com/goods.php?id=2215, and it's similar.
From OFF, 1 click to mid
From OFF, 2 clicks to hi
From OFF, 3 clicks to lo
From OFF, hold down for turbo
From ON, 1 click OFF
While ON, 2 clicks to turbo, then 1 click restores last mode (lo-mid-hi), another 1 click turns it OFF
Hopefully your biz new computer is about 1/3 the cost of my biz new camera. Man are they ever proud of these things! Makes me want to stay with the old tech, to be honest, but I’m using a Pro body from 2004, the newest offerings are Epic, gotta step up or step out.
+1 for me, please… and lenses with red rings. ![]()
Little more info:
It does do the rated 2,500 lumens, least in my PVC light box measurements. I got slightly better results on a BASEN cell than the LK. Could be because the BASEN makes better contact on the batt+ end - there's the black cushion stuff around the batt+ contact, making it more difficult for flat top cells.
The LED's are 7S, not 7P - kind of bad news for some easy modding. The MCPCB is aluminum.
Mine is the CW version...
BASEN cell @4.18V: 6.4A at the tail on a clamp meter, turbo lumens: 2,652 @start, 2,523 @30 secs
On a LK @4.20V (could not measure tail amps because of batt+ contact):
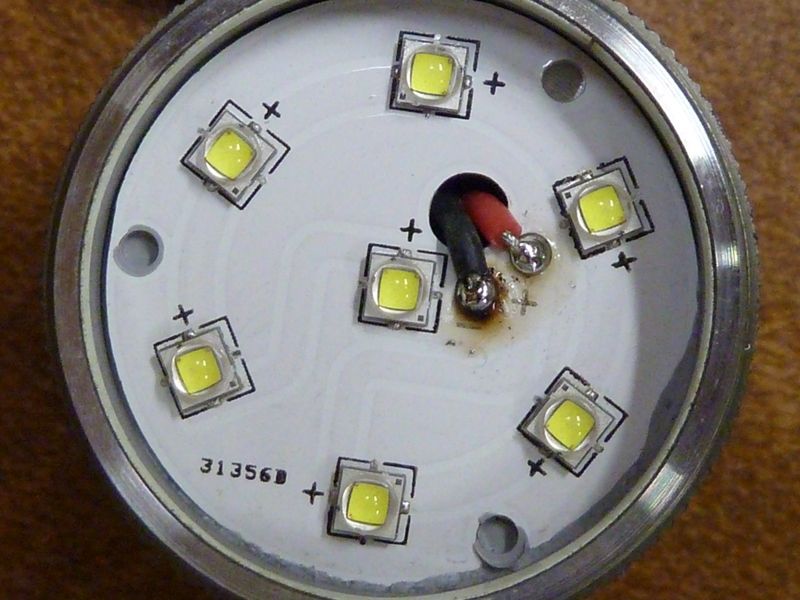
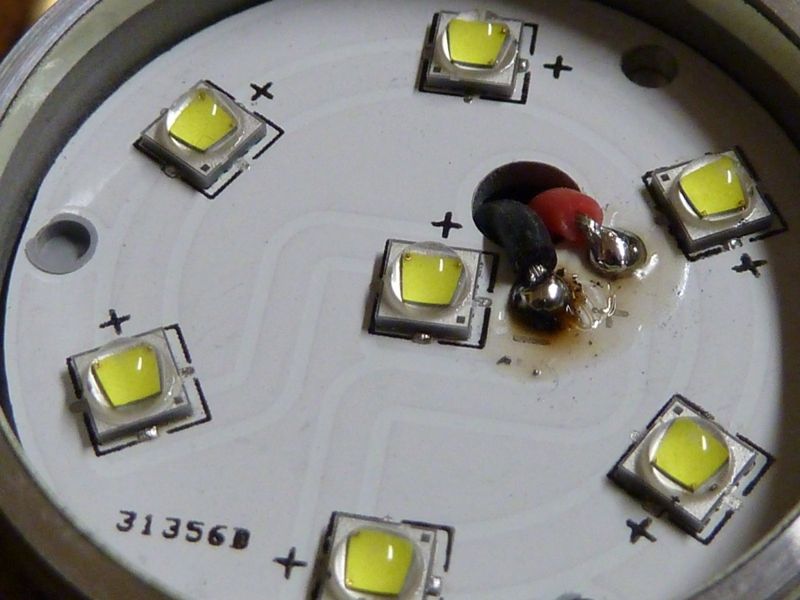
Here's the LED's - notice the traces are + to -, etc. for in series:
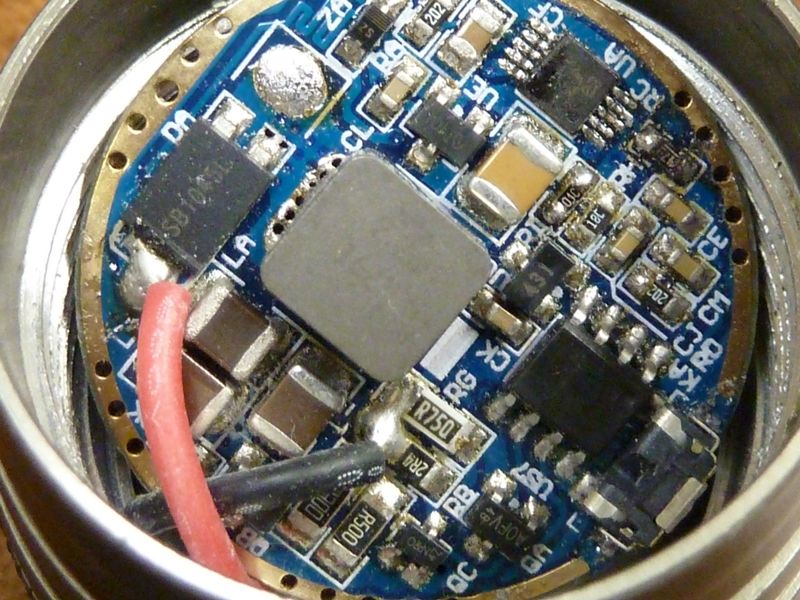
The driver - must be a decent boost:
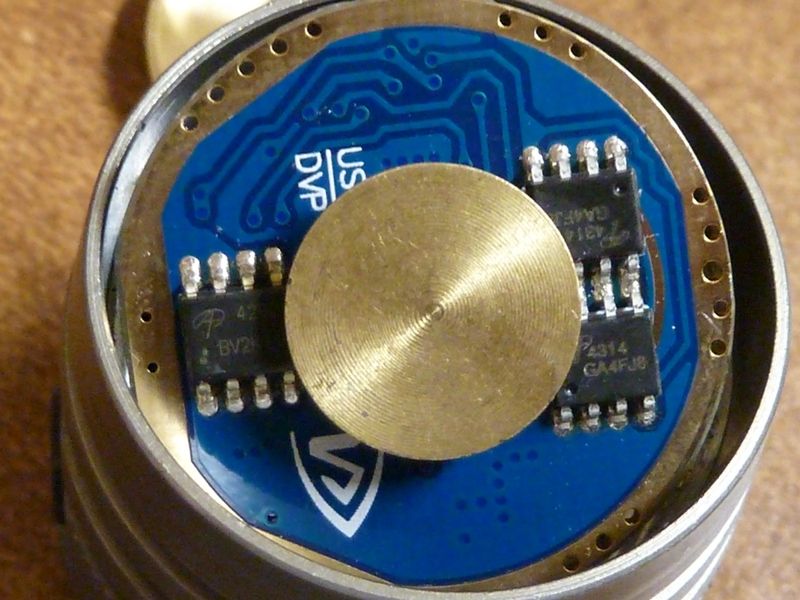
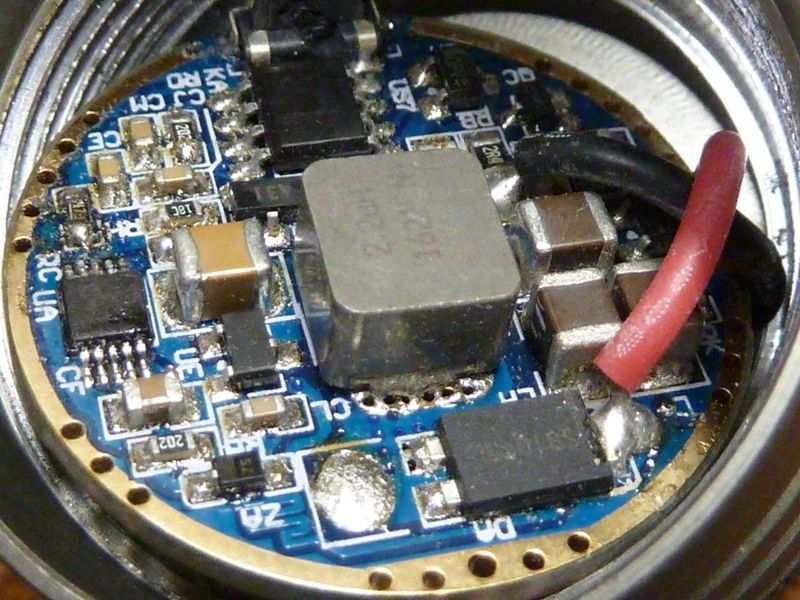
The switch. So far it's holding up but I'm not a fan of this style right angle PC mounted:
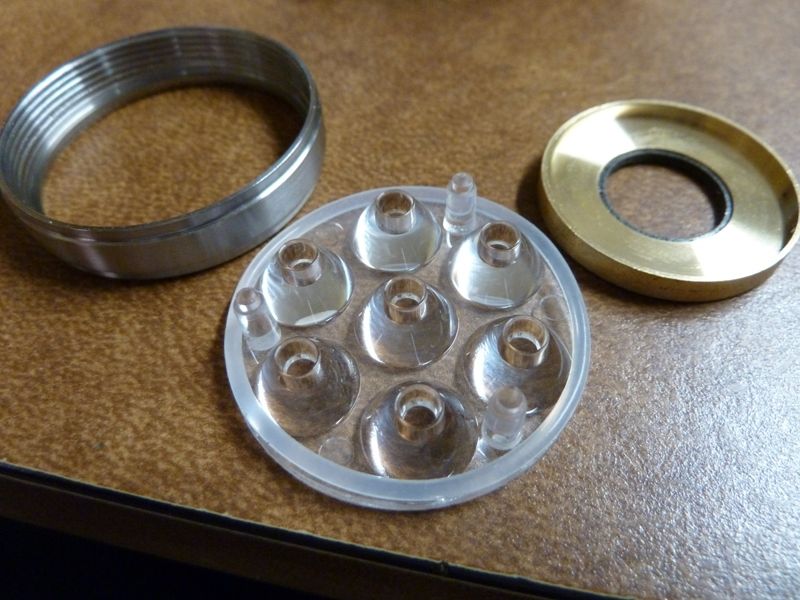
Other parts:
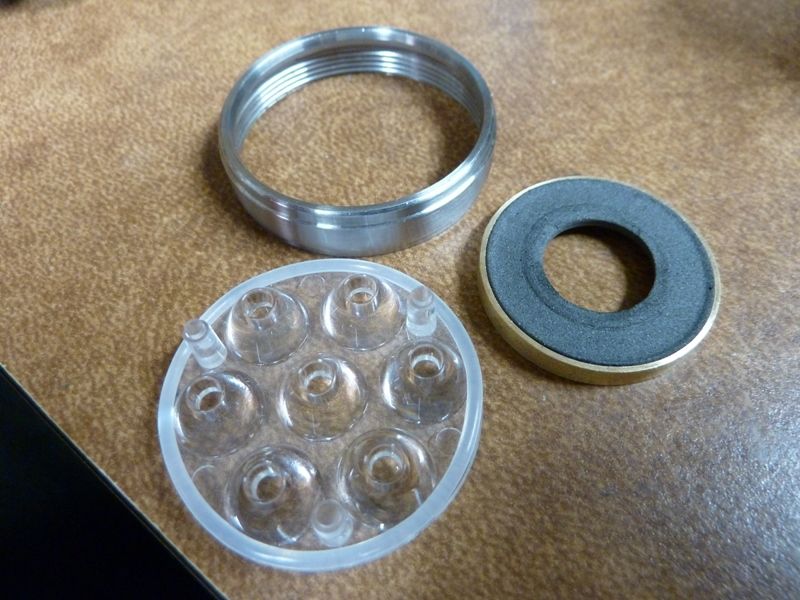
Inside of tailcap:
How in the world is a 4.2V cell powering up 7 series emitters? That’s some serious boost going on!
If it’s pulling 6.4A with a fresh cell, wonder what the current goes up to when the cell is low? Wow, surprises me big time.
Does it get hot fast?
Bad news (regarding the modding). Wonder if it’s possible to cut the traces on the MCPCB and wire the LEDs in parallel …
Got mine today but haven’t disassembled it yet. NW - which is very warm but I guess I like the tint. Has some dents, anodisation is far from perfect but not too noticable with the grey version (which actually isn’t grey, more a green/brown/oliv at the tube, the head a bit brighter and the bezel looks like stainless steel).
Also measured about 2500 lumens, not much of a difference using Keeppower protected or Liitokala 5000. About 7 Amps draw with Keeppower at 4 Volts. Due to the construction also (some?) protected cells fit.
I’m starting to like this light …
I’ve received mine today.
Thank you freeme.
It beats most of my other lights in terms of flood and brightness.
I’ve been thinking about this light, at 2500 lumens from 7 emitters it’s making some 355 lumens per emitter, which is really down there in the efficiency range of the emitter. Amperage per emitter is low, heat should be pretty well controlled as it should be quite low at each emitter, just wondering how it adds up?
I really like the look, have no idea if or how long I’ll leave it stock. ![]()
It did get warm at 30 secs, but nothing crazy. Actually in the quick testing I've been doin, haven't noticed it getting hot. Theoretically would be more efficient even with XP-G3's or XPL2's - that's my minimum mod plan. As you can see in the pics, lots of sub ohm resistors wired to the LED- wire, so I'm sure resistor modding would help, but risky since replacing/upgrading this driver is not so easy if you blow it because of the 7S design.
No mode memory, but it's how it's designed. On BG's listing it says:
"Four easily accessible brightness levels and memory function for fast boost"
Which is accurate - when you dbl-click with the light ON in lo,mid or hi, turbo comes on, then 1 click returns back to the mode you were in.
Little tricky to re-assemble after loosening the battery tube to get access to the driver. Some of you I'm sure may be aware of this trick. The driver in mine is not glued or even press fit in. The brass fitting/ring over it is also loose. It counts on the tightening of the battery tube to hold it together and in place. You must align the switch yourself - no alignment notch's, or anything that sets the position. So, trick is to hold down the driver while dropping on the brass ring, then continue holding it in place downward while threading on the tube. I used a simple solder pick tool with a dull point to do this. So, while holding the driver down firmly with the solder pick tool, I dropped the brass ring over the tool to set it in place, followed by dropping the battery tube over the tube, all while keeping downward pressure on the tool. This resulted in the driver w/button held in the perfect position.
I’m sure this is what happened to mine during assembly. Like you said, the only thing holding the driver and ring in place is the tube body. If that driver is not aligned where the switch sits in the slot, screwing the tube back on will result in shearing off the switch.
Maybe a good trick to reassembly would be to use a pencil to hold the parts in place.


I’ll look at mine when it arrives, see about cutting a new brass retainer that’s threaded to match the tube. That should help. Might drill a locator hole and thread it, put a single screw in the driver to hold it in place or act as a stop so it can’t twist.
Thanks Tom, nice tip. I have done that kind of thing before with drivers as well as lenses, but might have forgotten. ![]()
A threaded brass retainer ring would be awesome. Make some extras. I’ll buy one from you!
Sounds good Dale. Sure you will have ideas once you get it and look it over. The pencil is a better idea! The eraser won't mark up the surface and gives you some traction against possible twisting. I'm not crazy about the stiffness of the button - I've said this many times before with other lights. Good on preventing accidental activations, not so good for wear&tear on the switch, specially a right angle mount one, plus lots of clicks and holds can be a pain.
Does anyone know if D.Q.G. is RIC's company? I always associated this line of lights with RIC and BTU, but never 100% sure. Weird he doesn't have it listed yet on cnqualitygoods.com.
Mine arrived today. Good light!!!
I like to use JB Weld Water Weld, it’s a jelly roll epoxy that you simply cut a slice off the doughy roll and knead it together, place it form it and it’s hard as a rock within about 10 minutes (less actually) A big dollop of that backing the switch would go a long way towards making it indestructible. It will also serve to pot the driver which should help with any heat issues it may have or simply make it long term durable.
They call it water weld because you can slice off a chunk, start kneading it to mix the two components while you dive into a swimming pool and by the time you reach the bottom where the pool is cracked you’re ready to shove the epoxy into the hole and stop the leak. It hardens under water, on a leaking gas tank, anywhere and everywhere. It’s drinking water approved as well. Amazing stuff.