(mobile friendly version here)
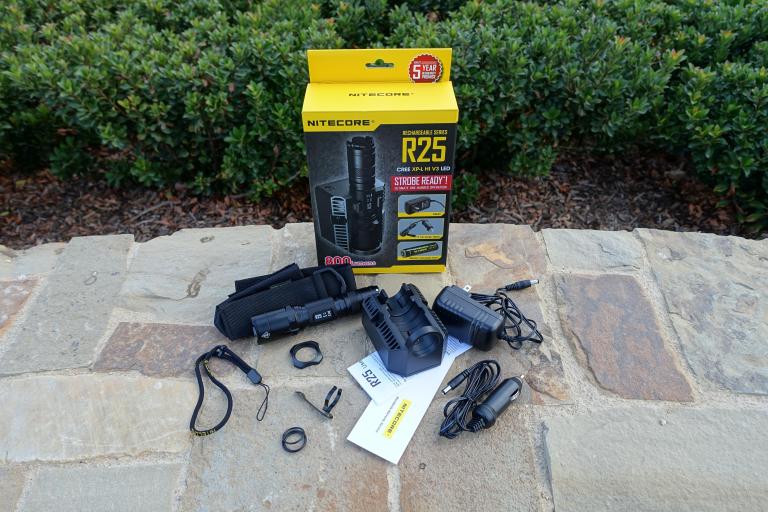
Hi All! I've been meaning to get serious about keeping a dependable flashlight on my night stand but just end up fumbling in the to find the light I left out and other times I end up using it and leaving around the house and don't have it at hand all the time. I asked Nitecore if I could test out the R25 and I'm happy to say that it's solved my problem. Here is my full review  (Sorry it's very picture heavy
  )
)
Do you sleep with a flashlight under your pillow? No? Well I bet you got one on your nightstand right? And you can find it in the dark in three seconds flat without losing it? No? Well what if it was always in the same place and it always had a full charge? Well say hello to the Nitecore R25!


QUICK SPECS
Spec sheet from Nitecore (as of August 2016).

LED SPECS
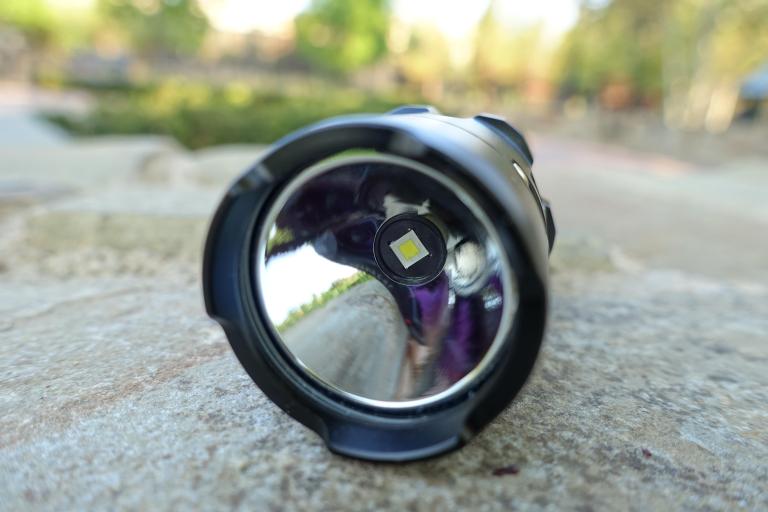
Type: (1) CREE XP-L HI V3
Color: “White Light” description by Nitecore
BEAM PROFILE
Nitecore does not advertise the beam angle but using a protractor I measured the main spot to have a total angle of about 20° and a total spill angle of about 80° . This seems to be more of a spot light than a floodlight. Also, the crenelated bezel encroaches a little into the spill but this is only noticeable at very close range.


WARRANTY
Because the R-series have integrated charging, Nitecore provides only a 1-year warranty for free repair, so make sure you only buy from an authorized dealer (you can contact Nitecore’s customer service to find one) or you will waive your rights to the warranty . Also, take care to store your light properly, as the warranty does not cover damages caused by batter leakage. Check their website for their full terms of service.
USER INTERFACE
I’m still a novice youtuber, but here’s a quick video review and a walkthrough of the user interface.
There are 3 user-selectable “modes” which I like to call “profiles” which describes the collection or availability of individual modes (High, Mid, Low, Strobe, etc). I could make it more complicated distinguishing “primary” from “secondary” but I’ll pass this time since strobe is the only “secondary” mode because it has its very own button.
Nitecore dubs the 3 profiles as “Tactical” (only High + Strobe), “Law Enforcement” (only High, Medium), and “General” (all primary mode levels: High, Medium, Low). Strobe is accessible at any time thanks to a dedicated button. The only catch with the profiles is that the Medium level is a lower lumen for “Law Enforcement” profile than for “General” profile (see the numbers in the Spec section above). The number of profiles shows that this is purpose built to support very specific needs as well as general use needs. Before we get to the UI lets go into what buttons there are to push.
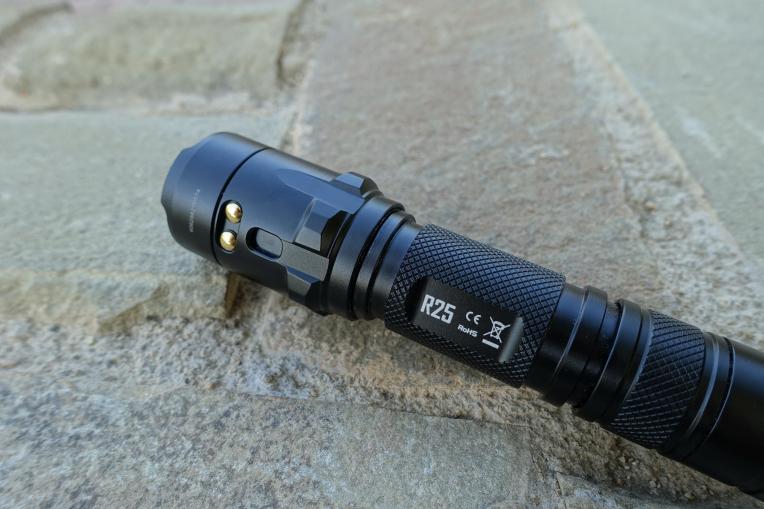
BUTTONS/SWITCHES

- Forward tactical switch, with rubber boot – used to turn on and off the light, solid on or momentary
- Metal lever – used for accessing strobe any time, or cycling through primary mode levels
- Bezel physical connection – tighten/loosen the head, used for lock out, and used during the process for switching profiles
STROBEREADY MODE (MOMENTARY STROBE)
“StrobeReady” is a term from Nitecore, but any time, whether on or off, and even in “lock out” mode!, click and hold the Metal lever and you will get strobe. If activated from off or lock-out mode, the strobe will discharge as long as you hold down the lever. If the light is in a primary mode and the lever is held down, the light will stay in strobe even if you let go of the lever; you can deactivate the strobe by giving the lever a single click.
PRIMARY MODE (ON/MODE CYCLE/OFF)
ON – Click the Forward tactical switch
MODE CYCLE – Single click the Metal lever to advance to the next mode/level
OFF – Click the Forward tactical switch
PROFILE SWITCHING FOR PRIMARY MODE
LOOSEN HEAD – unscrew the Bezel physical connection (or the tail cap)
HOLD LEVER – hold down the Metal lever
TIGHTEN HEAD – screw the Bezel physical connection (or the tail cap)
RELEASE LEVER – release the Metal lever
SECONDARY MODE (CONSTANT STROBE)
OK so this is a special application of the strobe while in the Primary Mode. When you are in the Primary Mode, and you click and hold down the lever, Strobe Mode will activate. You can let go of the lever, and the strobe will stay constant. To switch back tot the primary mode, single-click the lever and you will go back to the other constant levels like Hi/Mid/Low. The big surprise is that this constant strobe can be saved by mode memory!
MODE MEMORY
YES. Primary and Secondary mode has electronic mode memory. If you turn off the light while in say the “mid” mode, when you turn it on again, the light will come on in the “mid” mode.
LOCK-OUT MODE
Physically unscrew the bezel head or the tail cap and the light will be in a reduced power state, which also disables the primary mode. The StrobeReady mode is still active.
BUILT-IN/CRADLE RECHARGING
The light has an integrated battery charger and external cradle which is very helpful for those using a light everyday or need something just in case and at a notice. The cradle has an input 12 volts so it is setup for car use as well. The cradle uses contact pins for easy connection (no cables and flaps to have to wrestle). Also the cradle uses mechanical arms (pins and springs) to hold the light instead of just having to bend plastic and have the tension hold the light. I’m not that sure the “cooling fins” are all that necessary and am afraid of the dust they’ll collect. There are also only two holes for mounting. I did notice that once I started mounting it, the wall cable might get in the way of grabbing the flashlight out. But by far the coolest part is that the bezel cutout allows you to turn on the light and use the whole setup as an extra room light.


BATTERY
The R25 utilizes a special performance 18650 called the NL188DW which is recharged using the included charging cradle. Because this is a realitivlye high performance battery, the NL188DW take about 7 hours to charge with the included charging cradle. Nitecore says that the NL188DW can also be charged by any of their other charger, but I have not verified this info. The R25 charging system will not charge regular 18650’s but the you can still pop them in to power the R25. I’m no battery expert so my knowledge end’s here .


BATTERY INDICATOR
The R25 has integrated red LEDs in main click switch to indicate the remaining power. To check the charge, you have to unscrew the tail cap (at least a half-turn), wait 20 seconds, then re-tighten, and the indicator light will flash; 3x >50%, 2X<50%, 1x=”close to depletion”. Pretty basic as most new flashlight enthusiasts might not be familiar with a voltage readout like with Nitecore HC50 headlamp (check out my review here).
PROS
- Great throw thanks to the new CREE XP-L HI V3 LED
- Great weight balance
- Battery indicator is always a plus.
- Flexible options for niche uses like Police or Tactical applications and for general users.
- Home or in the car charging means you can put this in your truck or on your night stand.
- Charging cradle has a bezel hole cutout, and if wall mounted, allows for a great hands-free room light.
- Cradle has a mechanical holder and not just plastic that you have to bend open.
- Great battery life; even though the box says you get 1hr at 800 lumen, you still get 3 more hours (at reduced output but still bright) till the thing runs out of juice!
- Even though it can only recharge a special battery, you can still use regular 18650’s as well.
- Compatible with tons of Nitecore accessories, such as the nifty duty holster the NTH30B (see pics below).
- Fully waterproof IPX8 rating.
- Smooth knurling makes this easily pocket-able.
- All included accessories work altogether, you can put on the grip, and the belt clip, and still fit it into the supplied fabric holster.
- Holster works great, light is snug but not to tight or loose, and it’s nice to have 3 belt attachment options.
- Titanium coated belt clip very resilient and holds on tight.to the light, with just the right amount of tension on the belt.
OBSERVATIONS/WISH LIST
- There seems to be a slight audible buzz when operating the light, likely due to use PWM to control the lumen output.
- The tail cap does not have end protectors, which means the loss of tail standing, but this also means you get very quick and easy access to the switches, which may be more important if you are using this for personal security/emergency use.
- Screw holes on the cradle leave a little to be desired, but sill work. They are a bit narrow (~3/16-inch, a little deep (~1-inch), and there are only two holes (2-1/8-inch apart). I would have liked four mounting holes. If mounting on drywall, be sure to use some wall mollies our a wall stud.
- The barrel port on the cradle is on the same side as the flashlight handle and may interfere with quick grabs in the dark, depending which hand you grab with and what orientation you mount the cradle.
- The high performance battery takes about 7 hours to charge.
- Nitecore says the special battery can be charged in any of their chargers, but I have not verified this. I own the UM10 charger, but the battery does not physically fit in this smaller charger.
- The special NL188DW battery is noticeably longer than other Nitecore 18650’s.
- Battery indicator system leave a little to be desired, I wish that a single click of the metal lever would do the check for you instead of having to unscrew the cap and wait 20 seconds. Also, the indicator lights are a bit weak for checking in daylight.
The blue charging LED will always be on and blinking and since it’s a little on the bright side for a bedroom at night, I would suggest getting some LED dimmer stickers like these:
Light Dimming LED covers, Dims 50-80%


IN THE FIELD
Most of these shots are using the “Hi” 800 lumen mode.


PRICE
The whole R25 package is abou $100 USD check the amazon links below for current price:
Nitecore R25 800 Lumens Rechargeable LED Tactical Flashlight


BUT WAIT! THERE’S MORE!
OTHER ACCESSORIES
I was also excited to try out the NTH30B holster as I LOVE hands-free lights, and this holster allows you to pivot the light for a great hands-free option. The holster holds the light well, and it gives you a satisfying “click” when the light is in. There is a round button on the side that is pressed to rotate the holster. The holster is pretty easy to put on as you just open the back and click it back; you just want to be a little careful as the plastic bends a little when putting it on and taking it off . The extra battery slot is very handy, just don’t do any jumping jacks as the battery might slide out a little.
Once I got this on and tried it out, I realized, this would be great for using AR in Pokemon Go as a headlamp actually causes a shadow of your phone, whereas the holster puts the light below your phone. Overall, I really enjoyed this accessory and plan on using it much more!


PRICE
Should be able to find it for around ~$15 USD.


THANKS FOR READING!
Disclaimers:
- CivilGear Reviews received this product from Nitecore for testing purposes and to provide honest feedback
- CivilGear Reviews is a participant in the Amazon Services LLC Associates Program, an affiliate advertising program designed to provide a means for sites to earn advertising fees by advertising and linking to amazon.com