14500 I think is what Buck said, right? I’d recommend going with a solid cell, like a protected AW maybe from Lighthound? Since you’ll be showing this light off and it’ll be in a lot of hands probably, run time might not be watched very closely. While there are protections built into the Qlite, it’s also nice to know the cell itself is as safe as possible in this kind of situation. No need here for the high discharge cells. So go with a good solid reliable protected cell and feel safe about it.
Edit: Richard has some excellent EVVA 14500’s built on a Sanyo cell with a high quality protection circuit.
For chargers, I really like this XTar VP1 from Richards store…
showing the voltage in real time as soon as you plug in the cell really gives you a heads up on how long it’s going to take to charge it, and being able to select .25, .50 or 1A rates allows some flexibility for the different cells you’re likely to end up with.
I know this one is on the pricey side, but after having bought too many chargers I have realized it’s best to start with a good one.
I made a little progress today. I finally finished designing the tail cap (maybe) and put the driver and star on the pill. I am hoping to get the tail cap finished tomorrow. Since I ordered the wrong etchant the first time I have to wait until Friday for the ferric chloride to get here. I might use a little vinegar while I'm waiting to see what it looks like before then :)
Pill after polishing. I just realized what the text at the top of the pic says. Too funny.
Matt I think it's just the nature of the beast. The alternating metals cut differently and to the tool bit it is kind of like an interrupted cut. It is what it is. It isn't good or bad. Tool wear is part of the game.
Dale,
I’ve made a little mokume in small pieces. For me it is a pain, large prep time and a lot of go bad potential. This piece was made from quarters.
I’ve had the best luck with quarters but that limits the size.
Bucket, was the piece that give the most problems the very end of the bar?
I would not say that it was any one place. I don't think I have run into any scale or anything like that. It just seems like it work hardens if I take to shallow a cut. It it's more of a technique issue on my part. I just need to get a better feel for it.
Machine work is done except for a small brass retaining ring for the tail cap switch. Pics to come later after I talk to Matt. I have one thing I need to know his preference on.
I have the green light from Matt. Here are the pics.
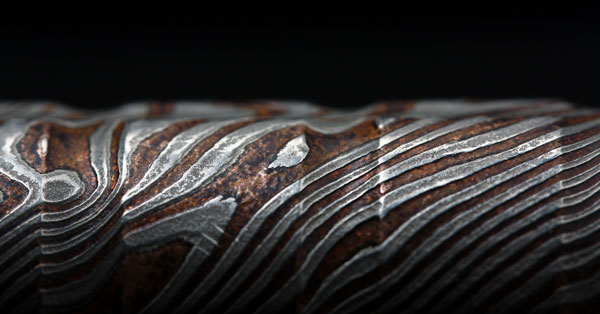
This is the tail cap OD when I took a .048" cut at 500rpm if memory serves. The heavy cut at higher RPM gives a vastly better surface finish, though you can see that the thicker layers of carbon steel look like they are just a bit recessed. I think that's because there is different tool pressure between the materials when one of the layers is thicker. I think that it will look very cool when etched. I did polish it after machining. The texture of those lines will still be there but probably less pronounced.
The other side.
Recess for McClicky. I threaded the bottom at 20TPI for the tail switch and the upper portion at 40TPI for the body.
Side by side with a C8
Ignore the scratches. Tomorrow I will do final polishing before cleaning and etching.


 Friday tomorrow? What month?