I wonder if that’s actually a good thing.
I read that manufacturers rough up surfaces to get a wider range of incidence angles and therefore improve extraction efficiency.
Maybe it would be best to polish only up to fairly-rough grit?
extraction efficiency is for the blue diode, to get the photons out of the semiconductor
Most LEDs have a perfectly shiney surface like XML2, XHP and XPL are textured to reduce the tint shift, but photon extraction has nothing to do with dome texture
On my C8F build with XP-L2s:
I shaved them, then sanded using 1500 grit, then when about 1.5mm away from the phosphorus layer (checked under my microscope), I THEN mounted these three shaved XP-L2s onto my Sofirn C8F build’s provided MCPCB. With the three LED on the MCPCB, I finally used Tarnex (silver polish) on my larger knife sharpening stone (fine diamond dusted metal sharpening stone). It took about six passes to “polish” the leds down to about 1/2mm from the phosphorous.
As I got closer to a fully sanded surface, the sanding slowed down and I had to keep rinsing the stone as the buildup from the leds would get between the led’s and stone. Took about 30 minutes total time: and the longer I went at it, the slower my rotations went. AND… the last pass, the Tarnex was on very liberally and the passes were very slow.
For me, the trick was to not go any faster than the leds (on the star, in the hand) would let me. If they started “jumping” up or “jittering” (or squeaking even)… time for a full stone rinse and NEW Tarnex. I found the MOST downward pressure was needed at the LAST pass. But when done, they led faces were like mirrors- very happy results!!!
I have an SST-40 I am pulling and shaving and will do this same process. Perhaps another agent (besides Tarnex) would work, but I found it to be very good for my LED shaving process. FWIW…
Aaah! The fine grit led dome polishing thread! I have 2000 and 5000 grit sandpaper sheets on the slow boat from china now, ordered just a couple days ago. Plenty of time to decide which leds to try them over, we'll see. Maybe some high-CRI LH351B and LH351D. 
Cheers :-)
Next time… (especially for a single emitter), I’ll flow the leds onto the MCPCB FIRST- then shave and proceed. It’s a lot easier to get the razor cut to match the face angle of the MCPCB— AFTER flowing the led. I had to work the C8F MCBCB harder than I would have liked, because ONE of the THREE XP-L2s was at such an angle as to require my taking them ALL down right to the phosphorous layer (I finally got a perfect, clear face on all three— with zero room to grind down further). But I got lucky… and did get three very clear faces— and I’m happy.
When I shave my older XPLs… I’ll have to be extra careful to not grind into the tiny lead wires which those LEDs (and my SST-40) use— as they stand up taller than the phosphor layer (encased into the clear dome, which I will look through on my microscope BEFORE shaving).
As the old carpenter’s saying goes: “Measure twice, cut once.” ![]()
Thanks for sharing your methods!
You bet!
AND… a month later I have burned up two leds: one XP-L2 (on my Sofirn C8F host build) and tonight (to my dismay), my shaved SST-40 (mounted on my Sofirn C8 host running Lexel’s Bistro TA 21mm driver and a Samsung25R). I did get very close to the phosphorus layers on both these failed emitters when shaving them. I need to pull the SST-40 and see where it burned (tonight I just saw a black spot after noticing what I thought at first was condensation- but turned out to be smoke!).
Anyway, the other XP-L2 (I replaced the burned one with) is working fine. I shaved it to match the other surviving LEDs and left a bit more of the dome on it than the one that burned had (about none). As these are “flip chips” I wasn’t worried about the “close shave” but now I will not get that close on future dome slicing.
And a final observation: The SST-40 shaved LED (when running fine on 30Qs) seemed to have about the same throw (in this host) as when un-shaved (when I first built this host up- I later pulled the SST-40 and shaved it). I didn’t love the shaved SST-40 although it was getting a good dose of current (estimated at 8 amps), it really didn’t “throw” any better than my Factory Sofirn C8T (or C8A which is VERY CLOSE in throw to it’s C8T sibling— and uses the same host, MCPCB, driver, etc.) Of the three lights, I’d take the C8A even for a gun light as it’s got a decent 200 meter throw, wider beam than the C8T (or my shaved SST-40 build), only pulls about 5 1/2 amps, and the tint is more natural.
And I now need to decide what emitter to put in my burned SST-40 host. As I obviously hit it’s limit, I now wonder if an XLP HI (or shaved XLP HD I have in a higher bin) might be a better fit if it can handle the power. Guess I’ll find out! ![]()
Hello!
I have a bunch of high-CRI XHP50 emitters worth dedoming, came here to peek at the minimum dome height figures before bond wires start going the way of the dodo.
As I see above it is said 1mm for XM-L emitters. ![]()
Hope all goes well.
![]()
this is a good way of doing it, I always thought I need chemicals and good luck. Never done it before… thanks for this.
Just a reminder, you have to make sure that you get all the residue off of the led after sanding it down or you will have a meltdown of the led. I burned up 2 leds like this, and now I have a smoked reflector to show for it on my convoy c8+. Luckily I have an extra reflector lying around and more leds to use.
Will an ethyl alcohol bath suffice?
![]()
That didn’t work for me. I did that for both the leds, the second one I did for longer and it still burned. This time around I’m going to use an air can to blow everything off and put a little bit more elbow grease using a qtip and alcohol.
What do you mean when you say the led burns?
Insight tells me this has to do with minuscule dome debris pieces being somehow pre-melted due to the very own abrasive sanding process, and this very stuff sticking somewhere and causing trouble due to alcohol not being able to really dissolve dome material.
Tip: use a bit of gasoline or white spirit for the next-to-last coating, then finish with alcohol.
![]()
I didn’t have problems with the sst-40, but the 351d’s were problematic after sanding it down. Even after I thought I thoroughly cleaned it some residue burned on the led when I turned it on and there were burn spots on the led. I’ll try your suggestion when I get my new order of 351d in.
Update.-
Ended up dedoming a couple XHP50As via razor blade plus fine grit sandpaper method. First one worked at first, but upon heating up installed in a modified SK98 half the emitter was turning off. I believed this was caused by going too low with the dome removal, thus for the next emitter I made sure to not go below 1.1mm. For this second one I sanded down the thing much more, until I noticed the actual emitter killer: the sanding movement messes up fatally with the bond wires à la domequake. ![]()
For a final round I'm gonna go slow (fridge temp) chemical dedome with white spirit, a method which works wonderfully with XM-L2s, leaving dome remnants protecting the bond wires. If this does not work I'll throw in the towel.
Cheers :-)
I will tell you guys that you should not be afraid for your bond wires after nice clean chemical de doming.
So for your peace of mind I’ve done hundreds of dd lights for hunters (mounted and used on high recoil centerfire rifles), and I did not had a single emitter fail (I had electronics fail or switch fails but not emitter).
I had some bad experiences also… Sometimes I was impatient leaving some micro residue on emitter and then after turning on the flashlight I could just watch how emitter goes from nice white to angry blue ![]()
That happened to me several times. If some micro spec of dirt or similar fells on de domed emitter it will kill it for sure.
So if you have any speck of dirt on emitter just rinse emitter with isopropyl alcohol and blow with compressed air.
Oh! Well, I immersed the semi-failed razor blade dedomed XHP50A in white spirit. After a day in the spirit the emitter wasn't even turning on. XHP50As and XHP70As are dedoming bitches. I may still try carefully with a sanding bit equipped Dremel style tool. ![]()
^:)
I have sanded my dedomed LEDs as well, after I saw this thread. I have used lapping sheets also.
Maybe, this is the best picture from the below thread:
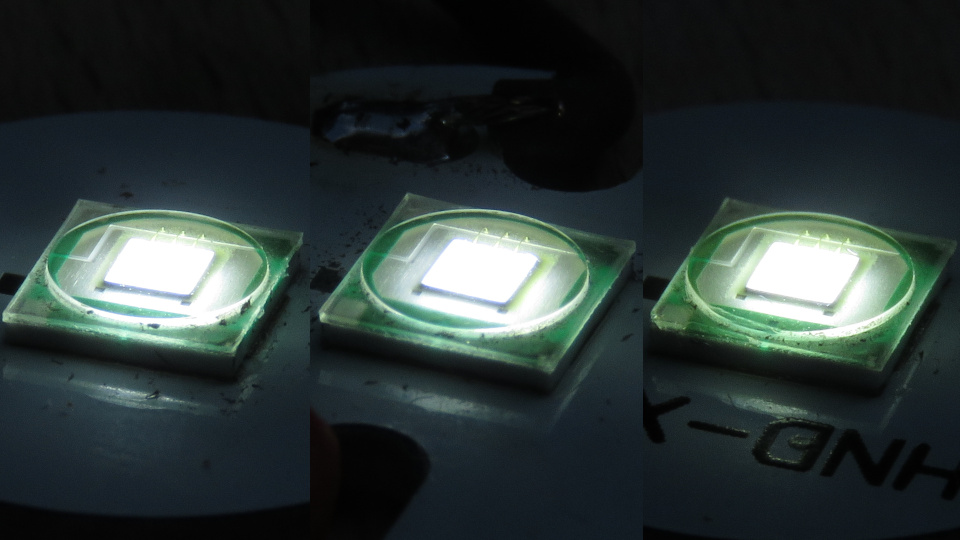
My dedomed LEDs are in that thread (picture heavy): Cheap chinese lamp dedoming pictures.
The LED came out nice, great job.