Switch ?
How about a trigger !
As we say in the south, “That’s plum perty!” :+1:
If you do go for a handle it going to need to be just as well-designed- perhaps you could locate the switch in it?
Phil
NICE!!! The setup in the first two images is sure creative thinking as well. Super nice work Steve!!!
Trigger. That would be different. Can you please send me a diagram of your thoughts Suncoaster. ![]()
If I put a handle on it It would probably have to clamp on as there is not a lot of spare material in the battery tubes.
There is plenty of room in the driver cavity for a switch as I built it large enough for a driver swap in the future if it was ever needed.
Thanks Dan. The V Blocks have come in reel handy. They are one of those items you wonder how you got along without them.
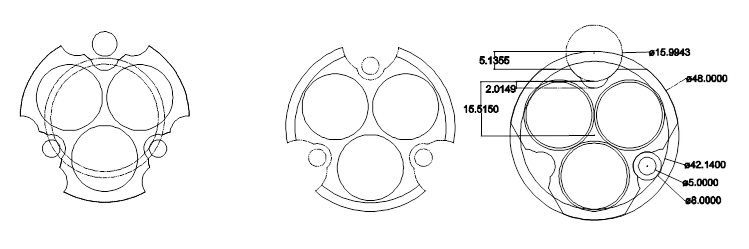
The shape of the long battery tube is pretty much what I drew up in the diagram in the op when I was playing around. Here it is here.
The handle could attach to the head, and a ‘trigger’ co-opted from a power tool might work- plenty of those out there to choose from and some can carry quite a few amps ![]()
Phil
For me it would depend on balance, if the light balances well in the hand then I’d put the switch on the back of the head but if it’s head heavy then I’d add a handle and mount the switch either on top as a thumb switch or underneath trigger style.
When the second battery tube is machined I’ll start on the head to get a better idea how well its balanced. I cant see it being head heavy with six batteries in the tube, copper earth thingy and brass tailcap. Its going to look a little odd as the head will be as long as the battery tube. I think I’ll stick the switch in the driver pocket area for the time being but then who knows. ![]()
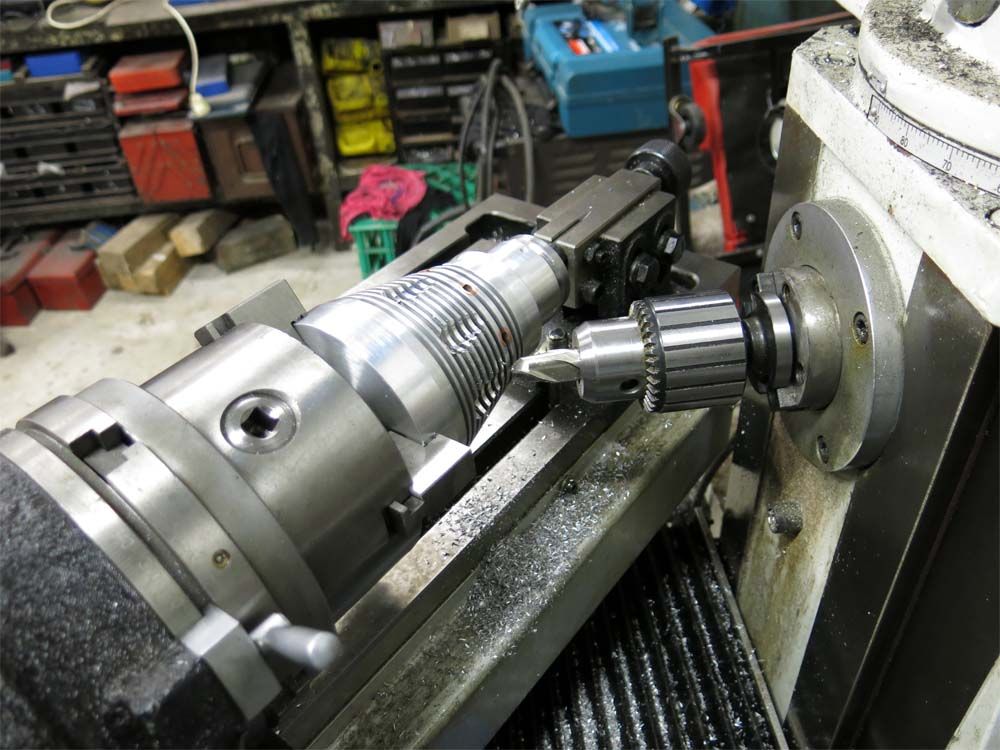
Work restarted on the head with the switch first up. A sketch was drawn up to make sure it would all fit.

Happy that it would all work the head was clamped onto the bed and machining of the switch area commence!

The area for the switch machined up ok and six holes were drilled to tap to 2mm. Unfortunately my abilities to snap of 2mm taps continues so this is still a work in progress to work out what to do. Only one head has had the switch pocket machined at this point in time.

A step was machined to allow access to the area allowing drills and taps to reach the bottom of the switch pocket.

The heads were profiled which may change yet depending on how they look with the battery tube attached.

The cooling fins were then machined. The thin fins are 2mm in width with a 3mm air gap in between. The depth of the fins follows the profile of the inside of the reflector housing with about 5mm wall thickness.

Small taps seem to be made more brittle intentionally just to frustrate us ![]() Not being “smart enough” to have the proper stuff, I began my career in metal tapping by using whatever I had, selected by eye. In that process I learned that a slightly oversize drill can still leave you plenty of thread to hold save for high stress or high fastener torque applications and it makes tapping much easier
Not being “smart enough” to have the proper stuff, I began my career in metal tapping by using whatever I had, selected by eye. In that process I learned that a slightly oversize drill can still leave you plenty of thread to hold save for high stress or high fastener torque applications and it makes tapping much easier ![]()
So looking at a drill chart I see M2**.4 calls for a 1.6mm (0.063”) drill. The next size up is a #52 which is 1.6129mm (0.635”). Just a tiny bit bigger so it should work. M2**.25 calls for a 1.75mm (0.0689”) drill and the next size up is a #50 which is 1.778mm (0.07”) which should also work. Of course you’d test it on some scrap first which I’d have done before posting but that stuff is in storage elsewhere so I can’t.
Yes it’s unconventional but in my world either something works fine or it doesn’t, and if it works fine there can’t be much wrong with it :sunglasses:
Phil
great work. progressing nicely .except for breaking taps.
I wouldn’t even try to use a 2mm tap.
keep up the great workmanship .
Super nice work!!!
The holes were slightly over size to start with. I think I put a slight bend in it which snapped it off. Tapping on the edge of a step probably didn’t help things either. My fault.
How do you fix that? My method involves a hammer and a high proof lubricant.
Good question. I’d hoped you would be able to tell me the answer. I will have to enact plan B to fix it. I have an idea but not measured anything up yet.
What;s next is kind of like the old joke about proper bolt torque: “Tighten it till it breaks, then next time a half turn less” :person_facepalming:
Locate, drill, tap, then mill the shelf. Also you might chuck the tap in a drill press turning the chuck by hand with the spindle feed free to follow down as the tap pulls in. Holds the tap as straight as anything can, just don’t try it under power or it will break every time. I imagine you know all this but I figured it might help someone else some day ![]() As tough as my old calloused fingers are I doubt I could feel a 2mm tap binding so I’d break plenty
As tough as my old calloused fingers are I doubt I could feel a 2mm tap binding so I’d break plenty ![]()
Phil
Update 19.2.16.
After snapping the 2mm tap off a new plan B was called for. New holes were drilled in a 4 bolt pattern instead of the original six and the drill used for the tapping size was 1.7mm instead of the correct 1.6mm. A pin chuck was used to hold the tap instead of the heavy tap holder. The tap went through like a hot knife through butter. Here is the second head drilled and tapped.
Note in the following pictures nothing is cleaned up so you are seeing the items warts and all

The rubber switch boot holder was machined up and the four holes drilled for the 2mm cap screws.

The heads of the 2mm cap screws were machined from 3.66mm diameter to 3.1mm diameter.

And here is the switch boot holder screwed into the head.

And with it machined to the profile off the head.

The switch boot retainer removed from the head.

To machine tear drops in the head the horizontal spindle was used.

The shape of the tear drops was determined by the amount I could swivel the bed. Another 3 or 4 degrees would of been nice but it just would not stretch that far around

One down one to go.

Lookin great! :+1:
Great work
You’re a freak! That’s so cool.
excellent great to see you back at it awesome job.
Steve does cool work :+1: for a freak.