Yeah i still kind of want one if we ever get a group buy/coupon/flash sale. Even a simple pack minus battery and charger for less money would work.
Especially when you can buy something as good for $3… nobody minds paying more for a superior product but this just isn’t.
I do not agree, the i3 has a many features that make it stand out against any of the sub-$10 zoomies around:
-it is really small, the smallest and shortest zoomie I know
-the lens is glass and of decent quality. I carry the i3 in my pocket with penknife and keys: no scratches
-apart from the good old (but bulky) sk68, all small zoomies I’ve seen have a too narrow flood, in contrast the i3 is optically well designed: nice wide flood and a spot just over the sharp focus of the die, which gives the nicest spot beam.
-the switch looks very reliable and is servicable. I had several sk68’s fail from a faulty switch, and it is press-fit and very difficult to replace.
-the UI is a few levels better than the standard high, almost high, strobe with awful PWM that the cheapies come with
-from a modders perspective: brass solderable pill, 15 and 16mm driver ready, switch board replacable with standard switchboard with small Omten.
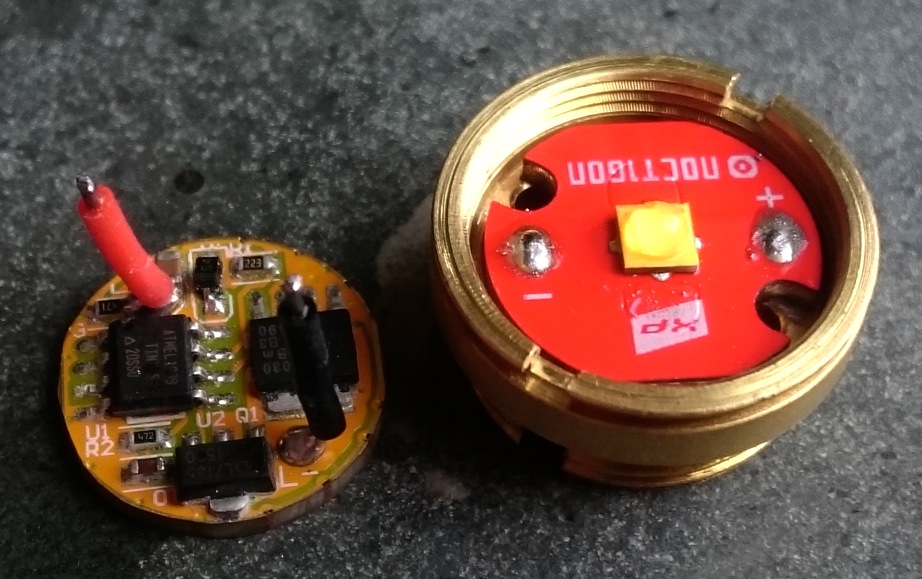
My i3 is modded with a standard Omten switch board, BLF-A6-driver and a 90CRI XP-G3 on a Noctigon, it makes a very smooth 700 lumen flood and throws 15kcd in spot. It was a fairly easy straightforward modding job in the i3, while in any cheap zoomie it would have been a h#ll of a fight with only so-so result.
+1 with djozz on all points, plus the SS bezel is gorgeous, 4 modes w/memory, zoom slide which you don't even notice it's there. The best small zoomie on the market. Though I like the new U-F10, this i3 is a keeper for it's smaller compact size and better quality optics.
The charger may have it's faults, but I didn't buy this light for the charger.
djozz,
Part of this is obviously personally preference as I’d rather better throw than flood and hence why I but a zoomie … the biggest thing is though I needed a certain level of output and wanted an “acceptable” run time and was going to use it on the mid setting which should give 1.5 hrs but instead to achieve 200+ lms I have to use it on high which will only give 30 odd mins run time and for me anyway is pretty much useless.
If the output wasn’t miss quoted I wouldn’t have wasted my money!!!
I have one of these on order. Can’t wait for it to arrive! ![]()
At some point could you shoot a little video using this light outside at night so we can gauge the throw? Maybe when someone gets the xml2 version they can do the same so we can somewhat compare.
To be fair, every cheap bundled charger I have tested charges to 4.3V. These include Thrunite’s U1 ( http://www.thrunite.com/bundle-u1-charger-1-18650-rechargeble-battery/ ) as well as Thorfire’s bundled charger ( 404 ).
Hm, I’ve never bought anything with a bundled charger intentionally, this is the only one I’ve ever gotten.
Definitely not worth whatever it added to the price.
Good potential host.
Hope they realize that and offer us hosts, they’d be exceedingly popular if priced right.
Here’s the warm i3 flood compared to a SK68 clone with a LatticeBright


Interestingly, the combination of the two is a lovely vanilla white.
No question it’s going to be modded along the lines described by others above.
Received my i3 yesterday.
My initial impression: I’m very impressed. This is one of the best stock zoomies I’ve ever seen. The light looks and feels fantastic. Build quality appears excellent… far better than any typical cheap zoomie.
It’s also very small… one of the smallest CR123 sized zoomies. It’s just slightly bigger in volume than a Nebo Redline CR123 zoomie, and MUCH better built than the Nebo.
Beam pattern is excellent for a zoomie. Very little in the way of rings or artifacts common to many zoomies.
I received a neutral XML2 version. Tint is very nice and output is decent. I’m not a huge fan of the UI though: It has 4 modes ramping from low to high, with mode memory. It also has a double-click shortcut to strobe. Personally, I think the UI would be MUCH better if it had no memory and always started in low, and the double-click shortcut went to turbo instead of strobe.
I expect I’ll swap the emitter in this i3 for an XPL HI and the driver for something with a FET in it. This one is worth upgrading.
If a US member does not like their I3 and wants to swap it out for a M6 5C, PM me. I think I would rather have one of these…
I’d be really interested to hear how you get on with this … especially the XPL Hi … it may be something that resolves my disappointment
I took this light apart last night and modded it. Unfortunately, I was in a rush and forgot to take pictures 
Disassembly and analysis of construction:
- The bezel is not glued on. It was moderately stiff to get out due to a rubber gasket below it, but it came right out with the aid of some grip tape.
- The lens is held in place with 2 rubber gaskets: 1 above and 1 below. This is good, since extra rubber means much more protection for the lens. No need to worry about crushing the edge of the lens with it surrounded by rubber. This might also help to increase drop resistance.
- The lens was stuck to the rubber gasket below it. Once the bezel was removed, I pulled the lens out with the aid of a dental pick type tool. It did not fall out on its own like some cheaper zoomies.
- Both of the lens gaskets are split gaskets and do not make a complete circle. Each has a 1-2mm gap in them. These gaps are intentional: They are there so air pressure can equalize when the light is cycled from zoom to spot. If the light were airtight, air pressure would cause the bezel to automatically return to whatever position it was in when the battery was put in. This is why most zoomable flashlights are not waterproof.
- The top of the pill has a metal cover on it. This cover screws into the pill and holds the star tightly to the shelf. Two tiny holes on its sides allow for unscrewing with tweezers. I really like this setup.... easy to remove, looks good, and no need to screw or glue the star down.
- Below this cover is a standard plastic XML sized isolator and then a 16mm aluminum star. Mine came with an XML2 with 5C tint with no hint of green. I was quite impressed with the tint of the stock LED.
- With the cover removed, the notches in the top of the brass pill are revealed. I used a needled-nosed pliers in those notches to unscrew and remove the pill. The pill was very tightly screwed down, but once it got started it unscrewed easily. It is not glued.
- The stock driver is 14-15mm. A 15mm driver from Mtn Electronics fits easily with minimal filing. The driver itself came presoldered to a tiny press-fit retaining ring. Solder that to the driver, then press the driver and ring into the socket in the back of the pill. If you need to remove it, there is a deep notch in the side of the pill to insert a pick or screwdriver below the ring to lever the driver out. I didn't test it, but it might be possible to fit a larger driver if you omit the ring and solder the driver directly to the brass pill. A filed down 17mm driver might fit.
- Not much in the tailcap: clicky switch on pcb with spring, metal washer, rubber switch boot, and retaining ring cover. In this light the retaining ring is on the outside of the light around the boot, rather than on the inside. The tailcap threads are square-cut.
- The bezel slides smoothly but is a little stiff. This is due to the unusual o-ring placement. This light has 2 bezel o-rings (which both appeared to have little or no lube).
- One is on the side of the pill. This is a fairly standard position. You can lube it up without risk of the lube getting onto the exposed neck in spot mode.
- The other one is unusual. It is in a narrow slot around the bottom edge of the bezel. Adding lube to this o-ring could backfire since the o-ring brushes the portion of the of the light that is exposed when the bezel is in spot mode. Too much lube and you'll have exposed grease getting on your hand every time you cycle the light to spot. I'm not sure how long this o-ring will last without lube though. But even if it breaks it's probably no big loss. It's not needed for water resistance... it's only purpose is to make the bezel action smoother.
Minor defect:
I noticed that the light would periodically change modes when I cycled the light to spot mode quickly. The problem was the tailcap wasn't making a good enough connection with the body tube. Air pressure changes when cycling the zoom were enough to cause it to briefly lose contact. I fixed this problem by inserting a small strip of aluminum bent into a flat ring at the top of the contact on the back of the battery tube. This completely solved the problem, but prevents the tailcap from screwing all the way down. The battery tube is slightly shorter than I'd like it to be. To fix this in future runs, I suggest On the Road makes the entire battery tube 2mm longer.
Modding the light:
- I replaced the stock emitter and star with an XPL HI 5A2 tint on Noctigon. No need to do any filing, the 16mm star fit and centered perfectly. I used the stock metal star cover and plastic isolator.
- I replaced the driver with a 15mm guppydrv FET driver from Mtn Electronics. I had a little trouble socketing the driver into the tiny ring, but eventually got it good enough. With the driver in the ring it was a simple matter to press fit the package into the back of the light.
- I considered, but have not yet attempted a tailspring bypass. the tailspring is pretty compressed so there isn't much room. Still I expect I'll get to this eventually.
- The Noctigon star is thicker than the stock aluminum star. However, in the stock light, the LED in spot mode is just past maximum focus. That gave the spot beam a nice rounded-corner square shape, but blended out the dots on the top of the star. With the thicker Noctigon the focus perfectly aligned with the top of the LED die, revealing the dot pattern. This is good enough and I did not attempt to further adjust the focus.
Unmodded this is one of the best small pocket zoomies around. It looks and feels well-built. It's incredibly small. Output is excellent.... much superior to the Sipik 68 (at least for flood mode). Stock UI isn't to my taste though. Modded, this light is a powerhouse. Fantastic throw for its size with a nice bright flood light.
I highly recommend this light.
Indeed without the brass press-fit ring it fits 16mm, a slightly filed down BLF-A6 fitted without issues:
(picture from post in what did you mod today)
Nice!
I might try fitting a DrJones H17F inside, but I have doubts the battery tube is long enough for the longer driver.
Looks like i’m going to have to buy one of these too… ![]()
I wonder if we can convince On the Road to make an 18650 version of this light.
Another thought — is anyone from the company reading here?
Putting two adjacent holes in one side of the tailcap would solve a problem.
With two holes 180 degrees apart, any lanyard string or split ring going through the hole also keeps the light from tailstanding.
Which it really should be able to do.
With two holes close together, a lanyard string or split ring doesn’t wrap over the base and so the light isn’t made tippy.
Does anyone know if the M3 pocket clip fits this light correctly? It really needs a clip and if it does not fit, I will not order one.
There isn’t a good position on the body that can hold a clip I’m afraid.