Actually they still make them. They even have them at FastTech. They must be original because I see they still stock them in the official Trustfire store.
Thanks Of. Thats good to know.
Nice work Ouch!! That should make a good one!
TL
Nice mod Ouchy :+1: Must be pushing close to 5000lm ?
Nah. Not with XP-G3s. I have no idea though. That’s djozz’s domain.
It’ll surprise ya Ouchy, those G3’s do a surprising job. I’m betting it’s up around 3700-4000 at 16A, really decent light and a nice upgrade for the ol girl. Good job! ![]()
I just purchase that light on Amazon with a similar mod in mind.
https://www.amazon.com/gp/product/B00G22V9H8/ref=oh_aui_detailpage_o06_s00?ie=UTF8&psc=1
Any chance of getting some beam shots?
Looks like 2 versions at Fasttech, try ’oogle
fasttech trustfire A8
mentions the BLF special edition in one of the results
[quote=CalebAny chance of getting some beam shots?[/quote]
The best I could do off my balcony with an iPad camera. It’s raining outside.
Control

High

Sorry. It doesn’t tell you much, but it really lights the place up.
I’ll try to do a comparison against my other stock BLF Edition A8 with the outdated emitter a driver. I might then mod the other one, keeping it as a single emitter light with stock reflector and upgraded LED and FET driver.
Thanks, Ouchyfoot.
How does the body handle the heat?
Just fine. I’ve got a pretty big mass of copper in there. I can run it for quite a while on high. In fact, I haven’t even had time to see how long it can go until I need to level down.
Good to see you’re using a hacksaw for that copper.
Making the chunky A8 even chunkier with lots of copper! Great job Ouchy!
I do not have a Trusfire A8 but do have a spare Ultrafire clone of it that has a threaded-in pill, have to use that for a project sometime with that Kathod optic!
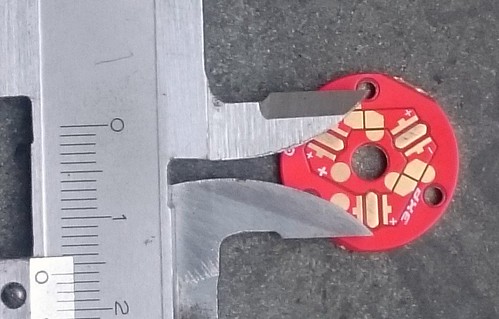
The heat is handled fine, the heat production is spread out over 3 positions, just 1 amp per led, and the leds are relatively close to the side so the 1.5mm of copper from the Noctigon is way sufficient even for much higher currents, potential heat path bottlenecks are not here. I showed with caliphers where the hole of the pill ends and the board is soldered on the top of the pill-wall. The thermal pad ends really close to where the pill-wall is.
Last time I looked at it, Nichia simply has red, green, blue in 219B format. Now there are more colours in 219B package: cyan, PC-amber, royal blue:
http://www.nichia.co.jp/en/product/led_search.html
Had an old ummodded Sipik 58 laying around. Actually not even sure if it’s a real Sipik 58… might be a clone.
The Sipik 58 is a great light. It’s basically a Sipik 68, but is fully knurled, is smaller and has a more tubular shape better for pocket EDC. Been awhile since I modded one as they are not as small as the newer #3 lights.
I performed the following mods on this Sipik 58 last night
- Driver upgrade - Replaced driver with 15mm FET driver with guppydrv firmware from Mountain Electronics.
- Heatsink added - Added copper heatsink to hollow pill
- Copper star added - Replaced stock 16mm aluminum star with copper Noctigon
- Optic upgrade - Replaced stock 18mm aspheric lens with an LED Lenser style optic. I took the optic from a $9 cheapie 2xAA light I found at OSH. The OSH cheapie has the advantage that it’s far cheaper than salvaging an optic from an LED Lenser. Also, the optic is truly an LED Lenser type optic with both zones of the lens having the same focal point (unlike COAST lights which have different focal lengths for each zone). In order to make the new optic fit I had to dremel the inside of the stock bezel. Then I painted the inside of the bezel with black paint and mounted the optic with grey stuff epoxy. Bezel was still a little short so I added a new aluminum ring at the top of the bezel to cover the edges.
- Emitter upgrade - to XPL HI 3D
- Special pillar installed - LED Lenser optics require the LED to either be mounted on a raised pillar or a very small star. This is because the LED actually fits into a pocket in the center of the optic. This system lets the light emit similar lumens in both flood and spot, unlike a typical aspheric lens which can lose 50% or more lumens when cycled into spot mode. To satisfy this need I placed a pillar between the LED and the star. The pillar is constructed of 4 strips of copper and is held together with arctic alumina. I balanced the pillar on the star and then balanced the LED on the pillar and reflowed the whole sandwich together. Electricity flows through the pillar so there is no need for any extra wires near the LED.
Tested it. It works! Still not my throwiest 1x14500 light, but much improved from stock.
Still to do and additional mods I’m considering:
- Tweaking. Pillar is very slightly tilted over to one side. This is quite noticeable as the image of the die doesn’t exactly overlap the center of the hotspot from the side TIR element of the optic. I need to remove the pillar and file the bottom of it flatter.
- Bezel. Front edge of bezel looks a bit rough. I have an alternate chromed bezel that might look better, but the aspheric lens in it is really stuck. Not sure I can get it out.
- Tailswitch spring bypass. Going to be tough to do as the switch is built the same as newer Sipik 68s: A single module press-fitted into the tail. Only way to get these things out is usually to press on the back of the button really hard, which often destroys the rubber boot. Also the spring itself is tiny and half sealed into the switch housing. If I want a spring bypass I’ll probably need to completely rebuild all tailcap internals.
- Bore out body tube so it can fit an Efest 16500. More amps in the same amount of space; or
- Install tailcap e-switch. This requires filing a slot on the inside of the body tube and then running a small wire along it for an e-switch in the tailcap. Then replace driver with moppydrv e-switch firmware. This is a pretty ambitious and difficult type of mod. I did a similar mod, also on a Sipik 58, several years ago and got mixed results. However, with that experience under my belt I have some ideas on how to make this system work better.
- Remove anodizing and polish the bare aluminum. Sipik 58’s type II anodizing wears quickly and very rapidly looks like crap. However, polished Sipik 58s look beautiful.
I took pictures as I was working on it. Will likely have a full build thread up within a week.
I’m looking forward to the build thread. There’s nothing more BLF than an over the top mod of a classic cheapie! ![]()
CONVOY S2 + 4
Had a bit of spare time, so I decided to see how one of those Manker quad optics would do in an S2+ host. You know, that little 22mm bipedal quad optic that first showed its face in the Manker E14 and Astrolux S41.
First off, I must tell you that I’m just laying back now trying to collect myself, as the flashlight gods seemed to be throwing every nasty trick they know at me today. It was a wearisome mental trial.
I had to start with some kind of board with a Manker footprint, so I cut a copper disc and layed out four 10mm sinkpads with Nichia 219C D320 emitters. Not so simple. I had to grind them a bit to get a tighter grouping, which leaves the plus pads dangerously close together and right at the very edge of the mcpcb. The tiniest bit of solder in the crack between the pads will result in an unrecoverable short.
Now a smart person like Dale would have just epoxied the four little sinkpads down with AA, but no, not ouchy. Ouchy decides he wants them soldered down.
I used solder paste, and soldered them with the optic in place to hold the footprint. It’s a tricky operation, but I’ve done it before without melting the optic.
I had everything lined up and applied the heat, but when the paste liquified, everything kind of floated over to one side on the surface tension.

Oh well. Nothing to be done. I’ll just play the cards dealt me and see what happens.
I used a dremel to grind off all the overhanging parts of the sinkpads, which also meant grinding right through parts of the negative pads. More shorts to ground just waiting to happen.

The next part took all my concentration. It doesn’t appear so hard viewing this enlarged on a computer screen, but in real life the area is tiny as are the teeny tiny lengths of 24AWG I had to use. One misstep and solder will seep over the side for a short, or I’ll burn an emitter with an errant hot tip.

Phew! That took all my concentration, but my DMM tells me all is well and no short to ground. Positive connected!
The negative pads aren’t grouped so close together, but those pads are ground right to the edge of the dielectric layer. Keep that hand steady ouchy!

…and…rats!!! I’ve got a short to ground.
Using a loupe I couldn’t find the short, so I went around the edges of the pads with an emery board.
Still shorted.
This time I used a dremel with 220 grit sanding drum. That seems to have fixed the short.
Built myself a MTN FET + 7135 with bistro. This is the first time I’ve built a +7135 board, so I had to learn the layout. It’s seems to have gone well.


Okay. Let’s dance this mess around.
The drivers in place along with the 22mm Manker quad, sanded down to fit into the S2, all mounted on one of hoop’s beautiful copper pills.

Everything screwed into the head without a hitch. I turned it on and got light. Yea! Went to change modes…nothing. I only have one low mode. Not moonlight, just low. I tried and tried to set up the UI, but nothing happens. Can’t get it into any kind of programming mode, just that same low.
I don’t know what went wrong, but I’m too tired and too dumb to figure it out, so I just took everything apart, removed the driver and replaced it with a regular MTN FET driver with guppydrive rev 1.
Hallelujah! It’s working. I got modes!
19A with an LG 18650 HE2

With all the freaking out over in the Astrolux S41 thread about the dangerous Manker MCPCB, I should post a picture of my board and have them freaking out for another week.
Just too cool Ouch!!! Just too cool!!!
TL
Thanks TL.
That mod wore me out.
You said it half way through. Phew. Hopefully you can sort this little beast out without to many more headaches. You have to love Hoops machining.