I have a set (1 set) of those, sadly the ends are too fat for the majority of my lights, they fit some of them but mainly not. They are good though if they work.
Good to know thanks!! Admittedly I have only used it on larger 26650 hosts.
OP take note of this.
I have seen people take cheap needle nose pliers and grind the tips to a point with a dremel. Never tried it myself though.
Henk4U2 Thanks for the nail suggestions. I have some nails. But I tried screw drivers which interlocked nicely. I could not get it to budge.
I have known I wanted a tool like this before so I am thinking that if I purchased the cool lens repair spanner recommended by G0OSE I am not sure I would use it again. I am in Japan so I would get it from China.
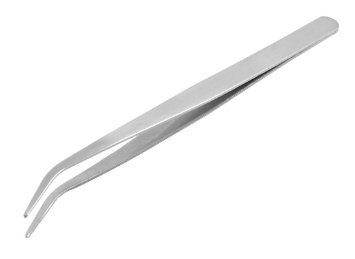
I tried tweezers, which bent, and crossed screwdrivers, with which I could not open it.
kramer5150 I have purchased some 100 yen shop pliers. They are not needle nose so I will have more to dremel but I will try them next.
I could also drill two screws, or hammer two nails through a piece of wood.
I use a pair of old micro shears . The fact they have a cutting-edge means they bite into the metal and don’t slip . The handles are padded and you end up at a bit of an angle which helps too . Downside is they only open so far . Upside is it’s bigger than you’d expect .
Thank you. Micro shears (which I interpreted as wire cutters) almost worked but I needed two hands on the shears/wire cutters, I don't have a vice, and my wife could not keep the torch from turning.
as said, circlip (snap ring) pliers are the tool for the job. but which kind and size?
for axial clearance reasons, you want the straight (not angled) ones. then for proper radial clearance, you want pliers for external circlips (form A), but pliers for internal circlips (form J) usually work.
for size, i usually use size 1 (~1.3mm tip diameter which is a perfect fit for convoy S2+), but size 0 is also a good choice.
putting that all together, i recommend circlip pliers A0 and A1, but J0 and J1 are also fine unless radial clearance is very tight.
narrowing it down to a single pliers, i'd get size A0. should hopefully work on anything you come across.
pictured below: sizes J1 and A1

The screws through wood idea, allowed me to apply quite a bit of torque, but did not work either. The screws bent and pinged out of the holes.
I have a vice elsewhere and will try again when I have access to it but, I am beginning to despair.
I think that the three LED version and the 12 LED version are not all that different in output so I think I may just purchase another light.
couldn't hurt to try some oil on the threads if it's in there really tight.
Now those are quality ones :+1: I’d love a set of those, but they are like £30 or maybe more for 1 pair here.
Thanks SYZYGY. I will try some oil. And those pliers do look high quality. By having only the last bit narrow they look really strong.
I will also try replacing the screws with thick, unbend able, pointy concrete nails, or get around to taking a dremel, or angle grinder (are they the same thing?No. I will be using an angle grinder) to my cheap pliers, in emulation of SYZYGY's pliers.
I also wonder if I could solder the 12 LED board that I have, to the cheap 20USD 3 LED light.
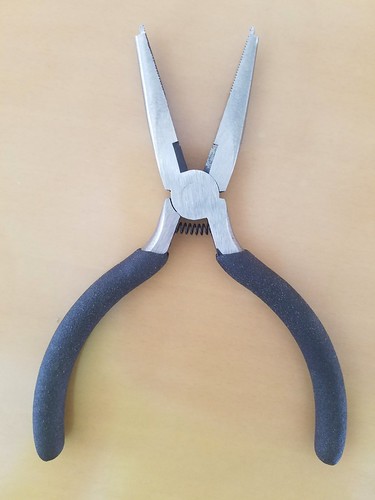
These are my homemade snap-ring pliers based on those of SYZGY. It was a 5 minute job with my angle grinder, wearing safety glasses and just reducing the surface area of the top of my 100 yen shop pliers, by grinding down the non face three sides and then making it a bit more circular. It really fits the holes in the driver retaining ring well, and I can apply quite a lot of torque, but it still will not budge.
I have hurt my left arm carrying firewood so I am going to wait till I have a vice, in a tool room where I also have WD40 or the Japanese equivalent.
I wonder how likely it is that the retaining ring is reverse threaded, and I am doing up the retaining ring, as suggested by Henk4U2 above?
nice job! if that tool you ground down fits it well (and you can apply torque), then something is wrong..
the thread direction is worth looking at. you can visually inspect the thread to determine if it's right hand or left hand thread. if it's too hard to see, then use a toothpick or something to 'feel' the direction. carefully run the pick along the thread in one direction and see if you move upwards or downwards. it will be noticeable after a revolution or so, but go however far you need to go.
if you're trying to turn it in the correct direction, and oil doesn't help, then something is really wrong. i wonder if galling has occurred. for example, if the retaining ring is made of stainless steel, and the flashlight is made of aluminum, then will happen. good luck unscrewing it in that case.
Maybe glued ?
I tried tweezers but they bent. I only tried them in the conventional direction.
If the retaining ring is reverse threaded then I have really done it up tightly.
There is no thread that I can see to put a toothpick into.
The ring, and the body of the torch, are made of aluminum.
I have no idea whether or why the ring might be glued.
The pliers are cool and i would recommend this method to anyone. You can really get quite a lot of torque into your twist.
Success!
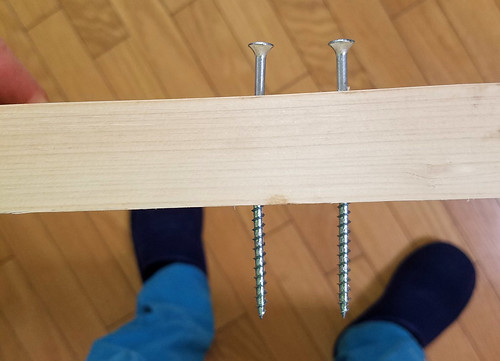
I was trying to unscrew the head of the flashlight from itself!
I put the light in my vice, gripping the thin barrel of the light and immediately succeeded in unscrewing the head of the light from the barrel. On the other side of the head, on the spring side of the driver, there is a retaining ring with two holes which I quickly and easily unscrewed using my adapted pliers.
The two holes in the photo above are not in a retaining ring but in the head itself. No wonder I could not unscrew it. I was holding onto the head and trying to unscrew the head from itself!
The driver is 26mm in diameter.
I wonder if this will do. I am thinking to get the two mode driver since I don't need it to flash.
https://www.aliexpress.com/item/1005001683924359.html?
Before I order I will connect the LEDs to a power supply to make sure it is the driver, and not the LEDs that are burnt out.
Well done! Reminds me of when I made a similar mistake with the Sofirn SP32A, which had an integrated shelf. Attacked it for ages with tweezers in pliers before I realized it was part of the head.
In Sofirn’s case, they tend to not have a retaining ring (the driver is glued in), so your light has a somewhat more convenient design.
Thanks. I am glad to know it is not only me.
I wonder if reverse polarising my LEDs will burn them out. The power supply I have to hand does not have polarity, and I don't have a meter here. I think I will just order the driver and hope for the best.
I just had mine arrive this morning fantastic tool, stainless steel too. For £9.99 it would seem a bargain to me as it has so many uses.


