I have a handful of lights that got pushed to the back of my light shelf simply because they have next mode memory
One of the latest lights is this ultrafire, it is a super cheap light, not one of my better lights, but it is something to throw in the glovebox just to have when needed, but I very much dislike the next mode memory
I’m not extremely familiar with modding lights, I’ve upgraded a few of my other lights with a driver swap, but that was nothing more than desoldering and resoldering a few wires. I’ve read a little about pencil mods and resistor mods, although I think that relates to bumping up the power of the drivers and not sure if it has anything to do with next mode memory. how can I remove the next mode memory using this like as a good test piece cause I’m only a few bucks into this light
As for the pencil mod & resistor mod, can someone explain this a little more.
Also, as for the heatsinking of this light, I’m concerned that if I do bump up the power of the driver, will the star be able to transfer the heat energy into the light body with such little heat sinking just the edges of the star touch the body. I read where someone took a ball of aluminum foil and crammed it beneath the driver to help with heat sinking, that seems like a bit of a solution but what would be better without going with a custom copper pill which isn’t justified to put that much effort into this little cheapie light, but i’m asking just to learn more about modding.
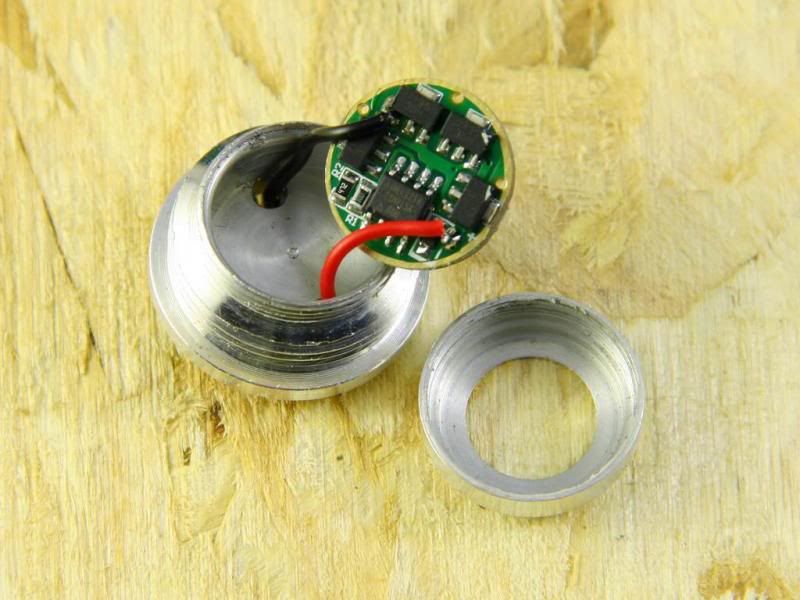
Just draw a pencil line across the top of that capacitor(square brown thing). It should discharge the capacitor and the light will lose its modes. You can play with the thickness of the line and still retain modes but lose the memory.
It looks like the 6 pin MCU is missing from the driver above…about 2 o’clock from the capacitor
The pencil trick is for the HI/LO/Strobe lights that when you click on it automatically toggles to the next mode you last shut it off…what it does is allows the capacitor to discharge faster “resetting” the MCU back to the first mode or “HI” alot faster than waiting for the capacitor to naturally self discharge (which can take a VERY long time)
Yours looks like a 1 mode
That row of resistors to the top left look like a resistor bridge…soldering a jumper across one of them could boost the power out, or move the black lead to the OUT1- connection
Someone who knows drivers better will be along shortly
I happen to have just received 3 ultra-cheap Aliexpress C8s ($4.50) with driver just like yours.
And of course they’re 5-mode with next-mode memory, that’s the way to get back at us for making them sell cheap stuff I suppose. Much like sneeze on pizza for bad tippers?
I’ve cleaned the cap, added pencil trace across 1/2 the capacitor and the memory resets back to high in under 2s. One of my favourite modes - and best of all with this type of driver, NO PWM at all either medium or low. Very nice.
It’s no performer though, at it drives only at 1.5A, good enough for XPE but I don’t recommend XML on this. I’ve burnt 2-3 of these IC-less drivers running them at 2A+ with XML (low Vf + spring braid + good battery).
i did this and it works fantastic, the light goes back to high within 1 second of being shut off but I also can still 1/2 click thru the modes. It took a few tries of using the pencil lead to find the right amount of lead needed to get it to function like this, but I got it set to work just right, I’m very pleased
I can’t wait to try this pencil mod on several other lights that I have. As I said initially, some of them are just collecting dust on the back of the shelf because of the next mode memory. As much as I dislike blinky modes, I really can’t stand having a light turn on straight into a blinky mode, that is the worst. So with this pencil mod, I can hopefully ‘fix’ some lights that are no getting used because of the annoying next mode memory.
By the way, this is a 3 mode driver, hi-low-strobe
one thing about this light that I have never seen before is the reflector is part smooth and part orange peel. It throws extremely well for a little light, the hotspot is extremely narrow, but it has good spill too. can’t say this is an impressive light, but it isn’t bad either. especially now since I learned and applied the pencil trick to get it to revert back to high within only 1 second of being shut off.
i’ve read before about someone else mentioning copper sinkpads. When you say reflow, is this a method of removing a emitter to transfer to a different star?
Also, even if the emitter was transferred over to a copper star (sinkpad) what about the thermal transfer of the star to the light body, is just the little contact of the corner of the star to the light body enough?
I wonder how your C8 driver do not have PWM. The modes of this kind of driver are not controlled by PWM signal?
I own two $6 C8s from Aurabuy and they have terrible PWM in medium and low mode. They are direct-drive on high though which can draw 4.5A+ with INR 20R battery and has MCU on their driver.
do you have a picture or might know of another thread where there are pictures of this process so I can see what you are saying. cause I don’t understand filling the back side of the star with epoxy or silicon as doing anything more than air. i read in another thread where someone stuffed aluminum foil ball to where it was touching the star and the inside of the flashlight body, to help transfer, and i’d think that would be better than using silicon as I’m just not seeing any thermal conduction in silicon
See the star, if it’s not physically attached to the pill the heat can’t transfer efficiently
Aluminum stars have a dielectric (PCB) under the emitter…think of it as a thermal insulator between emitter and the aluminum…heat does get thru but alot slower
Copper star the emitter is soldered directly to the star (the PCB has been cut away exposing raw metal underneath, copper can be soldered to…aluminum is much much harder to solder to)
By putting a thin bead of JB Weld under the star on that metal lip bonds the star to the pill allowing better heat flow…on the back side of the star there is a mm or two of empty space…by putting in a blob of JB Weld and letting it flatten to that lip it increases the surface area allowing more heat to flow…JB Weld isn’t the best heat conductive material but it’s better than having just air there, you don’t fill up the entire space…just the rim of the ledge on the back side of the star
Artic Alumina is supposedly superior thermally conductive epoxy vs JB Weld…but JB Weld is cheaper
Just remember epoxy for the most part is PERMANENT…you can break it free but usually requires alot of force or heat
This is an unfixed just laying in there hollow pill with star…there usually is a small plastic ring pressing the star to the pill…not very effective
This is a solid pill (notice it has full metal on the back where the star bonds to [this is the back side where the driver goes]) (by Relic)
Video on artic alumina epoxy (any epoxy…get 5 minute or 30 minute fast set epoxy)
This is the video by old lumens showing how to reflow an emitter to a star
You wonder why Chinese lights are not all the same? Really? :bigsmile:
In general, for this type of driver, I see no PWM whatsoever. So if there are, gotta be really high at least 8kHz or something.
I don’t know how they do it. Only three components - the 3-legs, memory capacitor, and current-limiting resistor - very simple. The only explanation I can think of is that the three legged chip is a controlling IC itself that allows up to 1.5A straight output. Using current control or very high PWM - I have no idea.
Oscilloscope can tell, but that is way out of my budget.
Filling the hole behind the star, aka filling the back side of the pill — if there is a pill. When the star is just floating by its edges on a little ledge cut out of the flashlight body, like so many cheap lights, that’s barely any path for heat to be carried away at all.
I’ve seen it done with an old copper penny filed down and hammered in, with holes drilled in it for the wires, or with the end of a copper rod the right diameter; anything that conducts heat better than air to carry heat from the star to the flashlight body will help.
> the leads of the capacitor?
Some capacitors are on little wire legs (“leads” that lead to and from the board they’re mounted on)
Surface mount stuff often (generally? always?) doesn’t have leads, it has contact areas.
That brown capacitor has silvery material on each end where solder can stick to it.
Simple parts like capacitors and fuses that mount onto a surface that way have no preferred orientation, so long as the electrical bits are stuck to the right places on the surface.
Someone will be along fairly soon who understands this to make it clearer.
It has to connect the silver edges (leads?). Try it out, it’s extremely easy to do. Afaik it can’t hurt anything. I’ve done it on 7+ lights that I can remember with 100% success and no issues with the light. Once or twice I had to make the line darker though.