Had some time this weekend, so I took apart the Noctigon K9.3 which I got from Tujone to see what was the main cause of the button /water issue.
In summary - it appears that water must have got into the dome switch of the K9.3. The switch is a standard SMT low-profile dome switch with a plastic surround, and it appeared to be potted with some sort of water-proofing compound around the edges. I was able to (mostly) fix the problem by baking the switch for half an hour in a reflow oven. It's much better now, but still a little finicky sometimes, so likely the switch had some contamination from the water + dissolved things. The driver and LEDs were fine.
With the K9.3 in hand, I thought I'd do some comparisons with existing flashlights that I currently have. Specifically, I wanted to compare it with the Fireflies E12R, as they appear to be similar and lots of people appear to have questions.
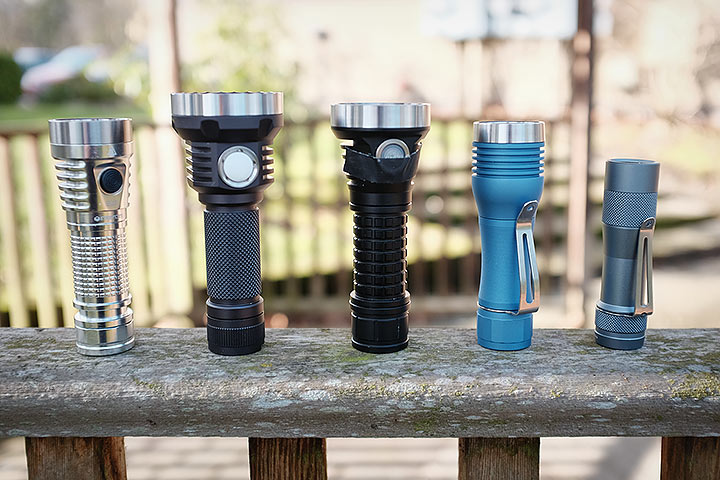
From left to right, Fireflies E07, Noctigon K9.3, Fireflies E12R (prototype), Noctigon KR-1, Lumintop FW3A. The left three are 21700 flashlights. Note - my E12R is a prototype and I put a piece of tape on the switch because I haven't pressed the switch ring in yet (and it is loose). If you didn't know, I was asked by Fireflies to design the driver for the E12R to their specifications, so I will refrain on commenting on its performance as I'm not impartial. However, I'd like to talk a bit about the machining and design, which I had no input on.
On paper, the K9.3 is only slightly bigger and heavier than the E12R, but it actually feels substantially larger in the hand, and is definitely on the heavier/bigger side for an EDC, even for a big jacket pocket. In the hand, the E12R feels really nicely balanced and the 'trombone' shape actually helps it fit in the hand well. In comparison, the K9.3 feels very front heavy (there's a LOT of metal in the head, as I will describe soon), and the center of balance is somewhere near the E-switch! However, the heft does make it feel like a premium product, though perhaps it can be a little heavy for EDC.
In terms of finish, both the Noctigon and Fireflies have similar quality of anodizing - they both feel smooth, even, and robust. However, I have to say that I generally prefer the colour of anodizing that Noctigon chooses - the dark grey looks a fair bit more premium than the black of the Fireflies. The scalloped stainless-steel bezel of the K9.3 is also very nice. Finally, I also prefer the texturing of the grip on the K9.3. I suppose this is just personal preference, though.
To summarize:
- K9.3 feels a fair bit bigger and heavier than the E12R
- I prefer the machining, anodizing, and finish of the K9.3
- I prefer the balance and shape of the E12R; K9.3 is very front heavy, ergonomics are not ideal
- I much prefer the switch of the E12R / the white rubber dome of the K9.3 looks a little cheap compared to the rest of the flashlight
For a flashlight of this formfactor, I'd like the shape and size of the E12R combined with the machining finish and anodization of the K9.3.
It's time to disassemble. The K9.3 I received from Thujone was misbehaving and the switch was extremely sensitive and inconsistent.
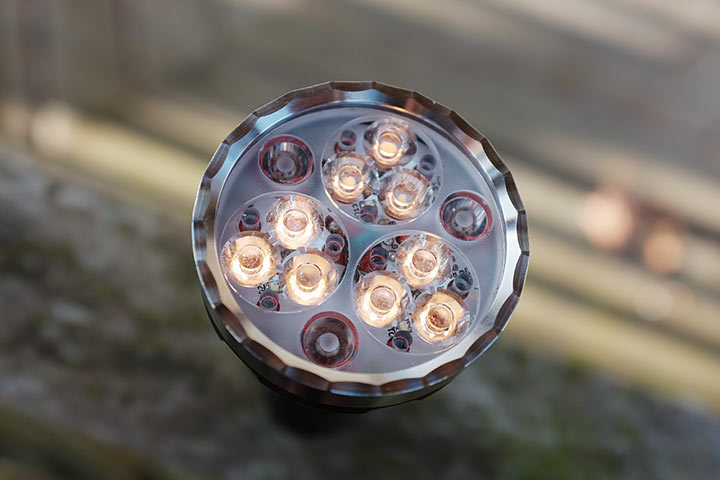
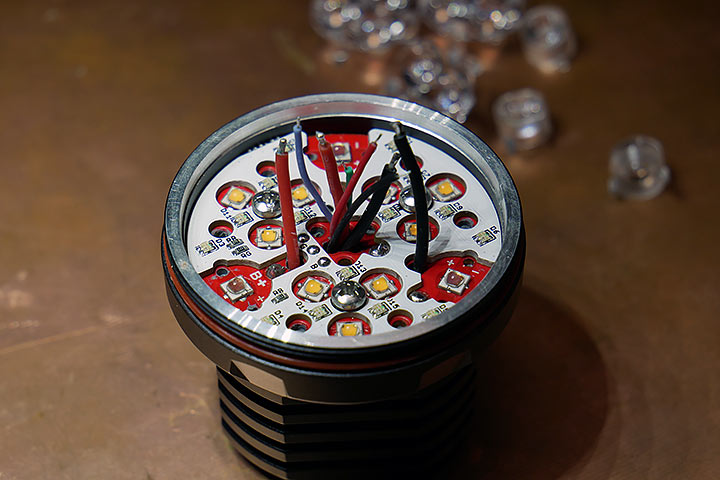
First was to remove the optics. This comes apart very easily. You can see that the K9.3 actually uses three triple optics plus three single optics. They are positioned and held in place with a nice frosted plastic spacer. This is topped by a large 49.5mm diameter 2.5mm thick AR-coated glass lens, held in placed by the scalloped stainless-steel bezel ring, and two red O-rings. It's nice to see a quality-looking glass, but it definitely contributes significantly to the front-heaviness of the flashlight. I'd like to see perhaps a thinner 1mm ion-treated lens instead, like gorilla glass (what Zebralight uses for the SC700d).
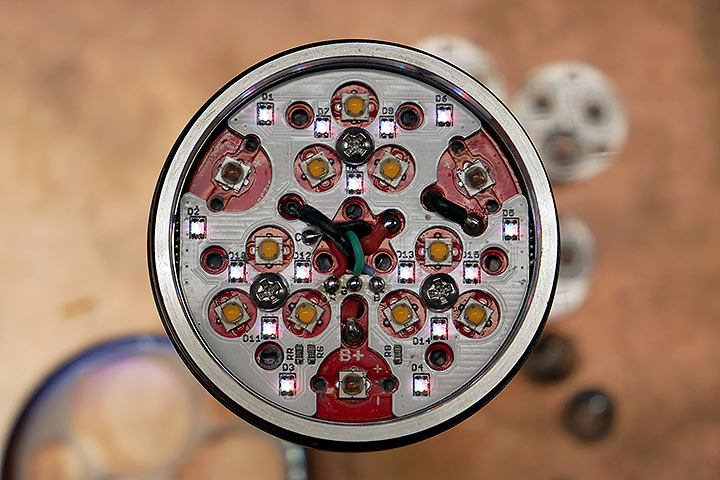
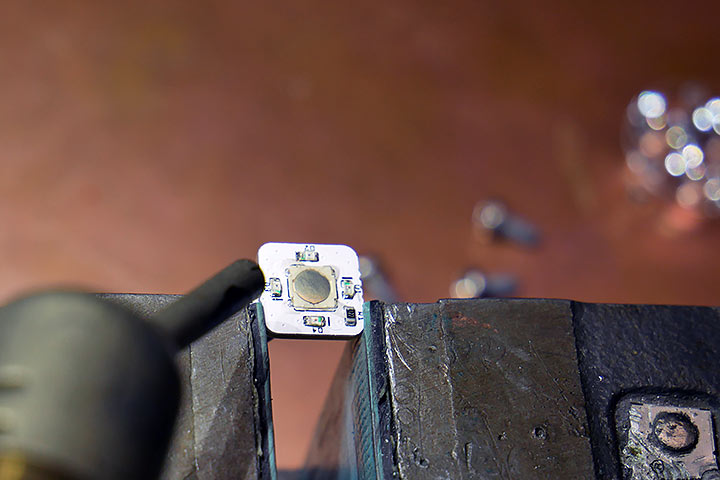
Out comes the optics and you can see the white aux-led PCB with 15 RGB LEDs, along with (in this case) nine 2700K SST20 emitters and nine red emitters. A total of 8 wires are needed for this - four for the two main LED channels and 4 for the aux LEDs.
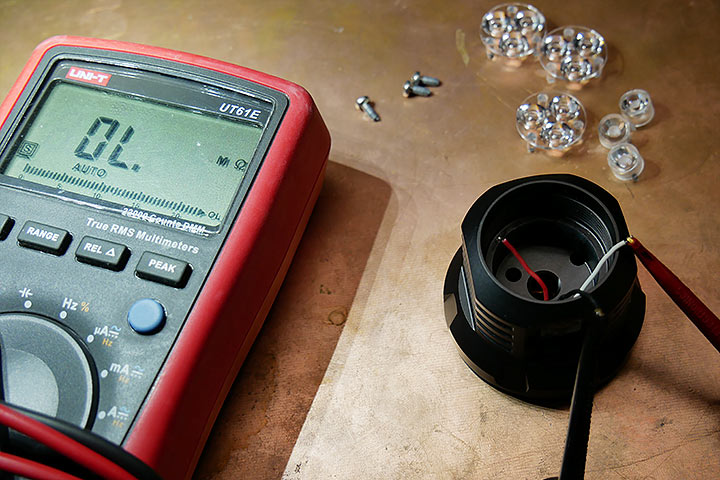
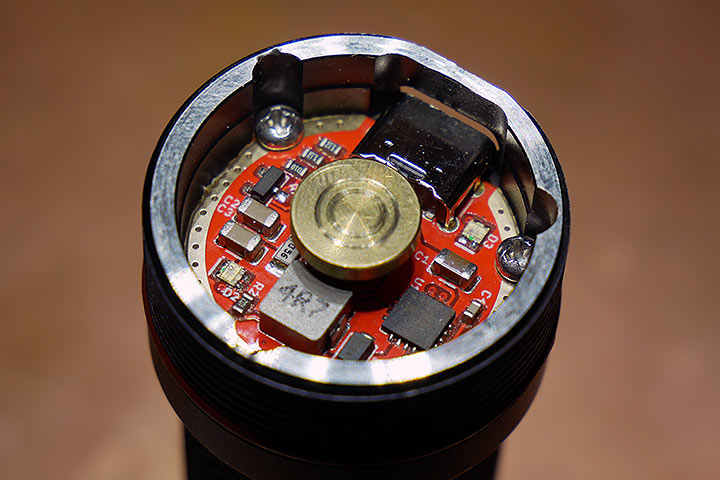
I had to disassemble the flashlight to get to the switch PCB and to remove it. As I had expected, the driver tested out fine, but the switch PCB was the issue. I found that with the slightest pressure on the switch, the switch resistance didn't drop to zero but hovered inconsistently around the few hundred ohms range. This indicated to me that most likely there was some contamination inside the switch itself, i.e. water got in and stayed there.
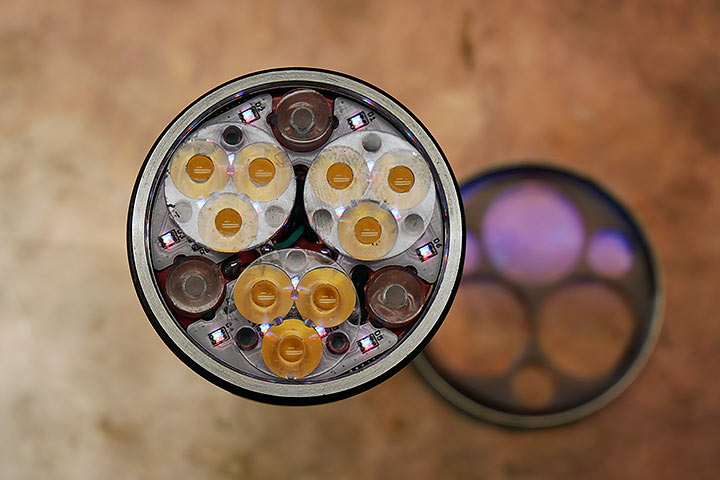
Here's the switch PCB removed, with the dome switch. You may be able to make out some conformal coating around the switch - it looks like it was there to prevent water from getting into the switch, but unfortunately, water seemed to get in, and the coating made it stay there. I tried blowing hot air on the switch for a while but it didn't solve the problem. Ideally I would replace the switch, but I can't get parts quickly, so I decided to throw it in the reflow oven and I baked it at 150C for about half an hour, placing it sideways.
While doing this, I had some time to take a look at the driver. It's a pretty simple design- two Constant Current Linear Channels, each up to 8.95A, one of which has a turbo FET direct drive (for the 9 LEDs).
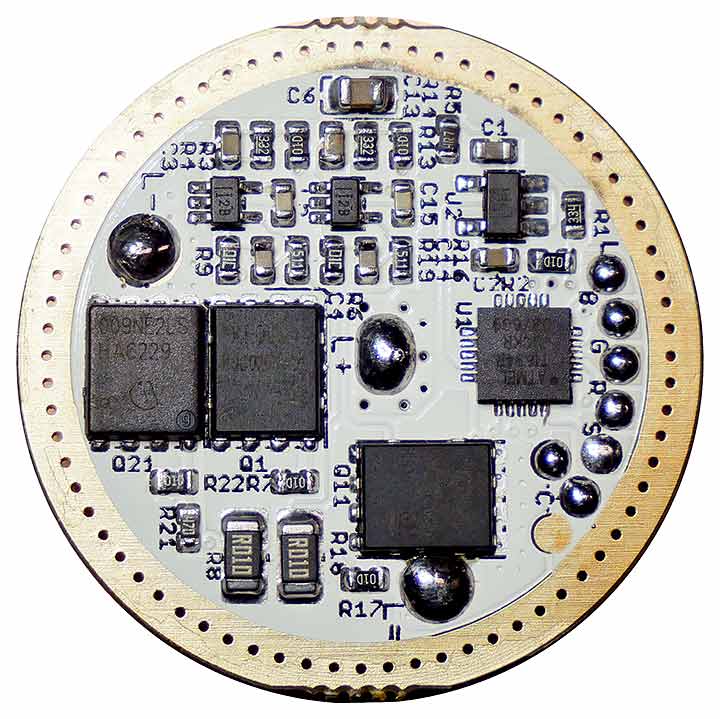
The main MCU is the standard ATtiny1634. There is aux RGB LED support, as well as a external LED for the switch. Power is provided via a 2.8V regulator. Sense resistors are 1206 10mR resistors, and the feedback loop for each CC stage is handled via a TLV333 op-amp, using a Mosfet as a linear pass element. The driver is 29.9mm OD with a 2.6mm ground ring around both top and bottom, with a 11mm spring pad for the battery-side. PCB measures 1.6mm thick.
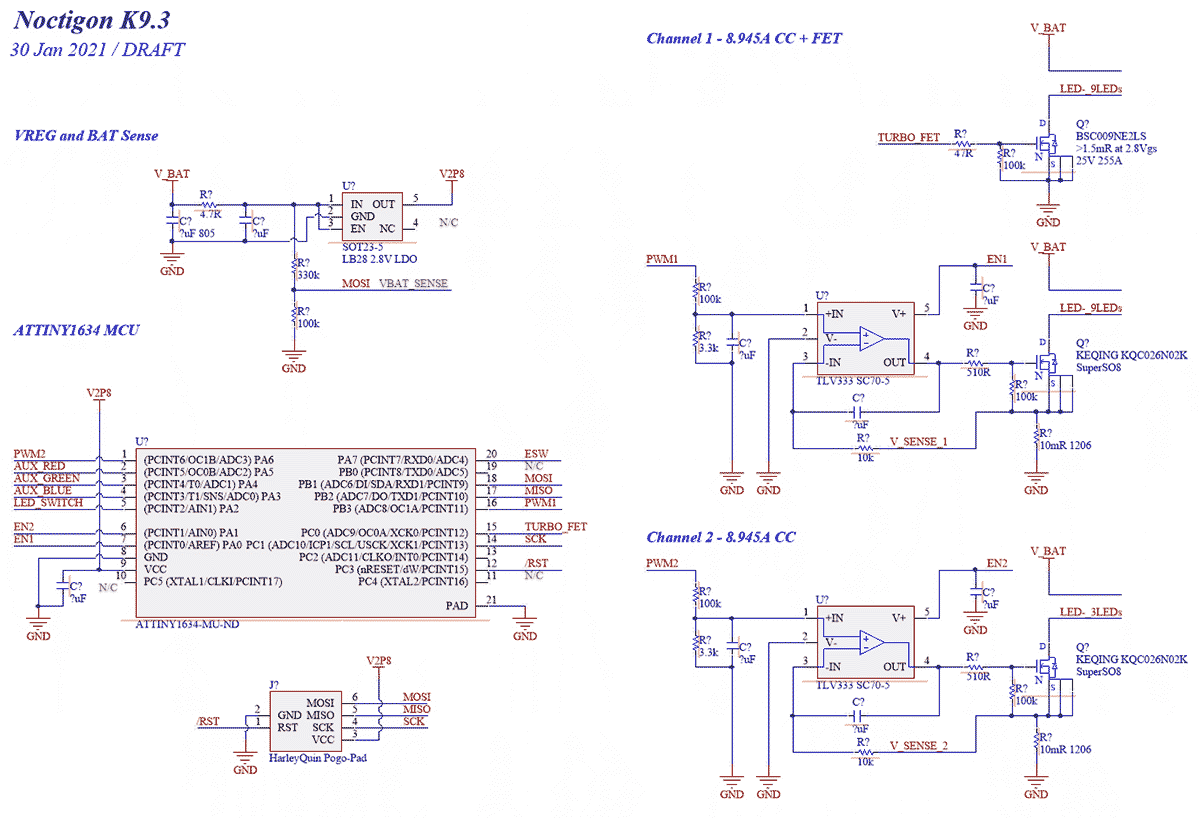
I drew a rough schematic of it, pretty standard implementation. Control is done via the standard OC1A/B 10bit PWM at 3.9kHz. It's filtered through a RC LPF and acts as the reference voltage for each linear constant current stage using a Mosfet as a pass element. Simple and effective, but fairly inefficient as well. It's one step up from the AMC7135 regulators since brightness control is now PWM-free, but the downside is that it still regulates and burns excess energy as pure heat (i.e. the pass element acts as a resistor).
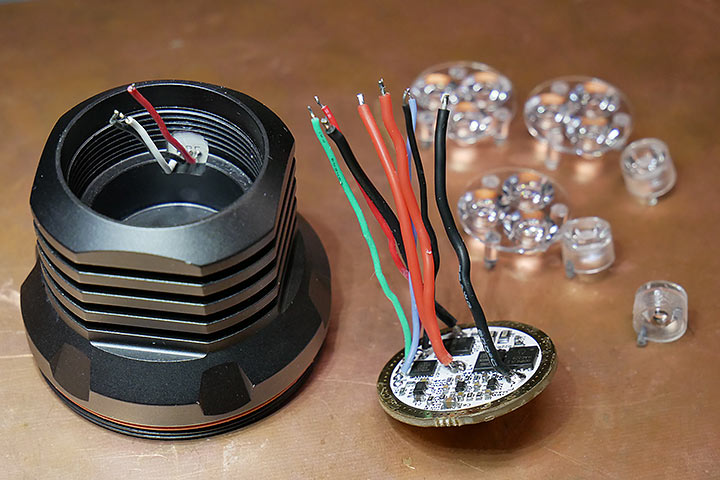
One thing about the K9.3 design is that there is a huge driver cavity, which makes sense since there needs to be a lot of wires (as you can see above), and it would be difficult to assemble if the cavity was shallower. The driver cavity measures 25.4mm in diameter and 10mm deep - this makes for excellent modding potential, with the drawback being that the MCPCB is custom, so it's difficult to use different emitters of different sizes. In addition, I found that the LED shelf is a whopping 8mm thick!! No wonder the front of this flashlight is so heavy! There is a lot of metal here.
For those keeping track, the main LED MCPCB is 45mm in diameter.
With the switch out of the oven, I found that it was finally working decently again. Not perfect, but it's possible that the water submersion dissolved contaminants around and in the switch; while most of the water should be baked off, the contacts are likely slightly contaminated still, and the switch is no longer perfect. But it's much better than before. So I assembled everything back together. The most difficult was getting all those wires through the holes. It took a bit of patience, and help with needle tweezers to get this done.
Problem mostly solved for now (I'm going to ask Hank what switch he used or if he can ship over a new switch PCB, since the switch is still slightly finicky), or if I have time I can dig around digikey to find a better replacement).
So.. what about the charger? The charger is integrated in the body-part of the flashlight, on the top of the battery. Again, this adds some additional weight and mass to the top of the flashlight, making it very front-heavy. However, this also makes the flashlight theoretically more waterproof than the E12R, which just uses a rubber flap.
The charging electronics are covered by a press-fit white plastic spacer, which I removed easily. The charger circuit is essentially a datasheet-recommended implementation of the TP5000 2A charger IC. https://www.rzxpoweric.com/data/upload/image/20190515/1557926480137873.pdf The CC USB C lines are terminated with 5.1k, so this should work with most USB C - USB C chargers.
Finally, one thing I noticed... this flashlight has no reverse polarity protection. I didn't see any on the main driver PCB... and I only tested this after I had re-assembled the flashlight, so I haven't been able to do a detailed analysis. It appears that there is some reverse current flow (my guess is that it's through the LDO, which also may cause reverse current through other ICs). The LDO has a marking LB28 L7F1, so while I initially guessed it is the MIC5025, the markings don't quite match, and the MIC5025 does have RCB (it is a footprint compatible part though). So just a note, do not insert the battery backwards in the K9.3, or there may be magic smoke coming out!
I tested this quickly with a bench supply with CC mode, and sure enough it seemed almost a short when plugged in backwards (there is a V_fwd drop which looks like some diode forward voltage). I thought that perhaps there would be some RPP in the charger PCB but it looks like there isn't, though the charger IC itself has RCP internally so it shouldn't be affected. Note that I haven't looked at this in detail so perhaps I missed something, and I only tested this at a low 2V.
As for why would water get in - the entire flashlight seems fairly well designed. Two large o-rings prevent water ingress from the front - adding silicone grease should help in general water tightness. The main body threads also have an o-ring each, and appear to be decent quality. The switch is held in place via a rubber dome, squeezed in via a switch ring - that needs to be screwed in tight for water-tightness, so perhaps Tujone's one had a leak somewhere around the switch dome, and water got in?
Overall - my thoughts on the K9.3 are a little mixed. I am impressed as usual, with the workmanship and machining, as well as the large amount of engineering that clearly went into the entire design, from the charger in the body tube, to the complicated MCPCB / Aux PCB / Optic combo.
However, I felt that this created a somewhat... inelegant design, and the overall package was a little.. big. The flashlight is a little too front-heavy, affecting ergonomics. The 9+3 LED design looks interesting but the choice of optics leads to an unnecessarily large head (the E12R also has 12 LEDs but is a fair bit smaller). The head is well machined, but it has a driver that I think could be improved to take advantage of all the space. This flashlight also has a comparatively large number of components both mechanical, optical, and electrical, leading to a complicated and time-consuming assembly (including the soldering). For a 21700 flashlight, is also very big compared to say a Fireflies E07, Lumintop FW21, or even a Zebralight SC700d (much much smaller!).
Thanks for reading!