I first would like to thank d337944 and Tom E for their generous tutorial on taking the driver out, which seems to be the hardest part.
I was very reluctant to do so because I would not only void the warranty but also screw the thing up. (no pun intended)
My goal was to fix two things:
Increase the current
Disable to next-mode memory
So without further ado, I drilled a hole on the bottom of the CRELANT logo as d337944 had suggested to avoid the electronic components.
Top view:
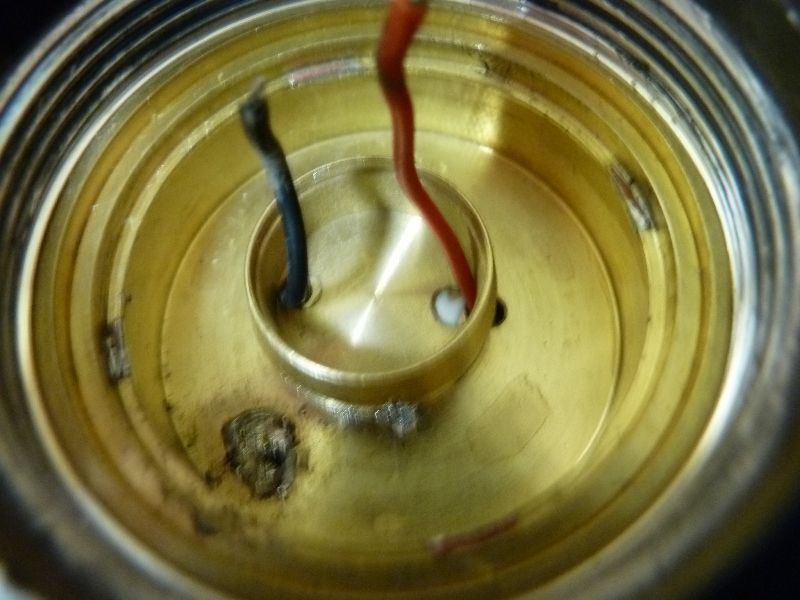
Side view:
Thankfully, the leads were long enough so that I didn’t have to cut them off to flip the driver around:
So I think we have some sense resistors in the circuit:
And here’s a closeup:
I see that one of the resistor pads is unoccupied, so I guess I’ll be back with some current measurements and calculations to determine the value of the resistor I need to add.
A very clean removal mate! Now let’s see hat kind of interesting driver mod / upgrade you come with.
Good luck … The DD mod I did was simple, but not as useful if you want multi-mode … I just chose DD because it was “free” and I’m a cheapskate at times.
I'm curious how this comes out. Man, I just tried to open the 7G9 head up using a vise and strap wrench - no luck. I'll give it a go this weekend with a better mounted vise. I was still able to use a lot of pressure - this is concerning...
For a regulated driver now at FastTech for about $3, and 10 7135 chips for under $2, pretty cheap. FastTech also has the brass pill I used in the 7G9 for about $1. I'm running mine at 3.85A but will upgrade it higher soon - still want to get that emitter checked out and updated though - XM-L2 U2 on a SinkPAD copper star - if only I can crack it open...
I’m with you on that Tom E - still unable to open up the head as well, no matter what I’ve tried. Hesitant to overdo it in case the lens gets cracked or worse …
Exactly - my concerns too. Brought in the 7G9, Gorilla tape, and the strap wrench to work today - will give it a go in our shop today on a heavy duty bench mounted vise. I can also ask some "experts" (mech engineer types/mechanical assemblers, etc.) here today about it.
I absolutely know this has been done because Vinh said he worked on a 7G9 that had a emitter upgrade - he didn't do it himself though. He did recommend the method I'm trying though. I know guys have used the freeze/heat method too, but same concern there about effecting the lens or reflector.
Well, i've been hearing the ThruNite's are about the same, maybe even worse. For the 7G9, others complained abot the tail being glued, but on this light it wasn't glued at all, came off easily.
Best thing to do what you want is to replace the driver, as I said in post #2. Remove all IC's on their driver, add a wire to get the battery + to the new driver. Now you can add 7135's and setup the amps you want, and choose the mode set you want.
Sorry for the delay. This has been a drag, and I’ve managed to burn up the emitter. :_(
I have had lots of trouble trying to access the emitter area, but TomE did write up a great tutorial.
Expectation:
Reality:
Guess it got too hot to cook the anodizing.
If you look carefully at the LED, you can see that that plastic retaining ring melted due to the sheer heat from my torch.
And I still haven’t opened it up… sigh.
I had access to a strap wrench briefly, but had to return it.
I even tried a cyanoacrylate (Loctite) debonder where the two pieces met, but the o-ring prevented it from getting into the threads.
Hi ryansoh3, it looks like you’ve probably cooked the glue well enough. Any updates to unscrewing the bezel?
Now that youve removed the driver, can the pill be unscrewed through the bottom side without removing the reflector? Just move the emitter wires to the side of the holes and insert a fine needle nosed pliers and turn counterclockwise?
I’ve tried to unscrew the head just a week ago, to no avail. I’m genuinely running out of ideas.
After I heated the unit so much that it turned orange, I could feel that the pill was loose, but I just tried to unscrew it with some needle nose pliers, but no luck. Sorry! :~
Last resort, I can try baking the unit in my oven…
I wouldnt bake it! Do you still have access to strap wrenches? Even if the glue is completely cooked, its still jamming the threads so youre probably not going to get it lose by hand. Only leverage and a lot of torque will turn it.
Haha no, I don’t access to the strap wrenches anymore.
They were 20 bucks a piece, and the storekeeper wasn’t too happy with me using them for 30 minutes.
That was before I applied any heat, so I’ll try begging him some more.