In the meantime, the light is running at 204Kcd making 1028 lumens from a de-domed xm-l2 u2 1c pulling 5.92A from a Pan Pf that is at ~4.07V. FET driver to the rescue! Dummy cell, 1 in the hole. Gotta get the e-switch hole plugged and play with the light some then I can go back to the buck driver.
Provided I’m not still frustrated at it.
I didn’t do anything with the firmware to account for 2 cells, didn’t know to, don’t know how to, and so the learning curve continues to grow.
I hadn't given it much thought until now, but I'm guessing that the MCU might have been fried by the 2S cells. Also, as Matt just mentioned the R2 and R3 resistors are different than the 19.1k and 4.7k we normally use. This will be rendered moot anyways by the zener mod so you could just remove them for now.
So r2 and r3 were specced based on firmware I use. Then again im not even sure those are right. Another oversight of mine.
You either need to change the values of the resistors to suit your firmware, or change the firmware. You need the output of the voltage divider to be 1V or less based on the MAXIMUM input voltage. So this will be different for 1/2/3/4S setups. There's nothing I can do about that unless someone writes a Universal firmware.
I haven't had time to look closely at the trace paths, but what voltage is the attiny MCU seeing? Hopefully not full 2S voltage, that would definitely cause a problem.
The MCU is seeing the regulated 3.3V from the LT chip. The pin the voltage is sensed on comes from the voltage divider. The divider dOes see full 2S voltage for obvious reasons (we want it to see the battery pack voltage, not the regulated voltage output for the MCU to run off). The voltage on this pin from memory cannot exceed 1.1V. Need to double check the Tiny13s datasheet.
I don’t know how to figure that though, so I’ll have to wait and let someone else figure out exactly which resistors it needs with a 2S configuration running a single XM-L2 or other set-ups.
<—-just sumdumguy tossing stuff on a board cause someone said so. Great when it works without modification. Not so much when it takes some chip shifting.
I looked at the ATtiny13 datasheet for absolute maximum ratings. I did not see anything that indicated putting over Vref (1.1v) on the ADC would hurt it. You just can’t put over Vcc + 0.5v on that pin, same as any other (so 3.8v in this case I suppose).
In that case the 10k and 3k will generate a Vout of ~1.9v at an 8.4v Vin. This is not beyond the absolute maximum so it should not cause damage. In the datashseet section 14.6.2 says that “Single ended channels that exceed Vref will result in codes close to 0x3FF” (1023 / maximum / fully charged battery). DBCstm is using JonnyC’s firmware, the code is clearly just a > for the ADC reading.
I don’t see how the voltage divider could be causing DBCstm issues right now.
On another note, if we wanted to improve the accuracy of the measurement isn’t the LT1761’s 3.3v more stable than the ATtiny13’s internal 1.1v reference? VCC can be used as Vref.
Thanks for looking into that, this is the kind of thing that’s over my head and confusing.
I’m running JonnyC’s STAR firmware with the 9.4Khz pwm, with moon at a setting of 1 (Star 2) and 4, 25, 120, 255 settings. This works well in a few other lights I have that are clicky in action. But the light is only working on 4 and 255 for some reason, and that doesn’t change whether I use 1, 2 or 3 cells.
The other puzzling thing to me are the 2 blank levels…with everything out of a host, testing on the bench, I can apply power through the steps and get blank, blank, low, Turbo and this repeats. If I leave it on low for a few seconds when I start again it starts on low, then Turbo blank blank. So the memory function works (did it with Turbo as well) but those two blanks that appear as off are very puzzling.
Should I attempt to change the PWM to see where that takes it?
Mattaus’s troubleshooting suggestions were really good. If you were building up another one from scratch or didn’t mind removing the components on the MCU side I would definitely follow his instructions from post #99. While we can assume that those things are working properly you’d learn a couple of things:
a. Since you’d be running the buck section at 100% with only that side populated we’d be able to compare LED voltage or lightbox results to see whether the MCU is actually driving the buck section at 100% when you build the full board.
b. we’d know that the voltage regulator is behaving as expected.
If you don’t feel like soldering right now then yes, I think changing the PWM would be interesting. I’d start with the frequency - just change the fuse from 0x75 to 0x65 in order to get 1.2kHz PhaseCorrect. No code changes, no new hex file, just a reflash of your existing hex with the different fuse. If that doesn’t do anything you could change TCCR0A from 0x21 to 0x23 in the code, then compile a new hex, then flash with the 0x65 fuse for 2.4kHz FastPWM.
I don’t know how to do that. Looking at the C file, I see where Jonny says he uses the 0x75 fuse but I don’t see where it’s implemented. Looking at the .hex file, I don’t have a clue. Not sure what you mean it can be changed without a rewrite, but I’ll open the flash code and see if it’s there…must be as that’s the only place I haven’t looked.
I can de-populate the 1st one I built, see what I can determine according to y’alls questions. You’re asking the mechanic to look into the engine’s design instead of just twisting bolts, so don’t expect too much…
Just remember that if the first one is damaged somehow it could still be ready to kill more LEDs. You mentioned that you’ve already poofed 2 or 3 with that one, right? I’d leave it alone for now if that is the case. Maybe someone can help determine what is wrong with it before hooking it up to any more emitters. Maybe it “fell over” and is in direct drive like I’m told the Solarforce S2200 driver can do.
If you are using a batch script (.BAT file) for flashing then that’s where the fuses are. The part you want to change is:
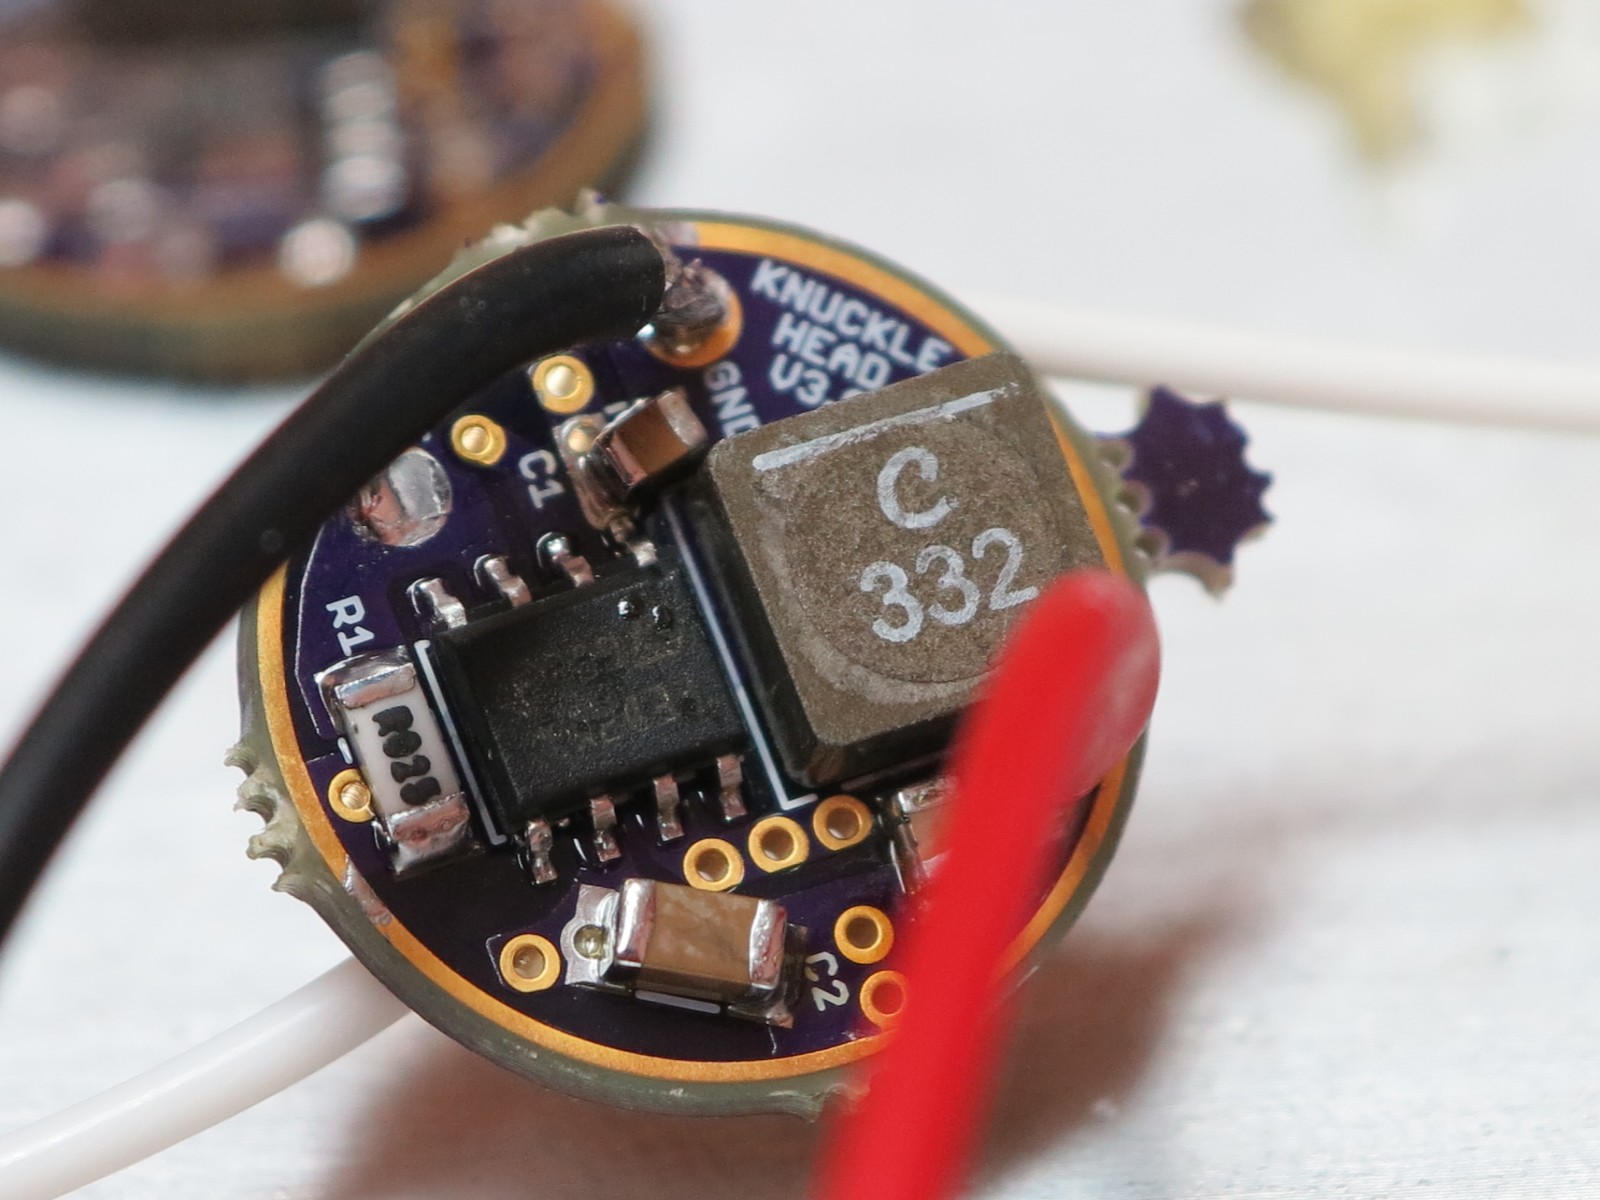
I got 3 of the Knucklehead boards. Components to populate 3 boards.
I built the third board, inductor side only, very carefully making sure everything on that side of the board went into exact position. I did not use solder paste, instead I used flux and carefully tinned the pads for the 8HSOP and inductor, also tinned the pads and hand soldered the caps and resistor in place. Then reflowed the 2 components that have the big pad unreachable with a soldering iron on their bottom.
Then I hooked up an XM-L on an aluminum star (red positive wire to the pad marked positive, black negative wire to the pad marked GND…the other 2 attempts I’d used the pad marked -), clamped to a 3x3x3 cube of 6061 with a plastic clamp. I set the clamp meter for amperage and ran the negative lead from the emitter through it’s hoop.
With 2 of the Sanyo UR18650FJ taped together, (each at 4.16V) I applied power. The led lit up quite well, the DMM showed 5.65A and the second 8 pin component (ST Micro LED2001PHR 8HSOP) went sizzle pop fizz (I had tried this test with the faulty first driver and already blown that one, moments before). There is nothing on the other side of the board except for the small wire connecting pwm to Vin. The little black rectangular box that is the 8HSOP now has two tiny little volcano’s of electronic eruption on the very top of it’s black box, between pin one and pin 2 on the left hand side as you’re looking at it with the inductor on top. This also happened to the other one. Snap crackle pop smoke and finito!
So, now the working Knucklehead that is missing the middle modes is the only one I have left. Nice way to clean $30 out of the billfold and rid the kit of some pesky old XM-L emitters.
Oh. Wiring to LED- to GND is bad, don’t do that. Doing that bypassed the sense resistor. The normal GND path for LED- would be from the LED- pad through the sense resistor to GND. A reading is taken on the voltage drop across that resistor. Based on this reading the LED2001 chip adjusts current.
Sounds like there’s a little headroom built into the LED2001PHR, maybe it would be OK to push it to to 5A in the future?
EDIT: You popped two LED2001PHR’s. Did both of them pop with the LED wired to GND, or did one pop with the LED wired to LED-?
The 1st one popped with the “-” and “+” pads used.
I didn’t get anything when I used that configuration, so I moved the neg over to the GND pad like in Matt’s first pic. When there was no light with the wires on the plus and minus pads I remembered Matt saying there would be no pwm, it’d be 100%, and I remembered that pic he showed when all this started where he only had one side wired up, but then again, that was an MT-G2 that can take 8.4V in direct drive.
Scott, you’re right, no sledgehammer….I mean, why exert that much more effort when there’s a set of train tracks a mere mile away and it carries 100 cars full of coal.
Ohh, I see how the pic in the OP could be really misleading if you were looking at it to troubleshoot a v3 board. I can’t tell what the layout is, but it’s the v1 board which only had the buck section. It does not include the MCU section or the MCU power supply section. The layout on that side of the board probably needed to be tweaked a little in order to accommodate vias coming through from the battery+ pad, MCU section, and MCU power supply section. On that v1 board I’m guessing that LED- has a long trace coming back around to the sense resistor, Bat+ is in the upper right, and the lower left black wire is actually PWM input… or something.
I see, now, that the board in that first pic is a different layout. But that still doesn’t change the issues I’ve had from the git go, I had the first one put together completely as called for and it’s a no go. That board and it’s components, save for maybe the inductor, are all pretty much ruined at this point. The second one is still together, with low and Turbo the only levels working. And this third one can be re-flowed to pull that 8HSOP (what is that one, anyway?) off and put another on. Can’t take it off with a soldering iron. Tore one up trying that and would be surprised if that board isn’t ruined as well.
Guess I’ll order some more parts and see where that takes me, but it’d be nice if someone figured out just what’s what with this driver in the meantime.
Pretty disgruntled with the Knucklehead at this point.