Tangsfire*, but we’re getting mixed results with them. So it’s pretty well a lottery. ![]()
Thanks thats worth a try…but I’m worried that if I use my bench grinder on it I will get metal shavings inside the reflector. Any ideas on how to avoid this?
I think he might have meant the plastic centering ring? Those can be shaved down a bit with some sand paper.
I meant the little plastic bit that's around the LED. The top can protrude too far into the reflector or the bottom may be thick enough to prevent the reflector from sitting low enough.
This part.
Another idea/trick I've used several times is check the pill - if it's screwed tight in, you may see improvements by loosening it a half turn or so. But then, you risk getting a flaky ground, so you may have to treat the pill threads with something to help electrical conductivity, maybe like CRC 2-26.
The HD 2010 is a great budget thrower and as such, it's beam isn't always so pretty on a white wall test, but outside, it's a "wow" light. Actually I think with a 1C tint, the rings around the center spot are more pronounced than with a 1A, but with the budget lights, it's a lottery on what tint you will get.
What he said. This is a great outdoor light. Don't let what it does against a white wall dissuade you. The only flaw it has (IMO) is that you have to cycle past 2 useless strobe modes to get from Low back to High.
Or just turn it off and back on. Skips the blinkys that way.

Ahaa! I see what the problem is. That insulator surrounding the LED is off-center and it is preventing the base of the reflector from sitting perfectly flat.
I know this is probably a dumb question but I have no modding experience. How do I center that insulator without damaging the light. I guess it must be glued down. Thanks.

Looks like lots of glue holding this down.
The centering ring looks okay, but the mcpcb is way off. It is glued down. It also looks like the positive wire is barely attached. This looks like a good opportunity to do some mods.
Get a brighter emitter with a copper mcpcb. Unlike most cheap copper mcpcb's, this one provides a better thermal path from the LED to the copper.
http://www.mtnelectronics.com/opencart/index.php?route=product/product&path=60_61&product_id=75
Use thicker wires.
http://www.mtnelectronics.com/opencart/index.php?route=product/product&path=25_71&product_id=148
Here's some adhesive.
http://www.mtnelectronics.com/opencart/index.php?route=product/product&path=25_74&product_id=114
You might as well do the spring mod too.
https://budgetlightforum.com/t/-/19507
Do all this and your light may be twice as bright. For a little more oomph, you can get a new lens with anti reflective coating.
http://www.cnqualitygoods.com/goods.php?id=1970
And for the last bit of gain, you can get a copper pill.
https://budgetlightforum.com/t/-/22119
And since the top of that pill is wider, now you can use a 20mm copper mcpcb.
http://www.mtnelectronics.com/opencart/index.php?route=product/product&path=60_61&product_id=81
Yeah, See how confusing this can be! I got mixed up, over at FastTech it is the FandyFire Warrior that’s the good one.
For the HD2010 it is the TangsFire at TMart, as you pointed out. I just picked up 2 more a couple of months ago.
Thanks for all those links leaftye, I appreciate your help. This looks like something I can do. Can the old mcpcb be removed without destroying it? How is that done?
I guess I am making too much of this. It’s just that my expectations for this light were so high that the ringy hotspot took me by surprise.
I’ll just live with it as is (and stay away from white walls) ![]()
Thanks for the input to those who took the time.
I’d at least pry up the mcpcb and glue it back down in the correct position. Just be careful so you don’t accidentally tear off the wires.
Yeah I thought about doing that, but the light only cost me $14.99. The thermal adhesive online would cost me $7.50 plus shipping.
Probably about $12-$13.00 bucks total which would almost double my cost for the light. Doesn’t make much sense since I don’t even know if centering the mcpcb will make a difference.
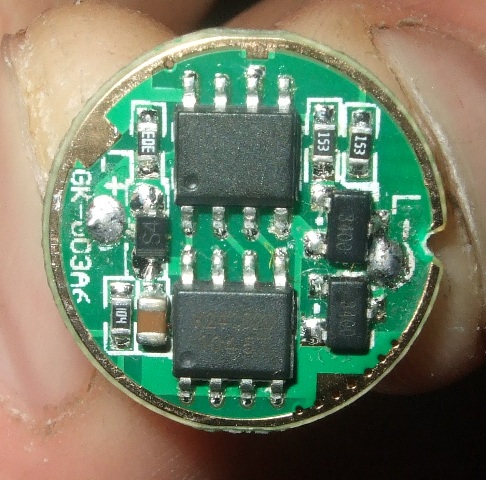
Is yours direct drive? Mine was. That was the main thing for me (east 092). Not like I was going to use one in mine, I just wanted to have a spare of those drivers for some other project.
Mine did not have the same focusing issues either, centered mcpcb, and different and shorter centering ring than yours. But I believe there are slight improvements to be made on mine (its currently being rebuilt). You seem to have one of those tall centering rings (as far as I can tell by the picture), and if that is combined with off center mcpcb and maybe even not the correct height (see what Tom said). You are not going to have a great beam.
If the mcpcb is connected with some sort of adhesive, and its not easy to get off with a flat screwdriver. Give it a "knock" from behind, through the negative wire hole.
its one gray with no name or brand.
wel good finisch no scrats or dust.
the emitter is one xml…… t?? or u star = +–16 mm(black)
i have one new from intloutdoors 20 mm red copper xml2-u2-a1
but can somebody help me with the driver?
the driver is one 17 mm the wires +–1,5 mm (poor)
there is one number on the drive: GK-003A6 2grand chips on the middle
is that direkt drive wit more than 3000 mah with good battery ?
so not i better replace with one nanjg 3.05 or qlittle 3.05 from outdoors (i have)
thank for replay
that driver but with 5 modes
lower than 2$ i think take the qlittle 3.05