Orsm machine work. Your finishing is astounding. Thanks for sharing.
That is very cool, I really like it short like that. Should make a great thrower. Looking at it up against the T20 I would think that hitting 200kcd wouldn’t be impossible.
My UF-T20 with dedomed XP-G2 at 3A does 108kcd, optically this flashlight is quite the same but with twice the surface area lens, and with the XP-G2 at 4A instead of 3A, I expect close to 250kcd.
Nice, I don’t think that is impossible either. I did an aspheric lens in a ZY-T08 once with an XP-G2 at 5 amps. If I remember right it was about 300kcd maybe a little less. I always think I’m going to get more from these Aspheric lenses than I actually do though. I’m working on a courui big head with an Aspheric or I will be when I finally get the time. I have all the parts and stuff ready to go. I like these laser beams but then again I have a use for them. I like going around looking for deer on the large open fields near my house. I get out to the edge of a field and zap them with it. It freezes them in place so I can watch them for a while. Fun stuff.
I really dig your mods on this one. That is still a size that can fit in a coat pocket easy. That is what I think makes it so cool. You can walk around with it and if you need something to really reach out there you have it. Or you can just walk with it on flood. Something you can’t do with the fixed lens ones I build.
Good luck on it, it looks great already.
I'm glad that you (all) like it sofar :-) . The rest of the build will be nothing that has not been done before I think. I am mostly curious about the performance in the end.
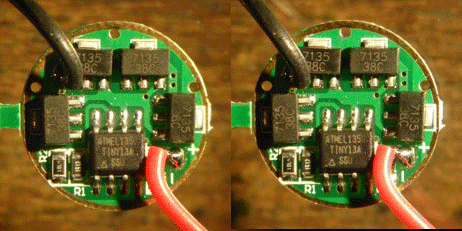
I made the driver, indeed a NANJG-92 driver made from a qlite revA, as invented and described by comfychair. I'm very conservative and still do not trust myself building a BLF 17mm DD driver, although I have all the parts in house. And I find it sort of neat that the NANJG-92 can be made without reflowing, just a solder iron does the job. I made an 3D animated gif of the build  (a BLF-first! ....and probably last, making the gif took more time than building the driver :tired: ). Try to parallel your eyes to make the 3D work:
Fantastic work on that GIF!
Dont know why, but seeing it rebuilt like that step by step put a big smile on my face. :)
Darrn, I can only series my eyes…
Sorry for posting in your topic but does anyone know where I can get a 58-60mm aspheric lens that doesn’t cost $1 per mm of Ø?
I know where you can get some that are around $5 per mm… will that do?
Lol no, unless you’re payin!
LOL you made me choke ![]()
Nice cut there. If we were going to guess I think its going to be in 250 000 cd range this cool thrower.
Totally cool, very easy to adjust focal point on smartphone, most AWESOME man!
Nice effort djozz. Thanks.
Next phase, the internals. In my case it really is a phase. Some of you do three of these mods in a day! For me a mod like this is done in an hour here, two hours there, a quarter of an hour to shoot some pictures, etc. (for the glory of this hobby I am looking forward to the day I retire and with my little boy out of the house on his own, this will be an odd 16 years from now).
So I did do some optical tweaking in the end, not for better output (I may even have lost a bit although I don't think so) but to clean up the beam. I made a small blackened collar around the led, made from a sanded down rivet, it should block all the light that will not get to the lens, at least in zoom modus, thus preventing artifacts and rings in the beam. In zoom-out it blocks a small percentage of the light that would reach the lens but not much. I first thought of keeping it shiny and hope for some photon recycling effect, but then I looked at it better, and the shape it is the light is not going back to the die anyway, for that I need a more globular shaped collar and I can not think of something suitable.
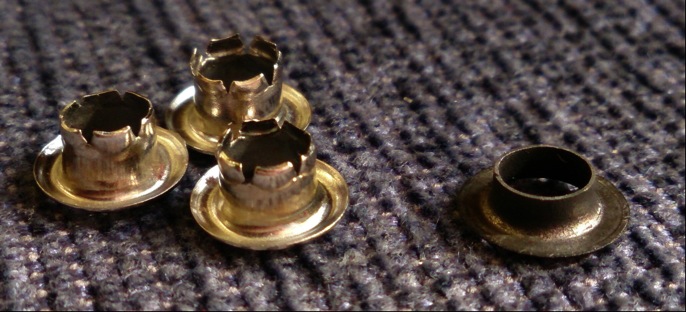
I had to spray paint (black matt heatresistant paint) the rivet anyway, so I painted the pill in the same go, not that it will matter for the beam, but it looks so nice :-) !

Here are the painted parts, as you can see the pill surface has some scratch marks, that is from flatness testing. I cleaned that surface first than sanded it, and the way I test the flatness (flat is waaaaay more important than lapped to a shiny finish) is that I push the led-board down onto the pill, twist it around and evaluate the scratch marks, if marks are everywhere, it is as good as flat, if the marks are mostly near the side, it is fairly ok because the copper board is the main heat route to the side anyway (thicker than the pill and has twice the heat conductivity), if the marks are in the middle there is a problem: the middle of the pill is raised and the ledboard is not used in the heat path to the body which is a waste. in this case I had to sand down the middle a bit of the pill surface to get it flat enough.

I used a XP-G2 R5 1A that I had dedomed some time ago for another mod that did not happen (which is fairly common in my case), so not the latest and greatest but it leaves some room for improvement if I am bored sometime in the future  . I assembled the pill, with the driver I made (soldered a spring to the battery side) and way too thick ledwires (I have only very thick and too thin wire, must get me some nice 22 AWG silicone or teflon wire sometime), and it looks pretty cool I think:

Now the switch situation :tired: . As with the well described 1405, this switch assembly is the worst I have seen ever: a small size switch contained in a plastic housing with the long steel leads (resistance!) sort of floating around with just their own spring tension to make electrical contact. I first tried to attach a layer of solder to improve the electrical conductivity of the switch leads, but the heat of the solder iron almost instantly killed the (plastic) switch mechanics. So I tried to fit in a small Omten switch (same dimensions) and killed that one as well with soldering heat.
At last I decided to leave out the whole switch assembly thingy and use a fat switch that I had around, the 6A ebay switch that I tested for 16A and low resistance before. It had to be rebuild a bit though, the leads were sticking out too far to the side to fit in the hole for the tail switch. So I opened up the switch, removed one of the leads/connectors, chipped a bit off the plastic under it and re-bended the lead so that it was going very flat along the side of the switch, then attached a copper alloy spring (no idea which alloy, it came from Fasttech) to it (the left lead in the picture was re-bended):


I used two cardboard washers (I think it is some impregnated cardboard, they are used in plumbing), one as a spacer between switch and silicon tailcap, one to insulate the switch lead going to the spring (a bit of Kapton tape on the side), and the assembly went in in this order:

Finally I soldered a bit of brass on top of the spring because I needed an extra spacer, and it looks neat :-)

I am not 100% happy about it but it works fine. (I am still angry at the designers: such a nice flashlight but they should have made it for 1x18650 and should have put in a standard big Omten switch on a 17mm switch-board)
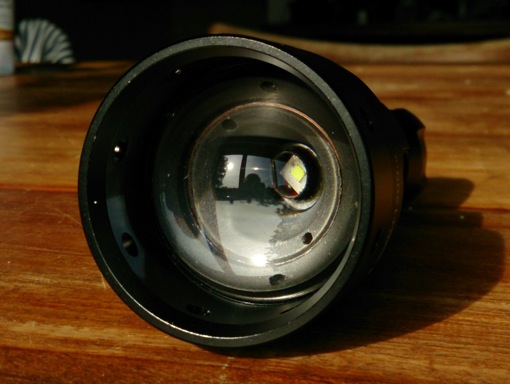
Finished! The performance still has to be tested, for now just a white wall beamshot zoomed in, UF-1406 on top, compared to my Uniquefire UF-T20 with dedomed XP-G2 3C at 3A (that does 108kcd). It looks like the mod has worked out reasonably well, in reality the brightness difference is a bit more than in the picture  . The battery I used for the 1406 in this beamshot is a NCR18650B, so the performance will be a bit better on a high drain battery:

I envy your creativeness. This is a really amazing modded light. Cheers.
Thanks MRsDNF, but there's only so much creativity in this mod, it is mainly a series of little solutions to many little problems that I tried to solve, as do most modders here.
And that there is where your ingeniousness comes into it. Little problems that need solving normally creates the biggest headaches.
I like that brass on the spring, it makes it look a lot more professional when a guy opens up the tailcap. I might have to steal that idea.
I’m the same way too- my wife mainly, if the dining room table isn’t cleaned by morning for breakfast, she doesn’t forget about it. Got a fortune cookie today that says I will have a magical trip to thailand- all I got was, you aint going nowehere! heheh
I keep a stash of money and I bring it out every once in a while for a one way ticket… It’s just one of the many ways I keep my wife taking me for granted. These are tricks of the trade- otherwise you end up on paternity court or jerry