Here is something you can do to gain a few extra mm in the switch to make room for your protected cells. I'm not using protected but after installing a spring on the driver end to stop unintended mode changes I found the tail cap would not go on far enough.
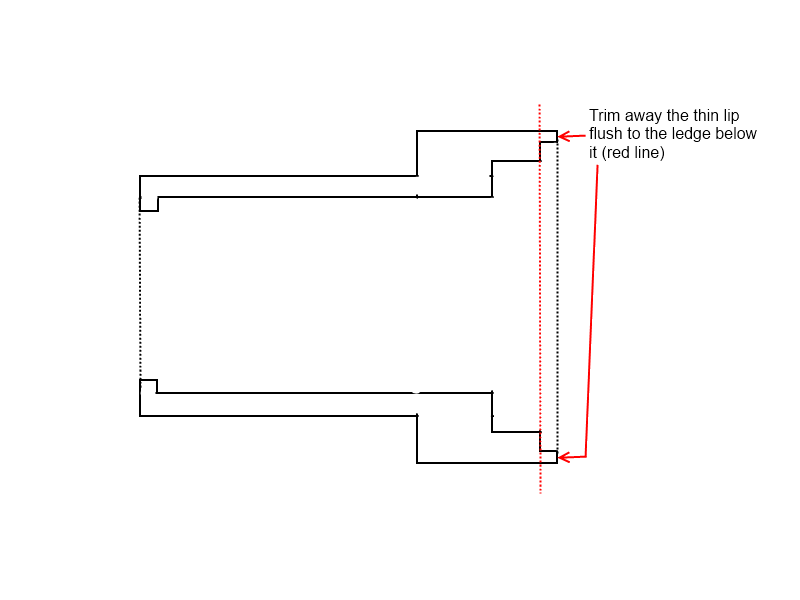
Disassemble the tail end including both threaded brass retainers. Take the white nylon spring insulator, at the base of it you will find that there is a thin lip that runs the perimeter. Trim that lip off using a sharp blade or file. I had to make a quick diagram (below) since I don't have the light on me to take a pic of what I did. Once that lip is off put that insulator between the switch PCB and the first brass retainer. Removing that little lip will allow the brass retainer to make contact with the PCB contact ring. Tighten it down all the way. Next, use the spring that came with the switch when you install the second brass ring. It is thin enough that when you tighten down the second brass retainer ring it will make solid contact with the first brass ring. Now your brass spring cap will go all the way down to the outer brass retaining ring allowing you to use longer batteries and/or add a spring to the driver side.
Yeah I cut down that plastic pice too... IIRC that was one of the original mods I did when I first took it apart. I think it does free up some range of motion. I think in my light though its the -B spring coils fully compressing from the added height of the 18650 protection circuit. I've been meaning to go back in and cut the spring down a coil or two, and add some wire braid to reduce the resistance.
Looking at Viffers pictures he clearly has a completely different light than mine. Different driver and tailcap switch gutts. Readers of this thread need to keep this in mind.
You had only a single retaining ring in your tail cap, didn’t you? I just now realized that looking at your pics (at least it would appear that way). Mine has two that came with it. I also have the same driver as Viffer.
Yeah... just one brass retaining ring. Thats the part I flipped over. In mine its that one ring + a spring that make electrical contact to the switch board.
What I do not like is the o-ring between lens and reflector instead of lens and bezel, the diameter of the lens is too small, it is about 53mm where 55-56mm would fit perfect.
Today I got the second skyray A0/MXDL SA-76 clone which was less than $13. It is the same light what I bought first. Some little difference: the reflector came with a very light OP pattern, the tint of the xm-l is a little warmer, and the stock driver+led combo is definitely stronger, I measured 3.1A on tailcap with a sanyo cell, after the driver mod 3.9A. With a cold start, I got 48kcd with this light. Awesome!
Thats a great deal Viffer!!… 45-50K lux puts it in HD2010 - STL-V2 territory.
This light has now completely replaced my 6P/18650 - Malkoff - OverReady mod as my night time jog-light. Its a great cigar holder thats comfortable and secure in the hand.
I’ll take some beam shots tonight comparing the two setups, and I’ll throw in a 3.5A modded HD2010 as well. My 6P has been bored for an 18650 cell, with a Malkoff M60-Q5 with the original TIR optic, and the tailcap has been modded with an OverReady zero resistance mod. All together its about a $140 setup. 3-4 years ago it was really considered mid-high end as far as P60 hosts go. Its really amazing how affordable manufacturers have phased out the quad-dies and stepped up their XML A-game the past 1-2 years.
Gee, when are the Americans going to be able to squeeze 1800 lumens out of a single XML? We are so far behind Chinese lumenology, I fear that we will never catch up. :cry:
Just got mine from ebay, the exact same as viffers. Love the spotlight on it and a nice warmish tint, quite unlike the typical XM-L colour. A very engineered light for the money and a real glass lens up front too. Ive tried the resistor bridging mod and also connected the red wire directly over the resistors and the light doesnt turn on with either of those configs, not sure what im doing wrong there.
I’ve had the “have you got enough torches now” comment following my latest package, um, there’s three more in the way that I can think off…. I hope toni does not pick the stainless one to brain me with….its a real nice light, I wouldn’t want it damaged. :bigsmile:
Had the same problem with the red wire straight over. Thought it was a bad joint. Resoldered it and it worked but found it had become a 1 mode. Put the wire back pre-resistor amps dropped back but still 1 mode. Moved it over again past the resistor amps back up, still 1 mode. Settled for that until I put a new driver in.
I still can’t figure out what happened. No dropped solder or spray. No other joints damaged or shorted. Maybe the extra amps blow the the board’s modes on occasion
I don’t know what happend, but mine 2 lights work well with this mod (almost at 4A). I know some people who did the same modification, and nothing problem with the lights.