Poorly performing FandyFire STL-V6

I’m kind of curious about something: When I modified the light to direct drive, I kind of expected to see larger tailcap current than I’m seeing (~2.2 - ~2.7 amps that I mentioned earlier), esp. since I’m using an IMR battery?

I’m still kind of lazy, so to make the light direct drive, I:

- Cut the 4 pins between the “contact” PCB and the other board (the one with the inductor), i.e., so now, I only have the board with the spring in the light, using it as the contact board

- I soldered the negative of the emitter to the trace on outer edge on the component side of the contact board, but I couldn’t find a place to solder the positive side of the emitter (I didn’t try very hard), so, instead, I ran the red wire from the emitter to the other side of the board (the side with the spring), and just soldered the red wire to the solder joint of the spring.

In other words, all of the components on that “contact” PCB are still there, and intact.

I’m wondering: Is that why I’m only seeing about 2.2 - 2.7 amps at the tailcap, i.e., because all of those components that I left on the contact PCB intact, and they’re still sucking up current?

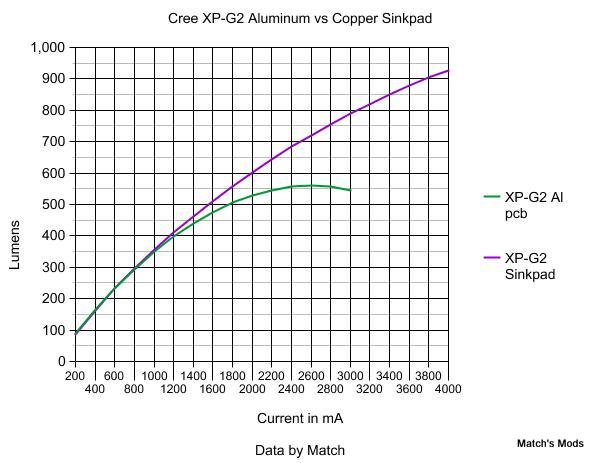
I’m kind of thinking about maybe physically cutting off some of the ICs from that board, but am kind of worried that if I do that, maybe too much current will go to the emitter (XP-G2 on regular, not Noctigon)…

I’m actually kind of happy with my current results, and the light is definitely better than it was stock, but would be interested in others’ thoughts…

Also, if I did remove those components from the PCB, would I need to add some resistor in-line?

Thanks,
Jim

You could try using larger gauge wires.

Did you add copper braid to the driver spring? The bigger emitter wires will help too.
And don’t forget the tailcap spring (doesn’t help the tailcap measurements, but in actual use it will).

Then again with an XP-G2, you’re already near diminishing returns.

relic (and biggulp),

Sorry, I’m having problems here on BLF, like everybody else, so I’ll try to respond to both of your msgs in one.

No, I used the original wire and also didn’t add copper braid to either spring.

I feel like I’m kind of lucky just having a working light at this point, and even luckier that it seems to be performing MUCH better than original (albeit with only 1 mode :)!).

My original plan was to mod this light one step at a time, but the “best of plans”, you know, and after I blew the first LED, I kind of went into panic mode, then was ready to dump it into the trash, then tried again with the new emitter, and even that was not what I had planned, because I would’ve hoped to get an XP-G2 on Noctigon, but I just happened to have only one on a regular PCB (from IS).

So, at this point, I think that I’ll just kind of “cool it” and enjoy the now better-than-new working light (I don’t usually do much with the modes anyway).

Plus, as I said, I’m worried that if I start optimizing stuff more, and, especially, start trying to decrease resistance, something will “pop” with the XP-G2 emitter.

After I’ve sat and admired it for awhile, I may get the urge to mod it more, but at this point, I’m pretty darn happy to have a light that appears to at least perform as well as “normal” STL-V6s, and maybe a little better…

I hope that you all understand?

Thanks,
Jim

Edit: biggulp, I thought that the XP-G2s could be pushed quite a bit more?

Also, BTW, now that I tried the light outside tonight, I remembered what a SMALL spot the XP-Gs produce :(!!

At around 2 amps, XP-G2 output is near it’s maximum with an aluminum mpcb.

More here

Thanks, so I’ll probably leave this light as is, because I had to use Arctic Alumina to glue the XP-G2 PCB on top of the original PCB, and I’ve had problems removing glued PCBs before (bent one P60 pill to the point that it was almost unuseable :laughing:.

I do have some chemical that I bought on Ebay for releasing glue, but I haven’t tried it yet. If I get “the urge”, I may try to see if I can use that to remove the original PCB and the new PCB+XP-G2 emitter and get a Noctigon with an XP-G2, but I was out tonight, and I was reminded how narrow that XP-G/XP-G2 beam is. I was out with the modded STL-V6 plus a couple of other lights, mostly XM-Ls, and the STL-V6s beam was TINY compared to the other lights, again, which I’d forgotten.

So, I think it’s time to “sleep on this one” :)…

Thanks for all the help folks :)!

FYI, in case anyone is wondering, still waiting for some feedback from the seller, but at this point, whatever I end up doing, it’ll involve keeping this light, since I’ve already invested quite a lot of “sweat equity” into it, and it’s working pretty well, to me, at least…

Thanks again!

Jim

FYI, here’s a white wall shot. Slightly less than 1 meter:

I was going to try to take some outside, but it’s raining “cats and dogs” here tonight :)!

Sorry.

Edit: XP-G2 on “regular” star, Arctic Alumina’d (is that a word) on top of original star. 1xEfest IMR battery + dummy cell.

Hi,

I’ve been going through this entire thread re-reviewing the posts, and realized how far I’ve come with this light, from a relatively poorly performing one to one that now appears to be a pretty decent thrower. I was looking at this:

which is from one of Selfbuilt’s recent reviews, and am truly amazed that this little light that I have now appears to have better throw than some of the ones on that chart!

Amazing :)!

I really appreciate all of your collective help, and patience with my own stupidity (in getting into this situation in the first place), but I think that we ended up in “a good place”, at least from my perspective. I also think that I’ve learned a lot (but I’m sure that I’ll probably repeat some of the same mistakes, and be back here for those :)!).

I may still take up some of your all suggestions with the solder wick, etc., but like I said, I want to take a breather from this light for awhile, and relish the “relative success” :)…

So, again, thank for all of the help!!

Jim

I still for the life of me cant understand why you didn’t keep the original driver, it was giving more to the emitter than your direct drive set up is giving now, I’ve been running an alu mounted xp-g2 at 3a (what your driver seemed to be taking) for a couple of months, its still fine, it will get swapped for a noctigon star, dedomed at some point soon but it is coping in my application at 3a.

Hi,

At this point (it’s 04:20 in the morning here :laughing:, I can’t exactly remember what lead to me doing that, but “What’s done is done”. In any event, as mentioned above the direct drive seems to be working fine, for now, albeit with 1x18650, so I can only move forward from here.

Thanks,
Jim

Unless you stripped the components, that driver is still fixable. The header between boards can be replaced.
It would be nice to use up the capacity of the light with two cells.

Hi,

I didn’t strip the components, but just cut the four pins on the header.

Having said that, when I get a new light, I don’t think I’ve yet bought a light with the thought of modding it from the beginning.

I normally like to check it out first, to see how it works, etc., which is what I did when I got the STL-V6 from Wallbuys, and then I couldn’t figure out how to get the modes working, which is why I started this thread.

If you seen some of my posts on other threads (e.g., on garrybunk’s DST thread), I don’t particularly like what I think of as “long” lights, so while I was waiting for the STL-V6 to arrive, I’d seen some references to making the STL-V6 a “shorty”, and I got interested in a “shorty STL-V6”. Then, when this thread got to a “good point”, for me, at least, I started a new thread last night, How "Shorty" STL-V6?, asking about how to make a “shorty STL-V6”.

Note that it wasn’t/isn’t my intention to cross-post. I really thought, and still think, the two threads were separate topic-wise.

Anyway, the reason I’m saying all of this is that there’s some information in that other thread, esp. the post from Gords with the pics of his STL-V6, that clarify how different the STL-V6 that I got from Wallbuys is from “other” STL-V6s.

Again, I’m not intending to cross-post, but I thought that if, in the future, anyone ever is trying to find info about why their “STL-V6” works differently from what they thought it should, providing a link to that other thread here might be helpful.

Sorry :(…

Jim

Mine arrived, 5mode with screwed in pill. Battery tube consists out of :adapter, longer part, shorter part,tailcap
The adapter is really hard to unscrew, you have to be strong(like me :bigsmile: )

Shorty

The longer and shorter batterytubeparts aren’t machined for each other, the threads are to long(or short) and there are some scratches/lack of anodizement on the tube.
Flaws, dust inside reflector,some contact issue when all parts are screwed in totally…

I haven’t checked the light further

Werner,

Thanks for the pics. FYI, Gords posted some pics of his “STL-V6” on another thread:

and you can see the difference between the STL-V6 that you/I got from Wallbuys vs. the earlier STL-V6 that Gords got.

Yes it’s a bit different. But if you have a thicker non standard c8 the tube could fit.

What’s with the threads of the tubes on your v6 ohaya? Are they fitting?(see picture4)
Mine aren’t even matching the color of anodisation.

I am not sure why I have bought this…I think because it was cheap.
But I have no need for it, perhaps I will put a xpg2 on a noctigon in it…but then I would still never use it…
I have a zyt13 after I modded it, I never have used it….

There is some contact issue with the adapter ring or so, I have lubed it up with some silicone grease perhaps that is why, but it was really hard to unscrew and this was the first lube I grabbed…I will clean and measure tailcapcurrent a on different voltages later.
edit: cleaned and lubed correctly, works now like it should. But the construction is weird the current flows through the battery tubes in the head, from head through reflector, from reflector through pill and finally reaches the negative contact on the circuit.
Thermal path isn’t perfect either…

The lens rattling occurs if you screw in the pill completely in the head and then screw the bezel on. That’s why the reflector is not reaching the lens.
Solution is easy just screw the whole pill/reflector from the circuit side one turn up against the lens…voila rattle solved.

The driver is nice regulated i checked from 4V until 13V

The spill is ugly, spot is smaller than my zyt13(3A through emmitter) but not brighter.
The lens has some weird coating in the middle part it looks like a drop of oil on water and it is dusty as hell inside the reflector…never had that before on a brand new light.

Lanyard is ok not sure what it is good for but I can swing the light around like a knight and no weak link ring like often on Chinese things,
Tailcapboot is bit too thick like always so it doesn’t stand on tailcap well if switched on(reverse clicky gets bigger if switched on)

It gets hot and that’s always a good sign, not sure if I want a shorty with increased current…but with an xpg and lower current maybe it doesn’t get so hot.

The size of the light is how I like it, I have screwed the scratched part in the head.
I would say its worth the 19$, but no super cheap deal but also no total desaster.

The dust is a nogo and the missing mode selection, too.

Werner,

Thanks for the detailed info.

First of all, I’m not sure what you were asking about the threads? Can you clarify?

Beyond that I think that I found pretty much the same things you found, including the dusty reflector and some kind of clear “spatter” on the lens, and the loose lens rattling :).

I haven’t done anything with the dusty reflector yet, but I’ve ordered a new UCL/p lens for it, and did the same thing with screwing the reflector out to get the lens to stop rattling.

Now, I have an XP-G2 in it on a regular star, but may replace that with an XP-G2 on Noctigon later, and I have a couple of other threads about what I’ve been doing it:

- Made it into a shorty:

- Did some work with improving thermal handling:

With the former (shorty), I think that the light is much more useable (1x26650 size), and with the latter, the light seems to be handling heat pretty well.

Thanks again,
Jim

With the threads I mean if you look inside the battery tube you can see the threaded area of the tube…that is not perfect…

Ahh. I think I see what you’re talking about.

On mine, there’s an O-ring on the back end of the front tube, so screwing the back tube all the way in is not easy. Plus if I do screw it all the way in, it’s a pain getting it out later (there’s nowhere to grip the back tube. If I screw it in all the way, I can’t, or it’s hard to, see the seam.

Jim

I have played with it last night and it is a really good thrower, not much spill at all.
I can’t imagine that a xpg is so much better…?