Hey Tony check your pm I sent u a message a few days ago ,thanks
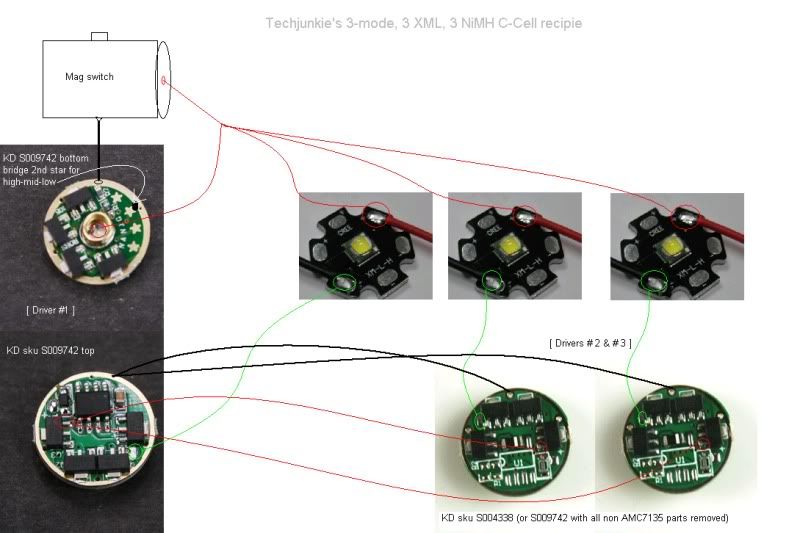
Yes, 3 LEDs = 3 driver boards.
Hopefully others will tell you about the 26650.
Each emitter uses approx 3amps. I would think the 14awg is plenty and then some.
Always order a couple spare, what if you mess one up? The boards are fairly cheap and having exrta won't hurt. I would think all the boards should be the same output, but different ones could be used. I don't know if the difference in brightness would be visible or not.
I will wire the 2280 last so if there is a difference I can replace easily and back before I got sick a couple years I ordered some dig stuff but can’t find it at the moment strength thanks a lot ,will let u know and do pics of my ugly soldering lol
Thanks for taking the time to put this us Old-Lumens
This setup is how I wire all of my Mag mods like the Neutralizer.
I use all 2.8A boards and remove every component on the slaves except the 7135's. Everything works great, but on a single IMR a triple will only do ~5A. The voltage just isn't quite high enough. If I use four NIMH's in a 4C body, it all comes alive and I'll get a full ~10A. (I add two 7135's to each board to get 3.5A to each LED.)
Pay attention to Techjunkie's advice on treating all contact points with Deoxit. I use a Q-tip to dab it on contact points, and the amperage jumped up.
To be honest, the difference between 5 and 10A isn't that much. The 1C lights I've done, using a single 26650, are still bloody bright and light up the world around here.
If you're gonna do a neutral configuration, use the 4500K neutral XML's from LED Supply. They have the best tint of any I got from a U.S. supplier.
Rich
Ok here is what Old Lumens and i have come up with for using the kd drivers for the triple xml upgrade , u have to remove the following 3 pieces on two of the 3 boards ,, as to the older one techno shows they are very similar but on different sides and there is a 3rd bigger one marked s8 not needed as well , so here is what i did and if u have any questions please ask, im not sure yet it works so u may want to wait till i get it all together and see what happens i just got one done and also wanted to post it up so Old Lumen can critique as well :)
here is where i used the needle noses to apply light pressure on one side while desoldering quickly the legs and pulling gently at same time till it popped up like u see, and then did the other side the same way
removed with a small needle nose plier
this is all 4 removed, i got a little burnt edge on the bigger on on the outer edge of the driver, hope it will not effect anything , what do u think Old Lumens?
these are 3 of the 4 pieces removed , i dropped one of the tiny guys on the floor and lost it, lol
thats all i got so far ;)
Cool pics, how to connect the master board with the 8 pin controller to the slave boards with no controller though? outside ring to outside ring for the negative and somewhere else for the positive?
Thanks!
I'm at work, so I can't see photos here. Maybe when I get home, but that's in the wee hours. Hopefully someone else will look in and say it's ok.
I think that at least ont of the 7135 chips has shifted during the desoldering. The one closest to the alligator clip has moved and the one farthest from the clip next to where the components are gone has also moved, (but looks ok). The one closest to the aligator clip does look like it might have moved too much to work correctly. I just can’t see for sure…
Can't see the other side to see if any of the four chips there have moved.
You got more moxy than me, I would never try this trick myself for this very reason. Every time I touch one of these tiny boards, something shifts that shouldn't and it dosen't work afterwards.
Hopefully someone else will come in and say their thoughts here.
As far as the removal, looks like you got the right ones off the board.
I can say for sure they never were touched and to my eye look the same , I’m more worried the left over solder and did I remove the correct ones?
I just doubly checked and those ones u referred to may have shifted look just like the untouched driver that I haven’t done yet , so maybe it will be ok , I’m in here now so gotta follow through ,lol
I could be wrong you know…
The rest of it looks fine to me.
Hm, you don't need to desolder anything to make that a slave board - it suffices to cut off just one pin (pin 3) of the µC. (That's the one above the "D" or "AD" in "L3AD4S")
Pictures r worth a thousand words , the lingo for most would not Be understood ? I was told u have to remove all4 pieces on the new kd drivers ,how do u cut them? Too small ,it was not too hard to heat up and pull at same time to remove?which ones are u saying to cut ?
Take that driver (or look at a photo),
locate the letters "L3AD4S" written on it,
it's the pin directly above the letters "AD".
(That's the third one counted from the little dent on the chip.)
Cut it with some fine cutting pliers - or something else.
(Damaging the neighbour pins won't be a problem.)
So the one I removed are wrong? Will the way I did it not work now?
You misunderstood me; it's ok to remove the µC completely, like you did.
But it's much more easy to just cut that one pin instead.
I love that extreme close-up. It appears that there is a trace link to both sides of the board above and a bit to the right of yellow pin #2 that connects the "pink" pins of the 7135 on both sides of the board together. I'm thinking that after soldering the led neg wire to each board you could solder a piece of resistor lead as a link to one of the boards in that hole and then stack them up, threading each board onto the wire and resoldering the link wire as you add each board. Heat sinking could be improved by potting each layer with Fujik, then AA a copper disk between each board with a hole for the link wire. Improved sinking might open up options for those wanting to mod older lights that have 6v lantern batteries. In general I use potting to help take the strain from wire links so that they don't break during testing and assembly. It also helps avoid other soldering problems. If this idea works it would make it easier to make a compact sandwich, even with the added copper.
Does anyone know if a reason this wouldn't work?
Scott
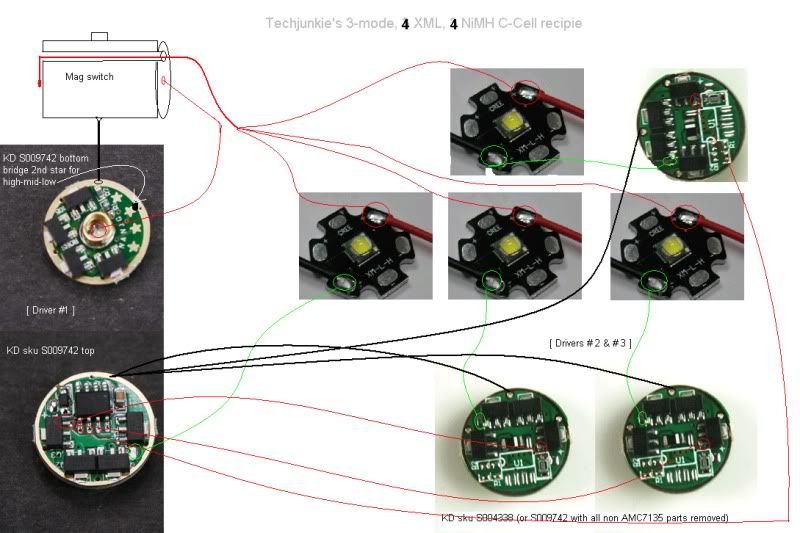
Just saw this thread and want to point out that in both Old-Lumens drawing and my original drawing above, there's one important thing missing... the ground wires that connect the slave boards to ground. Without those, LEDs 2 and 3 won't light. Here's the modified drawing:

Even better, here's a mod to the method above, whereby only the low current required to operate the micro controller goes through the switch, but not the high current for the LEDs. In this method, the regulators are operated by the mcu like a low current switch can be used to operate a FET or a solenoid switch. By doing this, the switch resistance is eliminated, thereby reducing parasitic resistance and increasing regulated runtime:

You can use any number of regulators and LEDs. The pic above shows 4-4, but 2-2 or 3-3 or even 5-5, 6-6, etc. would work the same way. Note that bypassing the switch to eliminate resistance is great for 3 cells or 4 weak cells, but I actually had to improve regulator heatsinking and add resistance back in when using 4 powerful cells and 4 tightly stacked regulators to avoid them overheating and throttling back.
I gave up because og 2 didn’t come on, now u have given me hope ,so I will give it another go tech junkie:) I didn’t do those grounds u have now showed ![]() Ty
Ty