For the aluminum D4 and D4V2, I don’t think the switch is on a PCB at all. It fits very tightly into a pocket machined in the head right below the switch boot. Below that pocket there’s room for 2 tiny wires to connect from the switch to the driver. There’s no room for a special pcp for the switch unless you start dremeling or glue on a custom raised switchboot.
I haven’t tried opening the head in the Ti and Brass D4v2. Presumably those have a larger pocket with room for a custom illuminated PCB.
I think FET is used for the final 2 modes (turbo). I think the power right below full power uses PWM.
Alright, thank you! That means I will have to basically treat this thing like a loaded gun while in my pocket or if a “muggle” has access to it. I have a few muggles to worry about.
Why I was asking:
I was thinking maybe I could add a dead-man style enable switch for turbo mode so that it would physically disconnect the FET gate from the uC when you release the switch. Doing that would obviously not be compatible without completely new firmware and a minor pcb hack, and loss of the functionality that TK spent a lot of time creating. This gives me an excuse to finally do some board design again! The size of this thing will make that a real challenge. I have been getting rusty, it’s been a decade since I last designed a board and I am itching for something fun and functional. I was going to get an FW3A but the price and build quality of the D4/D4V2 is very attractive. To get proper optics in the FW3A you are right back at the D4 pricing!
If you mean accidentally having the button depressed for a long time, resulting in high output (heat) while the flashlight is in your pocket, it’s nice to know that the later versions of Anduril now have “stuck-button” precaution. Basically if the button gets depressed continuously for about 10 or so seconds, the light will ramp to the top and then ramp down to the lowest brightness… and if the button is still stuck, the flaslight will go to Lockout mode automatically to prevent it from turning on accidentally again.
When exactly are later versions with this feature? Interesting just tried it:
D4SV2 ordered Feb 20th 2020 from IOS -- doesn't have the feature
Dec 2019 Anduril I customized in a SC31B mod -- yes, has the feature!
Ouch! Guess Hank is not keeping up, but I can understand - it's a lot of extra work if they were already manufactured earlier. At least I can now re-program the D4SV2 without taking it apart.
I had read through a lot of the later posts and did not see that was added, thanks! I ended up buying a gray KR4 last night since the traditional tail switch seems easier to modify and I can give it a quarter turn to disconnect the battery.
In the end, I am hoping I can cram in a design that at least performs to SIL2. in the meantime I still have my eye looking out for a used D4. I have a feeling there will be some soon. It’s scary that people on Reddit are saying they bought one and are asking how to charge the battery. Holy crap! I expect those will show up on eBay soon.
Hhmm, I've gotten threaded batt tubes to heat up in my hand before. I got a tube of electrically and thermally conductive grease - was pricey.
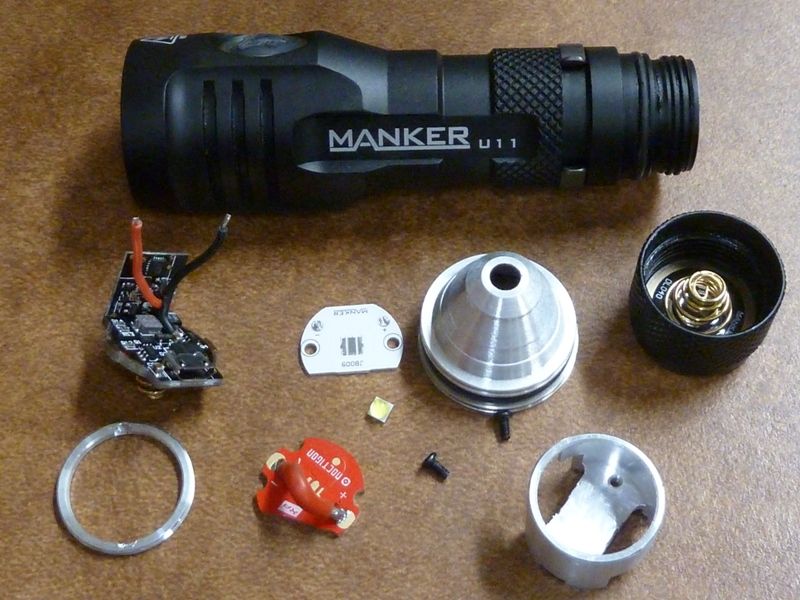
Never took apart a Zebra. Typical problems with uni-body designs is the pill comes out the top, so the head is poor thermally. Manker U11 is an example:
ZebraLights have a reputation for having one of the best drivers + excellent thermal management - there's a thermal camera video just a few posts above.
A battery tube WILL heat up, but the transfer from board > head > rest of the host can be so slow that I think the mass of that tube has little effect on sustainable brightness, at least not with the slight different 18650 vs 21700 would give. The temp of the tube (especially the very end) itself might be different, but wouldn’t really keep the light cooler/able to run hotter.
From my understanding Zebralights don’t use a pill. An integrated unit of MCPCB+driver is attached directly to a section milled out to fit it inside the head of the light.
Zebralight’s unibody design has superb thermal performance. The best of any of my lights.
Except for the tailcap, virtually the entire light is a single chunk of aluminum that contains the head, heatsink fins, shelf, driver compartment and battery compartment. There’s no separate pill… instead they have a shelf machined into that big piece of aluminum. There’s also no separate battery tube. Almost the entire light is a single piece of unbroken metal.
Also, to save space, modern Zebras don’t have a separate star. Instead they use an integrated board that contains both the driver and the emitter.
Modern Zebralights are an absolute royal pain to mod, but the thermal performance out-of-the-box is truly amazing.
Of course I know the Zebra rep. Someone hit me again to remind me... But I've never seen a tear down til now, and it ain't much of a tear down - one pic - many details missing. It's mentioned many many many times here on BLF how great the Zebra lights are, but noth'n - no real info, no real full teardown, least I know of.
Best I can tell is the driver surface mounts are on the same MCPCB as the LED - this seems to be counter intuitive by putting the driver on the hottest thing in the light, but obviously it must work. L4P is doing similar things with the FET for example, but again, I don't understand the thermal theory behind it. Clearly the potting on the bottom side of the MCPCB/driver here is probably significant. I don't understand how the heat gets from the MCPCB to the housing - that one pic probably is not telling the full story. I don't see where the shelf is, and how it connects to the MCPCB, if at all. It seems like the potting material sits between the MCPCB and the shelf, if I'm guessing right.
The thermal videos don't tell me much, sorry. I dunno who understands what they are looking at, but I sure don't. The Zebra starts out red and the head gets white, while the D4 starts out black and only gets to yellow in the head. What's goin on there? I don't get it - you can't even compare the vids. Is white super hot, and yellow mildly hot? So? Does this mean the D4 is cool compared to the smok'n hot Zebra? I'm confused...
Look'n at the temp, I assume the temp is coming from the external camera? if so, it's reporting external temp. Maybe it makes sense - the D4 is hotter because it's got a better thermal path to the shell, while the Zebra keeps it in better from the potting - dunno, just guessing here.
What you are looking for is how fast the heat spreads through the whole light. The whole Zebralight is warming up very quickly front to back, this is what you want: the heat away from the LED.
In the other 2 videos the heat is confined to the head for a much longer time which is both bad for the LED and the output level.
The design of having everything on one board is quite ingenious. Cables add resistance and points of failure. The electronic components can handle the temperatures without issue.
Everything under the copper board is the shelf. The whole light except the battery cap is made from one piece of aluminium rod.
I think most of the driver components are only on one side of the board that contains the driver and LED. This leaves most of the other side to sit flush against the solid shelf for maximum heat transfer. It’s not just attached at the edges… there is a sizeable shelf.
One reason you don’t see teardowns of Zebralights is they are supposedly really hard to teardown. Definitely not mod friendly at all:
The lens retaining ring is recessed and firmly press-fit. There is no easy way to remove it without destroying the lens.
All the electronics are potted with some white goop. So even if you manage to open it up, you have to scrape goop off before you can make any changes.
Single-board containing the driver electronics and LED. No separate star. Zebralight drivers are excellent. They boast high efficiency and superb thermal management. However, trying to emitter swap on an integrated board is not easy. With a regular star you can desolder the leads, pull it out and then use a number of different methods to heat up the star to desolder the LED. With an integrated star, you basically need a soldering station with a heat gun. Also, because there is no separate star, any alternate LED you swap in must be the same footprint as the original LED.
Good choice of stock LEDs gives less reason to mod. Modern Zebralights tend to have very nice tints. They’ve been spending more time selecting from good tint bins and it shows. However, with many options available at purchase, and given the high difficulty in trying to mod them, there’s even less incentive to try to take a Zebralight apart.
My SC600w IV Plus can sustain considerably brighter output than any of my Emisar D4 or D4v2. The heat management is considerably better in the Zebra.
I'm just not sure what's goin on, thermally. I think the potting really, really helps, just not sure what it's doing. Can't believe the uni-body makes all the difference. I've seen the old thermal images before/after with effective thermal grease on threads and the difference was huge - but it's a true before/after thermal vid, true apples to apples comparison. I think it's all about managing the heat - timing, amp controls, and heat draw and containment. I think Zebra has perfected it for their specific models. Plus the drivers giving them direct control of the amps which is a world of difference.
True I'm sure - they make it difficult to tear down, and it's different experimenting with a $10 light vs. a $125 light. Potting has been pretty well tested and proven to work, but I'm sure what potting and where/how makes the difference. We generally don't like potting because of the permanence, but for these Emisars with the pogo pin programming, sure makes sense to at least consider it, but again, must be the best stuff for this application and properly designed in.