Hi pinkpanda, I bought that exact same bike-light to be modded someday with a LD2 driver ![]()
Thanks for the pics of the inside and I will never be able to make it such a neat job with copper pills as you did!
Hi pinkpanda, I bought that exact same bike-light to be modded someday with a LD2 driver ![]()
Thanks for the pics of the inside and I will never be able to make it such a neat job with copper pills as you did!
Very sweet mod pp. Did you do the machining yourself?
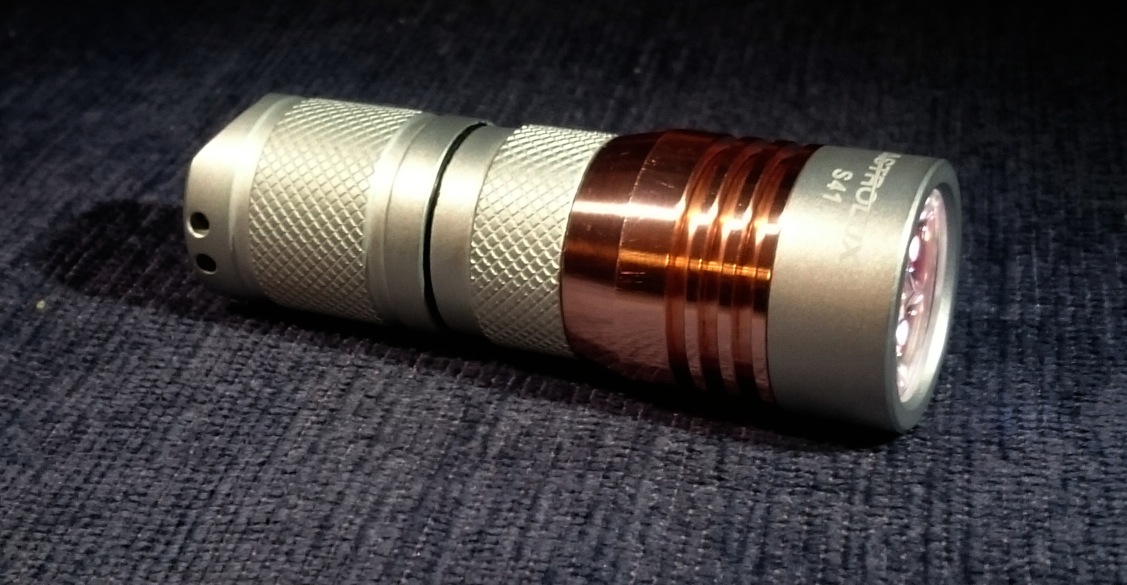
Finally I got my Astrolux S41 in today, it works but I still have to check the ledboard for safety. And since it is going to live in my pants pockets, always together with a bunch of keys, the ano would wear off anyway. so I helped it a little ![]()

Please if you think of repeating this, concentrated lye is very corrosive, wear goggles, do not get it on your skin or clothes, and do not spill it anywhere, even not a drop. And keep your nose away, the chemical reaction goes with the formation of hydrochloric acid
Btw, I lubed the o-rings very well before doing this, and it may be safer to not keep the battery in ![]()
I over-did it a bit, so the aluminium is not really shiny, and in the groove the border between bare and black is not really tidy, but I’m happy with the result.
I gas-dedomed the XPL V6 2C emitters and polished the texture off the front of the CUTE 3 SS optic (400grit to 3000grit sandpaper, then a toothpaste polish). The tint is very noticeably yellowish now after the dedome. I kind of like it; reminds me of incandescent light.
With a fully charged purple Efest 26650 4200mAh, I measured 46,500cd.
Damn that looks good! 
Very nice djozz!!!
I would remove everything from the inside , and just cover the threads , but as it worked it’s perfect ![]()
Wow you removed the ano without disassembling the light? Very brave!
I’ve removed ano before with Greased Lightning.
It’s very simple. I have a plastic mug with Greased Lightning inside. Disassemble the light then put the applicable pars inside standing up. Wait several hours. Stir if needed. Usually all the anodizing comes off.
Once the ano is off, you can polish the light with any metal polish for a nice look. However, the polish usually wears off really quickly.
Holly Molly. I couldn’t believe you could put the whole thing in that corrosive mixture. Plastic lens, rubber boot and all.
Your a braver man than I djozz, or very up on your chemistry.
Ziet er goed uit djozz!
I guess that way you can have physical lockout on a bare light, because the ano is still on the inside… Nice!
Experimenting I actually dissolved a piece of meat one day, using that same bottle. So yes, it might be itchy on the eyes ![]()
That satin finish looks better than polishing. Not sure about dipping the whole light though. ![]()
I thought disassembling it at first, and then covering the holes, but then could not think of a good reason not to put the whole light in it, lye does not affect silicon, copper or glass. I was not entirely sure about the anti-reflection coating, but it survived fine. And yes, I work with chemicals (my job is a teaching assistant for practical lessons in a secondary school).
@Dutcheee: yes correct, lock-out works fine, all threads still have their ano.
A few days ago my Skilhunt DS16 arrived.
The light was a disappointment.
Not sure what I’ll do with this turkey. Might not be worth the effort to try to mod it into something worth having.
Today I tried to artificially weather an old SK-68, as a test run for a later project. I used a dremel with a wire brush, and allowed the SK-68 to spin freely on a dowel. Some parts turned out okay, like the “tactical” heat sink section with deep grooves, but the rest is pretty bad. Then again, it was only a very quick first test on a cheap item I don’t use. All it tells me is that, yes, it’s probably feasible to lighten up some areas if I decide to… but I’ll need to gain some skill levels first.
The damage on the tail was already there, and it seems the head is anodized harder than the body. So my 5-minute test didn’t do much to the head. I didn’t do anything to the tailcap.

A second test is probably warranted, using better methods, to see how much I can improve it without a lot of effort. I’m thinking this time I should mount the item on a drill, by padding a drill bit with tape until it’s snug. Then quickly rotate the drill opposite of the direction the dremel bit is spinning, using only light pressure the dremel. This should keep it from going into recessed areas, while also keeping it from sticking in any one place too long.
The real project I’m considering is a weathered light saber. I’m trying to decide whether to get it all black-anodized so I can weather it myself, get it pre-weathered and hope I get lucky (and lighten any too-dark parts), or go with a black-and-silver stock design. The goal is to get it similar to the stock design, but … older. Kind of like the “weathered lighter” pic below.
Stock design (render):

Weathered (render):

Weathered lighter (render):

Actual photo of a similar design:

I like the weathered finish, but I don’t really want the recessed areas lightened… only the higher spots. Wanting more contrast, and not quite as dirty.
I use bleach to deanodise lights. I wonder how that would go sprinkled on the light without soaking it to get a weathered look?
Those light sabers are bitchen!
I did some modding on my Astrolux S41 today, and I must say that this host is a joy to mod! Yesterday evening I removed the anodisation (see a couple of posts above), this evening I first took the pill out, removed everything and blow-torched the pill to remove any coating, then polished it with silver polish (sanded the ledboard shelf back to copper too) and this came out of it (partly assembled again for photo):

Of course it will tarnish soon enough, but for now it is extra shiny :-)
Sofar the cosmetic part.
The rest:
*soldered the ledboard to the pill (the stock light had no screws to fix the ledboard! )
*in one go soldered two Nichia 219C 5000K 83CRI, and two Nichia 219C 3000K 83CRI leds, flipped, so that + and minus are reversed
*used a Mtn Bistro driver, 20AWG silicon wires. This driver board is a bit thinner than the stock BLF-A6 driver board so I had to solder some small blobs around on the ground ring to have the driver retaining ring make contact.
*soldered an intl-outdoor Be-Cu spring on the driver
*kept the tail stock so that if a short occurs somehow, the steel springs are able to collapse and may break the circuit, for safety
Numbers on a purple Efest 18350:
*current at start-up 12.5A dropping to 11.5A after a couple of seconds
*output 3 seconds after switch-on: 2290 lm
*output 30 seconds after switch-on: 1920 lm
The tint is what you expect: in the middle, around 4000K, no disturbing effect at all from the warm and neutral leds that are spatially separated.
Pictures:


Just Excellent!
I’ll bet you that MTN board gives a little more oomph than the stock Banggood BLF driver.
I doubt that the currents will be any different, but (must check it side-by-side with the Manker E14 that still has its BLF-A6 driver) the timing for forward and backwards through the UI probably is less dependent on temperature.
I’ve got a quad with 5000k and 4000k 219c’s. The tint is quite nice indeed
Wow, true pocket rocket! I have a chopped down Mini Magnate at 3 3/4 inches that puts out around 2200 lumens, but yours is even smaller and brighter. Course mine is a triple, and made by someone here in our Forum. And it was $80 instead of, what, $35? Sorry I missed this deal. Hoping it comes around again.