NANJG 112A 1000mA 4-Group Driver
Reviewer's Overall Rating: ★★★★★
Summary:
| Size: | 17mm |
| Voltage: | 1.0-4.2V |
| Regulation |
Buck/Boost |
| Current: | 1000mA |
| Modes: | 2-5 in 4 groups |
| Price Paid: | $5.02 |
| From: | KaiDomain |
Pros:
- Customizable number of modes
- Seems well regulated on 18650
- Runs on a single AA
- No PWM on low
Cons:
- Group selection requires soldering
- Mode memory a little odd
Features / Value: ★★★★☆
Mode Groups
I first learned about this driver at CPF (available at KaiDomain Product ID 10243 or sku number S009113) when someone ordered a different driver (DX sku 15880) from DealExtreme and received this one instead. What I liked about it is that it had mode memory and, although it came with 5 modes by default (Low, Mid, High, Fast Strobe, SOS), could be customized to 2 modes (Low and Hi), 3 modes (Low, Medium, High), or a different 3 modes (Low, High, Slow Strobe). Unlike some drivers with groups selected by button press series, this is hard wired by soldering some connections in place. I think that is good, because I knew I wanted only 2 or 3 modes. Output was advertised as 1000mA which is a pretty decent amount for a Cree XR-E LED.
KD advertises the Low as 5% and the Medium as 30% which would be pretty good separation and a very low Low. However, after installing it, I think the modes are more like the similar AK47 driver at DX (sku 6190) which uses 20% and 30% for its Low and Medium. At first I couldn't tell much of a difference between the two modes and was afraid I had damaged the driver with my clumsy soldering. The default 5-mode also seemed to have Low and Medium very close. So I wound up going back to just 2 modes, which suits me just as well.
Installation
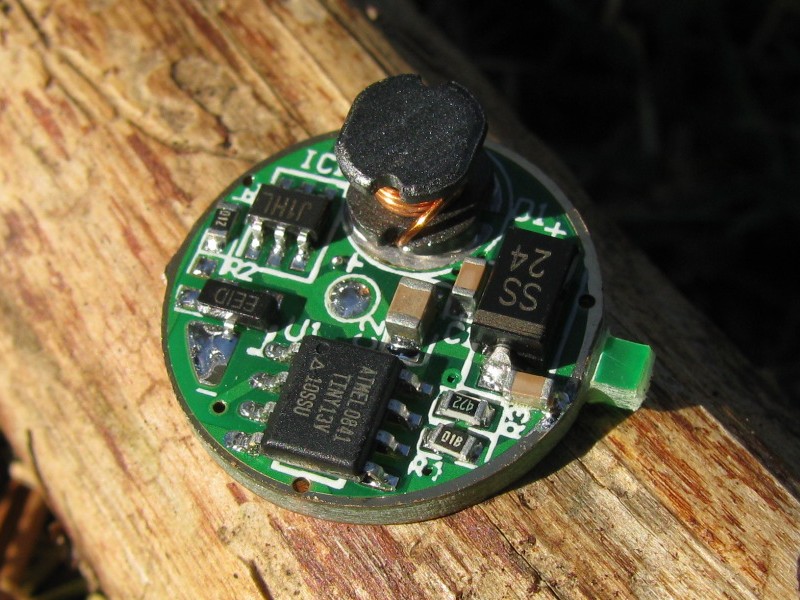
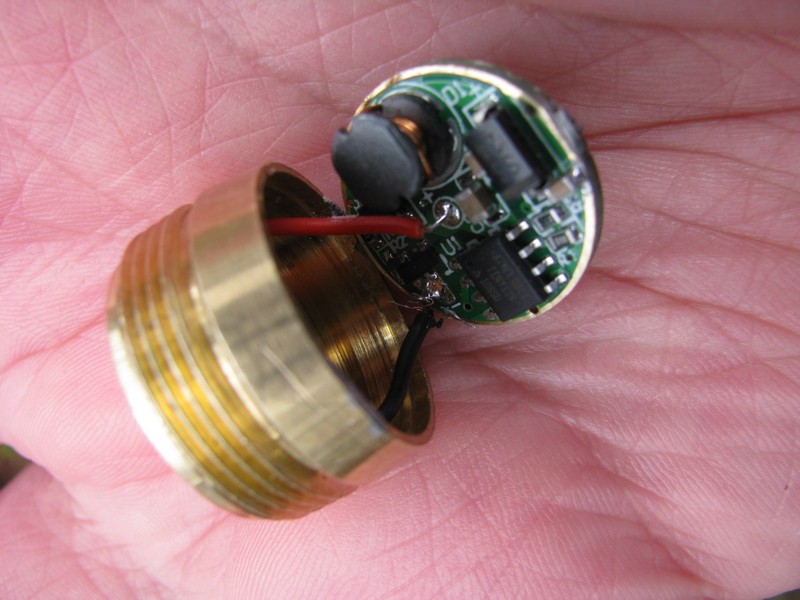
Here is where I soldered the leads from the LED. The postive (red) goes to the pad at the middle while the negative (black) goes to a triangular pad below the EEID chip not far from the ATMEL chip.
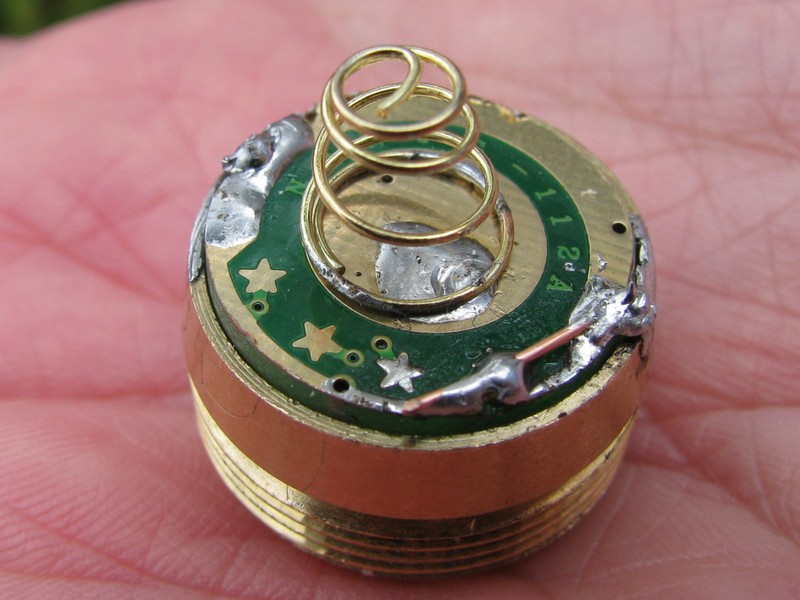
Here's how I soldered the bottom of the driver. I ran a piece of wire from the big negative pad around most of the perimeter of the board to the first star which you can't see because there is a big glob of solder on it. The wire extends farther than it really needs to. Also the second star has solder on it because at one time I had connected both the first and second star before deciding I didn't like the three modes. I soldered the spring pretty poorly and it came off (dangerous! the spring came loose and moved over, shorting the positive center and negative perimeter, but fortunately I was doing the Eneloop test at the time with the tail cap off and I noticed first that I had no current draw and then it jumped up to over 5 amps before I took the leads off and cut power. Now I have the spring soldered on at two spots. The other glob in the back was to get a good connection between the board and the pill. The first time I tried the driver out, nothing happened because the negative of the pill wasn't making contact with the negative of the board. It's ugly work, but it was my first try. I will do a lot better next time.
Mode Memory and Mode Switching
The modes are a little funky, not like most lights I have. With my other lights, if I leave the light off briefly by halfway pressing the power button, then the light goes to the next mode. If I turn the light off for a while (and this can vary from 1-5 seconds, though the S10 needed 25 seconds to remember) then the modes either start over again or, if the light has memory, will resume in the same mode. However, this light bases its memory on how long the light is left on. So if the light stays on less than 5 seconds and you turn it off, it will come on in the next mode. If the light is on for more than 5 seconds and you turn the light off, it will come on in the same mode. And that "off" can be for a fraction of a second via a half-press or left in a drawer. It works, it's just a different approach. The only bad thing is if the light has been on for more than 5 seconds and you want to change modes, you have to do two half-presses since after the first half-press the light will remember the mode. Also if you use the light in short bursts of less than 5 seconds, the memory won't work exactly like what you want, but that's not that unusual in a budget light.
Battery Protection
KD also says the driver has lithium-ion battery protection at 2.75V, but I didn't run my battery down that far to check that. However, I did connect 2 AA NiMH's which together measured 2.9V (without load) and the light started to blink, so I think it would work. This also means that a 2xAA configuration wouldn't be very good with this driver since it would assume that you had a low li-ion battery rather than 2 fresh NiMH's and start blinking.
Build Quality: ★★★★★
Build quality of the driver seems adequate to me. If anything, it is pretty robust because I wound up doing a good bit of soldering, desoldering, and resoldering before I got this thing right. I managed to rip the wires out coming from the LED and had to resolder those too. This was my first driver installation, so it was messy. And the thing still works. The only thing I didn't test out was the other 3-mode set with the slow strobe.
Battery Life: ★★★★☆
Lithium Ion Battery
I got a shorter runtime than with the original driver in this flashlight, which I reviewed here. Whereas with the original driver I was able to get 1 hour and 45 minutes of runtime, this was only 1 hour and 15 minutes. But with the original driver, the brightness was pretty low after the first hour and this one seemed to hold up, drawing more current as the voltage decreased. Here are the results of a test with my gray protected Trustfire 2400mAh 18650.
| Time (hr:min) | Volts | High (mA) | Low (mA) | Power (watts) |
|---|---|---|---|---|
| 0:00 | 4.21 | 1070 | 290 | 4.51 |
| 0:15 | 4.01 | 1090 | 320 | 4.37 |
| 0:30 | 3.90 | 1110 | 330 | 4.33 |
| 0:45 | 3.80 | 1160 | 350 | 4.41 |
| 1:00 | 3.68 | 1220 | 360 | 4.49 |
| 1:15 | 3.60 | 1250 | 370 | 4.50 |
I included a column for power which is just the voltage times high current (in Amps) to get watts. You can see the power draw is pretty steady. At least the power drawn from the battery, I have no idea how much power is actually reaching the LED. This is what I would expect to see under good regulation though. I could maybe get another 15 minutes if I had let the voltage go down a little below 3.6V.
AA Battery
I used a single 2000mAh 1.2V NiMH Eneloop and one of my adapters that I use to charge 14500 cells in my 18650 charger and was surprised to get light and modes. But you can see the regulation isn't working the same and the current draw drops with the voltage. The light didn't start out as bright and seemed to get dimmer over the length of the test. Still, I got an hour of light out of one AA battery. Because of the low battery protection, I don't think 2xAA would work well. The driver is definitely boosting the voltage out of that AA to get the LED to light up.
| Time (hr:min) | Volts | High (mA) | Low (mA) | Watts |
|---|---|---|---|---|
| 0:00 | 1.43 | 1740 | 1050 | 2.49 |
| 0:15 | 1.27 | 1650 | 1050 | 2.10 |
| 0:30 | 1.24 | 1640 | 1060 | 2.03 |
| 0:45 | 1.22 | 1600 | 1090 | 1.95 |
| 1:00 | 1.07 | 1090 | 620 | 1.17 |
After writing this, I managed to burn out the driver when I was doing some tests and connected the battery backwards. It didn't burn it out completely, but the light wasn't nearly as bright anymore. I ordered another one and put it in my Ultrafire WF-502B with a Cree XP-G LED. Originally that light was a 1-mode, but it was getting 85% efficiency. I did a very involved test measuring battery voltage and current (V in and I in) and then the voltage drop across the LED and current drawn by the LED (V out and I out). Multiplying V and I gives power and I used that number to generate efficiency. I used 4 different 18650 batteries at different discharge states and did measurements on High, Medium, and Low (skipping strobe and SOS) before converting the driver to 2-mode use. The remarkably low efficiency on Medium and Low may due to the effects of PWM on my cheap meter. It may have been measuring some kind of peak instead of RMS or average.
| At rest battery voltage | 3.57 | 3.84 | 4.04 | 4.14 | |
| High | V in (volt) |
3.40 | 3.70 | 3.89 | 3.93 |
| I in (mA) |
1170 | 1030 | 1220 | 1260 | |
| P in (watt) |
3.98 | 3.81 | 4.75 | 4.95 | |
| V out | 3.04 | 3.04 | 3.07 | 3.09 | |
| I out | 860 | 860 | 1030 | 1100 | |
| P out | 2.61 | 2.61 | 3.16 | 3.40 | |
| Efficiency | 66% | 69% | 67% | 69% | |
| Med | V in | 3.53 | 3.79 | 4.02 | 4.09 |
| I in | 510 | 460 | 420 | 410 | |
| P in | 1.80 | 1.74 | 1.69 | 1.68 | |
| V out | 2.42 | 2.42 | 2.42 | 2.43 | |
| I out | 80 | 80 | 80 | 80 | |
| P out | 0.19 | 0.19 | 0.19 | 0.19 | |
| Efficiency | 11% | 11% | 11% | 12% | |
| Low | V in | 3.55 | 3.80 | 4.03 | 4.09 |
| I in | 170 | 160 | 150 | 140 | |
| P in | 0.60 | 0.61 | 0.60 | 0.57 | |
| V out | 2.37 | 2.36 | 2.37 | 2.37 | |
| I out | 20 | 20 | 20 | 20 | |
| P out | 0.05 | 0.05 | 0.05 | 0.05 | |
| Efficiency | 8% | 8% | 8% | 8% |
Later I converted the driver to 2 modes and ran two tests using AA Eneloop batteries, one test used a fresh battery and the other used a partially discharged one. On an AA battery, the High and Low are much closer in output. And certainly the light isn't nearly as bright, getting only 310mA to the LED on a fresh battery instead of over 1000 with a li-ion. The driver efficiency drops quite a bit in boost mode. Still, it is usable in a pinch.
| At rest battery voltage | 1.345 | 1.169 | |
| High | V in (volt) |
1.265 | 1.040 |
| I in (mA) |
1420 | 1090 | |
| P in (watt) |
1.80 | 1.13 | |
| V out | 2.82 | 2.81 | |
| I out | 310 | 230 | |
| P out | 0.87 | 0.65 | |
| Efficiency | 49% | 57% | |
| Low | V in | 1.286 | 1.058 |
| I in | 980 | 730 | |
| P in | 1.26 | 0.77 | |
| V out | 2.19 | 2.19 | |
| I out | 40 | 40 | |
| P out | 0.05 | 0.05 | |
| Efficiency | 7% | 11% |
Light Output: ★★★★★
I thought the light output was good, but I can't provide numbers. It seemed just as bright as with the original driver and the current draw was nearly the same at the beginning on both drivers. But it does seem better regulated. On NiMH's, even KD says the output will be less, which it was. But it is still usable and nice to know that in a pinch, I could use an AA battery in this light. The old driver only had a range of 2.4-4.2V. The low mode is a good bit less than max, but not a super low. The high is probably 180 lumens and the low is 10-15 lumens on a li-ion. This is less than the current draw of about 30% would indicate. On a NiMH AA the brightness on high is probably around 90 lumens while the low again is 10-15 lumens.
I was testing some lights for PWM by moving them quickly on a time exposure. If a light uses PWM, the light stream shows up as a series of dots. If the light is current regulated for low modes, there is a smooth stream of light. I was surprised that the light with this driver gave me a smooth stream. Here it is on the left with the iTP A3 EOS on the right.

Summary: ★★★★★
I like having a 2-mode light with memory and I was happy that I was able to do this without breaking anything. It is a little clumsy soldering the stars on the back of the driver board, but the way I did it was reversible, and I should never have to do it again. The mode memory is useful, if a little funky. A a 3-mode driver, I was disappointed with the separation of Low and Medium, but it works quite well as a 2-mode driver.