DIY Light Bar - 40 x XM-L2 on copper.

After checking into several of the Chinese light bars, Ive decided that Id be far better off building my own for roughly the same cost. Although many of them advertised high lumens, and several of the off road community bought them and posted good reviews, they still appeared to be severely under driven and cheaply built. All the ones I could find were glued shut. A destructive disassembley using a ban saw revealed a single large mcpcb with all the emitters and a cheap small driver surface mounted to a large cheap board. Even worse was the extremely poor thermal path to a cheap undersized heat sink running the length of the backside of the unit. Sure, the sink gets hot after a few minutes, but by that time the internal board is running far hotter and frying the emitters and driver components. The reflectors were plastic with a dull cheap finish that probably cut 20-30% of the lumens. Also, only single mode high and no thermal protection. The Chinese must make an absolute killing on these from those that dont have anything to compare them with (other than their OEM headlights).

My DIY search began by looking for a driver that could power a large XM-L array with integral features to resist the transient spikes from an alternator. Having securing a local source from DIWdiver for the driver, I found a pair a massive aluminum heat sinks on ebay (20 lbs each). One will be used for the light bar.

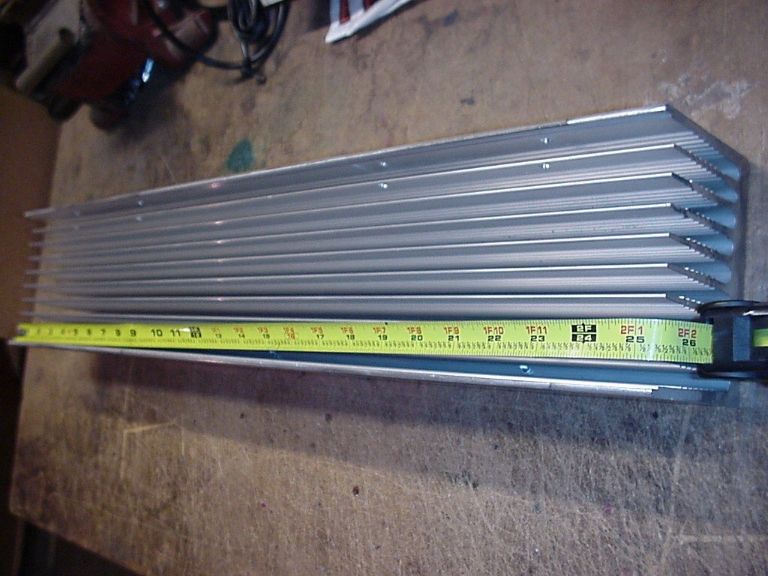
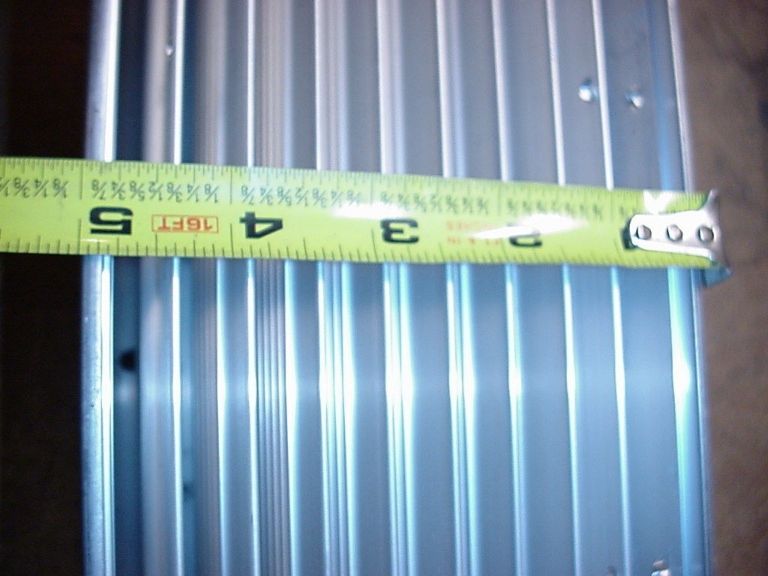
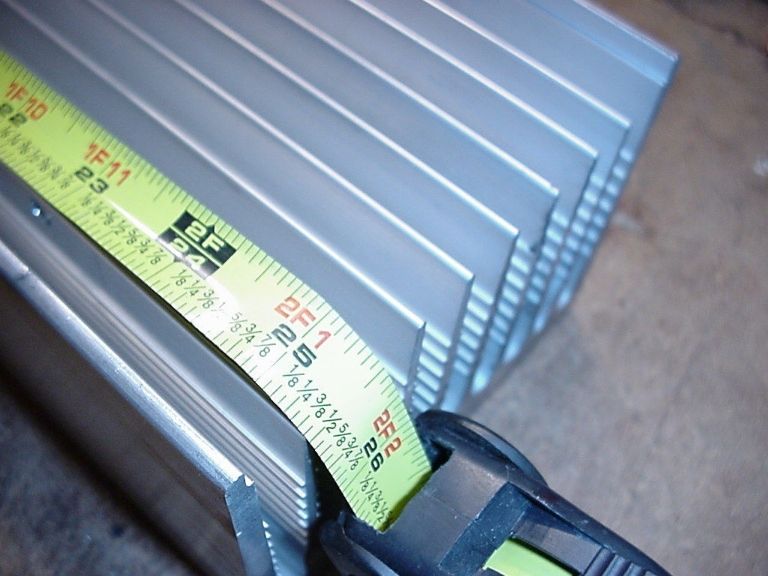
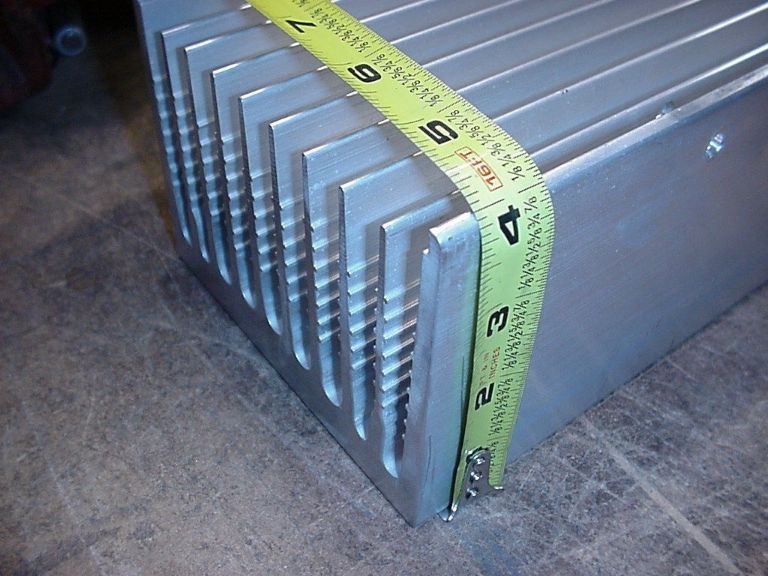
The heatsink measures 25.5” x 5” x 4”. So the mounting surface is 25.5” x 5”.

The driver is a linear mode design. The closer I can run the LED vf to the actual input power and maintain at least a +.2V differential on the input side, the more efficient the driver will operate. If vIN falls lower than vF, the driver will fall out of regulation and the lights will dim… nothing catastrophic to worry about. Since the alternator will already have to contend with 27 amps from the LEDS and 16 amps from the pair of 100 watt HID’s, plus power the vehicle (probably around 10 amps), this puts me at around 53 amps total continuous. The aux lights are on a relay and toggle. When the relay is activated, it kills the headlights and activates the aux lights. I wired it this way because the stock headlights contribute nothing when the HID’s are activated. I will add additional switching options and relays to individually select any combination from HID, LED1 high/low and LED2 high/low. More on this later.

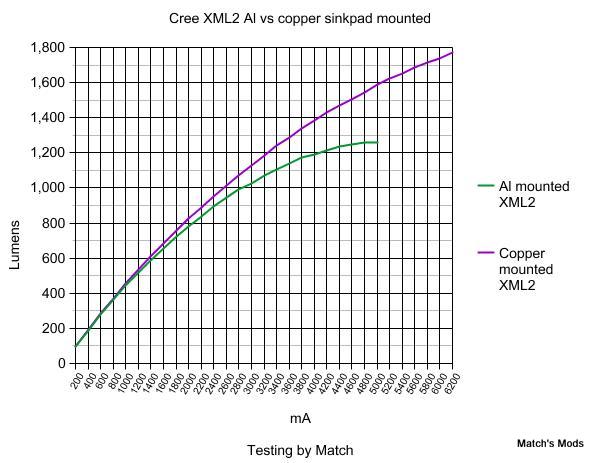
Ive already ordered a bunch of Noctigon mounted XM-L2 U2 1A for this project. The array will be wired through two independent drivers and each driver will run 20 LEDs in a 4S5P config at 13.5A total output per driver, or 2.7A to each emitter. After checking out Match’s emitter tests, it looks like this config would allow for the lowest vF while extracting the highest lumens.

A few extrapolations in different configs (4S4P versus 4S5P and different drive currents):

XM-L2
3A = 1125 x 32 = 36000LM (4S4P 12A total)
3.375A = 1220 x 32 = 39040LM (4S4P 13.5A total)
2.7A = 1040 x 40 = 41600LM (4S5P 13.5A total)

From Match’s tests:

With a great deal of help from Old-Lumens and a lot of digging, I think Ive finally concluded that I’ll use 40 x C8 smooth reflectors. A combination of different reflectors would complicate the build considerably because of their different mounting heights, so I think I’ll just stick with one type for now. The configuration will be a 3 row or staggered reflector pattern. Since most C8 reflectors are 42mm, this leaves something of a dilemma since 42mm x 3 converts to 4.96”. Thats cutting it a bit to close for a 5” wide sink. I think Ive found some C8 reflectors that measure 41mm, which will give me a more comfortable 4.84” to work with.

For the reflector config, Im considering:

Row 1 - 13 emitters
Row 2 - 14 emitters
Row 3 - 13 emitters

If anyone has any better ideas, please let me know. I wish I had some modeling software to test different configurations.

If I have cooling problems with the sink, I can fabricate a plenum to scoop air from either side of the sink, force it through the fins and eject it out the back of the center of the sink. I wont know how hot it will run till I try. The driver comes equipped for H/L mode operation activated via an optional on/off/on toggle, but can also use a rheostat for infinite control. I havent decided exactly which direction I’ll take at this point. There’s room in the cab to install duel amp meters, so a rheostat for infinite brightness control for each driver + dual amp monitor might be an interesting option. A temp probe might be mandatory.

I’ll update when parts begin to arrive. If anyone would like to play with some modeling software to help me optimize the reflector placement, that would be a REALLY big help.

Specs:
40 reflectors measure 41mm each
Reflectors must be in 3 rows, stacked or staggered, as long as they remain symmetrical.
Sink surface is 25.5” x 5”.

Any comments and suggestions would be welcome. Im probably already well over my head, but this is nothing compared to a few mega high output builds Ive completed in the past… its just different. :bigsmile:

How are you mounting the lenses to the front of the reflectors?

yeeeeehaaaaaa!

Here was my idea, i was going to use this as the body of my light bar light bar but i change from build to build to much and never got to it….i then was going to buy a copper plate to mount my leds to and use different reflectors to get flood and throw, then i would of got a sheet of plexiglass sheet for the front and used clear silicon around it followed by screws around the plexiglass

I like it!

Im thinking about having a plexiglass cover built at a shop that will slip over the font of the sink. Slip it on till it contacts the font of the reflectors, then drill holes, tap and secure with bolts. Seal with silicon. I will probably glue the reflector bases to emitter centering rings and then glue the centering rings to the MCPCB for added assurance.

Assuming it even comes apart with out completely destroying it, youre going to have major problems with heat sinking (if youre going to drive it properly). :wink: You could put 100 lbs of copper in it, but it still lacks the surface area necessary to exchange the heat to the air.

My HID’s are 18,000 lumens and make a pair of BTU Shockers on turbo nearly disappear in the beam. I wanted something more and you probably will too.

Why not liquid cooled? Aluminum rectangular tubing with the ends welded shut, 1/4" NPT holes tapped for hose barbs at each end, a small 12v pump, and a transmission cooler...

disreguard

I can imagine doing something wrong and blowing up all those less in a second..at least that's would be a possible scenario if I had to do that..

Looking forward to the build.

http://www.fasttech.com/products/1617/10001275/1208514

You might want to consider these for reflectors, since space is tight. These should do almost as well as the C8.

.

Great idea! I did consider liquid cooling but still needed a large aluminum surface to mount all the emitters and reflectors. When I found the right one on ebay, I pounced. According to the recommended total surface area requirements to exchange this amount of heat to air, I should be right in the ballpark of where I need to be. If not, the scoops and plenum should easily provide a 4x bump in cooling efficiency.

I already have an existing 2 x 100 watt HID setup on the front bumper (18,000 lumens) that provides 160 degrees of far reaching panorama. Even though the light housings were designed as cornering lights, the HID’s provide enough light they they completely overwhelm the stock high beams. The light bar is really a test platform for another array that Im building for a friends aircraft. The light bar will likely have a fairly decent spot beam straight ahead and provide more range than the cornering lights. During slow speed crawling, the cornering lights alone will be far more than enough and the light bar will likely be turned off.

Thanks OL. I actually ordered 16 of those last night for my friends aircraft. DX sells a 10 pack of 37mm lenses, so I ordered those as well. To bad Ric doesnt sell double sided AR in this size.

heatsink seems good, surfice area, is a tricky thing, it alone does not mean anything, same area might be more than enough as you drive, or not nearly enough when you stop, (no airflow).

i would not bother with liquid colling. KISS.

i would install a termostst on the bar, however, or two. small to220 t-stat, should let your driver, or you know temp is high, so either you manualy, or driver automaticly trims down current, i have done such temal control in my builds, works great. and it is not complicated. if your driver brighntess controled by current\ pot, you could include relay that will switch circuits, to “low mode”.

your bar seems just like heads that i build for my lights, just bigger. i would recomend ledil iris 38mm lens. i tried one made for mce, and it works just fine with xml. it is aslo attached by screws. also very important, you want lens\reflector that is screwed to the heatsink, not glued, you will have vibrations, that will comperimise glue, also i have no idea how you’ll be centering reflector you linked, and secure them. it will have to be very strong, vibration proof connection. also don’t try to press reflectors with your front glass. make sure they sit firm before you put cover on. or vibration will rattle them out of place.

It turns out that I already own one of the reflectors that I was thinking about using. It measures 41mm across and focuses well with XM-L2 and insulation gasket. Another piece of the puzzle down.


https://www.fasttech.com/p/1203500


https://www.fasttech.com/p/1182004

Thanks for your comments. The driver has thermal management and high voltage cut-off to protect itself but has no options to monitor and throttle for heat sink temps. Im probably going to mount the drivers in a remote location on their own heat sinks and put a cheap ebay digital monitor on the light bar to monitor it. Id probably need to ask the driver engineer how Id intergrate a to220 into the system, unless you’ve got some ideas for monitoring and management. Even a warning light would be very useful.

I like Ledil TIR optics but need as many forward lumens as possible, so Ive decided to go with reflectors. I think youre right about not letting the reflectors be retained by the lens because of impact rattling over bumps, although I might have one cut from quarts glass and use orings between the lens and the glass to cushion the clamping forces. I still havent decided. JB Weld epoxy between the mcpcb and spacer and again between the spacer and reflector will definitely retain that side or the reflector. I just might build a centering collar with 40 holes to retain the reflectors, but that would be such a pain to make and even more difficult to precisely align all the emitters on the sink. I think Ive seen gaskets with a lip, so if I could find the right size to fit the reflectors, they’d retain themselves. Another option might be to glue orings to the lip face on the reflector to dampen vibration. Any ideas?

There’s still much to consider.

if you want simple light to go on in your car to let you know the bar is too hot, you don’t need to do anythig with driver.

build simple circuit, where to220 tstat is a on off switch, it closes when it gets to its close\open temp. i usuasally install 70c t stats. even with copper stars like sinkpad.

if you have resistor in your driver which value you can change to change current. you can do autodimming,

i did similar in the light in this thread, post 21 has diargamm.

I just discovered that the driver has an option to monitor a thermal sensor on the light bar and ramp the current. Sorry, Ive been reading so many data sheets that I must have mixed this one up with another.

Data sheet link.

OH MAN, THIS IS EXCITING! Sounds crazy and like a job for the FlashPilot. Will be following this one.

I don't have anything useful to say other than I think thermal throttling (like your saying) is the way to go. The thought of being plugged into darkness while in a moving vehicle sounds very detrimental to the longevity of the emitters.

I agree, its probably best to let the driver manage the temps; especially since its capable of doing so. I could just envision getting distracted with something else (like getting stuck in a bog) and forgetting to dim the lights before they overheated.