[SALE] Emisar D18 lighted front board multicolored with LVP, stabilized or High/low

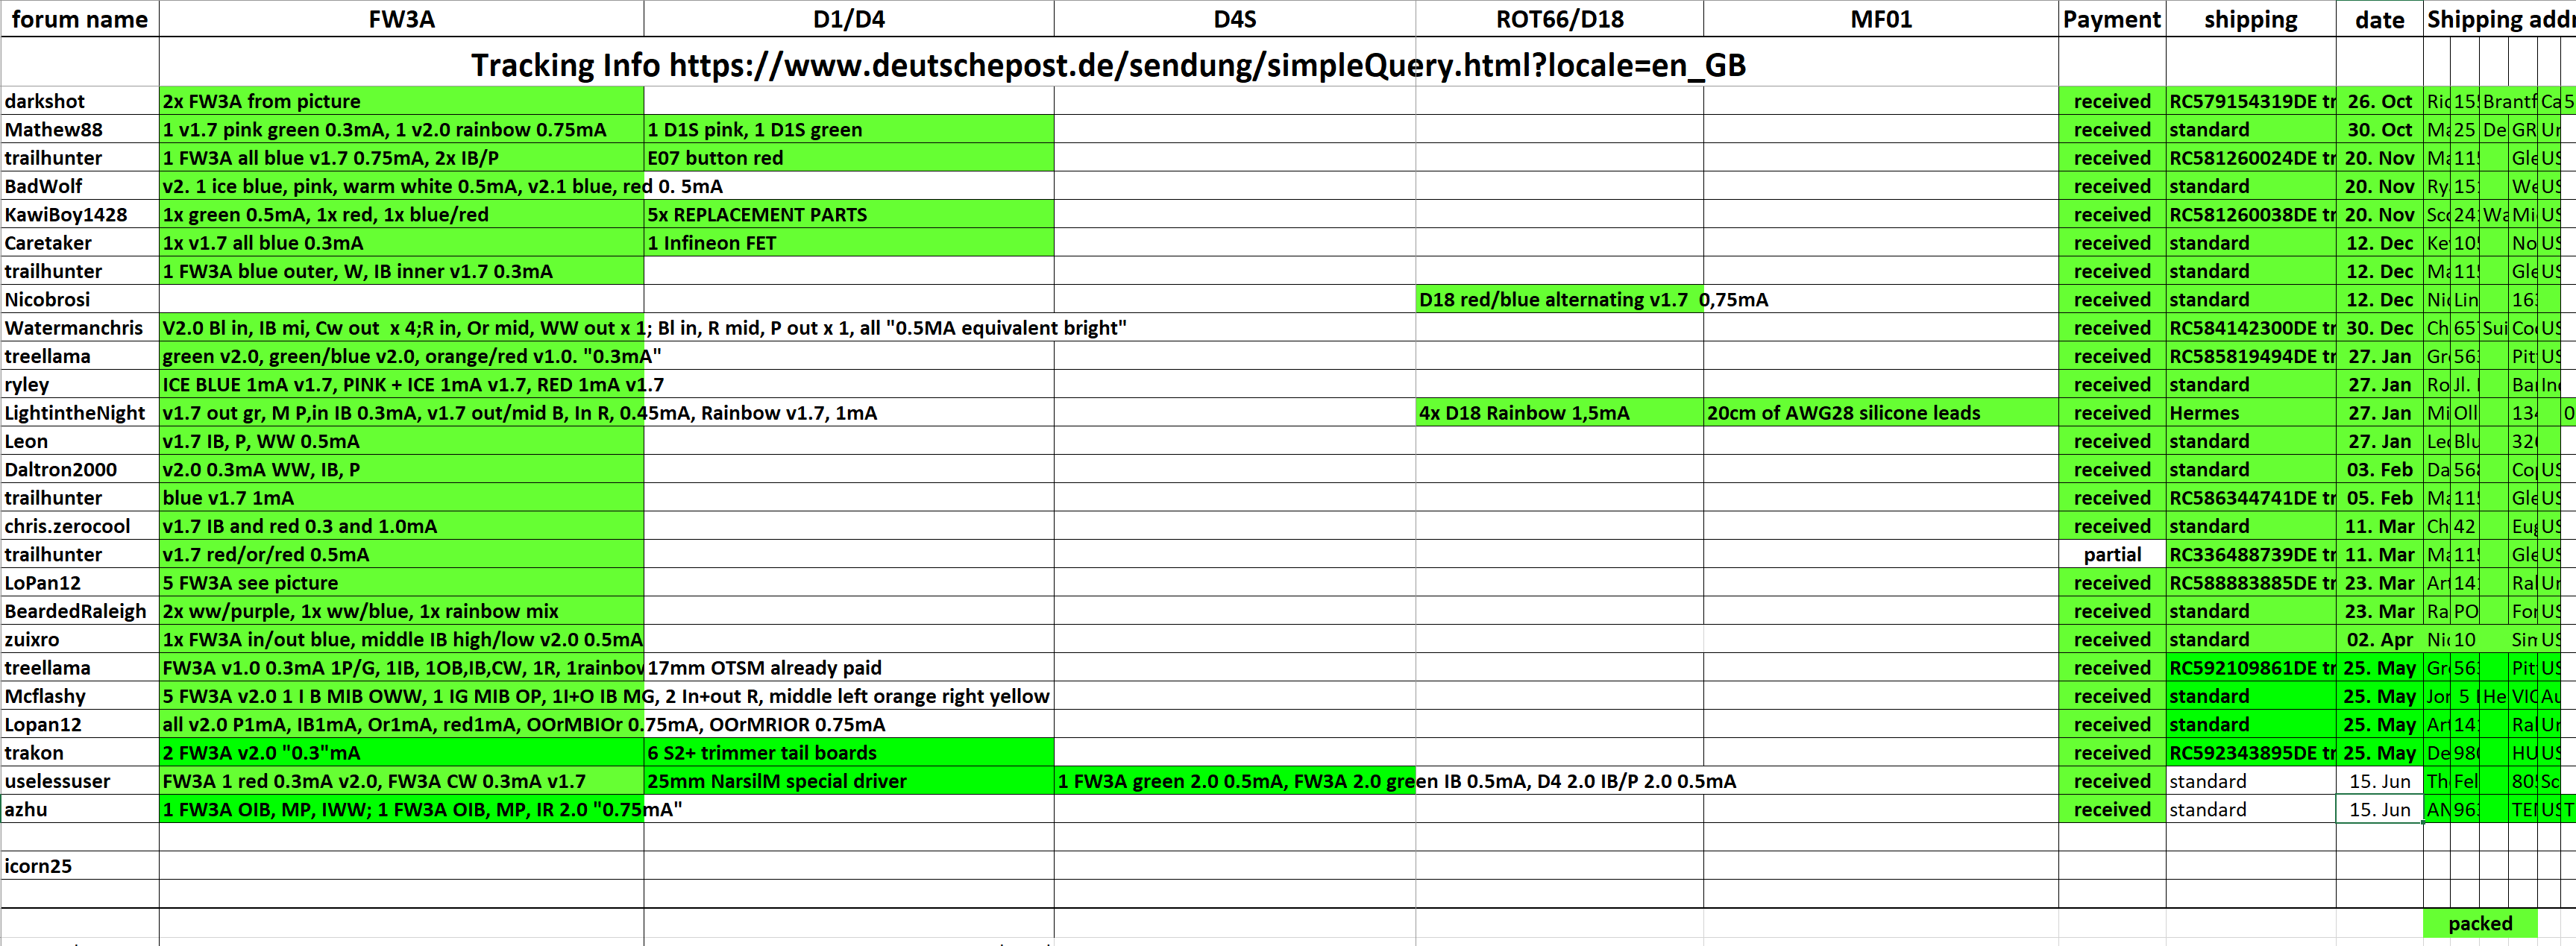
Aux board first steps here

Boards can be build as Gen 1.0 to 1.7

Generation 1 High/low capability but then LEDs dim to about 50% between full and empty battery
Generation 1.2 LEDs are voltage stabilized High/low does not work, no LVP
Generation 1.5 unregulated LED voltage + LVP
Generation 1.7 stabilized with LDO + LVP

Similar flowchart as the FW3A, but at the moment no v2.0 planned, depends on sales numbers

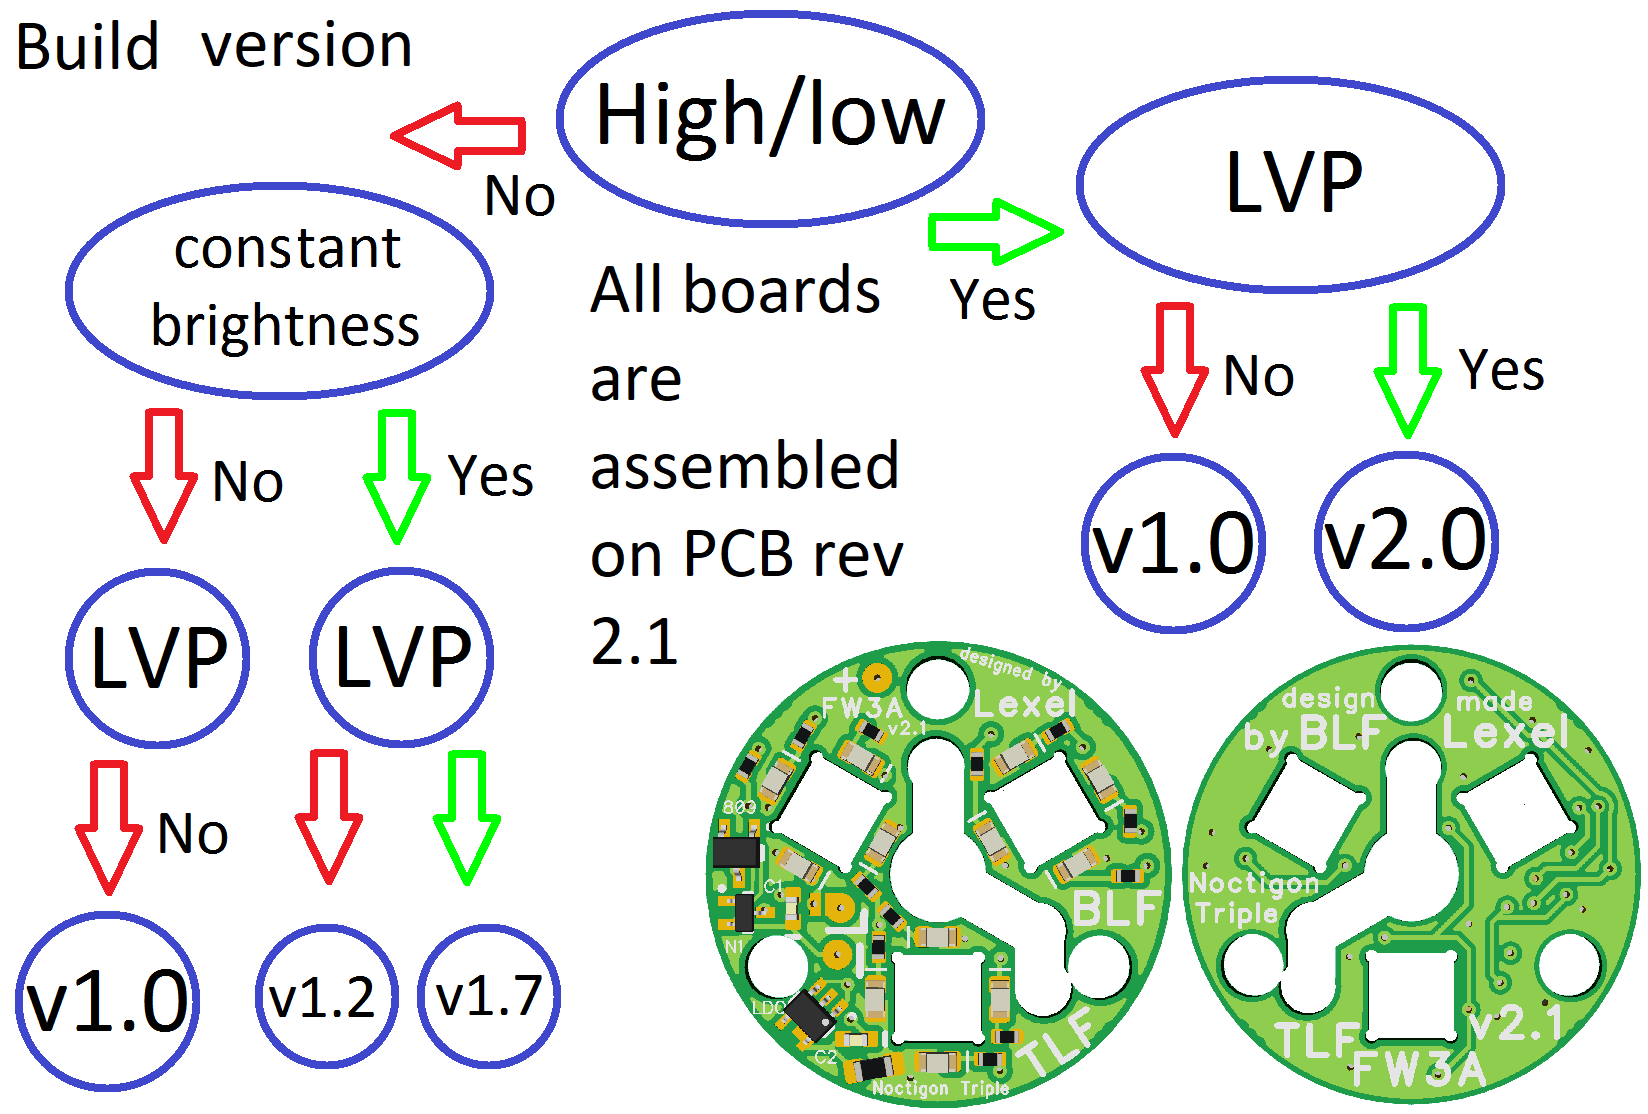
- version with LDO → High/low not possible

  • version with LVP → High/low not possible
    → flash #define INDICATOR_LED_SKIP_LOW setting as well

LDO → constant brightness and color mix over full battery voltage
LVP → shuts down when battery low (2.93V without MCU, 3.3V with MCU used)

.

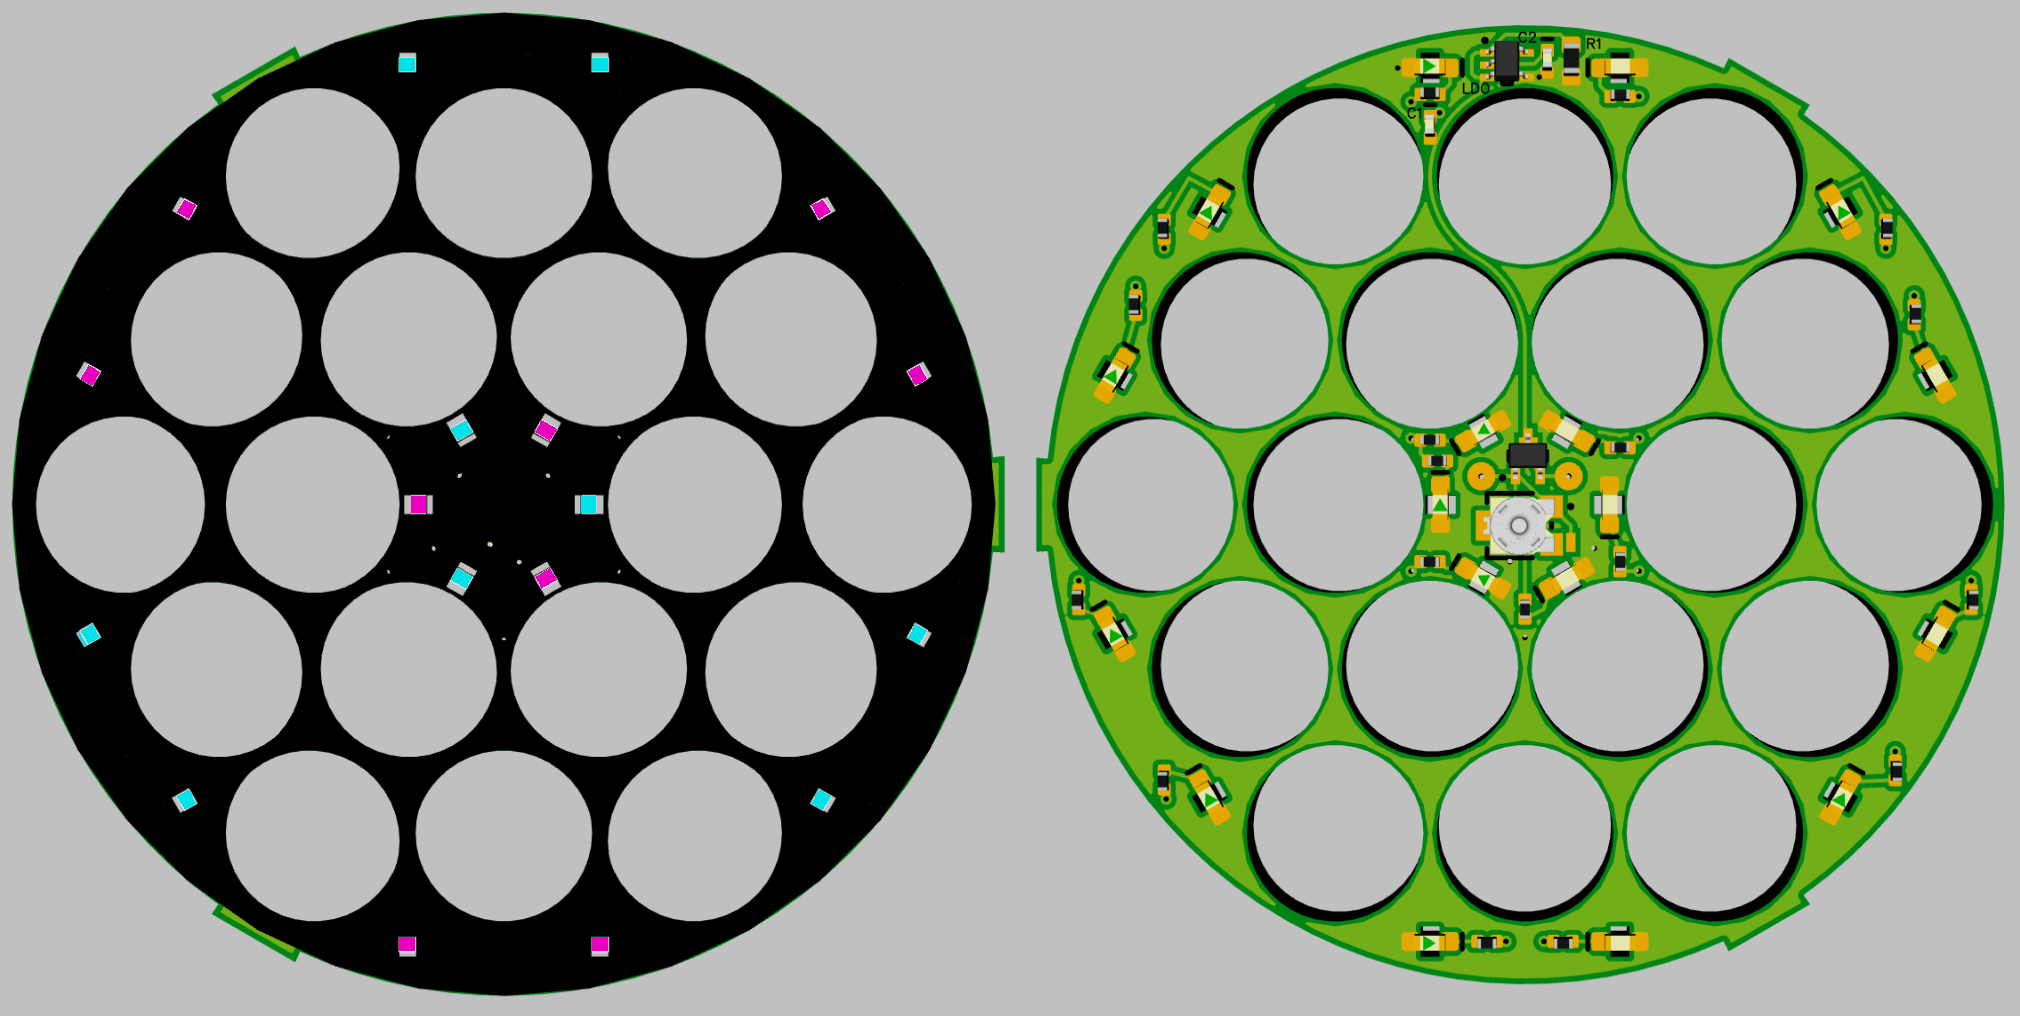
replaces original front board

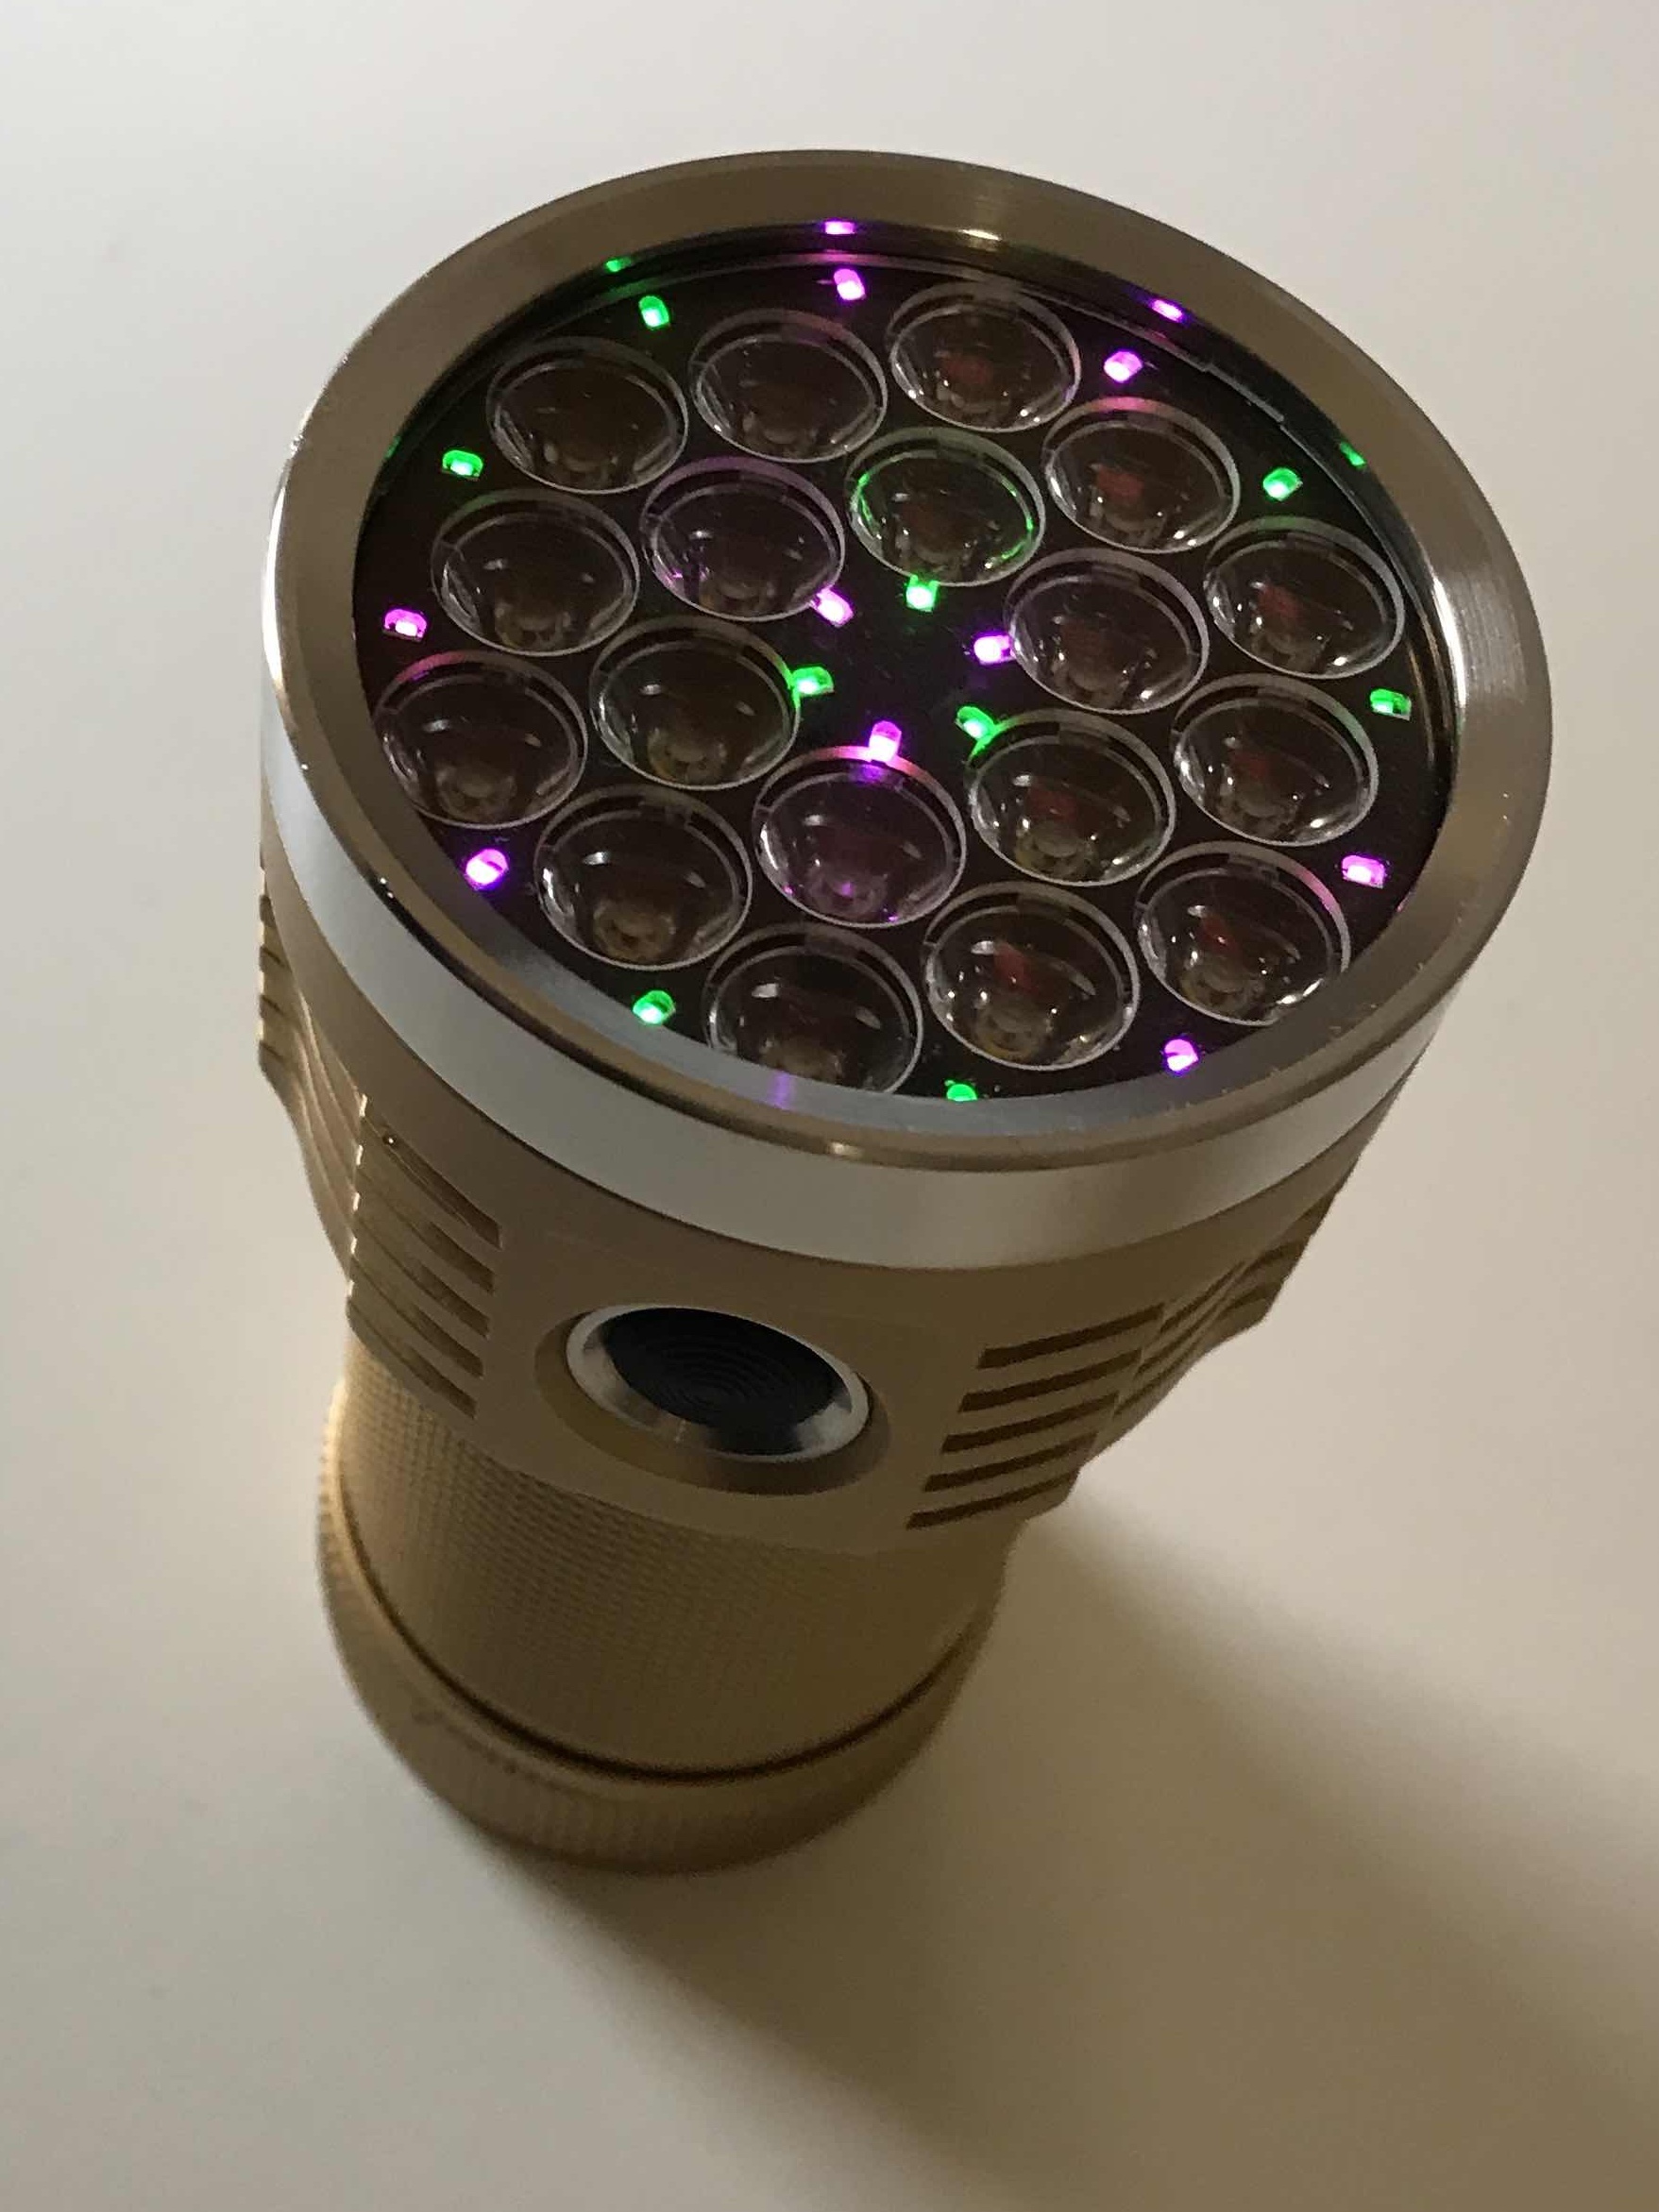
Sample with rainbow and WW

.

Production board and stencil ready, the Fab let me down again removing the frame for positioning with 4 rods on a base plate
and that after the order was delayed almost 7 weeks due to shipping problem

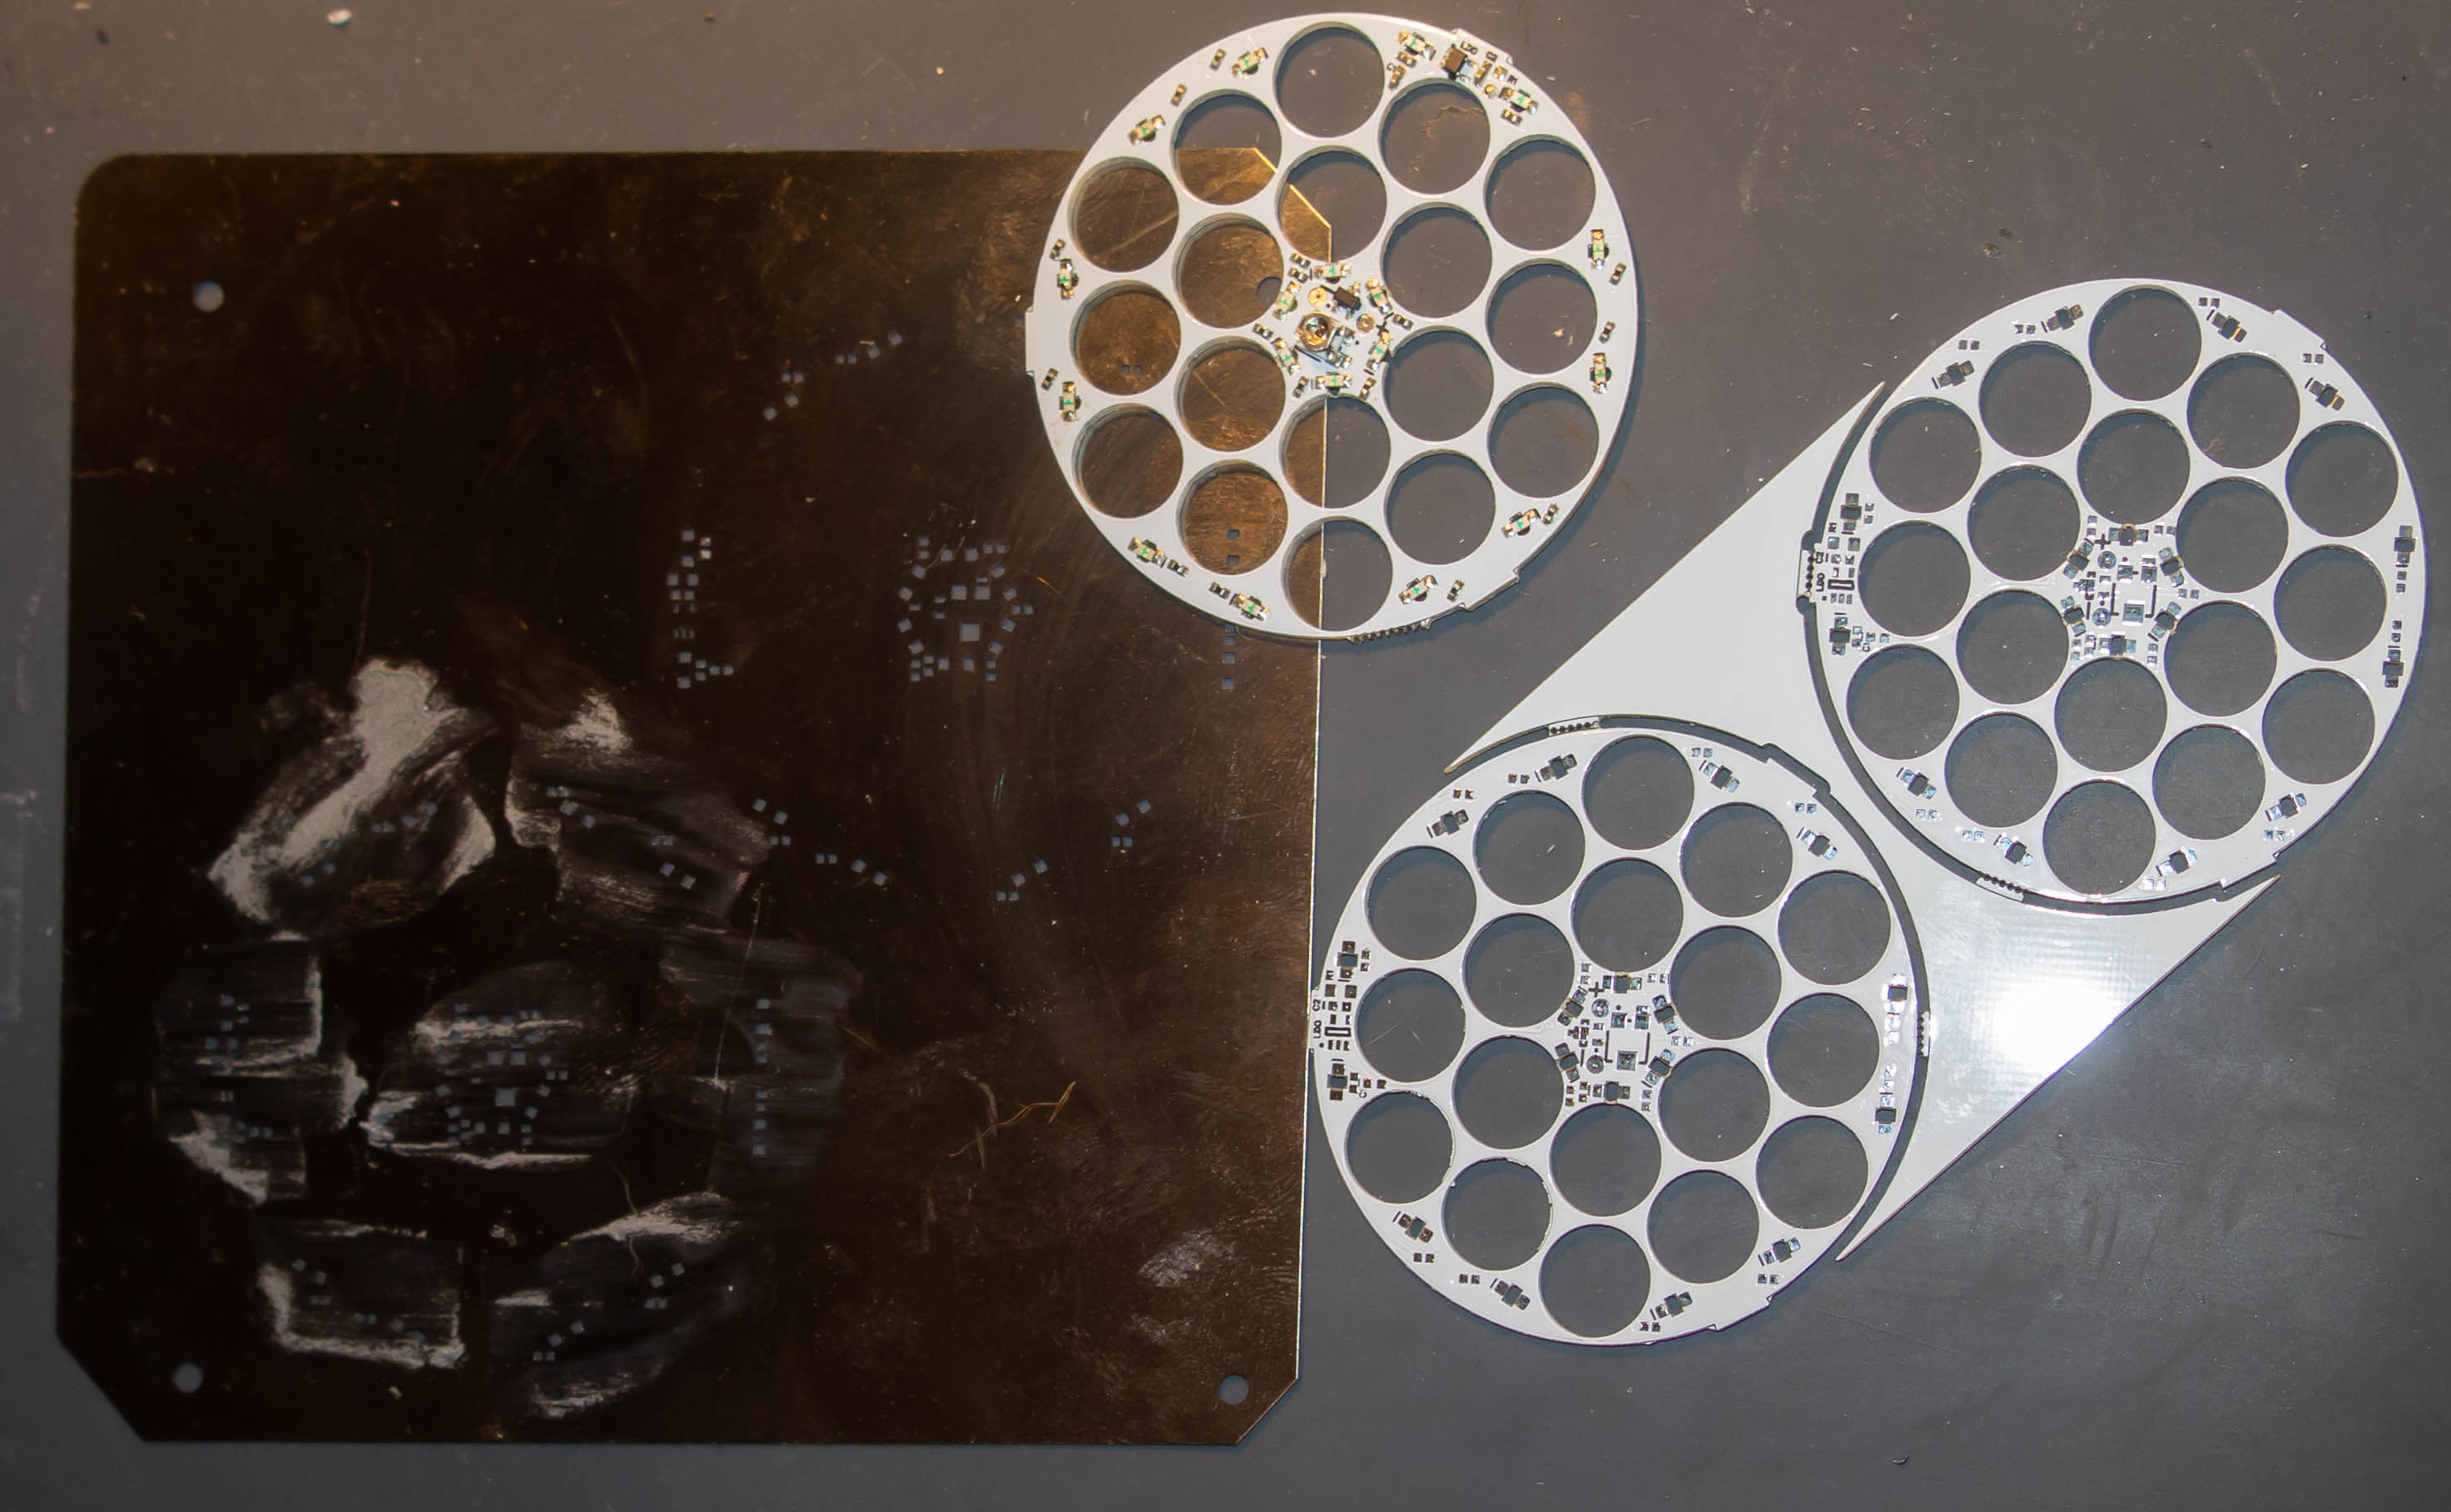
any color combinations are possible each LED could have a different color

.

LEDs as you wish colors and patterns
460nm blue, pink, red, orange, yellow, green, ice blue, WW, CW (the yellowish green is too inefficient)

New LED batch comparator boards for 3 brightness levels made

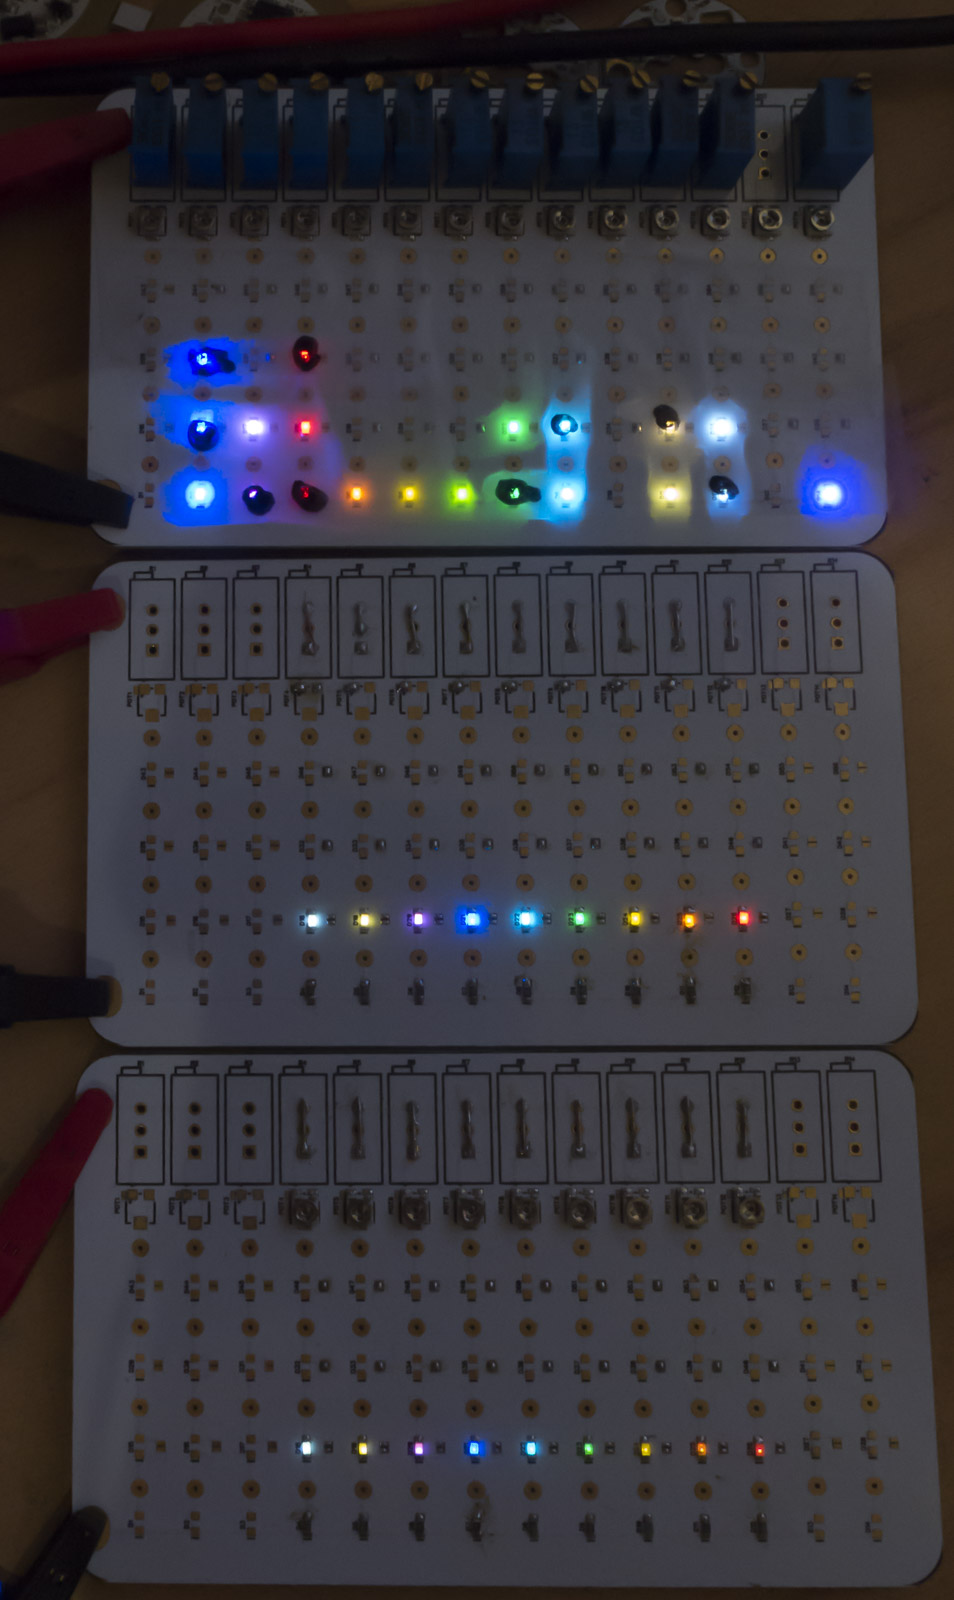
[LED colors] (top are most efficient, bottom inefficient)

LED color and each single LED current based on my “medium 0.5mA” brightness level

green 19.1uA
blue 21.2uA
ice blue 25.2uA
pink 30.7uA
CW 38.7uA
WW 40.2uA
red 50.9uA
orange 124uA
yellow 206uA

my LED brightness scale is based on my Rainbow+WW boards total current while LEDs seem same brightness

basically I have 5 levels “1mA”, “0.75mA”, “0.5mA”, “0.3mA” and “0.15mA”
this does only reflect on rainbow boards with WW the total current drawn

on the boards the total current depends on used colors and brightness level (“0.15-1mA”)

.

I can also build a board with a current consumption you want
for example, you can order a 0.5mA pink/green all 18 LEDs equipped

Prices:

7€ Single color board
+0.25€ voltage stabilization
+0.5€ LVP chip

custom color combination, with necessary balance calculation
2 colors +0.5€
3-4 colors +0.75€
4-6 colors +1€
>6 colors +1.25€

Orders with more than 3 identical or single color boards get 10% discount

.

Shipping:

I will add some plastic card and structured paper to protect the boards

1.5€ standard bubble envelope 0.5cm <20g
2€ thick bubble envelope 1cm <50g
tracking adds 4€

Tracking Info
https://www.deutschepost.de/sendung/simpleQuery.html?locale=en_GB

How to order

send me a PM if you want to order boards

tell me

- which color(s) you want,

- the color pattern you can make a simple picture from the preview picture like this example

- I need to know which version

  • brightness or current consumption you want

Modding guide

I would need a 2. D18 to make a detailed guide, but mainly the same as with the FW3A
The driver has already an Aux pad if I remember right

Has anyone done this to the D18 and done a flashing guide for it? I haven’t done any modding yet and a step by step guide would make me a lot more confident in doing it

you can use my FW3A flashing guide as well as the firmware how to

Are you still taking orders for boards like these?

I sent him a request last week and haven’t heard back. I’ve enjoyed working with Lexel on several projects over the last three years and I really hope he’s well. Super fellow!

I sent him a message before the new year as well. His account doesn’t seem to have had any activity in a while… I hope he’s doing ok!

I should mention that mine ended up extremely well and I didn’t have to do any reflashing since the D18 already had the software for the aux, and had pads right on the driver

This is exactly what I’m looking for! Looks great. Does it have the same RGB setup as the D4V2? I mean can you cycle through which colors, or the battery blue green red thing. Or are they a fixed color?

Have you sold light yet if not how much

Nope, just the two colours unfortunately. The ATtiny85 doesn’t,have the capacity to support rgb. Sorry I missed this earlier

Lexel is selling the boards for you to DIY assemble, not entire lights

Whats involved in installing them into the d18. What tools are needed and are there any instructions. I have never done anything like this. But would like to learn. But don't no where to begin.

You need a soldering iron, some solder, some thin wires, and a philips screwdriver for this mod. I wouldn’t recommend it if you’ve never opened a light before and done soldering. There’s some detailed points you have to be accurate with when soldering and it was a bit tricky at times for me in spite of me having some soldering experience in the past.

Do you have a D18?

For the mod: you open up the bezel of the light, remove all the little optics, unsolder the wires connected to the main led board, remove the main led board.

Next you remove the reverse polarity ring on the battery side of the driver which reveals the driver screws, remove those screws and pull out the driver, connect the two lighted pcb wires to two traces on the driver, and pull all the wires up and out through the hole mcpcb shelf.

Next you connect the four wires to their respective places on the MCPCB board as well as the lighted circuit board, assemble everything, and you’re done!

A bit tricky overall but it was a fun experience for me.

If you don’t already have a d18, but want a pop can light with lit up LEDs, consider the Rot66v2 or the MF01S. They’re not exact substitutes but pretty close to the D18.

I would like to learn to work on lights. Can you recommend a cheaper light that I can learn on.I have a mateminco mt18s and emisar d4sv2 so I have some lights with colorful auxiliary lights. I don't have a emisar d18. Would have bought it, if it had auxiliary lights. Thats why I purchased the mateminco.

How about building your own convoy s2+? You can buy parts from the convoy official store and message Simon first to get the BLF discount. Buy all the parts you want then put it together yourself. Also try to add in a spring bypass. If you have a soldering iron, buy some silicone coated wire, a bit of thermal paste, and you can build your own light.

It’ll be a good starting point imo

Ok I'm going to look into that,thanks

Yoooooooooooooo :open_mouth: