Wow that’s very bright for sst20 version. Those sound like numbers for xplhi version. I’m gonnna wait til others chime in before I make my purchase.
Which version d18 and m43 do you have?
4 tint SST D18 and 80 CRI 219C M43
How is the tint of your D18 on low and high compared to your M43?
Ordered my D18 from MTN. I have 4 of the D4Ss and the 3000k sst20 is my favorite. All the others were HIs in 2 tints and a HD. The sst has about a perfect incan, the best throw, and was the cheapest. Mine was shipped out on the 26th and has arrived today the 29th.

Working of vinh, he did a good job. I asked him to remove that black crap on the glass, it was a good call.


Dale,
It looks like the LISA3 medium optic shows up in the datasheet as supporting LH351D’s. Not sure about the rest of the dimensions though.
Thanks, will try to keep that in mind. The optics with their holders fit in the head in an almost puzzle like precision, they are crammed in touching all around. Neat work, zero tolerance.
Hey skv89, you got to rememeber batteries make a big difference on the d18…
D18 sst20 6500k
Sony vtc5a solder blop. 14040 lumen
Sony vtc6 button top. 13160 lumen
Samsung 30q button top 11830 lumen
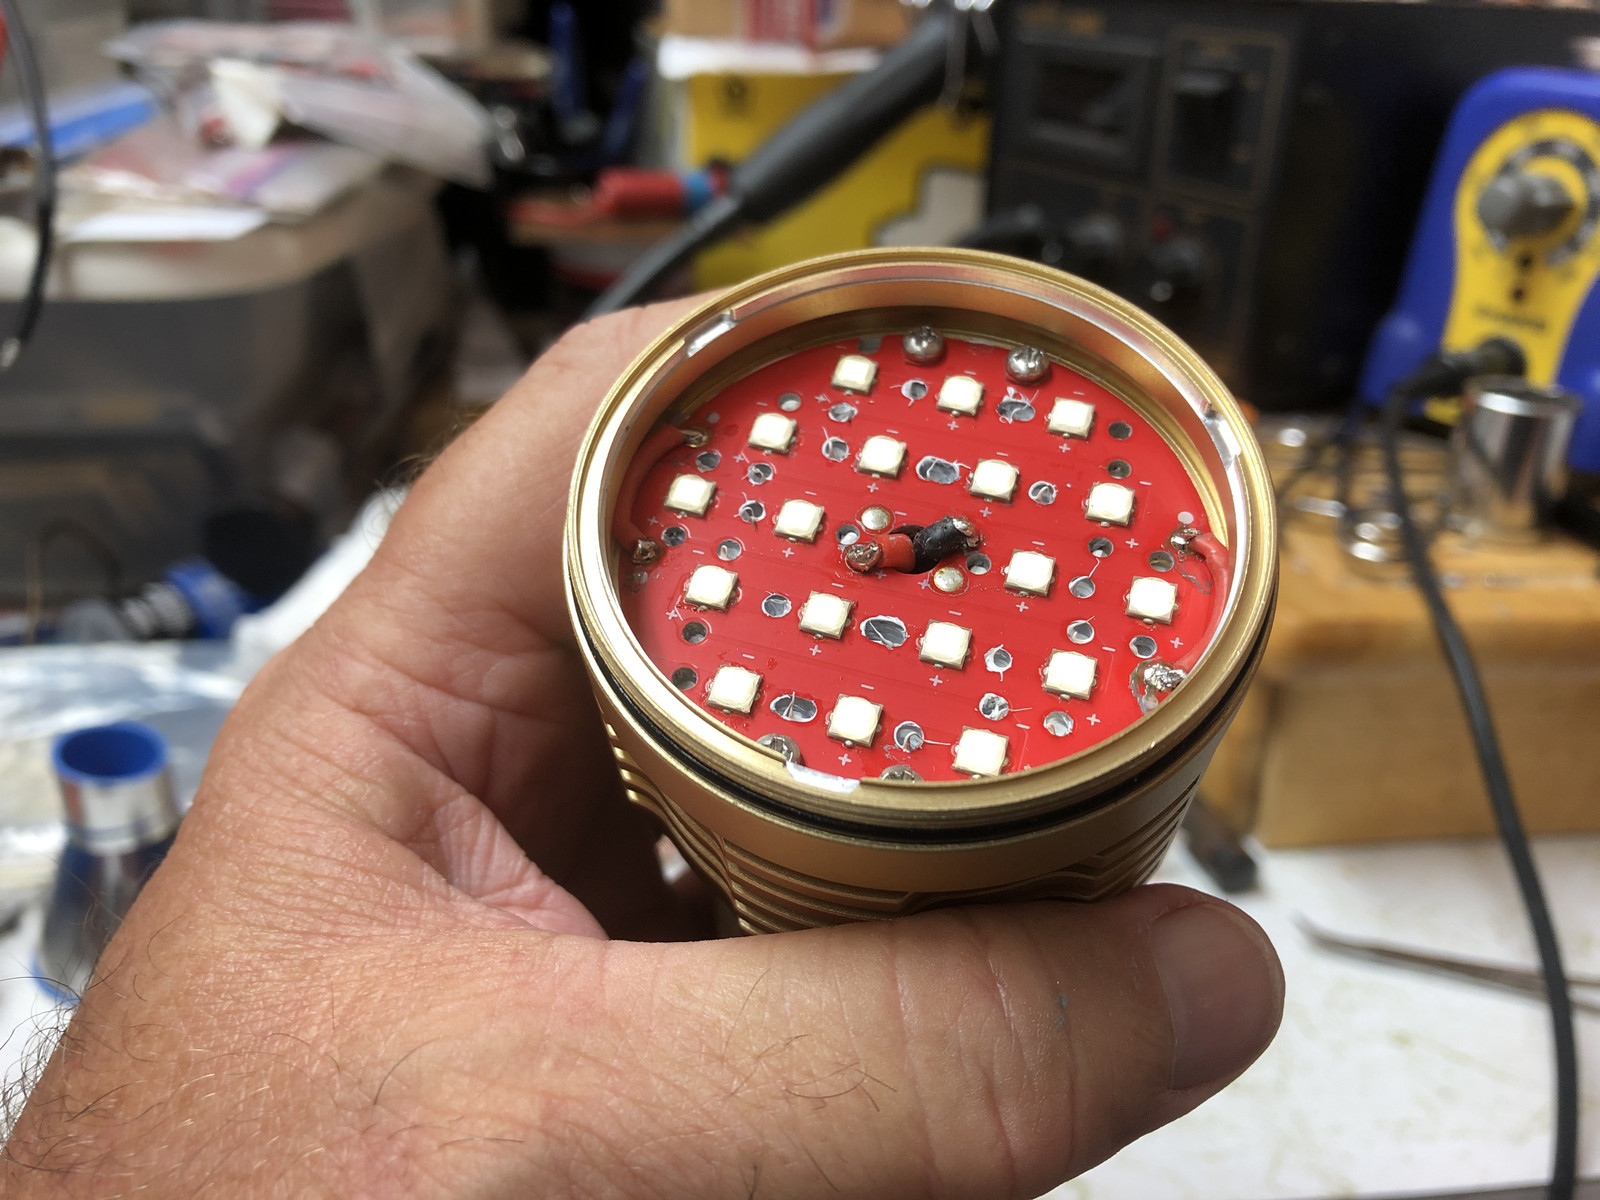
Bigger pics on Vinhs light because it looks neat. ![]()


.
Looks to me like Vinh changed the optics and they are taller, taking up the space the cover plate occupied before. In the original the TIR was flush with the aluminum shelf the cover plate sat on, you can see in those pictures that the TIR is taller. Wondering which of the LISA family he used…
On TK pics the TIRs don’t look flush either:


And molding details just look the same…
I really want mine now… ![]()
I ordered maybe 3-4 weeks ago. But i ordered with custom emitters, and that took 1 week longer. And now its stuck in the Customs… Sucks…
Hmmm.
The one I swapped emitters in had the thin PCB material cover sheet on top of the TIR’s, with the glass lens having an o-ring that fits in a groove around the periphery and another o-ring on top of the glass that fits into a similar groove in the bezel. If that thin cover plate is simply removed, the stack height won’t be correct and the TIR’s can shift around, especially if bumped. They do fit in tight, might not seem to be an issue, but unless they’re glued going in they will shift and mess with focus if that plate is simply removed without filling the gap.
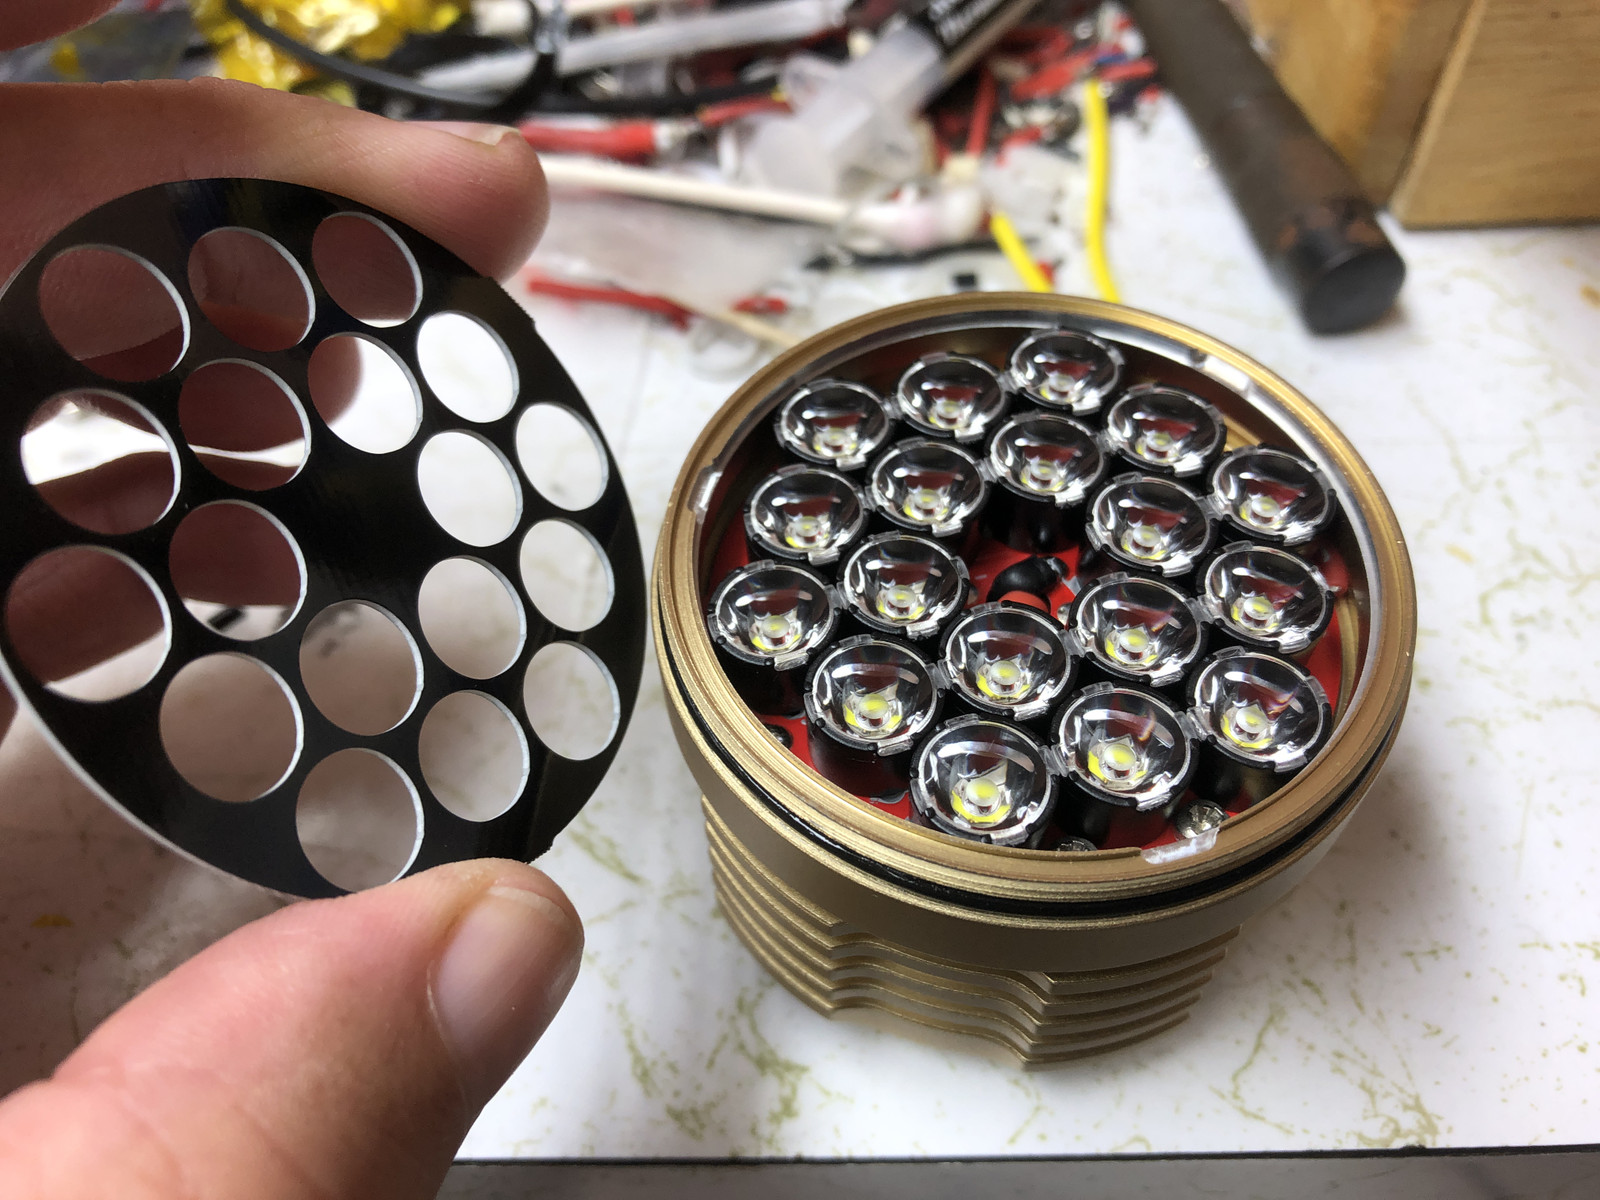


There really isn’t a fitment between the TIR/Holder and the cover plate like I thought, the cover plate merely sits on top of the holder assembly. The plate itself is indexed at 3 points into the head of the light so it’s just by precision machining that it works at all.
I would think that a secondary piece of thin glass could be used to fill the cover plates stack height or the bezel could be shortened accordingly, not sure what amount of work that would entail as I didn’t look at it in that context. It’s not a thick cover plate at all, quite thin actually, so it wouldn’t take much removal from the bezel or even a deeper cut on the head to accommodate the plate’s removal. But it would take an effort, of some kind, to maintain the TIR’s focus.
Perhaps I missed something, maybe the holes in the cover plate completely clear the TIR and it’s holder and sits down into the shelf cut in the head, maybe it’s the glass itself that holds pressure down on the TIR assembly. You know how it can be, you get an idea by how something looks that it works a certain way and so don’t bother to look further. In the case of swapping out the LED’s it wasn’t critical to the job at hand so while I did look at fitment to ensure everything was aligned I didn’t notice if the holes slid down over the assembly. Should have thought to try that fitment when it was all apart… it’s en-route to Houston at the moment.
Edit: Looking at photo’s closer it’s obvious the cover plate sits on top… the TIR has 4 tabs that lock it into the holder, these tabs are covered by the plate so you only see the TIR from the front. ![]()
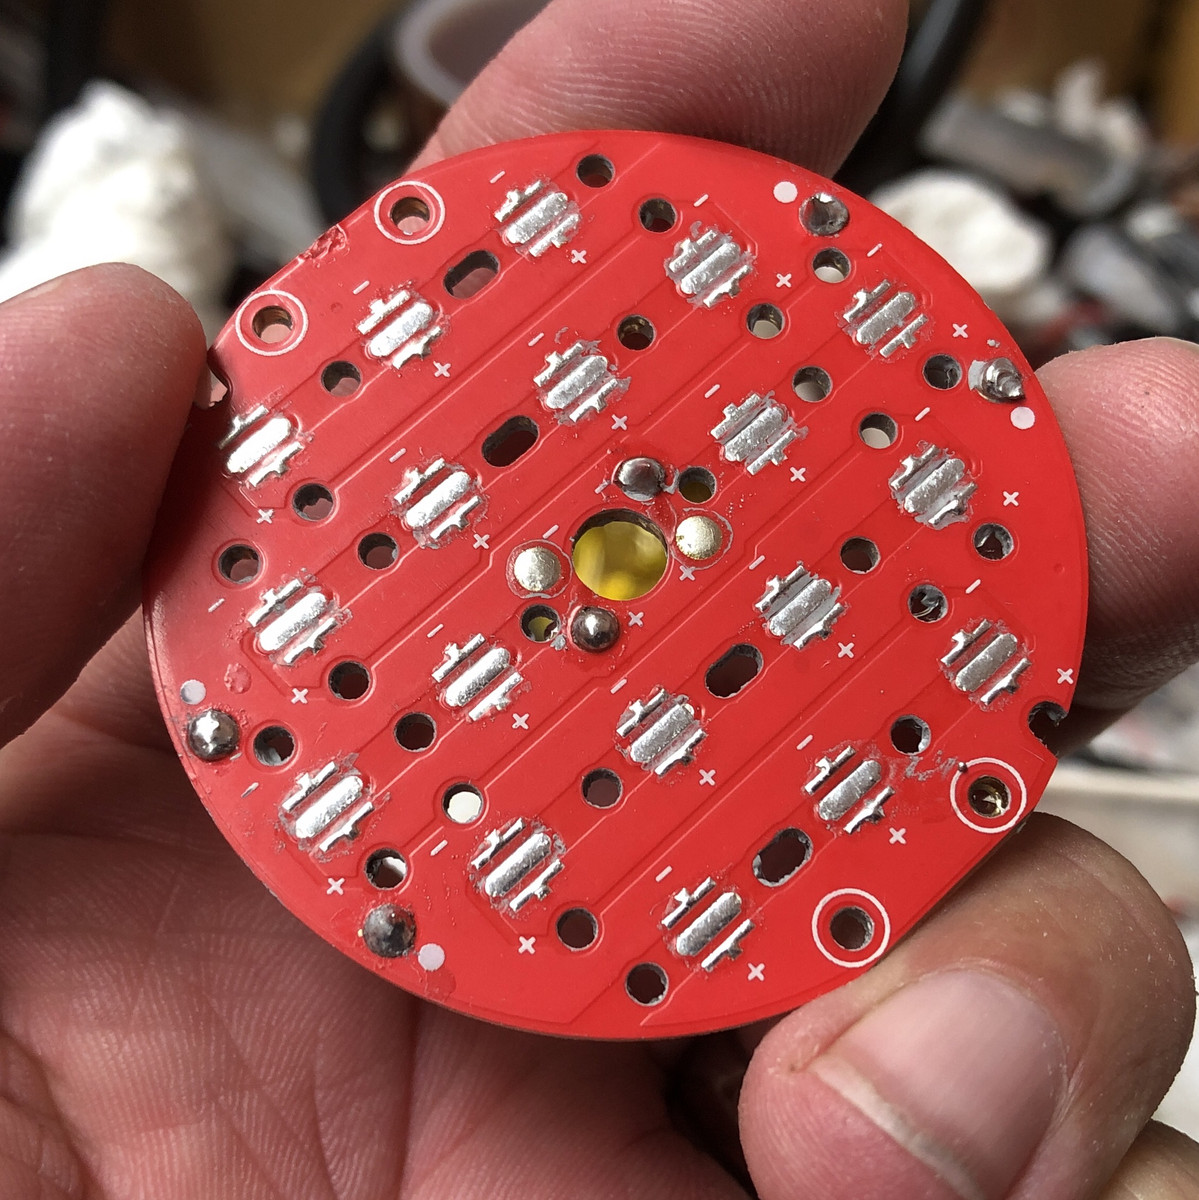
These things fit TIGHT! Something as little as that tiny solder ball sitting in the hole upper left in TK’s photo can stop the assembly from sitting flat and mess up the whole assembly process. ![]() Also, there was excess thermal paste on the one I worked on, it had oozed up into the holes such that every optic holder had a string of the grey thermal paste coming off it removing it from the board, have to be very careful to preserve the SST-20’s when removing the optics and not get a mess all over the domes.
Also, there was excess thermal paste on the one I worked on, it had oozed up into the holes such that every optic holder had a string of the grey thermal paste coming off it removing it from the board, have to be very careful to preserve the SST-20’s when removing the optics and not get a mess all over the domes.
Dale,
As thin as that PCB material is, i seriously doubt that it would make much of a difference. I think the PCB serves two functions:
1. Cover the MCPCB so that you cant see connections.
2. Making sure the optics are centered as the bezel is tightened down.
Also, that clear Oring is a PITA to get back in!
The optics are centered because of the two pins on the bottom of the holder, the cover plate doesn’t alter that, it just presses them down so they stay the correct focus height.
That clear o-ring was equally challenging on the Meteor. On the D18 I was careful and left the orings stuck to the glass, went back together easy. ![]()
I wish i had done the same. 45 minutes to get that bugger back in there.
I would think the lense would do the same thing. I dont get it