Hence why I asked what temp device pp is using as reflective type measuring devices dont like nice shiny aluminium.
Doh! :person_facepalming: You’re absolutely right. I forgot IR guns are unreliable on shiny stuff. The gun is a left over from when I used to play with brushless r/c cars. I hardly ever use it now. For the record the temp gun stayed where you see it in the pic for the duration of the test but I guess that’s irrelevant now. DOH! I don’t feel so bad about not doing the before test.
That was well picked up Miller. Before I had the temp gun I used to go by the 3 second rule for the brushless motors. It’s about as accurate as it sounds. If something (e.g. brushless motor) became too hot to hold at the 3 second mark then the temp was guessed to be about 50C. That’s how I remember it anyway, I might be wrong.
Oh well. It will probably perform differently with batteries anyway.
As for the optic. I have another I can use. I hope it doesn’t keep melting them with batteries.
Was gonna post this, I have a similar “mini lathe”, think mines a 7x12, and slack in the lead screw is most likely the culprit. What I did to “patch” mine was attach a long elastic bungee to my carriage, it pulls and puts positive pressure on the carriage in one direction. It’s ghetto as all get out, but it did help mine. One other thing I’d suggest is to try and avoid disengaging the carriage, just reverse and back up. Have to slow down as much as possible and it’s way more unnerving, but I found these two suggestions help the quality of my threads.
Great work BTW!
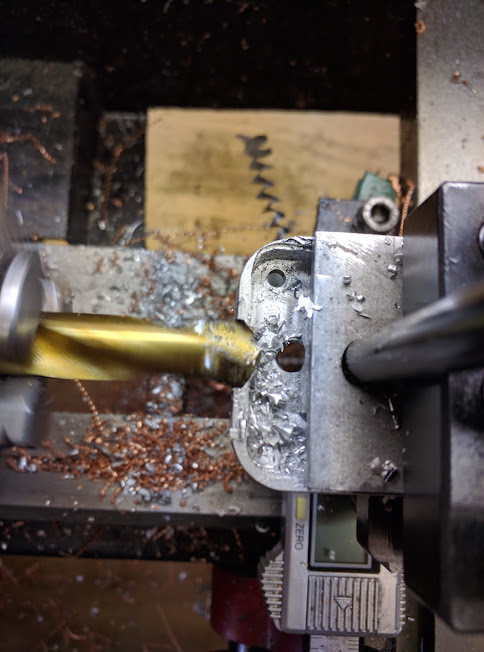
I got a little more done on this. It’s almost complete :disguised_face:


I still need to drill and tap some screws to fix the body to the head but, of course, now that it was assembled I had to test it. It’s more floody than I was expecting, even more floody than my meteor and the tint is warmer. After playing for a bit I took it back inside to look at the optics. I suspect what happened is I sanded down the legs to get the leds closer the optic and one of the leds ended up touching the optic, hence the discolouring. That led had brown muck on it (see below), I tried to scrape it clean but ruined the led :weary: I have a new optic but I’ll need to check if I have a spare xhp35.


Ouch! Looks great otherwise, what condition was the optic in, the single over the burnt LED?
It wasn’t just flux or something got on the LED, noticed it’s one right next to the solder joint.
Nice, looks like a real powerhouse.
Be careful with that khatod optic. I had a project which involved sanding this optic to reduce the diameter a bit, and the next day there were so many cracks that had formed it looked like it had been crushed. I guess it has a lot of internal stress that makes it crack easily.
To get accurate IR thermometer readings I’ve found aiming at a bit of electrical tape or even masking tape stuck to the aluminum leads to accurate readings. Most of these cheaper IR thermometers use just one frequency measurement which means the reading is directly sensitive to the emissivity of the object.
Looks amazing pp but a real shame about the optic and led.
really nice!
dang about that XHP35,hope you geta good replacement soon
Are you sure you dont want to make a nice plate to replace that yellow stock thing?
lovely work! Do you have 4 jaw for your lathe? If you don’t, I think it would be a great investment. Save you having to use ghetto set ups to bore a hole in odd shaped work.
I’m pretty sure it’s not flux as the optic is worse than last time I looked at it.


Thanks for the tip. I’m thinking now that it is assembled I could aim at the body up near the head. Maybe a bit of tape on the face of the head, next to the optic would give me a second point of reference.
Thanks DNF (…you hung like a moose?)
Whilst I agree that would look really good, I don’t think I have the patience to try and replicate this part

Lol, I do have a 4 jaw but honestly I think this ghetto setup was much quicker and easier to achieve the end result. Mounting stuff in a 4 jaw is a lot of fiddling around not to mention the flex on the drill, tail stock and bed with unevenly loaded drill bits. My ghetto setup was fairly easy to align the drill since the height of the tool post was pretty accurate to what I wanted and the cross slide made it easy to adjust on the X axis.
No. Just a big dopey country boy when I went to the big smoke. They called me Moose. That was back in 1979 and the name is all most people I know now know me as.
If you need anything from Cutters shipped cheap send me a PM.
I would have drilled the largest hole that I could without one of the flutes breaking through the side, then bore to size.
Ahh so the ol’ stubbies shorts didn’t give you the cover needed and they all saw you were hung like…. That’s it! You’ll forever be known as Moose :laughing: ![]()
![]() :laughing:
:laughing:
I don’t think I have a boring bar that small so I would still be using a drill bit as a boring bar so kinda defeats the purpose to me.
grind one? Not trying to be an ass, just trying to suggest some ways you can up your game.
That wouldn’t have occurred to me as I’m still not that good at grinding the cutting bits :person_facepalming:
I appreciate your input though ![]()
no worries, it’s a steep learning curve ![]() There’s always a trade off between trying something new and getting something done, but the more you try (and the more tools you acrue) the quicker and easier it will be next time.
There’s always a trade off between trying something new and getting something done, but the more you try (and the more tools you acrue) the quicker and easier it will be next time.
I had to come back and have another look at this light. For some reason when I should of been asleep last night I was thinking of this light and the effort you have put in to create a really unique torch. This is an Aussie term that may not translate anywhere else for what it means, this torch is fully sick mate. Well done again. :+1:
Thanks Moose. Is ‘unique’ a polite way of saying ‘off kilter’ ?? :laughing: :laughing:
I’m thinking about sanding back the next optic to suit the larger die size but i’m not sure what the result would be :question:
We will never know if you dont try it. ![]()