Current info 10/14: Final update for the 12F617 boards, I will be switching to 10F322 MCU (Which are WAY cheaper) which also has the code written in C for all us idiots (all thanks again to tterev3
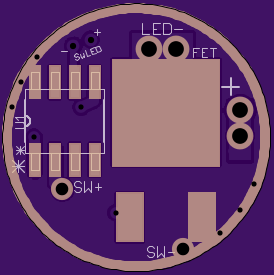
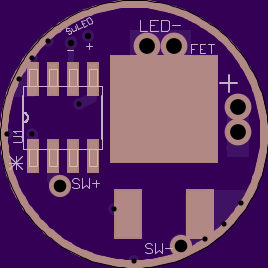
I've learned the proper way to use poly's in eagle and have made a final revision to the board, I've moved the CAP's and polarity diode to the bottom (note I'm not using C2 on the 17's, C1 on the 15's). Other changes include making the SW+ via large enough for 26AWG wire and a Z1 silkscreen mark (you stack it over C1). About the SwLED via's, these can be used to wire a switch LED to (which will flash as the indicator if switched from the main LED in the code and enabled with the config option). You can also solder the legs of a 2/5mm encapsulated LED straight to them. [This next part is ONLY for the 17] and they're spaced correctly to use a 0805 directly on the board if it can be lined up properly for that. It's masked incase you done need / want to use a switch / indicator LED so just gently scrape it off to use. [again not so with the 15].
(mouseover)
(mouseover)
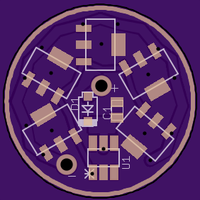
I have built several of both of these all working fine (tho one is giving me issues, but its isolated and it still works even when it happens so it wont leave you in the dark). Up next is a 7135 board I have ordered but haven't yet received. I'm posting it here incase anyone wants to order but I'm not gona say its G2G till I have them together and running, especially since its an all new MCU and code. Also note, there is a clicky switch UI thats available now too, its a very basic UI that can be built from.
(mouseover)
Note I do not plan to develop the 12Fxxxx boards or code any further, I also have new 17dd boards on order for the 322.
--------------------------------------------------------------------------------------------------------------------------------------------------------------------------------------------------------------------------
EVERYTHING BELOW THIS LINE IS SUPERSEDED BY ABOVE
See reply 32 for info on new 17mm 7135 driver with clicky FW!
I've been looking for a better momentary switch FW for a while and I've finally found it! I've started using "The Ultimate Flashlight Code" by tterev3, an open source (single channel) FW he wrote a few years back but as far as I know up till now he's the only one that used it (atleast around here). I've took and modified remade starting from scratch, the BLF 15 and 17dd drivers to use a Microchip PIC MCU, specifically the 12F617. The MCU can handles voltage monitoring internally so no voltage divider circuit is needed making all components for both drivers fit on the top!

OSHPark links:
BLF 15dd_PIC_v2.1 READY TO ORDER
BLF 17dd_PIC_v2.1 READY TO ORDER
10* 7135_PIC_v0.2 NOT READY TO ORDER, only shared in case you want to play with it
Universal parts:
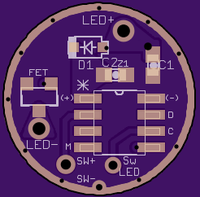
U1 = 12F617 (10F322 on the 10*7135 board)
D1 = SOD-323 (standard 105c polarity diode)
C1 = 0805 10uf XR7 (standard 105c cap) required
C2 = 0805 10uF (this cap may not be needed at all, will take further testing to determine, this is the cap to do the same thing as the new location for the AVR drivers a la comfy style)
Driver specific parts:
17 FET = DPAK such as the 70N02 and AOD510
15 FET = SOT-23 such as the AO3400A and IRLM 2502
For a general tutorial to get setup for PIC you can read threw tterev3's thread, the picKIT3 can be purchased from between $25-40 (I paid $27 for mine on ebay and it came in about a week but I had to make an offer, it was regularly $33 and on sale for $31).
You will need 2 other files: One, the part-specific header file (P12F1822.h ) is included in the Microchip suite of software, the other is an instruction file (instructions.inc) you can get from my drop box. You can see when and where you need these two files in tterev3's tutorial.
All credit for the FW to tterev3, you are free you use and modify the code for private use but please do not rehost the code. tterev3 is happy to field any code related questions and I will try to answer hardware questions and some basis code stuff.
Ramping only code (video example)
Ramping / non ramping code (same code but with an additional configuration option to turn off the ramping and enable 4 arbitrary levels)
If you are using this code for a dual switch light and want the light to come on when power is applied (when the tail clicky is turned on) you can add a few lines of code to the initialization section at line 427, I'll post that change in the first post below.
So you can see it in action I've created these 3 short videos, I tried to keep them short but I'm notoriously long winded and its a lot to cover, each one turned out 3-4 minutes. I will be remaking these video's once my Y3 gets here and I have a dual switch light to put these in. If anyone is interested in one of these drivers before they can get setup with PIC I will be happy to program MCU's for you for no charge (just pay~$2 for the MCU and shipping) and tterev3 would probably be able to help you out as well but I didnt talk to him about that yet.

