Been on hold. Hoping I got the wrong programmer. I have redone the cable ends. Cleaned chip legs. Rechecked everything.
I am trying on AK47
Been on hold. Hoping I got the wrong programmer. I have redone the cable ends. Cleaned chip legs. Rechecked everything.
I am trying on AK47
I just got a whole stack of qlites in the door today, and am wanting to program them. I would prefer to get the hardware from Digikey if possible. Does anyone have part number or good search material for the USBASP, clip, and wire bundle? Shipping from China takes a really long time to Canada.
Thank you very much for this tutorial Hoop!
I just erased the ATtiny13A of the BLF A6 17DD driver using your how-to.
Maybe it’s posted here already, but my ribbon was wired the other way around. The coloured strand on the ribbon, is ribbon #1 (MOSI) instead of #8 on your specimen. So i just colour marked every strand with a sharpie, and followed you how-to from there. Works fine now, the test in AVRdude passed!
Thanks for putting this toghether!
hi I just recevide all the components for flashing attiny13 but i cannot undurstend how to connect the programmer (10 pins) with the Soic8 (8 pins)
some photos aren’t avaiable and maybe there is the answer to my problems
thank you
cicciopanzarotto, connect the pins according to the tables here:
http://flashlightwiki.com/AVR_Drivers#Getting_Ready
You should end up with 6 pins connected — the five in bold plus VCC.
When finished, it should look something like this:

Thanks TK. This will make it a lot easier for a lot of members here.
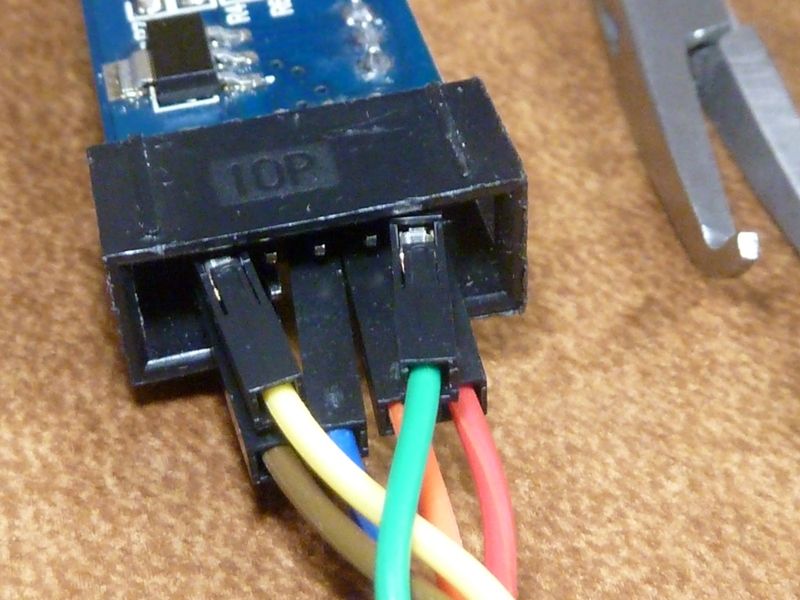
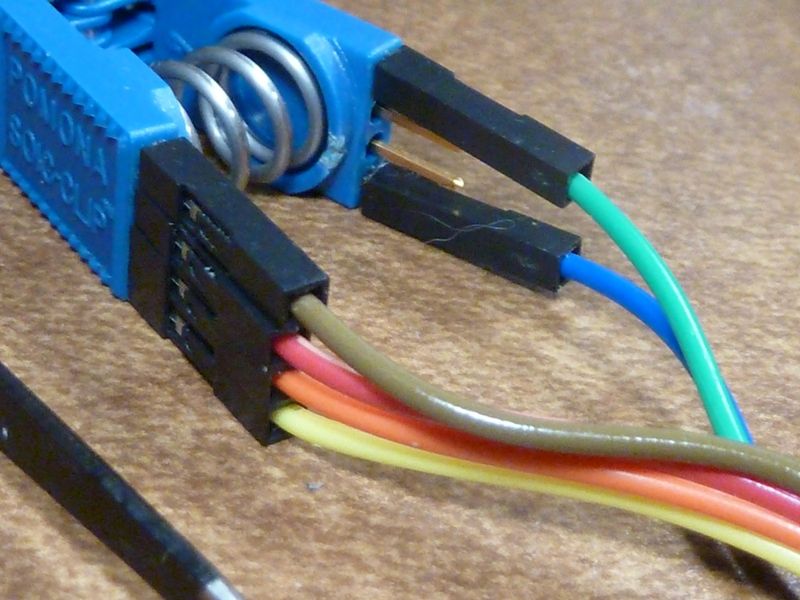
Can't leave me out of this one...  Been meaning to take updated pics of my setup. Looks like I'm matching TK's exactly, just using different colored cables. Here's pics of mine, showing a couple of my favorite, most commonly used tools as well.
Please Note: green is GND, yellow is VCC
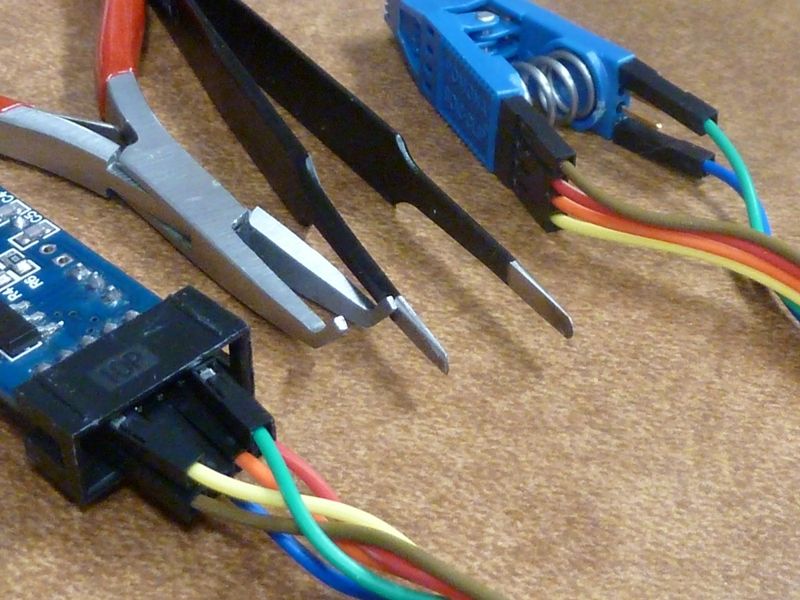
Closer uppers:
I'd add in addition to getting the USBASP dongle listed in the OP here: https://www.fasttech.com/products/1002900, get this ribbon cable:
https://www.fasttech.com/products/0/10000072/1011800-40-pin-splittable-ribbon-cable-20cm
and simply peel off a 6 wire section, save the rest for a backup.
I updated that flashlightwiki page for the proper USBASP V2.0 wiring. The change to using Pin 10 on the AVR programmer side for ground solved a few flaky problems I was having  .
.
I've said this before -- Please note the wiring pin-out details is wrong in the OP - don't use pin 4 for GND on AVR USB programmer side: use pin #10 instead, as our photos show.
Also, this colored ribbon cable is much easier to work with than the typical gray ribbon cable in the OP. I know from experience - I evolved from the gray to the colored stuff - very easy to swap around pins, easy to trace the unique colors.
I believe post #2 shows the wiring as you’ve described Tom. Should the grey wire scheme be ditched altogether and only the Pomona/ribbon cable combo recommended? It’s been a while since I’ve used the original cable, but it worked until, I think, the clip started malfunctioning.
Ahh, ok, missed it there. Well, it's just easier to work with the colored ribbon, having the individual pins, and available from FT and other sources cheap. Forgot who recommended it first originally, but some one definitely did before me.
thank you all, just one question, I have the fasttech programmer and I would use the connection of the programmer
How I would cut and select wires?
is the dotted one number 1 or 10?
how can I know the cable/pin courrency for choose them? (e.g. top left pin is the first cable? top right or second left is second cable and go on)
thank you all
Please only look at the pin numbers. For wiring to the clip, look above at Toykeepers post #125 or Tom E’s post #127.

So the right upper pin on the programmer is pin #1, below that #2 and on… Search for the little triangle on the programmer. This is pin #1, the red wire in post #125 and the brown wire in post #127 of this thread.
thanky you
i’m trying to download the softwares but I can’t
can anyone link me a download link?
Sorry, I don't think I was clear. The pictures and labeling on the MCU and clip side are all good and accurate, just the inset diagram of the first pic in post #2 is wrong, and the last two pics in post #2 aren't showing for me, so can't comment on them.
Oh, and yes - I whole heartedly agree the original gray ribbon cable should be discarded, and the colored ribbon used/shown. It's just sooo much easier to work with, and cheap, and available from several sources. The gray cable can still be used of course, but working with those ribbon crimp on connectors can be difficult. I know for me, I got help from a tech @work to do it, but the color ribbon cables requires no tools, no crimping, etc.. Anyone should be able to work with them.
Ok, I removed that picture. Later on when I get some time I’ll redo the OP, only recommending the colored ribbon and Pamona combo.
It’s the first link in my signature.
Or if you are able to use bzr, you can run “bzr branch lp:flashlight-firmware” to get the entire repository.
Any help is appreciated - I’m stuck at trying to install the libusb-win32 drivers on my Windows10 64 bit laptop. I got my usbasp plugged into the usb port, I can see the device in the device manager but I can’t install the drivers. I ran the install wizard after I extracted the files but it then says windows policy won’t install unsigned drivers. It mentions this on the libusb-win32 wiki page, but I still can’t find a solution that works. What am I missing?
Yep, some don't work. I did get mine working, but since then, my Win10 notebook died, unrelated though. Pretty sure I dnld'ed mine from here: http://www.protostack.com/accessories/usbasp-avr-programmer. They claim there it's fully signed.
Thanks. I figured out how to install the unsigned drivers in Windows 10. Now I just have to figure the rest out.
Help!
I’ve got the cheapo clip and cable setup, but I’ve been able to program the BLF FET+1 A17DD-L (from Banggood) with much success.
Well, I went to assemble some lights using the Qlite from Richard and thought I’d give a shot programming those as well. I can’t get avrdude to communicate with the Qlites properly.
I have everything wired up, and I execute the test command (below) and I get an error saying that it has the wrong device signature. I thought perhaps my clip got messed up, so I double checked all my wires. And some searches indicated it could mean a dirty clip, I wiped everything down with rubbing alcohol. Tried again – no dice. I then hooked up a A17DD-L and tried – it worked! Swapped back over to the Qlite, still not working.
The command I’m using to test (I’m on Linux):
sudo avrdude -p t13 -c usbasp -nThe output from the A17DD-L:
avrdude: warning: cannot set sck period. please check for usbasp firmware update. avrdude: AVR device initialized and ready to accept instructionsReading | ################################################## | 100% 0.00s
avrdude: Device signature = 0x1e9007
avrdude: safemode: Fuses OK (E:FF, H:FD, L:75)
avrdude done. Thank you.
The output from the Qlite:
avrdude: warning: cannot set sck period. please check for usbasp firmware update. avrdude: AVR device initialized and ready to accept instructionsReading | ################################################## | 100% 0.00s
avrdude: Device signature = 0x000102
avrdude: Expected signature for ATtiny13 is 1E 90 07
Double check chip, or use -F to override this check.
avrdude done. Thank you.
Things I’ve tried:
I’m getting a bit discouraged. Anyone run into this before or have ideas on things I should try? Sincerely, thank you!
It may be a stupid question , but have you wired the clip correctly ?
http://flashlightwiki.com/AVR_Drivers#Set_up_your_clip
Also try this command :
avrdude -p t13 -c usbasp -u -Uflash:w:XXXXX.hex:a -Ulfuse:w:0×75:m -Uhfuse:w:0xff:m
I’m not sure if it will work , it’s the one i use on windows …