Introduction
As you probably know, there are different categories of flashlights for different tasks and one of the most basic distinctions is between flooders and throwers.
The Acebeam P20 is one of Acebeam’s latest offerings and it peaked my interest.

Most of the time, throwers are designed to focus the light into the tightest beam possible in order to illuminate over long distances but I prefer to have some spill to help me locate my target and throwers utilizing the Luminus SBT-90.2 emitter, like the Acebeam P20 does, are quite good at striking that balance.
But before we dive into the technical stuff, let’s start at the top.
Unboxing
The Acebeam P20 comes in a nice box in orange, black and white. The main features of the flashlight are described as well as it’s applications. The Acebeam P20 comes with a 5 year warranty.


The box opens using a magnetic flap and inside we find the flashlight, covered by a carrying pouch.

The carrying pouch seems robust and has the company’s branding.

Under the flashlight we find the user manual, the safety instructions, the warranty card and the product certification card. We also find a pair of spare O-rings, a spare tail switch boot, a lanyard and a USB A to USB C charging cable.


The Acebeam P20
Putting all that to the side, it’s time to focus on the star of the show. The design of the Acebeam P20 is definitely a statement of aesthetics, combining classic with modern lines, while the use of domed hex nuts to secure the bezel gives the Acebeam P20 a distinctly industrial look.

There’s no need to describe the intricacies of the design as there are no words that could be clearer then the photographs themselves.


The machining is perfect, with no sharp edges and excellent fit and finish. The anodization is impeccable.


The Acebeam P20 is controlled by a side switch, which features an indicator LED.

The long, thin battery tube has an aesthetically interesting pattern, which also serves to provide additional grip.

Near the tail, there is a ring that could theoretically assist a cigar grip, but the light is too long and front heavy for it to really be used in that way. The ring includes a slot to tie the lanyard.

The lens is covered by a protective film, which must be removed before use.

Removing the film, reveals the deep, smooth reflector and the Luminus SBT-90.2 emitter.

The emitter is nicely centred.

The tail cap features 3 crenelations so it can both tail stand, although quite precariously, given the length and weight centre of the light, and allow the tail switch to be used with gloves.

Indeed, there is a tail switch, featuring the Acebeam logo, which can be used in conjunction with the side switch to operate the light.

Unscrewing the tail cap revels the battery compartment, under a security film that ensures that the light will not inadvertently turn on during shipping.

Removing the protective film reveals the included battery pack.

The battery tube can also be unscrewed from the flashlight head. The threads are thick, clean and square cut but they are not anodized, so there is no option to physically lock the light.

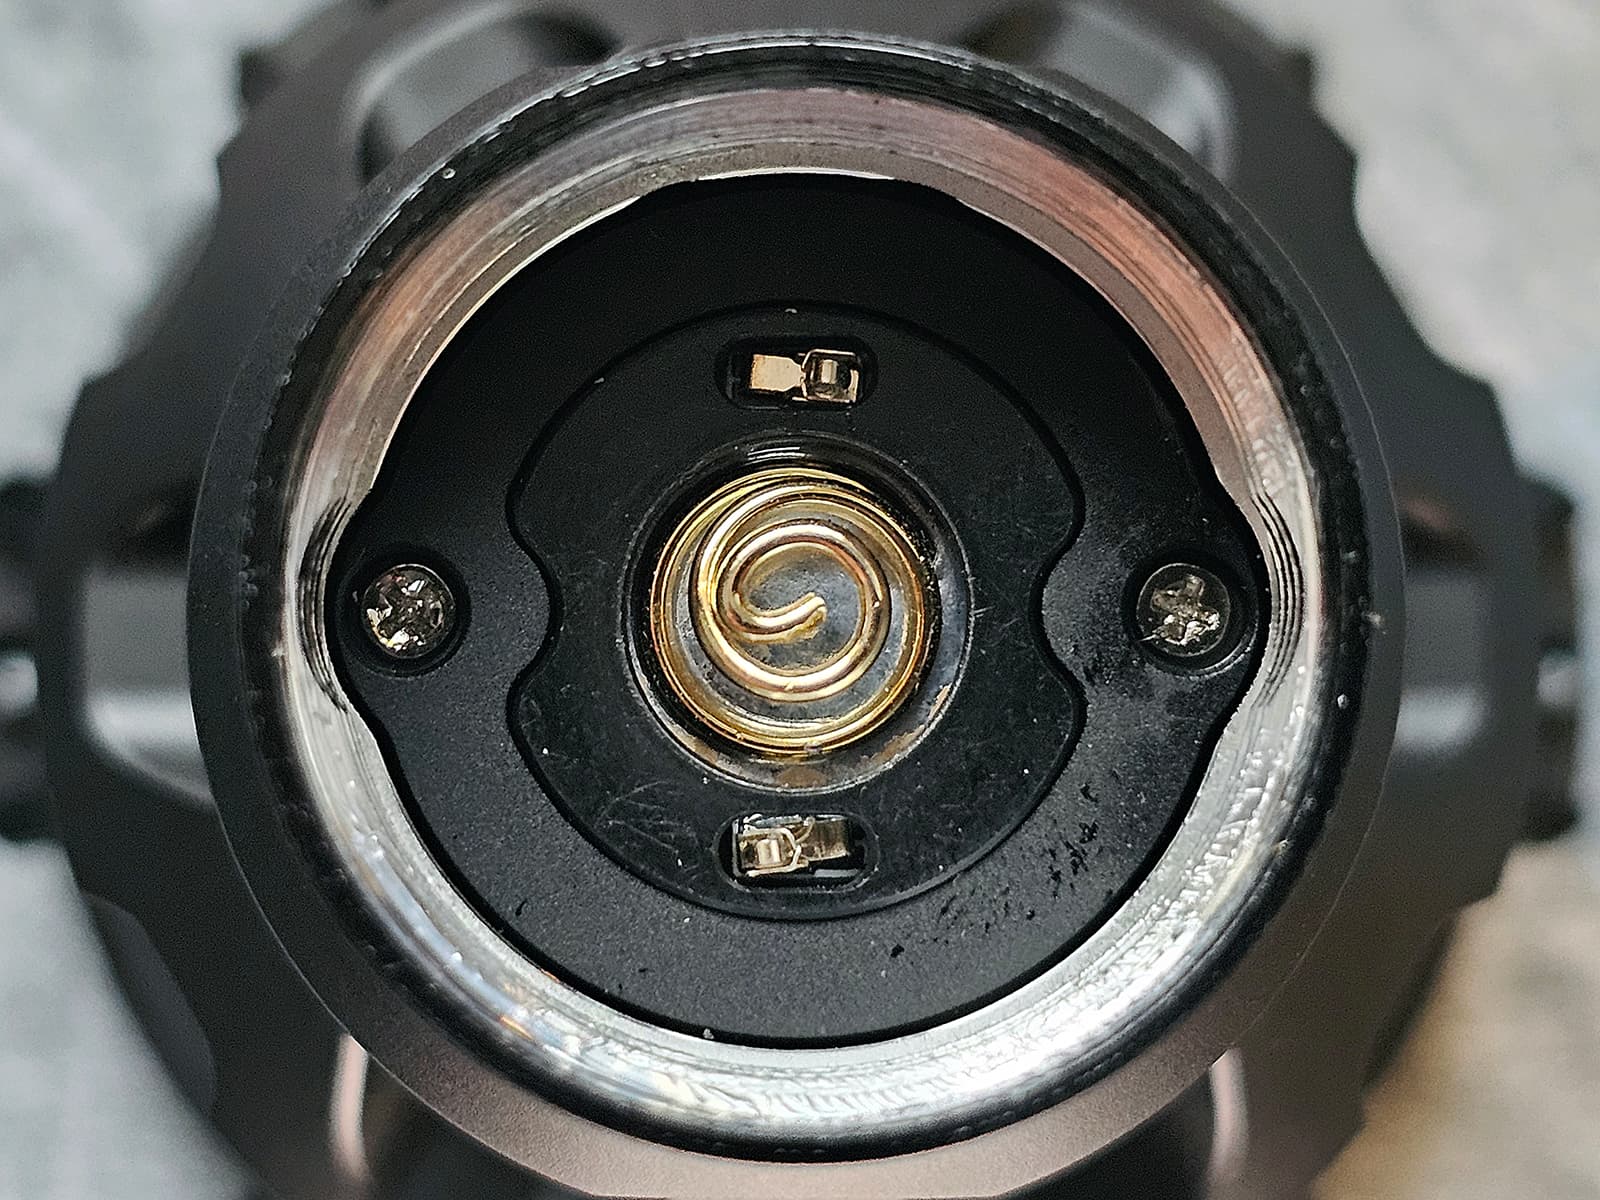
The springs on the head and the tail cap are thick and high quality. There are also a couple of contacts to the side of each spring. These are there to carry the signal from the tail cap switch, through the battery pack, to the driver. Unfortunately, instead of a double wall design in the battery tube, which would allow use of the tail switch with any battery option, Acebeam opted to use the battery pack to carry the tail switch signal, rendering the tail switch inoperable if the proprietary battery pack is not used.

The lanyard ring can be removed, if that is preferred.

The battery pack is a 5000mAh, 7.4V Li-Ion pack, including 2 21700 batteries.

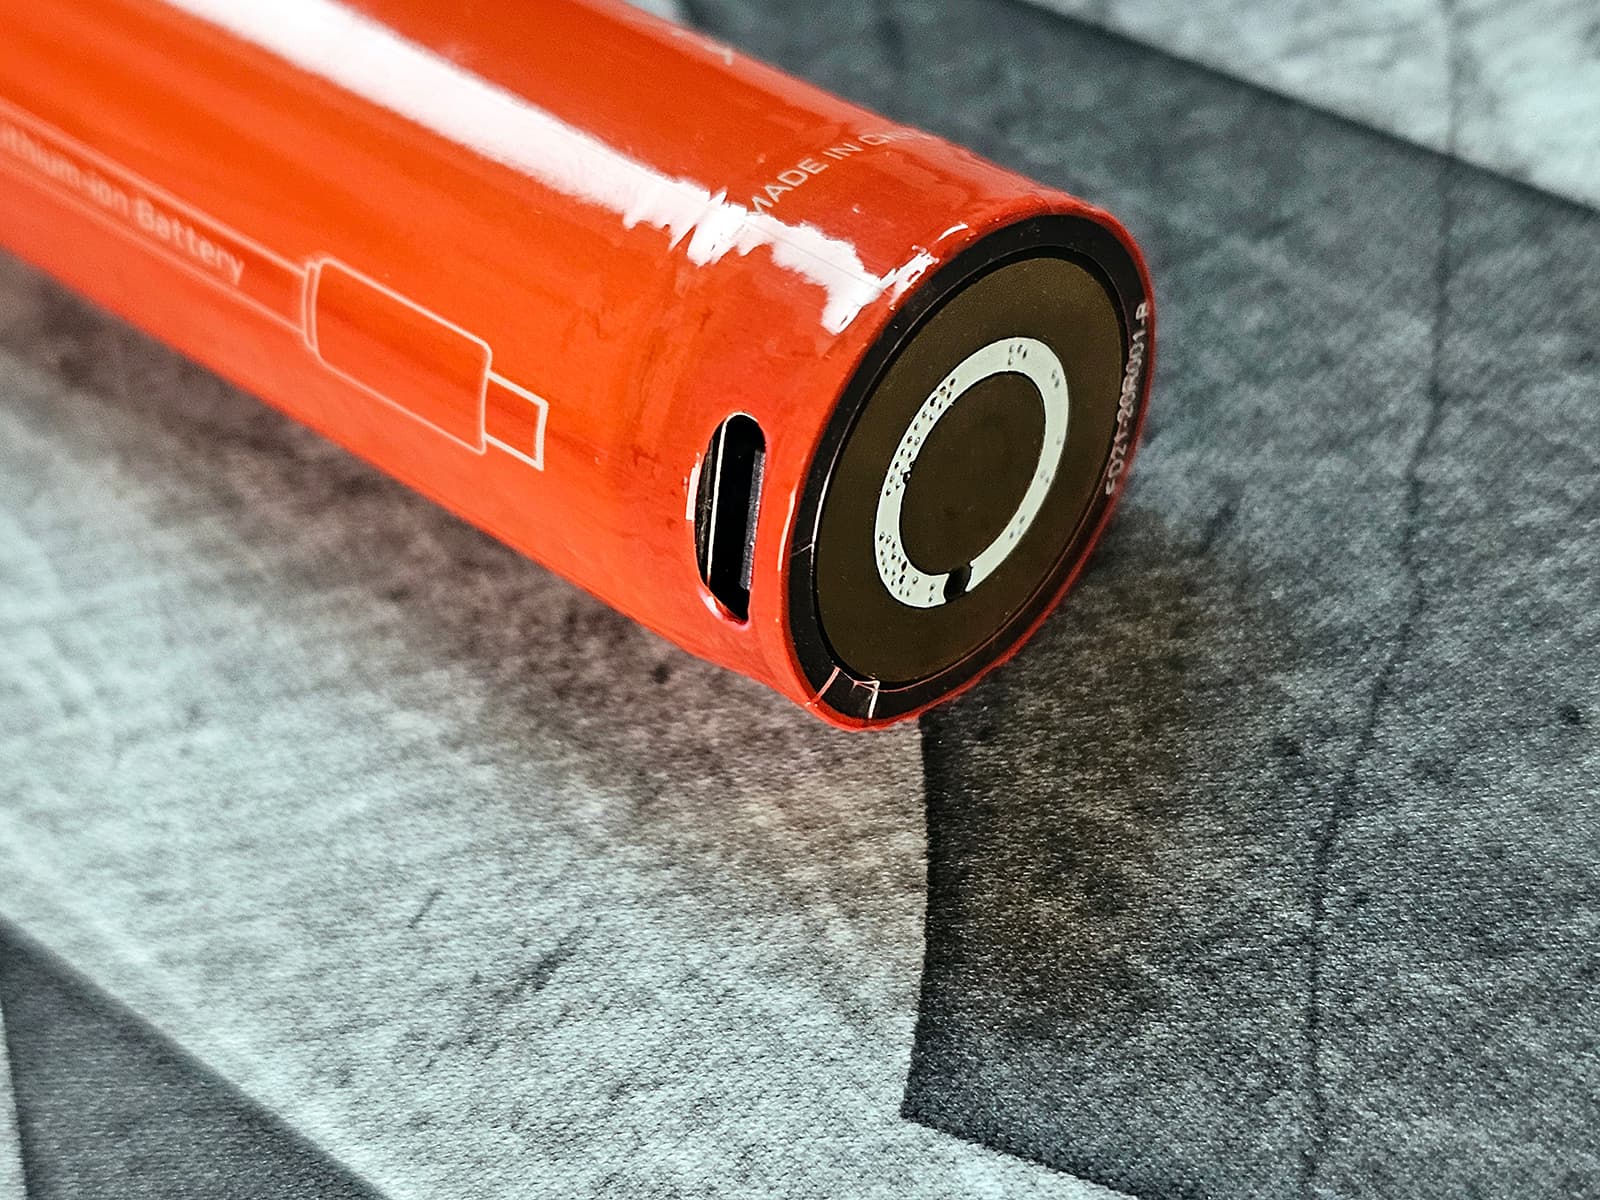
There is a ring around each pole of the battery pack. The 2 rings are interconnected through the battery pack and serve to carry the tail swich signal to the driver.
The negative pole has a little hole through which the battery charge indicator shines, when the battery pack is being charged.


There is a USB C charging port near the negative pole of the battery pack.
There is an option to use 2 21700 batteries in the Acebeam P20 instead of the included, proprietary battery pack, but that will render the tail switch inoperable.


With the flashlight reassembled and the protective film removed, the flashlight is now operational.

The domed hex huts that secure the bezel also allow light to bleed through the sides when the flashlight is head standing.

Green Filter
The Acebeam P20 has the option to use a screw-in green filter which is sold separately and Acebeam forgot to include in my parcel.

It screws on the inside of the bezel and - unsurprisingly - produces green light.

The Carrying Pouch
The included carrying pouch is a nice addition and I found it quite useful. It includes a plastic anchor point to connect to a carabiner and a strap that can be used as a handle but also worked great to hang the flashlight from my belt.


The Acebeam P20 can be carried lens down or lens up inside the pouch. Lens down protects the lens and allows the pouch to close better but lens up will quickly reveal any accidental activations, so the choice is yours.


Specifications
The specifications of the Acebeam P20, as found on the manufacturer’s website, can be seen in the tables below.


The marketing material emphasizes the robustness of the Acebeam P20, focusing on the 3mm thick lens, 1.5m drop resistance and the IP68 testing performed at the manufacturer’s facilities.


Size
The dimensions of the Acebeam P20 can be seen in the marketing material below.

And here is the Acebeam P20 next to a Lumintop FW21 X9L Copper on its left and an Imalent DT35 on its right.


The Lumintop FL21 X9L also features a Luminus SBT-90.2 emitter but has a smaller reflector and employs only 1 21700 battery while the Imalent DT35 has a different approach, with a soda can design, 4 18650 batteries and 4 Cree XHP35 emitters.
Indicator LED and User Interface
The side switch of the Acebeam P20 is the main means of operating the light and also includes an LED indicator to show the remaining battery level.

There is also a tail switch which provides the option for immediate activation.

According to the user manual the battery level indicator works as shown below:

This is a permanent gripe I have with Acebeam flashlights as I wish their battery level indicator had more granularity.
The user manual also describes the flashlight operation in detail, as pictured below:

Modes
The Acebeam P20 has 6 modes, plus Strobe.

The detailed output level, intensity, throw and battery duration for each mode are provided in detail by Acebeam, which is rare for manufacturers to do.
I do not own a multi thousand dollar worth integrating sphere, just a logging Lumen meter and a home made integrating tube. The array is calibrated with 3 professionally measured lights and gives me consistent results, but there is definitely room for error and deviations are to be expected.
The output levels of the Acebeam P20 can be seen in the following table. The numbers provided by Acebeam are in green and my measurements are in black.
As you an see, my measurements show a consistent exaggeration of the claimed values, which I have found to be universal when it comes to Luminus SBT-90.2 emitters. Maybe manufacturers go off theoretical output numbers for the emitter or measure differently or my measuring tube is not quite up to the task. But then again, my candela and throw measurements are done properly, with multiple takes and 2 separate lux meters so I am inclined to believe that the marketing claims are just exaggerated.
Still, the output is more than good for the light’s size and weight.

The following graph shows the lumen output on all modes.

The next graph shows the throw on all modes

Photometry
I’m happy to report that to the lasting dismay of my wallet, I now own a Sekonic C-800 spectrometer, so the measurements below should be quite accurate.
The SBT-90.2 is all about performance and was never designed to win any light beauty awards, so it is distinctly green and low CRI, but it does get neutral in Turbo.
The detailed measurements can be seen in the table below.

You can see how the tint of the Acebeam P20 looks like on Low, next to the Lumintop FW21 X9L and the Imalent DT35. The photo was taken with the white balance locked at 5500K.

Here are some graphs to illustrate all of the above.
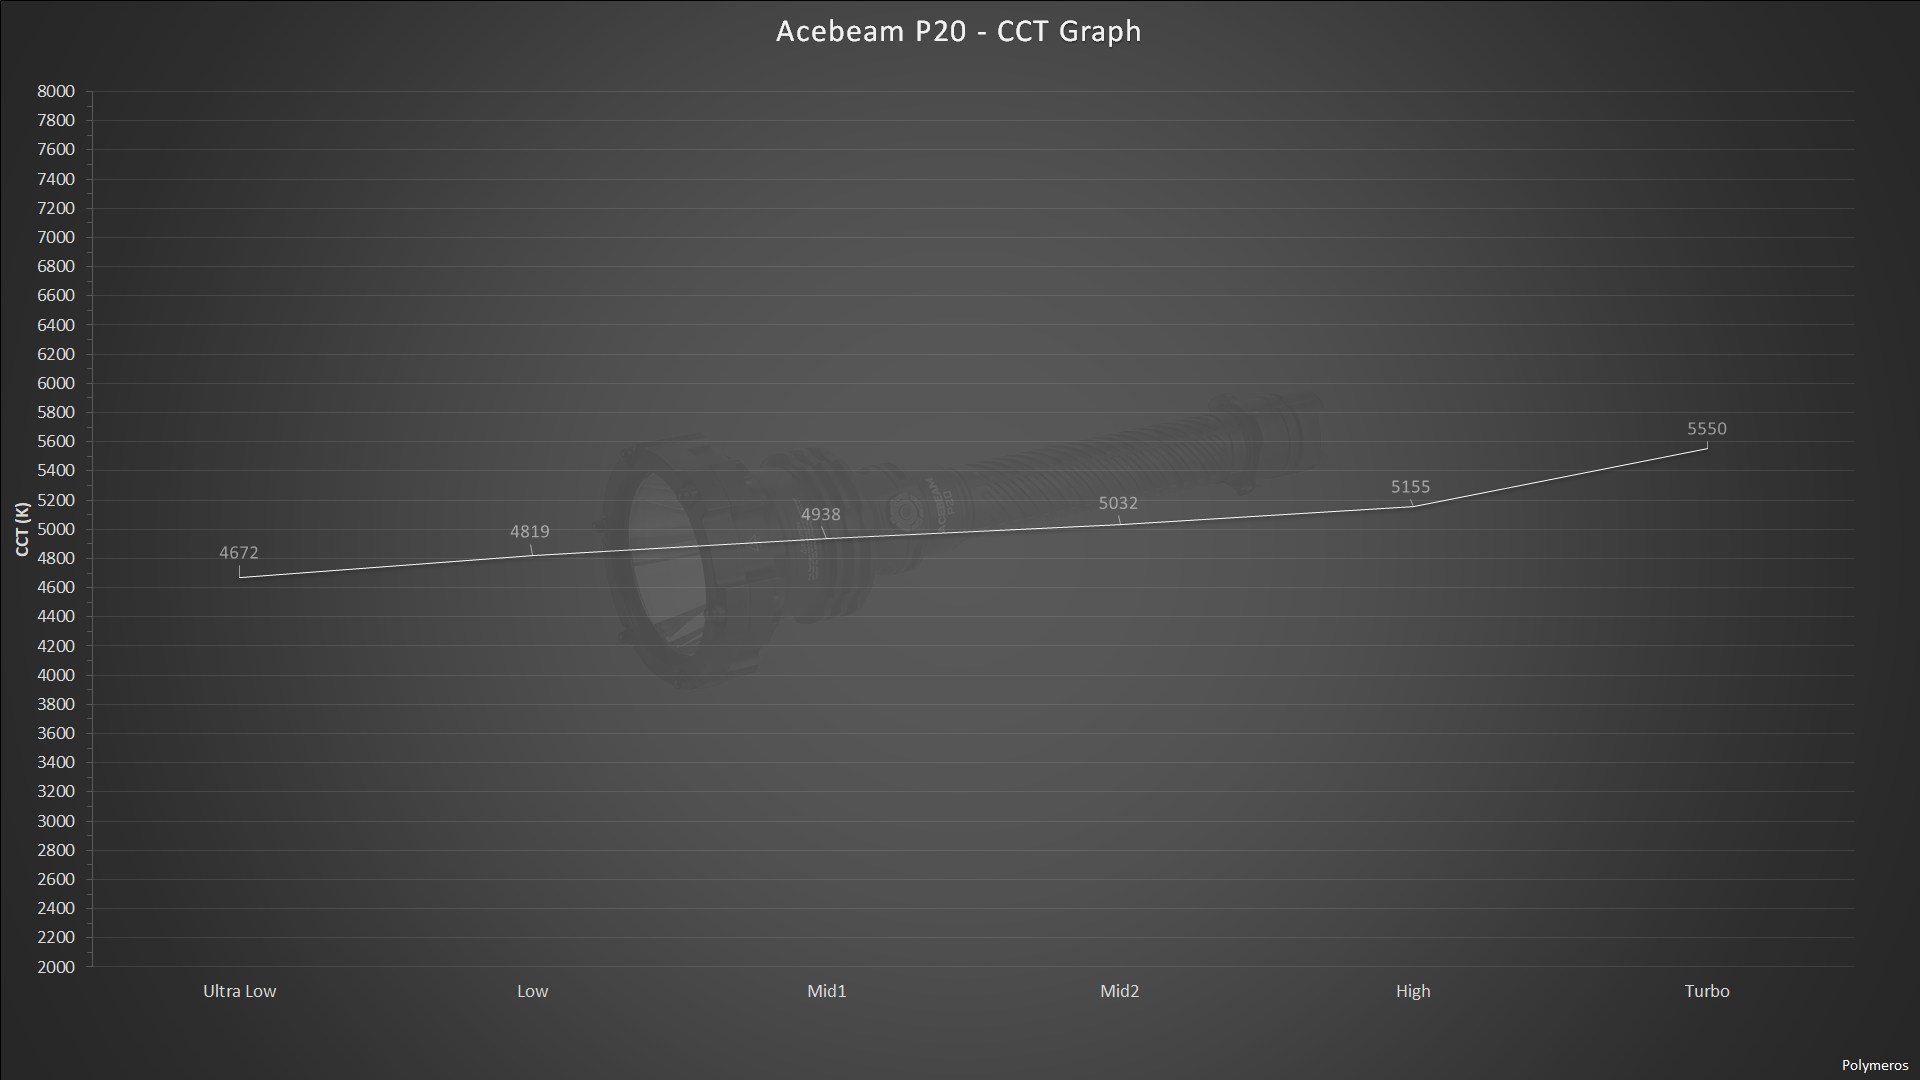


For the more tech savvy readers, I’m including the measurements from the Sekonic C-800.
The Spectrograms and CRI graphs clearly show the poor colour rendition and the TM-30 graphs are extremely revealing!


Beam Profile
The beam profile of the Acebeam P20 can be seen below:

Video Comparison
I took a short video showcasing the modes of the Acebeam P20 over a distance of 70m and also comparing it to the Lumintop FW21 X9L and the Imalent DT35 over a medium and a long distance.

Driver
I requested Acebeam to send me a driver of the Acebeam P20 but they forgot to include it in my parcel, so they sent me these pictures instead.


The Acebeam P20 uses a buck driver with LVP, OCP and temperature regulation.
There is no visible PWM, in any of the modes as the driver pulses at a very high frequency.
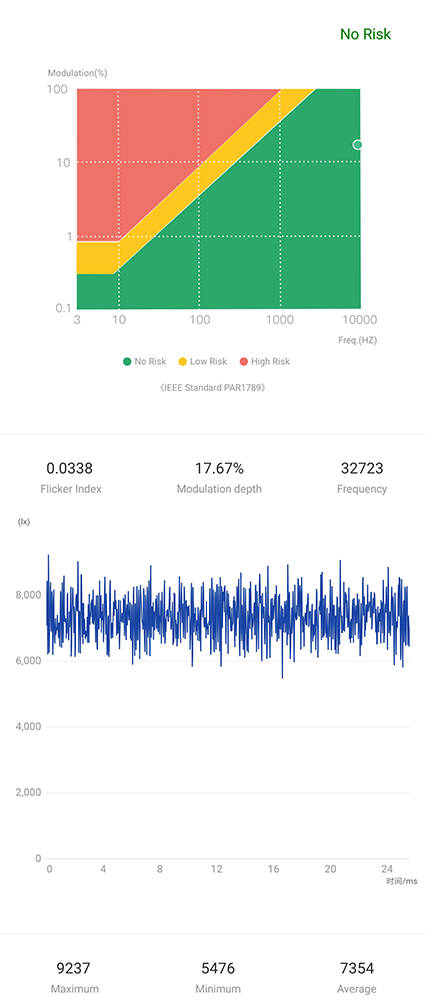


Here is what my camera saw, at a shutter speed of 1/12000 sec. No tearing at all.


Current Draw
The following table shows the current draw of the Acebeam P20 on all modes. It also shows the respective measured Lumen output and the ratio of Lumens per Amp.

Here is the current draw graph.

Here is the Lumens per Amp graph. As you can see, Mid1 is most efficient.

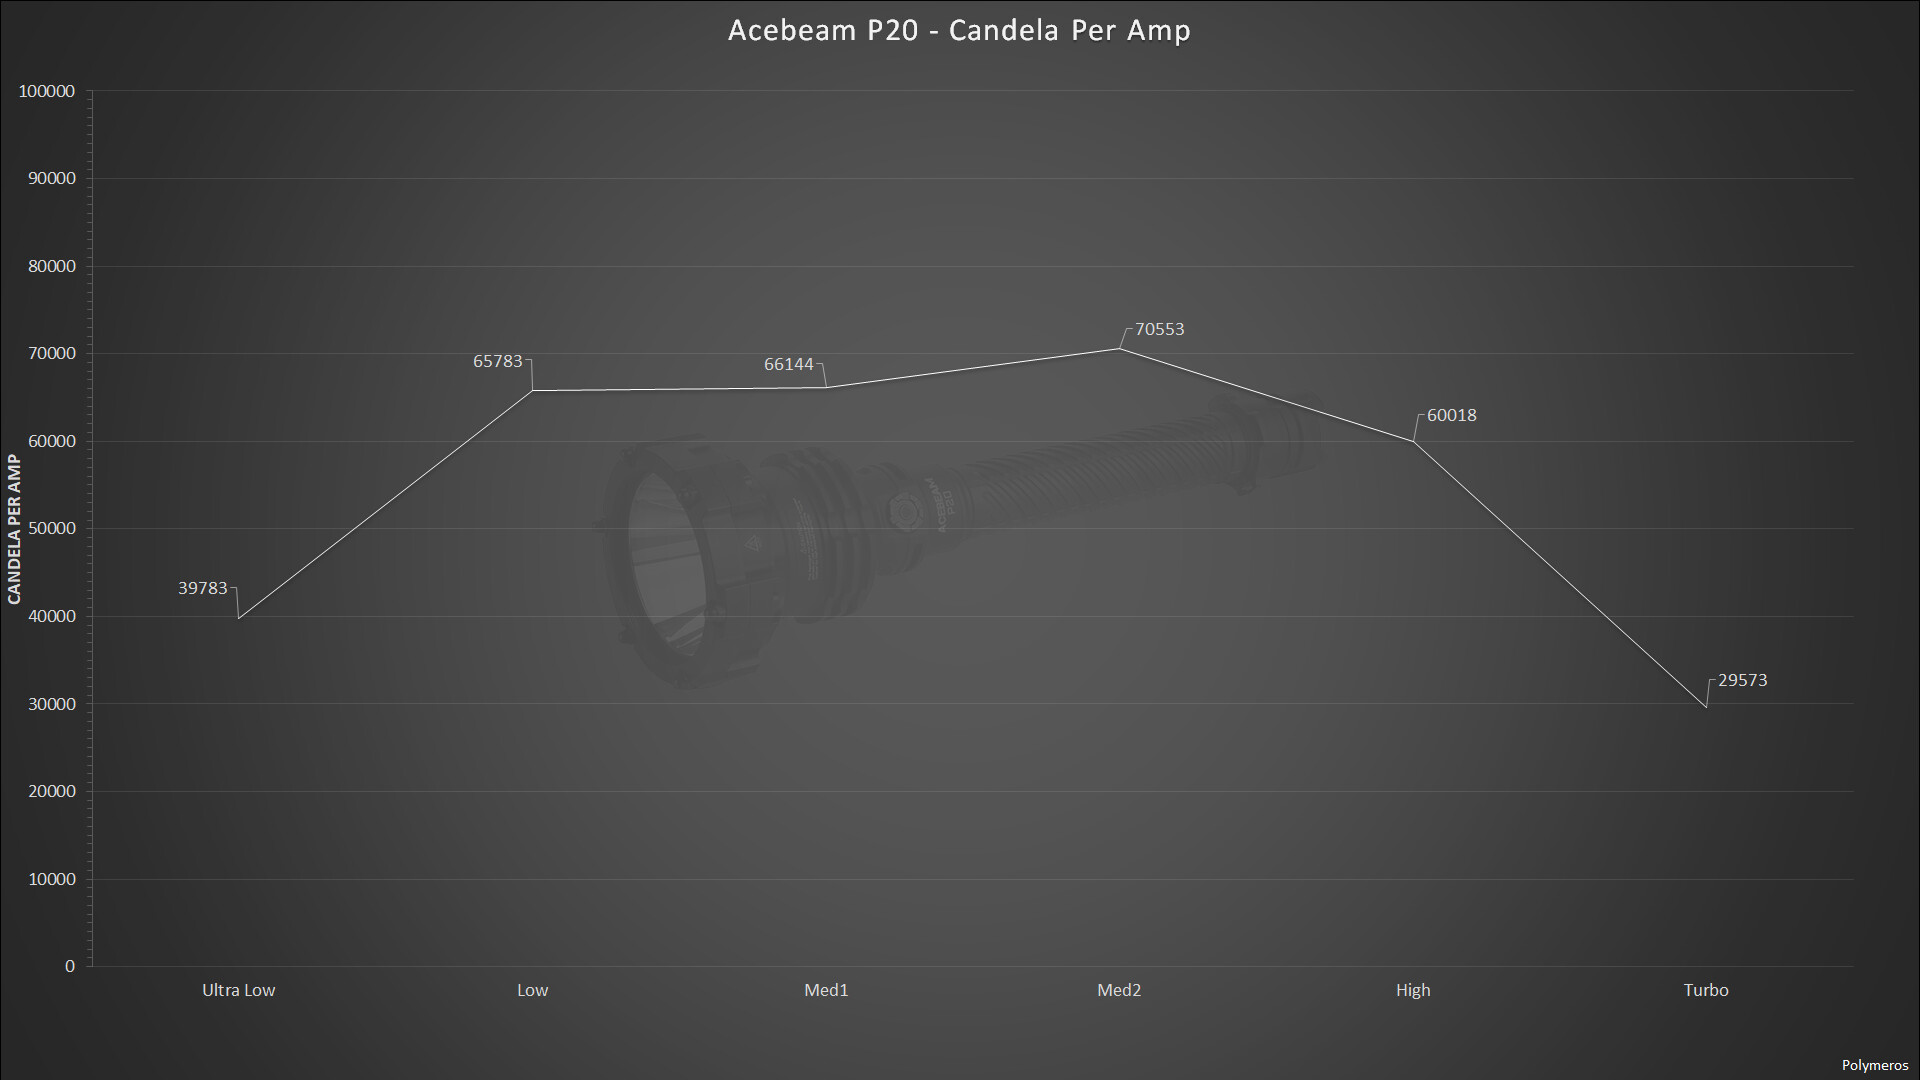
As a bonus, here is the Candela per Amp graph. One would expect to see the same result, but here the candela (and therefore the throw) is most efficient in Mid 2.
Battery Pack and Charging
The Acebeam P20 comes with a proprietary battery pack that charges via a USB C port located on the side of the battery pack, near the negative pole. Both USB A to USB C and USB C to USB C cables work fine as well as simple and advanced chargers with PD.

The LED indicator on the negative pole of the pack lights up red while charging and green when the charging is complete.


The Acebeam P20 can also be powered by 2 button top 21700 (short batteries will not work as they do not reach both springs inside the flashlight). Please note that without the use of the proprietary batter pack, the tail switch will not work, but the side switch will operate as normal.
The following chart shows the charging of the battery pack, after it had been depleted to the point where the torch turned itself off. At that point, I let the battery pack rest and then measured it at 5.47V. The charging used a maximum current of 1.72297A and was completed at a total charging time of 5 hours, 45 minutes and 20 seconds. This charging process used a total of 43.2786Wh. The voltage of the battery at the end of charging was 8.41V.
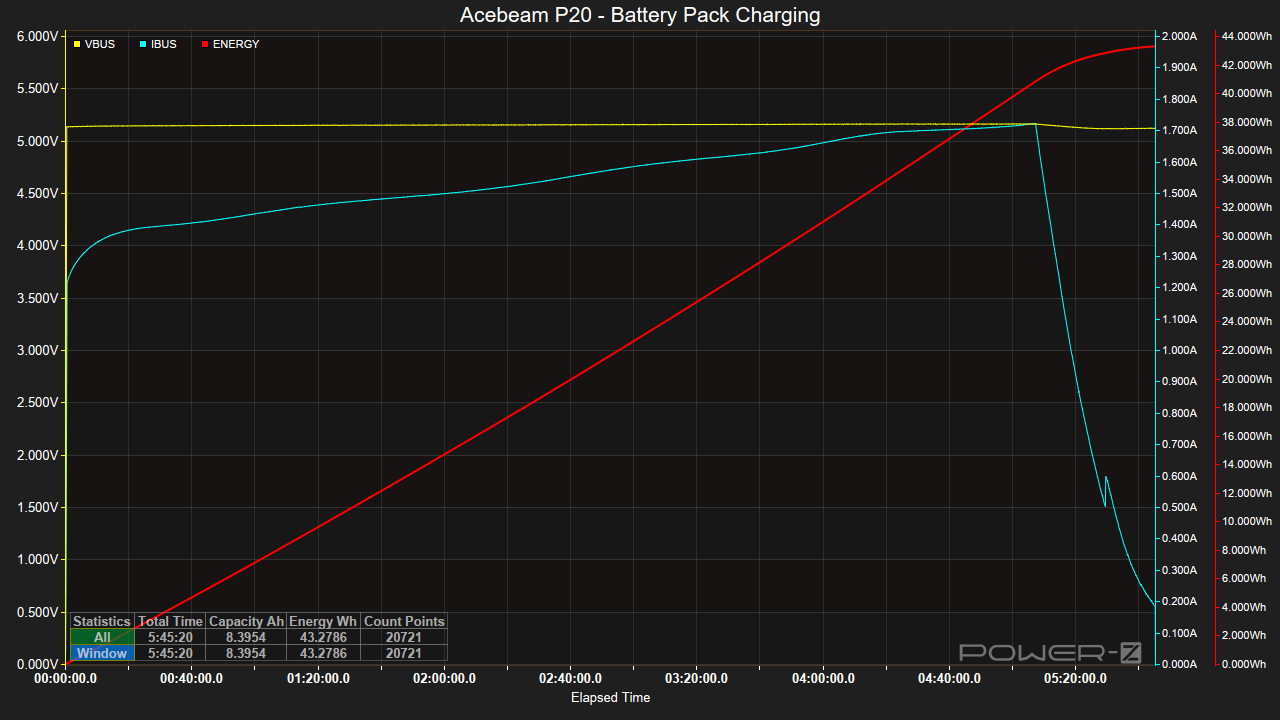
I think that the charging time is quite long and would prefer to see a significantly faster charging time.
Runtime Charts
Let’s go over some runtime charts for the Acebeam P20.
The first chart shows the full runtime of the Acebeam P20, on Turbo. All the details are noted on the chart.

Here are the first 10 minutes of the above chart, in greater detail.

This is the full runtime chart, on High.

Here are the first 10 minutes of the above chart, in greater detail.

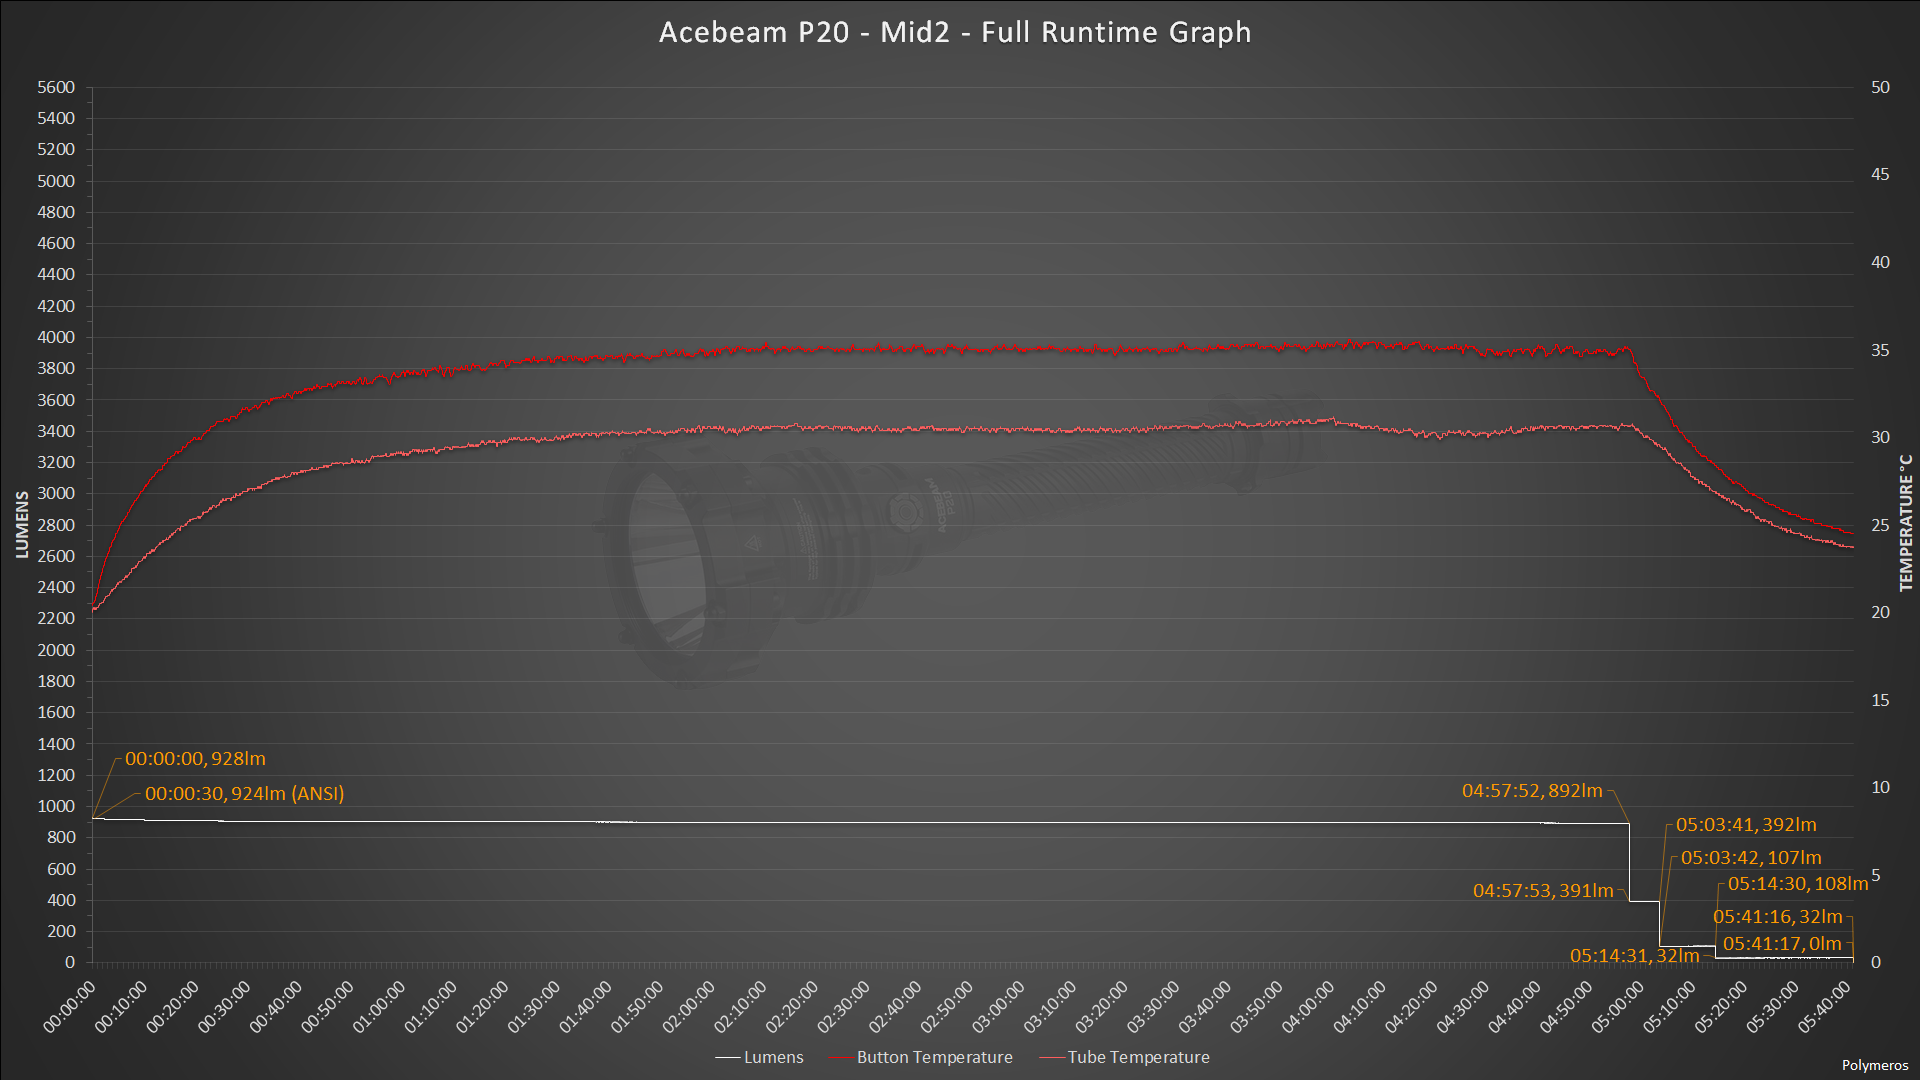
And this is the full runtime chart, on Mid 2.
Here are the first 10 minutes of the above chart, in greater detail.

Conclusion
The Acebeam P20 is a thrower, utilizing the Luminus SBT-90.2 emitter for a combination of throw and usable spill. The flashlight is machined to a very high level of detail and quality and the anodization job is excellent.
The design combines classic with modern lines and has a distinct industrial look, emphasized by the use of domed hex nuts on the bezel.
The driver is excellent and provides stable output and all the required features and protections are in place.
The user interface is simple and intuitive, combining a side switch for all the modes along with a tail switch for instant turbo. Unfortunately, the tail switch can only be used with the included, proprietary battery pack.

The Acebeam P20 can be purchased directly from Acebeam’s website for $199. Alternatively, there is the option to purchase it from Amazon, at the same price. (Prices at the time of writing this review).
Let’s list the Pros and Cons of the Acebeam P20:

Pros
- High Throw and Output.
- Intricate design.
- Robust construction and thick (3mm) lens.
- Regulated buck driver which provides stable output and high efficiency with no visible PWM.
- Excellent fit and finish.
- Included battery pack with USB C charging.
- Overcharging protection, Overcurrent protection, Low Voltage protection and Thermal Regulation.
- Simple and intuitive User Interface.
- Replacement tail switch boot and 2 replacement O-Rings included.
- Springs on both ends of the battery tube.
- Tested to IP68 standards.
- 5 year warranty.
- Included carrying pouch.
- Optional screw-in green filter.

Cons
- Low granularity of the battery level indicator.
- Lumens / Candela / Throw below specifications.
- Proprietary battery pack.
- Tail switch does not work without the proprietary battery pack.
- Slow Charging.
Disclaimer: This review is not sponsored and I was not compensated for it. The review sample was sent to me to review by Acebeam, free of charge. However, all the measurements, views and opinions in this review are my own and they did not get to review the data or tell me what to say.
