BTU Shocker Triple MT-G2 with a twist -- Aiming for >100Watt ~9000Lumens -- With external 2S power pack, handle etc...

Ok, here are the final results after the fujik potting.
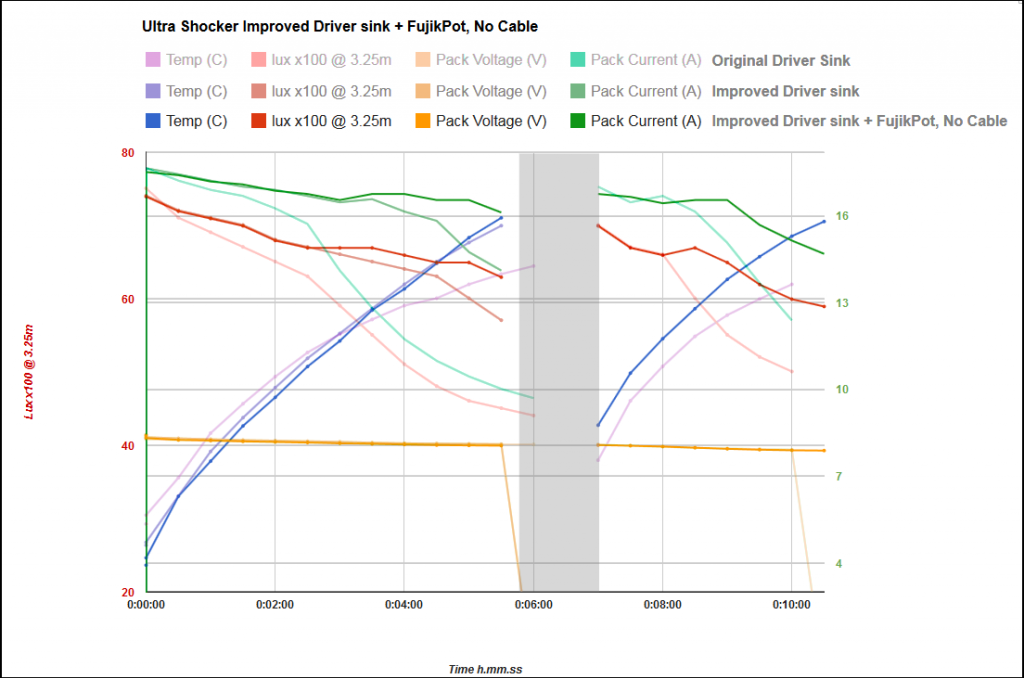
The graph is a bit of a mess because I overlaid the first two no-cable tests to show the direct differences that upgrading the driver heatsinking has made.

I’m glad to see that potting in fujik has shown another improvement, more subtle this time but still a worthwhile improvement resulting in a flatter overall current/output plot. Particularly obvious after the 3.5 minute mark where current seems better regulated (why it jumps up suddenly I have no idea, but I’ll take it!) and output is considerably higher than before as a result. The output heat cliff is pushed further back and is now very close to my 70degree temperature cutoff on the heat sink. When I called it a day at 5.5minutes I was still seeing 16.31 Amps draw. Nice!

Output heat sag at the emitters is obviously also a factor in all this, but even without considering the drop in current from the start of the test I’m only seeing about a 15% drop in lux over the course of the test. That’s pretty acceptable to me considering the exceptionally high power levels we’re talking about here.

I also tried to repeat the cool off and retest method of the very first test to see how things compare. I failed to get the light back to the same temperature but pack voltage and output was very similar. Actually they track amazingly well just after the turn on and even with a higher overall starting temperature it’s obvious that performance is maintained far better than before.

-

Overall I’m pretty pleased with the output characteristic of the light now. I still need to see how things have changed in the fully assembled light but this gives me confidence that the driver heatsinking related performance is now about as good as I can get it. Anything I can do to improve resistance losses from here will likely result mostly in higher output.

-

Unfortunately the bloody flicker is still present, it seems to start right around the 2.5 minute mark and looking closely at the offending emitter through the welding glass I see nothing at all dodgy with it. All array tiles are fully lit, very even and frankly I can’t directly see any flicker at all while looking at the emitter this way. It’s only really obvious when shining at a white wall and covering the other two reflector wells with my hand, it’s the kind of thing you catch in your peripheral vision more than when directly looking at the hotspot.

Well I was hoping it was the emitter that was obviously at fault, it might still be but if so only in a subtle way, maybe it will get worse and become more clear as the light is run in?

I think it’s most likely that I damaged a 7135 chip in the stacking process, either through bending the legs (not recommend I know but had to be done) or through applying too much heat. It may even heat up, flicker, go offline completely and then flicker back online as the overall temperature gets higher. Possibly a stretch but it might just explain the jump in drive current I see around the 3.5minute mark… :expressionless:

I dunno it’s too complicated with all these chips, trying to keep track of all the variables is doing my head in. The 7135s are probably all going through varying degrees of not working 100% right at these temperatures and all I’m seeing is the sum total if their combined agony! :stuck_out_tongue:
I don’t really want to desolder the emitter wiring to swap over and test since that part of the light, i.e the ground flat insulated solder blobs and the alignment of the emitters is quite a pain to get right. I think I’ll live with the problem for now.

-

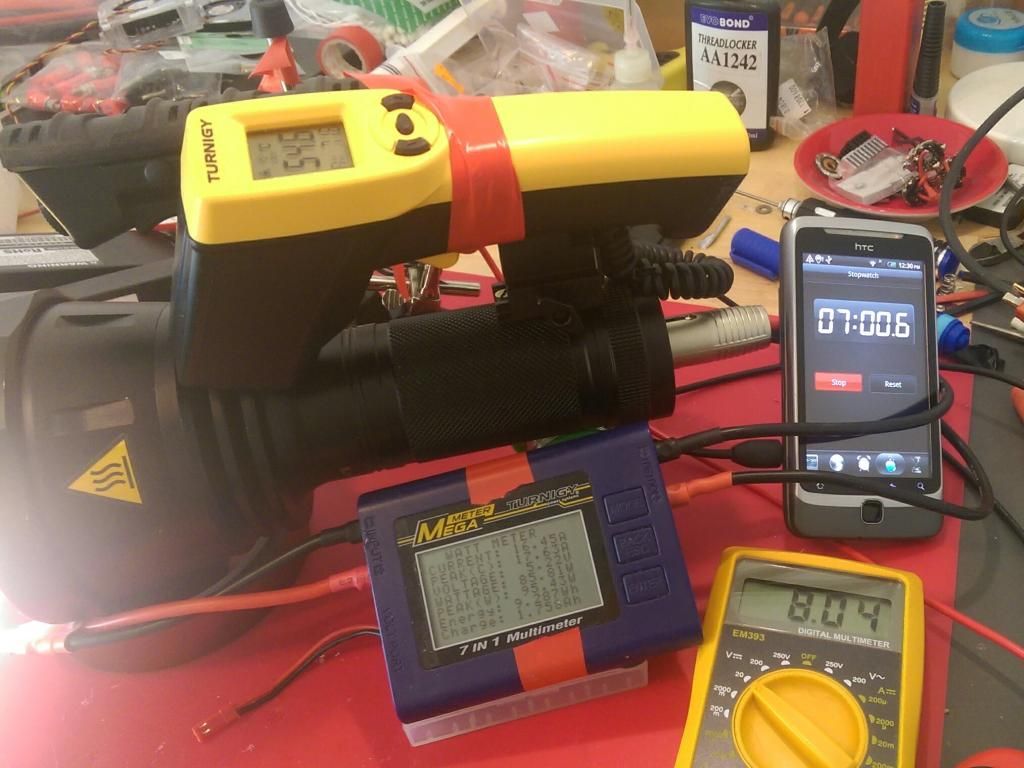
Edit: And here is the test setup. Got this going pretty well at this stage, I can just snap a photo with my other phone every 30secs and get all the data bar the lux reading in one easy snapshot. :bigsmile:
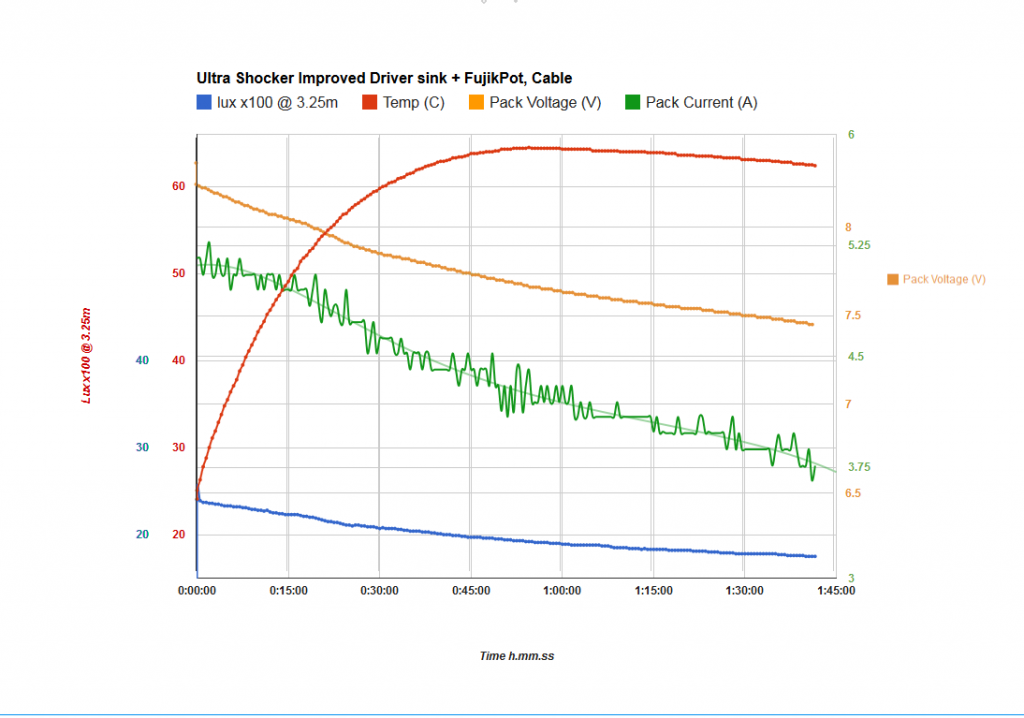
Ok, so after solving my driver temperature issues on turbo I decided to do a long and incredibly annoying 1hr45min test run on medium/high mode (~30% pwm)to see how battery voltage affects the performance at a much more sensible 5A draw current. I wanted to see if the light could dissipate enough heat at this power level to run continuously and to get a clear idea of the voltage overhead that I’m dealing with in the fully assembled light. I still had a niggly feeling that I don’t have a big margin in that regard and had to see just how much of a regulation phase there was without the extreme heat sqewing the results.

The result?…no obvious regulation phase at all…damn! I know it’s not quite ideal to test this under PWM dimming but I believe the regulation and voltage relationships are a fair representation of the light’s behavior under full duty cycle, correct me if I’m wrong here guys.

It’s also clear my current meter is anything but consistent in it’s granular readings (maybe affected by the pwm? however drawing an interpolated line gives me a good idea of whats going on).
Still, even taking that into account it’s not looking right at all. What I expect to see with my projected 0.55v voltage overhead is a consistent regulated drive current at the very least until the battery voltage drops below 8v (theoretically with my estimated drop of ~0.8v it should regulate at max output right down to about 7.7v)…instead I’m seeing a steady drop right from the start that’s more or less in line with the voltage drop at the battery. There may be regulation over the first 10mins but it’s a lot less than I predicted and I’m definitely not seeing a nice flat section anywhere on the current graph.

And this is at a third of the current draw of Turbo mode…voltage loses across the cables should be about a third of what they are at the higher current no?

Ok well I guess I need to spend some more time reducing resistance losses across the light.

-

Obvious places I could improve.

1. Twin power relays in the battery pack (~0.06v @ 17A). I like the idea of having a physical switch to turn power on and off but maybe a mosfet would be better suited to this task. Not to mention the relays use 0.11A just to turn the coils on so that basically negates any efficient long running of the light in moon mode :stuck_out_tongue:

2. The Coiled Power Cable (~0.6v @ 17A). There’s obviously massive loses here, even though it’s decent quality copper two core speaker cable, just the coiled nature of the cable means it’s massively longer overall than a comparative length of non coiled cable. I could gain a lot of effeciency here simply by switching this out for a half meter of 12awg silicone wires. The home made coiled cable also isn’t particularly stretchy (especially in sub zero conditions!;)) so the main benefits of this thing are actually cosmetic… :zipper_mouth_face:

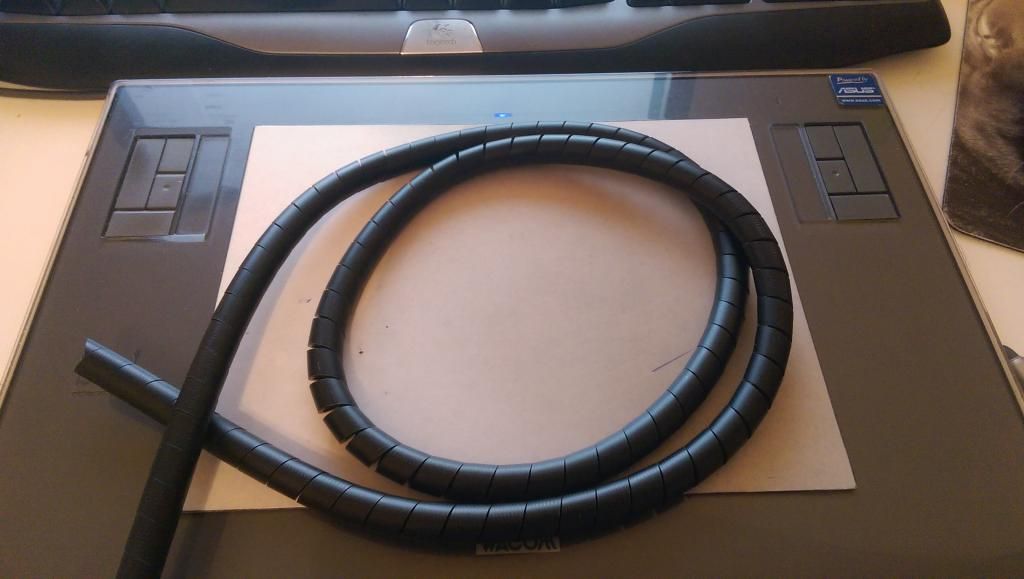
A pair of 12Awg silicone wires encapsulated in this type of thing would certainly be a more sensible option, wouldn’t look to bad either… but I’m still too damn attached to that coiled sucker!

3. Twisty contact interface (??). I’m still not sure how much I’m losing across that interface but this would be the most obvious place for unexpected losses in the power train. The rest is down to the drop across the 7135s and I can’t do anything about that.

Edit: Forgot to mention, heat-soaking the light at ~60degrees for close to 2 hours while doing that test has had the positive effect of completely eliminating the moon mode flicker I always had before. I suspect this may be related to the burn-in procedure reported to be beneficial to leds by reducing their vF, in my case moon mode doesn’t seem to be any brighter but it’s much more stable. Yay :slight_smile:

Burn in procedure or fixing the dry solder joint when the solder melted through the heat in the extended run time? l love your persistence.

You know I did hear something sloshing around inside the light after an hour…maybe that was all the solder :wink:

Do you have access to a powerful bench PSU?

On the twisty interface… does the GND spring from your carrier interface with the bare aluminum at the top of the battery tube? If so it all looks pretty good to me… the only thing left to do would be give up on the ability to install a normal carrier. Once you give that up switching to Deans Ultra is a no brainer…

Unfortunately not, that would certainly make testing easier. I do have an iCharger 1000w lipo charger that I could convince to supply a constant voltage/current (using the motor run-in mode). But I’d still need a powerful dc source to make that work, my best source taps out at 90w, unfortunately I left my 1300w converted 24v server PSU in Ireland. :frowning:

Hmm, although…thinking about that again I may be able to make it work if I power the iCharger off the Lipos and use it like a boost driver to supply a constant voltage to the light…need to see if it can safely supply 150w at only ~8v input though.
Don’t want to burn anything out on that thing if I can help it, I’ve had some bad experience with lipo chargers in the past going poof when pushed close to their limits in slightly unintended ways.

Edit: According to the manual the charger should be good for an output of 300w at an input voltage of 8v. So I think this is safe to try.
Will report back, hopefully with an output graph at various constant voltages! :slight_smile:

The GND springs are the more robust part of the interface because there are 3 and they’re all making good contact with both the aluminium contact plate as you say but also partially with the edge of the contact board which is directly soldered to the GND supply wire in the head. Everything is additionally clamped together and continuity is good on that I’m fairly certain.

The positive contact point on the other hand is a lone brass stud mating with the center of the 20mm contact board and a recessed second brass stud that’s soldered to the positive driver supply.
If there are losses it’s going to be here I’d say, it relies on pressure more than the others and the mating surface is a lot smaller. I just don’t have a great way of testing this interface with the light assembled as it currently is, wish I’d done this earlier.

I was contemplating doing away with the spring and brass stud on the positive and changing it out for a short beefy 6mm bullet connector. That would still allow the whole thing to turn but make more solid contact.

The bullet connector sounds good, but requires precision unless you soft-mount it somehow I think.

To keep the iCharger happier why not run it from a car battery? I guess it’s cold outside, but the car battery does seem ideal to me.

Yeah, although the battery carrier has quite a bit of give in it. It’s only hot glued into the bottom of the tailcap anyway so I think that shouldn’t be a problem. As long as things are relatively well lined up to begin with.

Coldness, heaviness and laziness all make that power source an unappealing prospect! :wink:
Although I should really have a LeadAcid on hand in future to stand in for this kind of thing.

I did just try using the Lipos to energize the Charger to power the BatteryPack to run the Flashlight though :stuck_out_tongue:

Works pretty good at full whack, only downside is I can only adjust the output voltage by 0.1v increments but otherwise it’s perfect. CC and CV at >150watts, plus a soft ramp up to avoid things going bang too quickly! Not too shabby at all. :smiley:

Let’s see if I can figure out what’s going on a bit better like this.
Thanks for the kick to rethink this. :slight_smile:

Nice! I wish my hobby charger had a motor drive mode… it’s been standard on “nice” chargers for so long I just assumed that the wave of modern, cheap, character LCD controlled chargers all had it. My 200W cheap thing from HobbyKing taught me differently: I assumed wrong. I’d have chosen a different charger at the time if I’d known that feature wasn’t present on the lowest end units.

Can’t wait to hear the results.

Yeah, it’s certainly something I’ll be looking out for when choosing chargers in future. I’d always dealt with brushless motors in rc helis so never saw the need for it’s intended purpose but as a variable CC/CV power supply of up to 1000w it’s bloody useful!

Ok, anyone still awake in here?

Time to wake up cause I have more Graphs! Yay, exciting! :nerd_face: :party:

Spent most of the day/evening rigging up and running tests using the new iCharger based stable voltage supply. It was almost a complete success, giving me a much better idea what my voltage overhead was doing and just how this driver behaves in and out of regulation. But particularly interesting was how the 7135s behave when I assume they are just on the cusp of being in and out of regulation. Things get pretty freaky there!

-

Unfortunately the one failure of the tests was to get an accurate value of what the vBatt voltage was. I know exactly what voltage the iCharger is putting out (verified and precise compared to the digital readout) but since the leads running from the iCharger to the battery pack connectors where relatively long and passing through my Turnigy power meter (as a backup current reading) I had to measure the actual voltage arriving at the battery pack off one of the deans ultra connectors using my DMM. No problem right?

Well so I thought but after doing 3 tests and seeing a consistent voltage drop (seemed rather large tbh), I touched the probe leads leading to the DMM with my hands and this consistently threw the reading off by as much as 0.3v. I checked all my connectors, resoldered aligator clips, swore at the crappiness of my DMM… tried another DMM (also a fairly cheap one) but I kept seeing the same thing, it seemed if I was touching the DMM or the leads in any way the readings would jump up 0.3v and give what seemed to me a more precise measurement. But leaving the DMM to do it’s thing it dropped way down again.

So I don’t know what’s going on, my theory is that the iCharger is not putting out a particularly clean voltage and that the buzz on that line is throwing off the DMMs, maybe my touching the circuit produces a slightly different waveform and a different voltage reading as a result. I dunno, it was really frustrating and I don’t have a scope to try and check anything high frequency related.
Anyway for now I don’t know how much voltage I’m actually feeding into the deans connectors at the battery pack but simply going by the iCharger voltages it already gives a pretty interesting look at the driver behaviour.


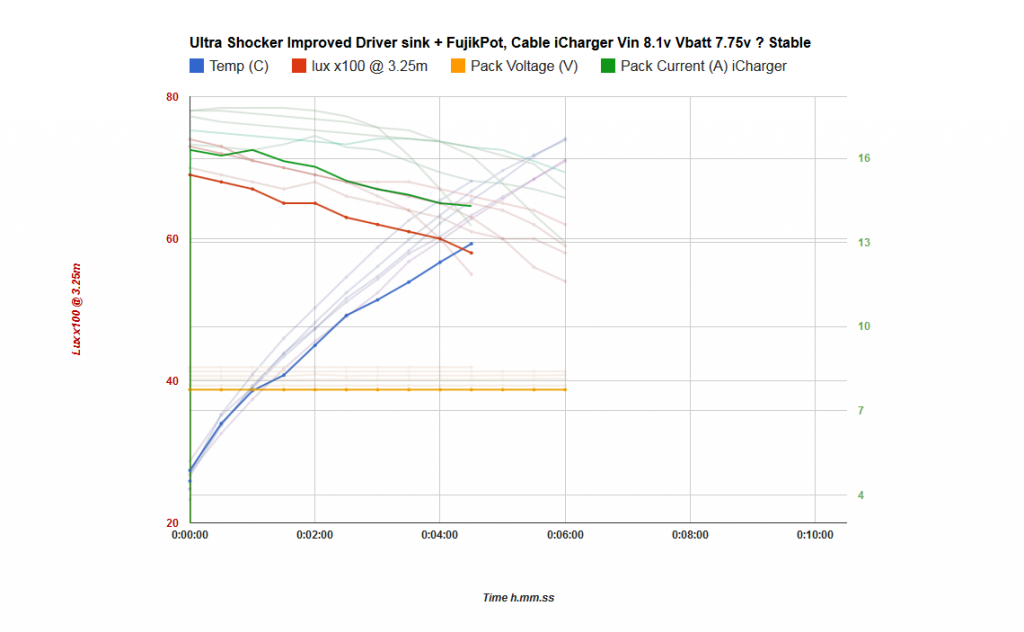
Let’s start with a low regulated voltage of 8.1, I was measuring 7.75v at the battery pack but as mentioned above, I can’t trust this reading. I suspect this may be closer to 8v at the pack.
Either way, this is not a good output graph, current is way below the regulation target of 17.5A, starts at 16.3A and output drops with temperature increase. Remember this is with no voltage sag in the supply at all! This test also ends early because my lipos powering the iCharger ran out before the 6 minute mark, too tired to run it again tonight. :stuck_out_tongue:


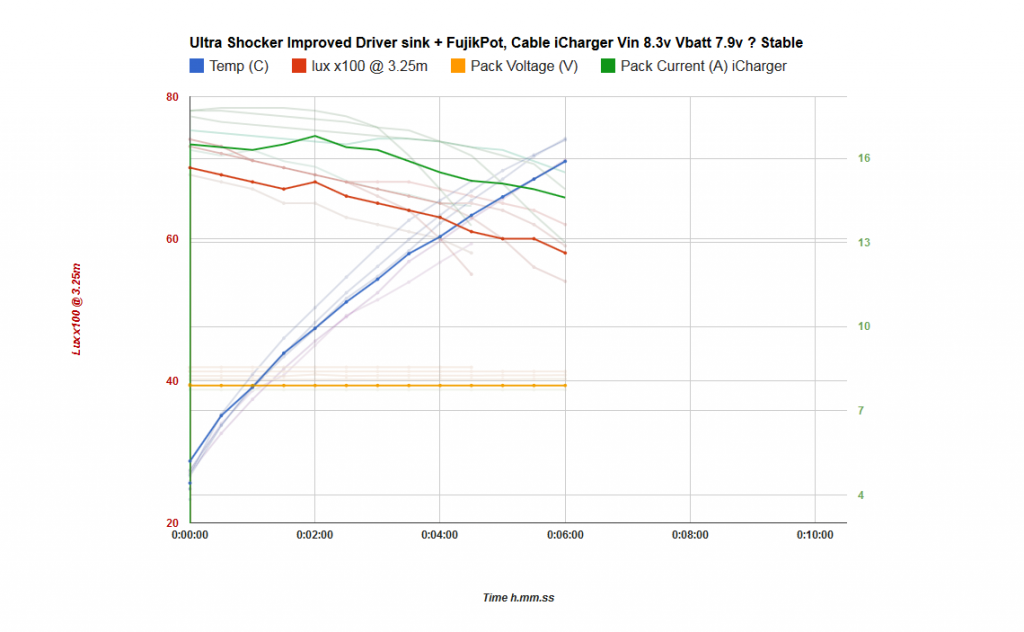
This one is at 8.3v on the iCharger. Funky stuff happens to the current here as the driver/light warms up, starting around 16.5A again it now peaks strangely to almost 17A at the 2 minute mark. I noted plenty of flicker on the troublesome emitter/driver during these tests as well.


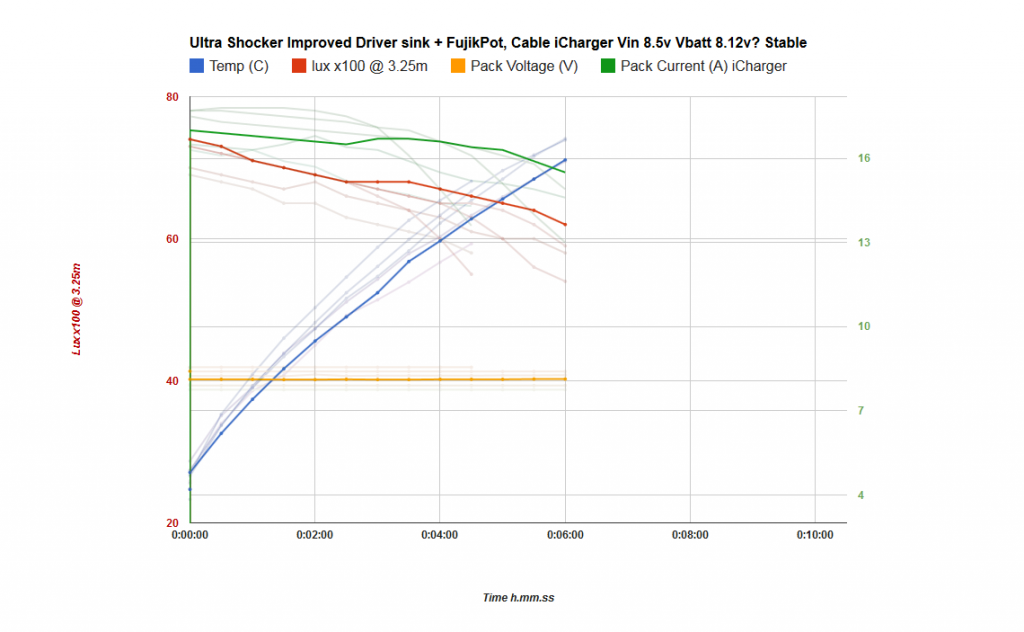
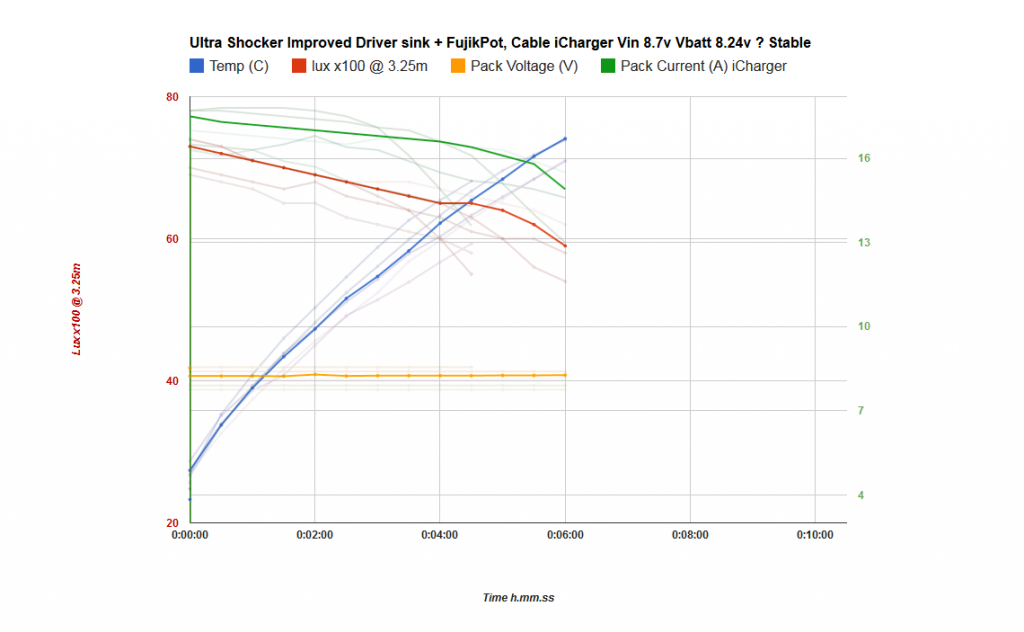
At 8.5v the current graph is looking rather similar to the no cable tests I ran earlier on. Still only starting out at 17A but relatively well regulated from there on. Steady decline at start and with that little bump at the 2.5-3 minute mark. Less flicker noted and actual output is maintained really well here, we’re still well above 60klux at the 6 minute mark which is great!


Well praise the lord does that look like a hint of regulation there?? I can’t believe my eyes, at 8.7v the current curve is very very clean. Not flat but this is more like what I expected to see. No funny business from the output side either and I’m almost certain I didn’t notice any flicker at all during this entire run. Of course because the drivers are now burning off more energy and also maintaining a higher output the heat cliff is very noticeable at the end of this run.
I still get the impression looking at this graph that the light is happiest running at this kind of voltage overhead, whatever that ends up being.


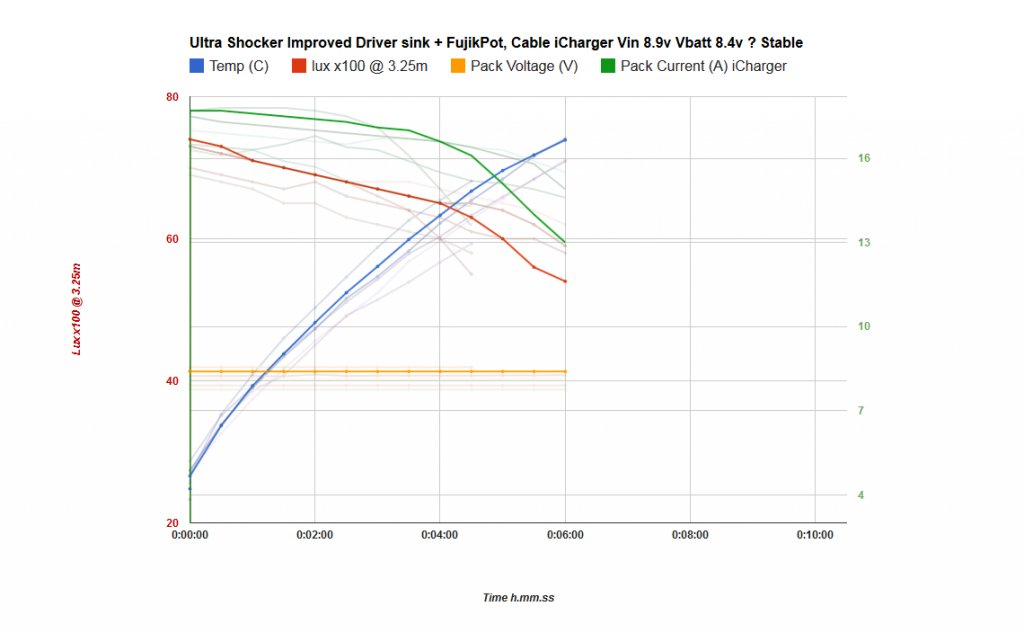
Now we’re starting to push it a bit, 8.9v shows a more extreme version of the previous test. But this is still the nice predictable shape to the curves that I was hoping for, the heatcliff is arriving earlier just as expected and output tracks identical to the previous test despite the higher drive current. I suspect that’s simply the emitters hitting a bit of a limit in terms of how much heat it can shift into the pill. Output beyond the 8.5v test seems to be determined more by the heatsink temp than the drive current.


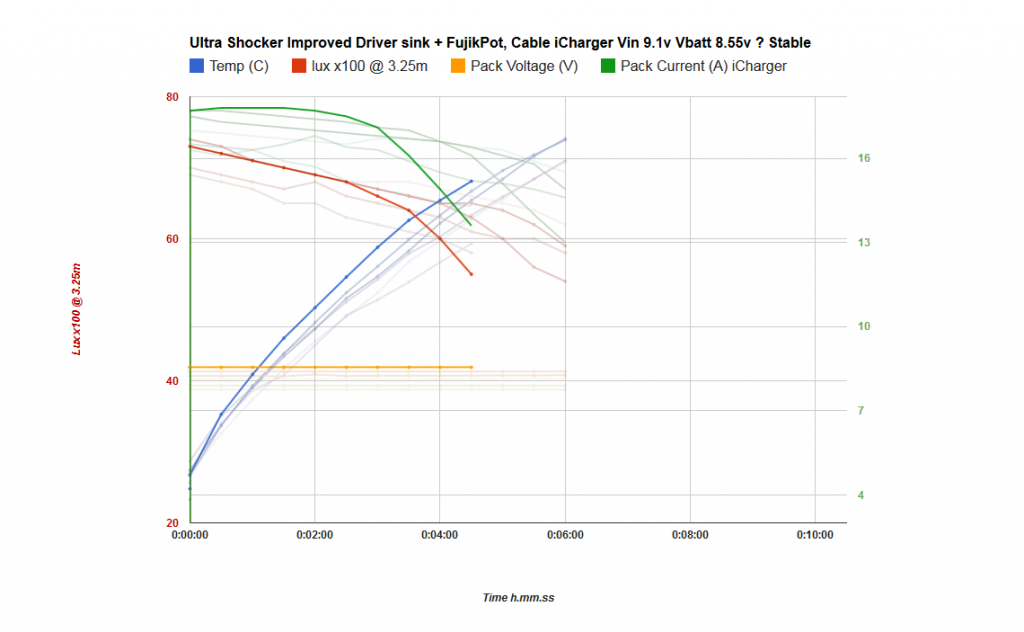
And finally the extreme torture test at 9.1v. Things don’t stay cool for long at this input voltage, the driver seems to peak at 17.8A (~0.3A higher than it should based on the number of 7135s i used, but hey up to now all I’ve seen is driver current missing the target in the other direction so I’ll take it…) then it drops as temps get critical. Output settles into it’s steady decline, identical in slope to the previous 3 tests and then follows suit over the cliff. This test was ended by one of those alarming mega flickers so I hope things are still ok in there :stuck_out_tongue:


So that’s about it for now, it was a massive pain in the ass doing these runs. Waiting for the light to cool down to 24 degrees after each one and recharging my lipos in between every couple of runs. But I’m pleased with the insight it’s given me, once I figure out what my actual voltage drop is before the battery pack I’ll have an even better idea of what’s going on.
Plus it’s given me a really nice baseline that I can compared against when I go resistance hunting! :slight_smile:

Ultimately I think I’m losing closer to 1.5v across all the connections and cables before we get to the driver, much more than the ~800mv I was hoping for.
But that’s just a gut feeling based on these tests and seeing where the regulation actually seems to start happening, I’ll know more when I have precise vBatt measurements to look at as well.

Thoughts really welcome, does this look familiar to those who know these 7135s better than I do? To me they seem to be doing really funky stuff that I never considered before, especially in the range where they are presumably just switching in and out of regulation. I also thought their behaviour would get MORE erratic as the voltage overhead and temperatures increased but frankly they seem to run much more predictably in those conditions…I’m a bit lost tbh!
Haha bring on the linear FET drivers! :stuck_out_tongue:

Cheers
Linus

Good work there.

RE: the flickering… My money is still on the emitter, but I’m not one of the experienced gurus. I figured I’d hold my tongue when you said the problem had gone way: no reason to be a downer.

I noticed one thing while doing a brief test with a small number of 7135s (less than 8 ). The more I added - the higher the dropout voltage. I am unable to explain this behavior, to me it is not logical.

Ah no the warm up flicker on high hasn’t ever gone away, except seemingly during the higher voltage tests I just ran. Sorry it was the flicker on moon mode that had fixed itself. I have my fair share of flickers here :stuck_out_tongue:

No that doesn’t make much sense does it. Could explain why I’m seeing such a high drop, provided it’s not caused somewhere else in the power train.
Were you running them off an MCU perhaps at the time? I wonder if it’s possible that the PWM pin on the MCU struggles to fully turn them all on, surely with 48 of the buggers switching them all is a fair task. Could that be it?
In my case I’m also using a fair distance of thin wire to connect PWM pin to the Vcc pins, not terribly long but certainly a bigger distance than the average board trace on a 17mm driver. Combine that with the relatively low 4.3v zener voltage source I wonder if that isn’t contributing to the weird behaviour and high voltage dropout I’m seeing.

I may try bypassing the MCU board entirely and simply driving the Vcc pins directly off a 6v dc source. Just to eliminate any possibility of only partially turned on fet switches in the 7135s.

Ah, I see. (RE: the flickers)

Sorry to make observations which do not make a lot of sense. Sometimes mentioning crazy stuff is poisonous information: everyone starts seeing the same false thing. Hopefully we can avoid that and get to the bottom of things with enough measurements. I hope to re-attack testing for that problem myself.

I do not recall what I was using to turn on the 7135(s) for that test. I would say that your suggestion is a good one (giving them 6v directly). The required Vdd is quite low according to the ADDtek datasheet: 2.7v.

Another thing of note in the datasheet, check out the OUT CURRENT vs. OUT_DROPOUT VOLTAGE graph. It shows an odd blip upwards right as dropout is hit. Maybe this explains your odd performance around 8.3v w/ the iCharger.

EDIT: the datasheet also claims 200uA of supply current consumption… so 48x would be <10mA, which should be no problem for the ATtiny’s output pins. I don’t know what speed they can switch that load at though, capacitance is also not mentioned by I assume it’s incredibly low.

great work Linus!

thanks for sharing. :beer:

Truly amazing! I applaud you for all your efforts!

Yes very interesting, that could well explain some of the weird behaviour. Also I may be missing something but it doesn’t state at what temperature that test was done, but I’d assume that’s done in ideal conditions showing a best case scenario.
What I’d love to see in the datasheet is more graphs based on temperature, since there’s no mention anywhere about the throttling back behavior we observe when temperatures get too high.

Surely if that was an active control system to protect the chip they’d mention it in the datasheet? More likely it’s simply a side effect of the circuitry not working right at high temperatures right?
Makes me wonder what else is happening inside the chip on the way up to those high temperatures… :stuck_out_tongue:

Dropout voltage graphed against out-current like it is in the datasheet but done at various temperatures would be very interesting. I suspect it can vary a fair bit as the chip heats up.
Could temperature have been a factor in your dropout observations do you think? More chips, more amps, more temperature and a higher dropout as a result?

They strongly advise keeping operating temperature below 85 degrees (max junction temp is given as 150) but I’d love to see how higher temps affect dropout voltage and max out current directly.
Only one way to find out I guess! :wink:

-

“What is AMC hiding! It’s all a conspiracy, I have seen the light…stop using 7135s you brainwashed sheeple, it’s all a big cover up. Wake up!” :open_mouth:

We really need a tinfoil hat emote… :slight_smile:

I don’t think so. As I said, it was <8 chips. I was operating them on a pair of those 4x7135 PCBs I think (in free air). I will re-test. Maybe I have stripboard that the 7135s will fit on nicely.

Cool I look forward to seeing your results on that.

I’m not sure I have the right equipment to really test this stuff accurately, but I’ll have a go at characterizing the thermal behaviour. Maybe something like soldering a few 7135s to a block of copper and heating the copper to various stable temperatures to see how that affects their regulated output and dropout behavior. I don’t want to rely on just letting the little buggers heat themselves up from their own junction temperature but see how they respond once heatsoak has set in.

From my testing in the light it seems heat is always a factor in how the chips perform. Even when out of regulation completely the output current seems to drop linearly as things get hotter. Wonder if I can replicate that in an isolated test.

Probably so. I think sense resistors are actually characterized in their datasheets RE: how much the value changes with temp.