It sounds like a pretty detailed project, doing fairly deep modifications of both hardware and firmware. Have you considered making a thread for it here on BLF? It’d be exactly the sort of thing people love to see and talk about.
The hardware should be fairly easy if it’s possible at all. Del and (mostly) you have already solved the biggest problems.
The most daunting part is trying to understand FSM and Anduril. All the modes I don’t want to accidentally enter need to be removed or made inaccessible to the e-switch. If I get to the point where I’m able to do this its going to make other small projects I’d like to do possible.
Typing speed and writing skills are not my strong points, any thread I create will be pretty bland.
If, for example, you wanted to disable the ability to go from “off” to the strobe modes… go to the off_state() function, look for the part where it changes state to strobe, and comment that out. Basically, remove this:
    // click, click, long-click: strobe mode
    else if (event == EV_click3_hold) {
        set_state(strobe_state, 0);
        return MISCHIEF_MANAGED;
    }
This basically removes one arrow in the UI diagram, and thus gets rid of an entire set of blinkies.
Or there are other FSM-based UIs which don’t have all that extra stuff to begin with. You might do better making something new instead of removing most of the fancy parts you don’t want. The DarkHorse UI might work for the purpose you described, though it could probably use better thermal regulation.
Using the pyramid method fixed the issue completely when building triples with high current using a A6 or X6 board transplanting the attiny85 running NarsilM. I used Djozz’s pic’s as a guide. ![]()
I’ll have to look at Dark Horse, if it doesn’t have smooth ramping it could be a good place to start. Or taking a functioning program, understanding and removing one piece at a time and seeing what breaks. Ideally it gets so stripped down that e-switch programming is removed. If I end up writing my own program I’ll probably use a different MCU with more pins and do it in Arduino, it comes with training wheels. And it will be very, very basic.
Good temperature regulation is important, there won’t any hands monitoring temperature for long periods of time. And stepping down to 400 lumens after cresting a hill on the trail and heading down at 20+ km/hr will probably end badly for me.
Step one is to wait for a new buck driver to arrive for a flashlight and then use the old driver as a proof of concept.
If you’re familiar with Arduino, FSM should be pretty comfortable. It uses a very similar code interface, except it has a bunch of flashlight-related and e-switch-related stuff already taken care of in a library. You mostly just have to design the interface flowchart-style, then convert the flowchart bubbles into _state() functions and convert the flowchart lines into state changes.
The Baton UI might be a simpler place to start. ZebraLight (DarkHorse) is kind of a funky interface.
So i have do some research on BLF A6 driver and attiny 13, the driver already uses the Interupt pin, so E-switch is hard to add, i guess
I’d like to try Anduril on the BLF Q8.
I don’t have any knowledge on flashlight programming, so maybe just a precompiled hex file that will work on the stock BLF Q8, and also what exact command-line to use (Windows command line).
(I have a USBASP programmer device and have downloaded AVRDude software; but have yet to try a successful flashing with it)
I can’t seem to find the correct Anduril repository from TK’s firmware repository here:
https://code.launchpad.net/~toykeeper/flashlight-firmware/
~
another question:
I’d also like to flash an old Convoy C8 XM-L2 (the one with the 5/3-group modes L-M-H-Strobe-SOS) into Biscotti, I’ve found the biscotti.hex file from here (hope it’s the correct one):
https://bazaar.launchpad.net/~toykeeper/flashlight-firmware/convoy/files/head:/ToyKeeper/bistro/biscotti/
what specific command line should I use with avrdude?
Pardon my newbie questions…
The avrdude commands are in the bin/flash*.sh files, one file per MCU type. Like, flash-85.sh for attiny85.
Anduril (latest dev versions) are in the fsm branch under ToyKeeper/spaghetti-monster/anduril/. Or I have precompiled versions here:
http://toykeeper.net/torches/fsm/
I’ll probably add hex files to the repository at some point, maybe next time I merge the dev branch back into trunk. But for now they’re on my janky personal site simply because it’s convenient.
Thanks to the above responses.
I was able to flash the BLF Q8 from stock NarsilM v1.0 to NarsilM v1.2 (check version will now blink v1.2). Then I also flashed to Anduril (thanks for the link).
The command I used for flashing to Anduril, I copied from here:
“avrdude -c usbasp -p t85 -u -U lfuse:w:0xe2:m -U hfuse:w:0xdf:m -U efuse:w:0xff:m -Uflash:w:anduril-q8-2017-11-08.hex”
(I changed the hex file name to the correct name)
In the above message thread, Tom E says:
“The 0xde vs. 0xdf does make a difference —
0xdf is Not Recommended. It disables Brown Out Detection.”
I wonder what is “Brown Out Detection”? Also, since I just copied and pasted the command line above, I used the “0xdf” which is supposed “not recommended”.
Do I need to reflash Anduril on the BLF Q8 using “0xde” which is recommended by Tom E?
~
So far, I’m still trying to figure out Anduril’s usage (lots of options… but then again I also haven’t tried out all the tons of options in the stock BLF Q8 firmware; just that the Anduril “special strobe modes” look more interesting.)
I do have a question regarding the “thermal control/tempcheck mode” for Anduril on the BLF Q8 (I used the 2018-07-01 BLF Q8 Anduril hex file)
“Tempcheck mode:
* 1 click: off
* 2 clicks: battcheck mode
* 4 clicks: thermal config mode
- Hold: thermal calibration mode
Thermal config mode:
* Setting 1: calibrate sensor:
At buzz, click N times for N degrees C. For example, if the light
is current at “room temperature” of 22 C, click 22 times. Is
intended to only be done once upon initial setup, or not at all.
* Setting 2: temperature limit:
At buzz, click N times to set thermal limit to roughly 30 C + N.
Thermal calibration mode:
- Hold until hot: set new ceiling value
- … don’t hold: blink out current ceiling value and exit”
So when I got to TempCheck mode, 4-clicks gets me to “thermal config” mode. I notice 2 buzzes, so that corresponds to the “Calibrate sensor” and the set “Temperature Limit”.
However, while in TempCheck mode, I also tried HOLDing the button to get into Thermal Calibration mode. But the flashlight does not seem to be doing anything
(I’ve tried it Temperature Calibration on other firmwares, namely: Bistro (Astrolux S2) and NarsilM (Emisar D4), which will put the flashlight in Turbo, and just hold down the button until it’s too hot, then release the button.)
However, when I HOLD down the button while the BLF Q8 (Anduril) is in TempCheck mode, the flashlight does not seem to go into Turbo mode, so it’s not getting hot. What could be the issue and how do I set Thermal Calibration?
Toykeeper:
Now only the Q8 version has the indicator led support in Andúril or it is easy to activate it in other versions?
I want to put one led in the center of my D4 optic as an indicator.
Oh, sorry. That text file was originally a todo list. Items marked with “*” are completed, and items marked with “-” are not. Items marked with “+” are partially completed.
The “hold until hot” thing was never implemented. I used a more precise calibration method instead, which is the two “buzz” parts you noted. Tell it what the current temperature is, and how hot it should get before regulating down.
About brownout detection, it works kind of like LVP / low-voltage protection, except in hardware instead of firmware. And it increases standby power draw by about 20-30 uA, if I recall correctly.
In the case of a genuinely low battery, the firmware’s LVP activates long before the BOD would. It steps down repeatedly until it gets to moon, at which point it has the MCU underclocked enough that it should keep running fine until a much lower voltage. And then it shuts off. This happens at around 2.8V to 3.0V. But the 0xDF brownout detection doesn’t activate until 1.8V or so, at which point the battery has probably already become permanently damaged.
There is also 0xDD BOD at 2.7V, but it risks shutting the light off during turbo or other really high modes, instead of allowing the LVP to step down as intended.
So, as far as I can tell, there are three choices:
- 0xDD (2.7V BOD): May activate too early and interfere with firmware-based LVP.
- 0xDE (1.8V BOD): Unlikely to activate at all, because li-ion cells don’t safely go that low and LVP shuts things off long before it would happen.
- 0xDF (no BOD): Reduces standby power draw and relies entirely on LVP.
The one situation where I could see BOD being useful is if something physically interferes with the power connection for a moment, briefly dropping power to very low voltages. LVP won’t respond because it doesn’t act until voltage has been low for at least one second. And during the split-second of low voltage, the MCU could potentially behave very strangely, executing random instructions which most likely make it freeze.
Basically, if you drop the light and the battery connection gets briefly weak enough to confuse the MCU, the flashlight could lock up and require a power cycle. BOD could, in theory, make it shut off instead of locking up… but I’m not sure if it actually works. I’ll have to try it on my lightsaber prototype and see if it makes a difference, because the lightsaber’s charge port is weak and can probably trigger BOD during impact.
Of course, for lightsaber use, it needs to not lock up or shut down at all. So I plan to add a big capacitor somewhere to keep the MCU running until normal power is restored. But the prototype doesn’t have that, so it might be a good platform for testing BOD.
If you want an indicator LED on a D4, edit the D4 config file to copy a few things from the Q8 config file. These are probably the options of interest:
// the button lights up
#define USE_INDICATOR_LED
// the button is visible while main LEDs are on
//#define USE_INDICATOR_LED_WHILE_RAMPING
// enable blinking indicator LED while off
#define TICK_DURING_STANDBY
The “while ramping” option should probably be off, if the aux LED is under the optic instead of the button.
Thank you TK! I thought I will put there a warm white led but with the off while ramping option I can put there anything.
Thanks for the clear explanation, TK!
Although I’m still not sure if 0xDE is used, any idea how much would be the power draw versus when it’s just 0xDF.
In stock form for BLF Q8 versus Q8 running Anduril, would there be an increased power draw when OFF?
Having BOD on increases standby power by about 20uA, I think. Or 25uA. Or something like that. So, for a Q8 with the button light off, it’s like 2uA vs 22uA. Or with the button light on, it’s like 100uA vs 120uA. These are rough estimates though. With the button set at a lower brightness, it’s closer to 30uA.
Narsil vs Anduril doesn’t make much difference in standby power draw. The main bits which are relevant are whether BOD is enabled, and whether the button is lit up.
Plus, Anduril can run the button at a lower brightness level if desired. And it goes to sleep a few seconds earlier. And if you enable tick during standby, the button can blink, which is basically 1/8th as much button-related power as the high brightness setting.
In all cases though, standby power is pretty negligible on a Q8.
Thanks again for the informative reply.
I have a few other minor questions, maybe they’re already answered somewhere but I haven’t been able to sift through the messages.
a) candle mode timer: by default, when set to candle mode, then flashlight is in candle mode indefinitely until user clicks to change mode or the batteries get drained; doing a triple-click adds a +30 minutes timer.
my question is (I haven’t been able to actually do a timed testing), the +30 minutes timer is added from the time the triple-click is initiated?
That is: set flashlight to candle mode, then triple-click, this causes the flashlight to stay in candle mode for 30 minutes (on the 29th minute it dims down and sputters before the flame dies).
Now what if I have already done the triple-click, then let’s say on the 20th minute of the previous timer, I do another triple-click, that means, the timer gets reset to 30 minutes again right? Or is it 10 minutes (previous timer still has 10 minutes remaining) + extend another 30 minutes, so that makes it total 40 minutes?
b) the 2 blinks when ramping
I’m still a bit new to Anduril (I just got the Emisar D4 recently, and notice it has a very fast blink while ramping up or down. I noted that the “blink” exactly occurs at the regulated level — which is the exact level when re-placing a new battery inside the D4, the max regulated level where there’s No PWM.
In Anduril, there are 2 blinks in between while ramping. From what I understand, the first blink (lower) occurs at the max regulated output. So this is exactly the same as the blink in the stock D4.
My question is about the second blink (while nearing the top brightness). I think it’s called the “ceiling”, but I’m not sure yet what level this is, or is it just the configurable ceiling?
c) question about shortcuts to Moon and Turbo (when ramp floor is set higher).
In ramping mode, the lowest level (“floor”) and highest level (“ceiling) can be configured by the user thru the Ramp Config. So the lowest level can be higher than Moon (lowest possible output) while the highest ramp level can be lower than the Max Brightness (ie. Turbo).
In case the flashlight’s ramping floor and ceiling has been set to higher-than-Moon and lower-than-Turbo, the shortcut to Turbo is to double-click.
And the shortcut to Moon, when the flashlight is Off: Hold the button until it turns on in the lowest Moon mode.
My question is: if the ramping floor (memorized level) is set to higher-than-Moon, and the flashlight is currently in the ON state (“Steady” mode), is there a way to go to Moon (lowest) brightness mode?
d) Good night / Sunset mode (how does it work?):
- I have yet to test this out, just curious about the brightness ramp down (eg. how many steps brightness level ramp down, spaced for how many minutes each) for “good night” mode? (I suppose if I can read and understand the source code, the “program flow” of how it works should be there…)
e) BattCheck (voltage blink out differs from stock vs Anduril?):
I’m not very sure, but it seems that while my BLF Q8 was in stock mode, I can get BattCheck readings of 4.1v (4 blinks, then 1 blink) when the batteries are nearly fully charged.
But now after flashing to Anduril, when I do a BattCheck, I can get readings of up to 4.3v (4 blinks, then 3 blinks) — is the BattCheck changed when flashing from the stock NarsilM v1.0 (for Q8) compared to Anduril for Q8 (I used the current 2018-07-01 hex file)?
f) Is there a way to “reset” to a baseline configuration, in case the various settings have been “messed up”?
BLF member steel_1024 has posted more photos of the GT mini, including disassembly.
I think this is our first glimpse at the driver:

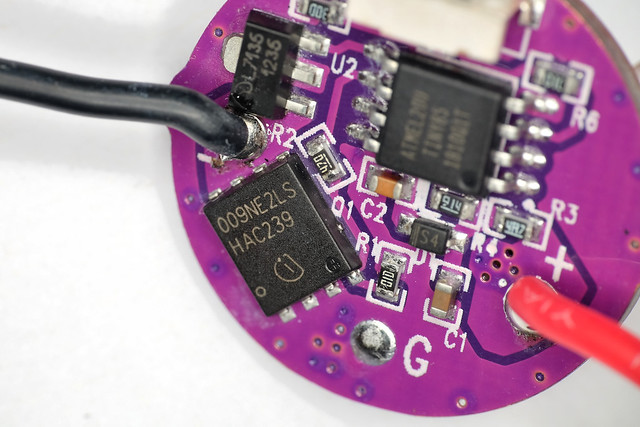
Does this get us closer to an Andúril build for the GT mini? ![]()
I also wish to try Andúril.
But I still have no time to study the information.
![]()
ToyKeeper is traveling right now, but she seemed optimistic about the GT mini being capable of Andúril.