As I’ve learned from these forums, focusing an HD2010 is a pain. Today I decided to try improving the focus on mine. This was all ad hoc and cobbled together by eye hoping for the best. This was a first attempt with no measurement taken. I just snipped copper bits til they looked about right.
Keep in mind that in real life, those little LED pads are one hell of a lot tinier than than they are in you’re minds eye when your mentally planning it.
I snipped a small scrap of copper to size for the thermal path. The -/+ pads are just too tiny to cut from a sheet of copper, so I used some 20 gauge copper jewelry pins cut to size.
These photos are from the first attempt, which worked fine, but the LED came off when I was trying to fit the centering ring. I guess I didn’t have enough solder paste, or enough heat to set it properly. I reset it with a bit more paste, and fluxed the bottom of the emitter. I think the flux helps to draw the paste onto the pads so it won’t short to the neighboring pad. Also, when you see the flux smoke, you know the temp is right to set the solder.
The beam is considerably more focused with the emitter sitting a little higher in the reflector. Hot spot is well defined and the blurry half light, half dark fuzz around the hotspot is now an homogenous aurora.
The thermal pathway from the LED seems to be working well as I can feel the heat transferring to the outside through vestureofbloods custom copper pill.
I’d like to try this with some 1/16” copper I have, but there is no way I can cut anything so tiny out of that thickness of plate.
Well that’s very cool that it worked but I think I would have just used those copper strips to solder onto the wire contact pads. Then solder the emitter wires to the copper strips at the sides for a very flat setup on top of the mcpcb. In my experience there’s no need to raise the emitter into the reflector, just flatten the connecting wires and solder blobs as much as possible, using copper strips instead that should be relatively easy and result in a very flat mcpcb surface. Then just use something thin to insulate the reflector like kapton tape or greaseproof baking paper.
But hey whatever works and congrats for getting it done so neatly. That’s some very tiny engineering work!
Would you mind posting some beamshots on a white wall at like 2-3meters away, underexposed so we can see the hotspot clearly. I’d be keen to see what it looks like with a raised emitter
You know, I’m not sure. Like I said, the emitter fell off after that picture was taken. The heat is transferring quickly to the pill, so it must be working. This was a first attempt, and I intend to improve this slapped together trial.
I tried taking beam shots, but all I have is an ipad, and everything look the same. It just focuses on the available light in an area and combines it into a large hotspot.
I have the emitter wires mashed down flat. I don’t think I would get any flatter of a surface even if I used copper braid. As it is, Klapton tape is the only thing keeping the reflector from shorting. On my next attempt, I’m going to try to raise the emitter a little bit higher.
Very cool and man those pads are small, very detailed work. I think DBC did something similar with his solarforce m3 or maybe HD2010. How durable is a mod like this? After reflowing can it take hits and drops without anything coming apart?
This is something I would like to try with some reflectors I can’t get to focus properly but not if reliability takes a hit.
I don’t think there should be any problem. The first one that fell off was because of not enough paste, and my first usage of a new hot air reflow station. All of the paste hadn’t really turned into shiny solder. Once things are soldered properly, they shouldn’t just “fall off”. I’m still on a learning curve.
Hmm, then I would think the emitter is pretty much as focused as you’re going to get it. Maybe you have a dodgy reflector?
I know how it can be to try and get a good hotspot from these lights, sometimes it just falls into place and other times you have to spend hours fiddling and seemingly getting almost nowhere. I also tend to obsess over artefacts that are probably not going to ever go away in pursuit of the perfect beam profile
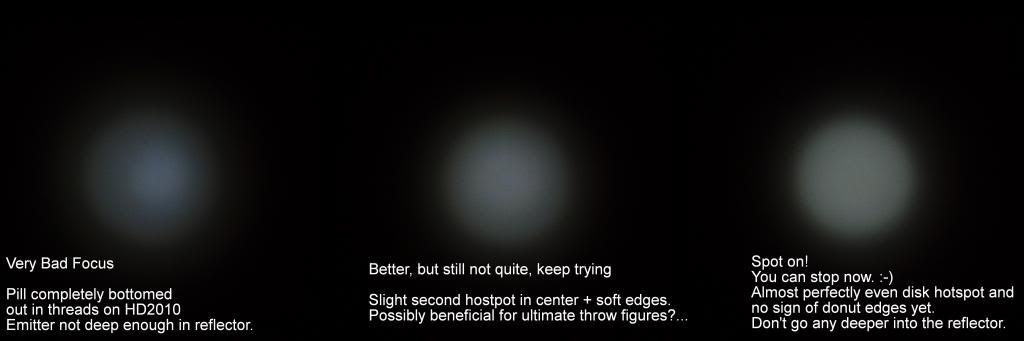
unknown, I was just playing with my new HD2010 from willbuying so I threw together a little guide image of what the unfocused emitter images will look like and when, in my opinion you have reached the “perfect” focus. This light incidentally has a superbly clean and focused hotspot right out of the box and I really struggled to get anywhere near this good with my other HD2010s…go figure
What I wasn’t able to capture is what it looks like when you go too far the other way and push the emitter further into the reflector than is possible on the stock light.
That’s why I’m interested in beamshots from Ouchy’s pedestal attempt
Low exposure combined with some contrast boost to show the hotspot features a little better. You’ll see this stuff very clearly in real life if you know what to look for.
Hope it helps anyway
Edit:
You may also find this image useful since it pretty much applies to focusing emitters.
It concerns defocusing profiles in camera lenses, also known as bokeh. The image on the left is what happens when you push the emitter too far into the reflector, you get like a disk with brighter edges or a “donut effect” which is really bad in bokeh and also not nice as a hotspot profile. For me the ideal hotspot is actually the middle one but in photography you want the defocus circles/hotspots to blend together so soft edges are beneficial.
Also want to point out that a lot of this “perfect” focus is really based on your personal taste. Maybe you like the hostpot a little on the softer side with a brighter core, it just depends where you stop in the adjustment range.
I personally hate any sign of a donut hole and also don’t like a soft double core for throwers, so I try to stop just as the disk is getting very even and defined and then not go any further.
Yes I’m aware of that. Its just some of the things I’ve seen members here do with items I’m sure the tool inventors never imagined possible, well you know.
I think one of my main obstacles is having no workshop. Everything I do is at my kitchen table. When I’m cutting with my dremel, I have to clamp what I’m cutting onto my balcony railing…and it’s snowing out there.
That dark spot is pretty much always there on a reasonably in focus reflector.
If you have a p60 with a very low or moon mode check if you can find the dark spot when aiming at less than an inch away. It will be there but just not as defined, it’s just how parabolic reflectors work.
It’s more obvious with bigger reflectors designed for more throw but not unique to being in perfect focus.
Doesn’t really help you in checking the focus of the hostspot at range either, as long as you have a wall that’s over 2 meters away to check what the hotspot looks like you should be able to get it close to ideal.
Ideally you won’t have a massive white wall either, best to have just a small clear part to check the shape of the hotspot only. Move some paintings or posters to cover the rest of the wall otherwise you’ll start obsessing over all the other artefacts visible in the beam apart from the hostpot and won’t get anywhere at all…haha
Interesting… I have the small dark spot at close range (thought this was a bad thing), but it just doesn’t look focused, like parts of the central hotspot are arching off a bit like solar flares on the sun.
Thx for the pics btw Linus. Mine looks somewhere in between very bad and better, but irl looks somewhat like ideal.
A bit offtopic, is this what kind of kapton tape you guys use? been meaning to get some.
It’s very hard to take accurate pictures of the fringes of the hotspot, like almost impossible.
I know exactly what you’re talking about with the solarflares though, I tend to call them flower petals or something similar, I think these are the smeared emitter images that surround the central hotspot and form the fringe or corona to the central disk.
You won’t get rid of this by focusing, in fact you can’t get rid of it completely with the hd2010 reflector or any smooth reflector as far as I’m aware. It’s just an artefact of having a a sharp and square emitter image projected through a parabolic reflector.
All you can do is try to get the focus right for the hotspot and the emitter as perfectly centered and square to the reflector as possible, then the fringes will be fairly smooth and you’ll only notice the “solarflare” edges/transitions by turning the light and shining it on a white wall.
Best to learn to live with it
One handy indication is if these fringe artefacts are asymmetrical then it means your emitter is not exactly in the center of the reflector, even tiny offsets can cause these artefacts to skew and stretch a lot which in turn makes them less smooth.
They’re not really that relevant in terms of getting the focus right though and will vary in definition and size depending on the reflector, emitter centering and various other things.
Smoother reflectors will suffer more from these effects as well so be warned!
It’s a pain really but if you want throw you have to deal with it.
If you’re really frustrated, put the light away for a week and then turn it on again afterwards. Or just use it outside for a bit and see what you think of the hotspot/corona then. You might not even notice the thing that was bugging you so badly when fiddling with it the first time!
White walls are the devil…hehe