HD2010 reflector/LED alignment

The HD2010 I received from Tmart has a poorly focused beam. I did some experimenting to see what I could do to fix it and I’m curious if everyone else is seeing the same thing.
Here is what I found.

This is the reflector from my HD2010.

The emitter MCPCB is 16mm. The base of the reflector is 18mm. Here is a picture of the MCPCB sitting on the base of the reflector. The point here is that you must have a spacer between the MCPCB and the reflector to allow room for the wires.

I wanted to place the LED deeper into the reflector to see if that corrected the focus issues, so I used a 25mm MCPCB.

First, I tested the reflector on the 25mm MCPCB with the stock HD2010 plastic alignment/spacer ring.

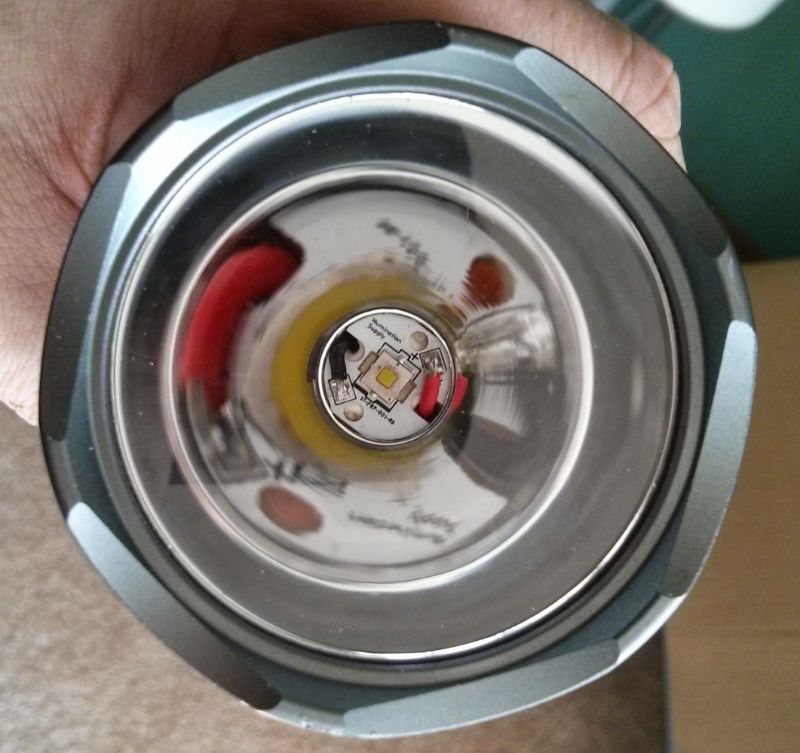
Then I remover the plastic alignment/spacer ring and set the reflector directly on the 25mm MCPCB. Notice the wires- the reflector just fits between the MCPCB solder points without shorting them together.

And finally, here is the hotspot with the plastic spacer and then without the spacer.

It’s not easy to see in the beamshots, but eliminating the plastic spacer drastically improved the focus. With the spacer installed, the hotspot is wide, blurry, and ringy. Without the spacer, the hotspot is much smaller and even, without any artifacts.

Is this how all the HD2010s look? If everyone got the same reflector as me, why are there so many people happy with this light? It looks terrible.

It looks like the only way I’ll get this light to focus correctly is to replace the 16mm MCPCB with a 25mm one so that I can butt the reflector base right up against the MCPCB and still have clearance for the wires. That means I’ll have to shave down the top of the pill since it has an 18mm wide, 3mm deep recess machined in it for the 16mm MCPCB. And I will have to figure out a way to keep the 7.7mm reflector opening centered on the LED.

Why is this slight so popular?

Mine has the same problem as yours, I have the same question as you.

I’ve ordered one from fasttech. I plan on opening up the pill to 20mm. I’m going to try and shave the bottom of an MCPCB so that the lead pads can be bent down (with a little copper layer left under) to the pill.

I’m hoping this will help with the clearance issues.

I don’t have the light but I suppose I’ll try the MCPCB mod later tonight.

LOL..you answered your own question. You're modding it ..right?

It's a light for modders.

That stock HD2010 LED alignment piece appears to be quite different from the spacers I've seen with HD2010's. Right now, I own 6 or 7 HD2010's and worked on/modded countless more. Usually (almost always in the past) the spacer is pretty thin, but yours looks thick. I would sand that spacer down (from the underside) til it's much thinner - common thing I do for many spacers. This way you can still use the spacer for LED centering alignment, if you need to. When we upgrade to 22 gauge LED wires and de-domed emitter, you may find you need to do a bit more. A few of us file/sand down the back of the reflector - must be very very careful though... Other techniques is extending out the solder pts of the wires using copper sheet metal strips, so equivalent (may not work with a HD2010). I always use 20mm stars, and sand them down to size to fit nice and snug - theory is to help with heat sinking, having a bigger contact surface to the pill. Then I sand down the reflector a little, really flatten out the wire solder connections - maybe not leaving any insulation over the star, but using kapton tape to prevent shorts.

Popular? Well, built like a tank, plenty of heat sinking, plenty of output in lumens and throw for it's size, uses 26650's, easy to mod relatively. Only light I like better right now is the Yezl Y3 in this price range and class. Like the T08, but, more of a PIA to mod, SS bezel pops off easy, cells and switch assembly more complicated, etc.

I did pretty much exactly what Tom said, to mine. Beautifully focused circle hotspot. It did take quite a bit of work compared to other lights, but the end result is very nice.

Yes, with a lot of work I think the HD2010 could be nice. My intended giftee for the HD2010 group buy, who is a non-flashoholic liked the TRJ-3T6 is much better, so I ended up with it again. I just wish they would have kept the driver the same, this one’s driver is bad and pwm makes noise, even on “high” mode.

You may have to grind the reflector a bit for the solder connections and wires in order to get it really flat. This isn't the only light like this that comes to mind but it is unfortunate that they don't come pre-clearanced.

Mine also has the PWM in high mode and is only drawing about an amp from my 26650 and my bench power supply.

I have a selection of replacement LED alignment rings, but they are all for narrower reflector openings. I have other lights with the correct diameter, thin, alignment rings, but I like those lights so I’m not robbing their rings :bigsmile:
I’m sure I can work out a solution for the alignment ring, just not sure how I’ll fix the clearance issue with the wires.
Wish I had a lathe, and the training to use it :bigsmile:

When you use a copper or alu washer of the determined thickness, you can use the reflector as (extra) heat sink.
(more relevant in case of hollow pills…)

I like that idea, but how do you shape the copper or aluminum washer so it has the stepped inner ring that the reflector sits around?

This just keeps getting better and better…

Depends on the overall build quality really.
I have 2 C8’s, one of which self centres perfectly
The other one doesn’t…
I haven’t solved that yet.

It would be nice if they were for sale, copper rings with square hole and a centring ridge…

I just drilled out the flat spot in the reflector so it could sit around a 16mm MCPCB

That looks like the easiest for me (or anyone for that matter) to do. Pretty slick idea JonnyC !

Not without a proper tools, plunging a drill bit through the reflector won’t do much good…

Maybe we should ask JonnyC what tool(s) he used and his method.

Choices of tools I can think of off hand are 1.) drill press, 2.) hand drill, 3.) dremel, and 4.) milling machine. I have all 4 of these and would choose an end mill bit in my mill and run it at a very slow speed. Anyone could do the same thing with a drill press by chucking up and end mill and again running it at the slowest speed possible.

However, I’m certainly open to any and all ideas. An end mill does not have to be used and a regular drill bit could be used if you are careful in the operation.

I have only regular hand drill and dremel, (no end mills) and those are definitely not the tools you want to use for widening the hole in reflector.
I think drill press or milling machine + high speed, are the best way to go!

hmm somebody make copper pill for this light… anyone want to make and sell bigger bottom reflectors for this light? hint hint @ JonnyC :bigsmile: