Well that was cool. You could see the color suddenly start to change right around 1:15 into it. Also interesting to see the color spread throughout the parts as it heated up. Thanks for posting.
That was pretty cool watching the light change color. Thanks for posting !
It amazes me how evenly the color changes. The first one I did, I turned it over in the oven partway through, but clearly it doesn't matter. The aluminum is transferring the heat pretty evenly.
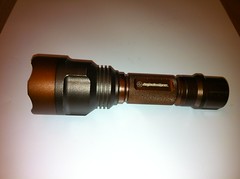
Took my Nitecore Ex10 Tanning
after 1.5hrs


Now that turned out beautiful!
I like that golden 502B very much and want to do the same. Could you please give some more details about the cooking. You gave the assembled tube 30 min. but at what temperature, was it an oven with glowing rods above, the distance from theese, was it standing or lying, what was underneath?. Excuse the many questions, but I hope to get it right the first time, never tried this before.
You are way overthinking the process; it's not that difficult. Completely disassemble the light, removing the switch, lens, and all O-rings, and put in the oven. I successfully used a toaster oven set to broil. I put the parts on the tray that came with the oven. If you only have a conventional electric oven, use that with a cookie sheet. Set the oven to "Broil" and place the parts as close to the elements as possible. If you have a gas range, use that! It doesn't make much difference as long as it's a heat source. I have laid lights on their side, as well as stood them up on end. Just watch through the process, and when it gets to a color you like, remove it! Larger/thicker/heavier parts may take longer to turn the shade you want, and you may get minor differences between parts due to differences in the anodization.
I used this method to match the colour of the head and body of a no name flashlight with magnetic ring that I bought from BIC. I never liked the look of the flashlight because the head was brown and silver and the body and tail cap where black.
It look much better now with the body and tail cap also brown, it took only 7 or 8 minutes in the oven at 250º C to lighten the original black.

Thanks, Keltex. I understand now that it is the time it cookes that determines the shade of color, rather than position, oven type etc.
From Brted's pictures I guess it starts with brown, then yellow and ends in red shades
I will give it a try.
No, you don't have much control over it. The final color just depends on the recipe from the factory (though you could stop it early and get partway to the final tint). Other people have baked their 2100's and gotten the same brown color I did. I baked my three lights for different times, but it seems like once they change, that's it. You could leave them in for another hour and they would be the same. I feel like I lucked out getting three different colors. Yet another *fire tint lottery!
Yes, time determines the shade, but once it starts to turn, watch it closely... It starts off a dark chocolate brown then progesses through a dark bronze, up through the copper shades and into golden.
OK, thank you guys. Two scools here. I guess you both are right somehow. My first try prooved that. I got a color somewhere between the golden 502B and the more red 501B and it seemed that I could lighten the color a little towards golden by giving it much more time (45 min. total).
But I like the final result. Thanks again.
my flamed 502b


and now a shilling photo indoor xD

Who ever started this has some serious explaining to do! Will baked lights become an "option" in the future?
Roflmao,it should be ![]()
Interesting thread!
I just gave it a try with an old Rominsen that I didn’t care about and that I had modified as a dive light to test out certain aspects related to depth.
I had removed the clicky tail switch and which left a hole in the tail cap that I filled in with epoxy.
I can tell you that epoxy smells when you broil it ![]()
The epoxy didn’t hold of course but the color change was as reported here. I cooked it 15 minutes.
I’m now doing an olive colored light in sections and checking it every 5 minutes. There are 3 sections (head, body, tailcap) and right now I’m just cooking the middle section.
If I don’t like the multi-colored look I can just cook the other two sections for the same length of time for an even coloration.
bryan -
Hmmm . . . maybe I can make my unloved, gold-supposed-to-be-sand L2 less ugly.
cannotbeanyworseFoy
gcbryan, I like the way the multi color turns out. I did the same treatment on my C8:


My contribution.
http://gbpics.shutterfly.com/394
The P60 host was all black and I baked the head and tail cap and left the body alone.
With the two Ultrafire BJO8A’s I went for a two tone look as well. The one standing up has the original color only on the head and the rest is lighter.
With the one on the far right the head is lighter and the body and tail cap are the original color.
I couldn’t get the lighting just right on the P60. The colors blend together better than it might appear in the photo. The color difference in the Ultrafire on the far right is a bit more pronounced in reality as well.
Nice C8 BetweenRides, looking the pioneering dry i was with gcbryan(wity all the respect Mr.Ihatesomuchmydry de gustibus....), you made me change opinion i will try to do a mestizo but is not easy it change color too fast can't create easily shades