OBJECTIVE OF THIS THREAD
The reason I am starting this thread is I would like to find out from site members how I can fix a flashlight I broke. It is a cheap flashlight, so buying a new one like the original is not that big a deal in most people’s eyes. My eyes are different.
I don’t want to waste the parts of the flashlight that are in usable condition.
PLEASE CLINK ON THE GRAPHIC IMAGES TO SEE THEM AT A SIZE MORE CLEAR THAN THE IMAGES DISPLAYED
CONTENTS OF THIS POST
Statement of the objective of this thread.
.
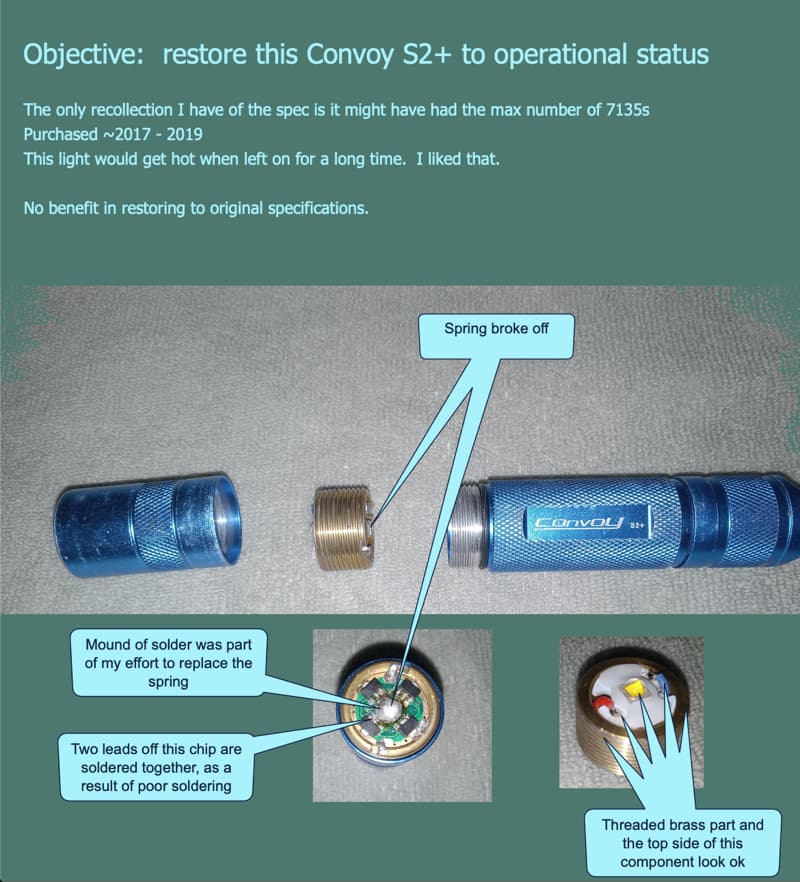
A graphic that shows the broken flashlight. The graphic includes images and words in graphic form.
.
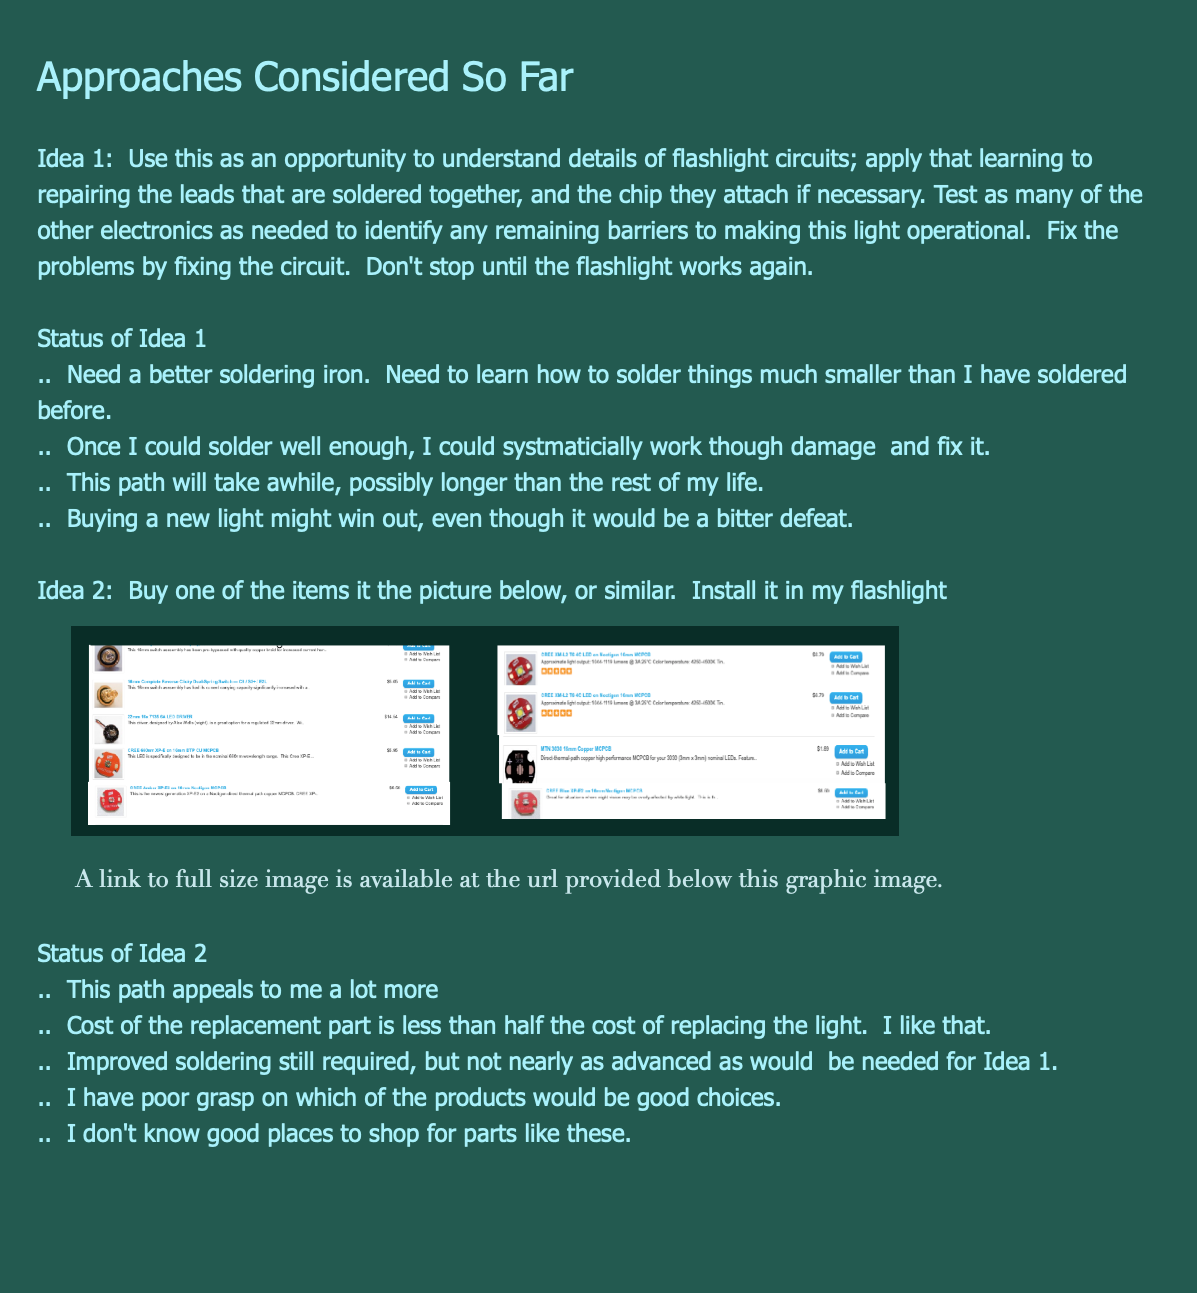
A graphic that lays the approaches I have considered thus far. I have reached a point where I am finding I cannot save all te good parts, because I lack the hand skills for the soldering required to repair the part that has the circuit installed on it. This graphic mentions gaps in my knowledge I hope will be filled by discussion that takes place on this thread. The graphic includes images and words in graphic form.
.
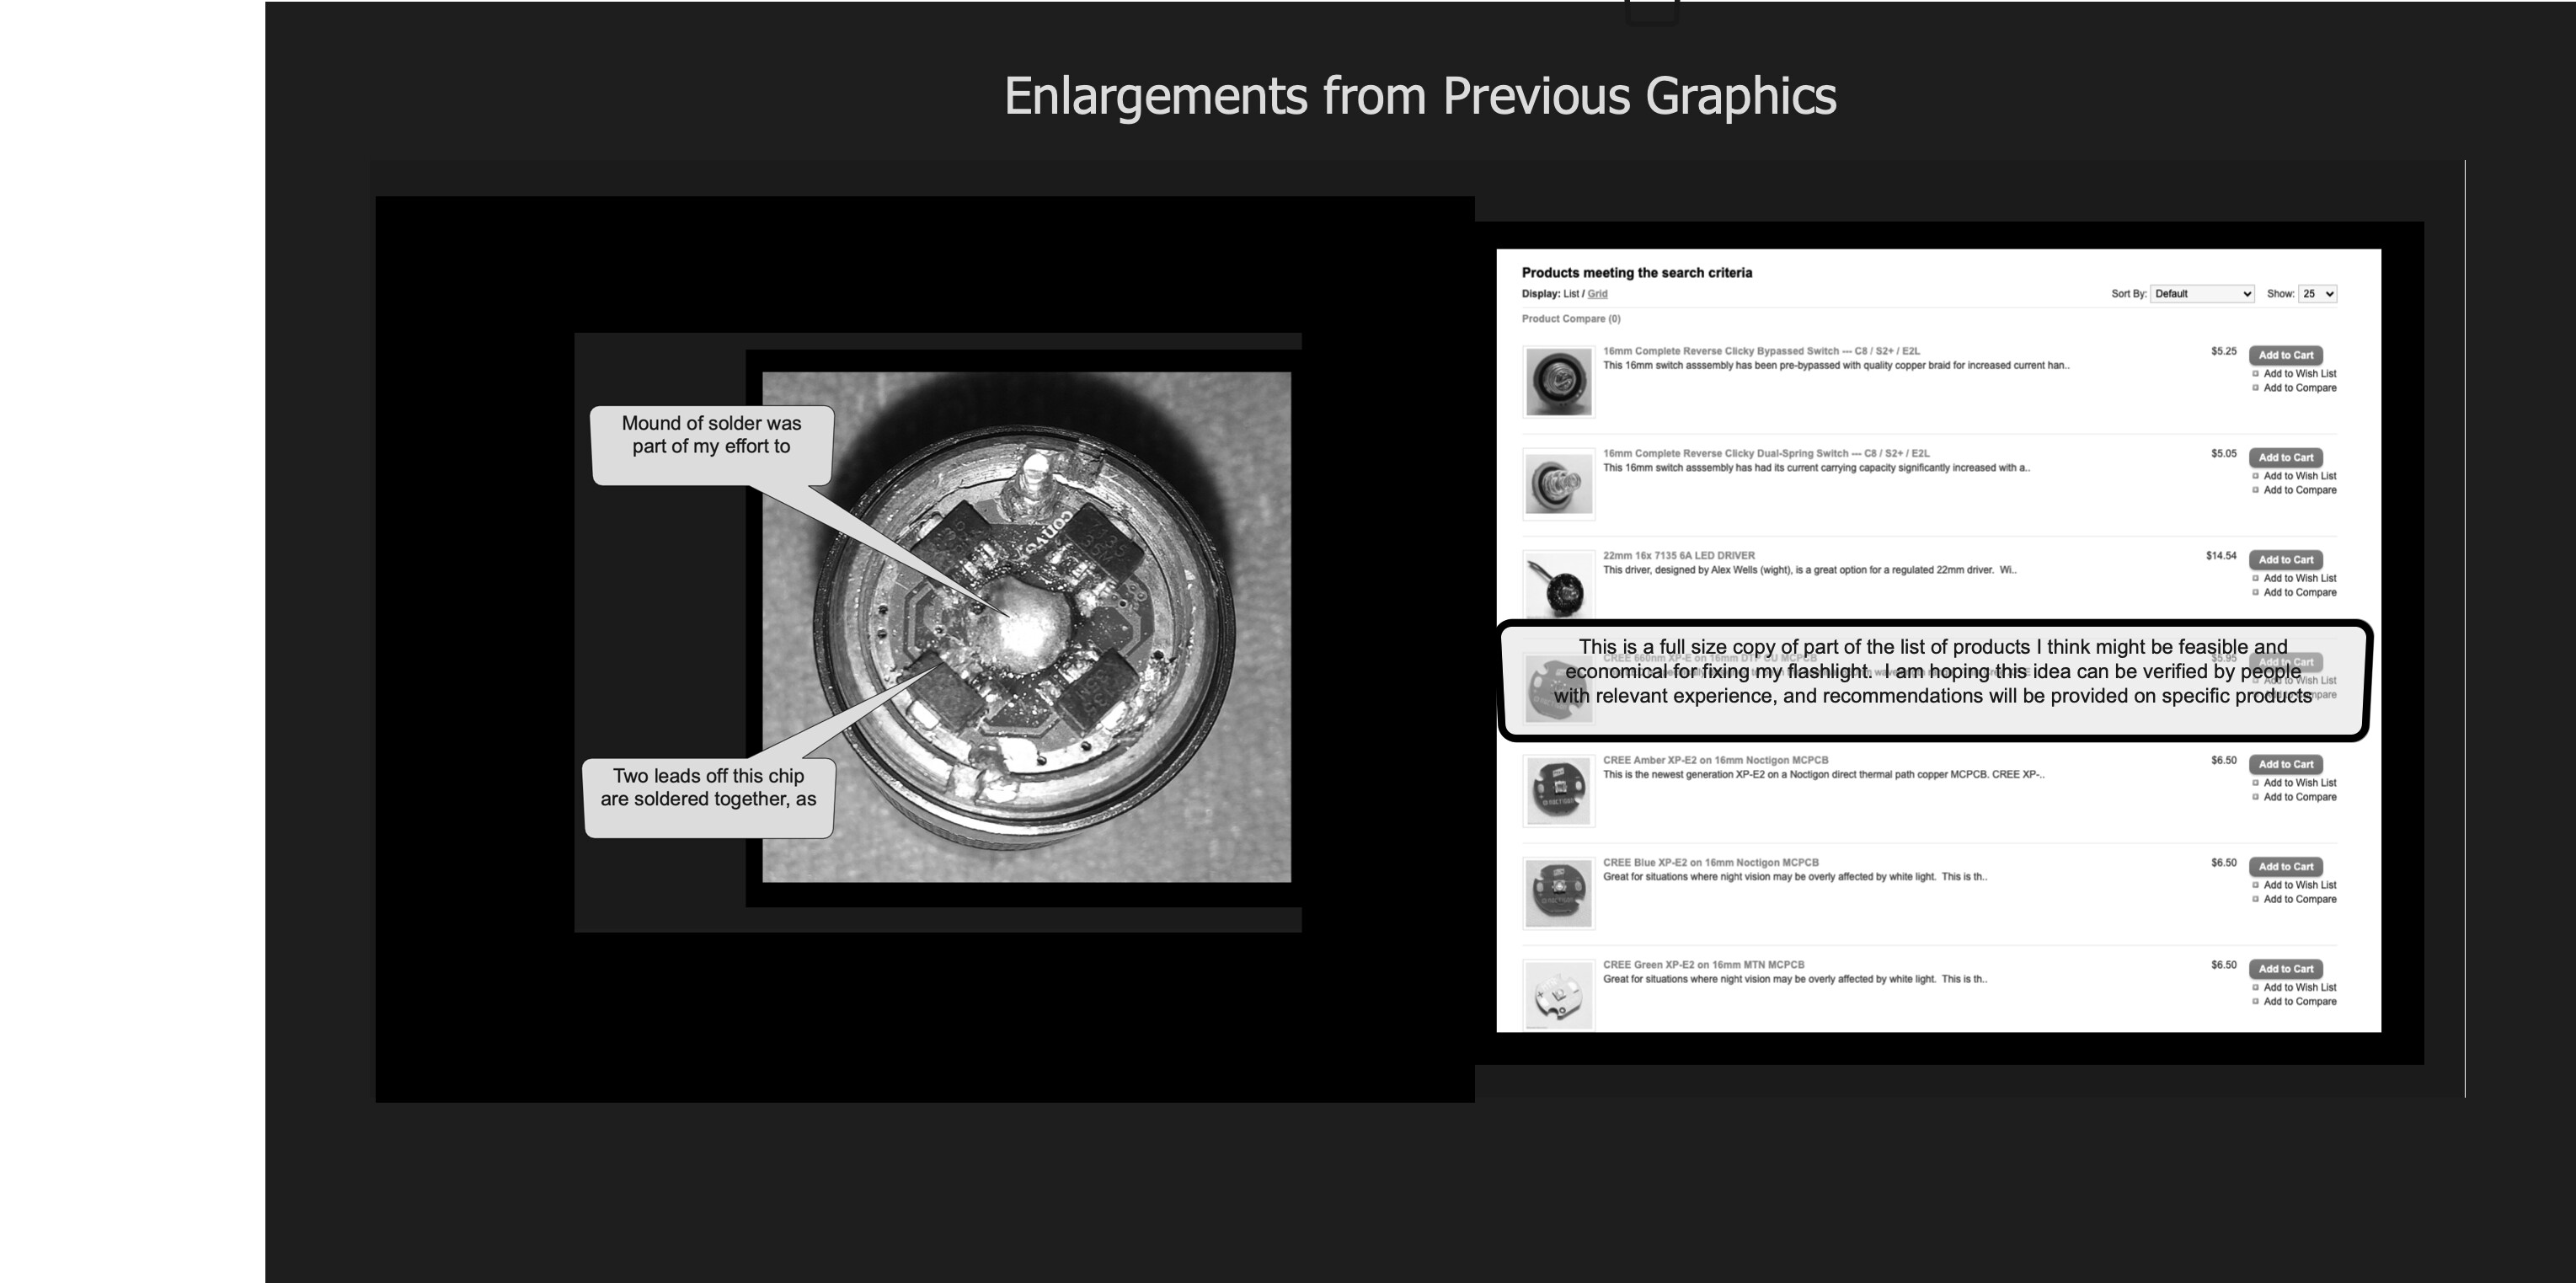
A graphic containing enlarged portions of the previous two graphics, to make important details easier to see.
.
A brief statement requesting input from this website that will help me get this flashlight fixed;
REQUESTING QUALIFIED, SOUND JUDGEMENT APPLIED TO RESPONSES FROM THIS COMMUNITY
I have no right to expect help from anyone unless I have hired them. This community operates every day at the highest level of technical excellence humans can do. I am hoping of that phenomenal talent will be applied to this simple flashlight. I promise to pay attention to every word and implication I can recognize, giving the highest level respect have to the best things humans do, and feeling as grateful as possible.
For Idea #1:
I’d recommend that you get a 50Watt or higher Soldering iron and some desolder braid like the braid found here:
You can use the new Soldering Iron and the desolder braid to remove all the excess Solder from the driver.
After you’ve removed all the excess solder, clean the driver with Isopropyl alcohol on a q-tip.
Then solder the spring back on, be sure to use some flux.
For Idea #2:
You could replace the driver with one of these drivers:
The trickiest part is going to be removing the driver from the Brass Pill.
Your driver is soldered to the Pill.
Think of the Pill as a Large heatsink, you’re going to need a lot of heat to melt the solder that attaches the driver to the pill.
And even harder still, Soldering a new driver back into the pill.
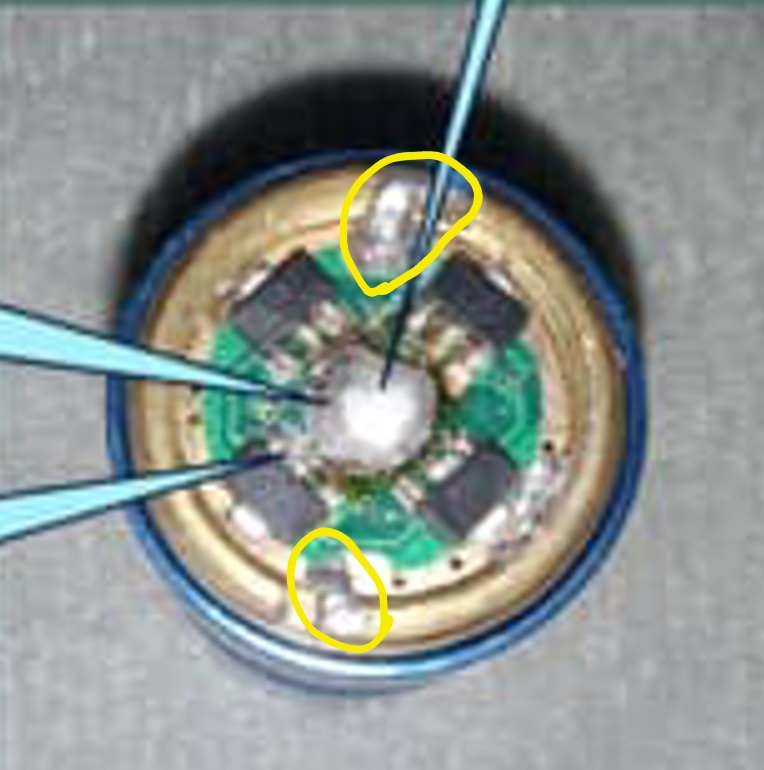
The 4 chips around the spring are 7135 regulator chips. For the ones that have bridged solder you can try to remove the excess solder with:
copper solder braid; or
a vacuum solder sucker
If you still can’t get the excess solder out it may be helpful to remove the affected chips, then vacuum up any excess solder on the board then replace the chip. To do this use a fine tip on your soldering iron and touch it to the center wire or the tab on the opposite side while gently lifting with tweezers.
If you try to remove a 7135 chip from the center wire you’ll probably need to first remove the spring as it will be in the way. Or you can touch your iron to the tab on the opposite side of the 7135 chip.
It should not be necessary to remove the driver from the pill to do any of this. However, unscrewing and removing the entire pill from the light and placing it upside down in a vise may make it easier to work on.
If you accidentally damage a 7135 regulator chip you can remove it completely. The light should still work without it, but output will be slightly lower. You can buy fresh 7135 regulator chips online.
Welcome back into the fold. I really like the way you setup your post with such organization, combining a professional presentation with a CV.
Your commitment to learn all you can is a great attitude, which will be appreciated by those willing to share their knowledge. As long as you put as much effort into learning about electronic circuits, soldering techniques, etc. as you put into your initial post, you’ll definitely avoid being “bitterly defeated”!
@INeedMoreLumens and @Firelight2 have both provided you with solid information to get started, all of which address your initial objectives.
If you feel that your current soldering setup may need some upgrading, please list and describe what equipment and supplies you already have so that we can offer appropriate suggestions and avoid redundancies.
It’s important to also include a budget so that suggestions are hopefully commensurate, and we’ll go from there.
As already suggested, if don’t already have some braided soldering wick, you’ll definitely want to add that to your supplies.
I would recommend adding rosin solder flux paste to the legs of the 7135 chip, and then using some solder wick and a soldering iron to remove the solder.
You might want a fan and good ventilation so that you are not breathing in the flux as it burns.
You could add flux to the spring, heat it up with a soldering iron, and remove it.
Try to remove excess solder. Clean the board with some isopropyl alcohol.
Add some more solder and flux to the board. Put the spring back on. Heat it up and get it to stick to the board.
Use heaps of flux. Smother the board in it. It makes soldering so much easier.
Flux and solder wick might cost $15. You don’t need to buy a lot of new equipment.
This is a response from an unqualified flashlight enthusiast.