Comments and any help would be appreciated. I have yet to get all the parts together. Has anyone used this type of lens Anyone use one of the 18650 w/PCM battery holders?(see pic) Tips?
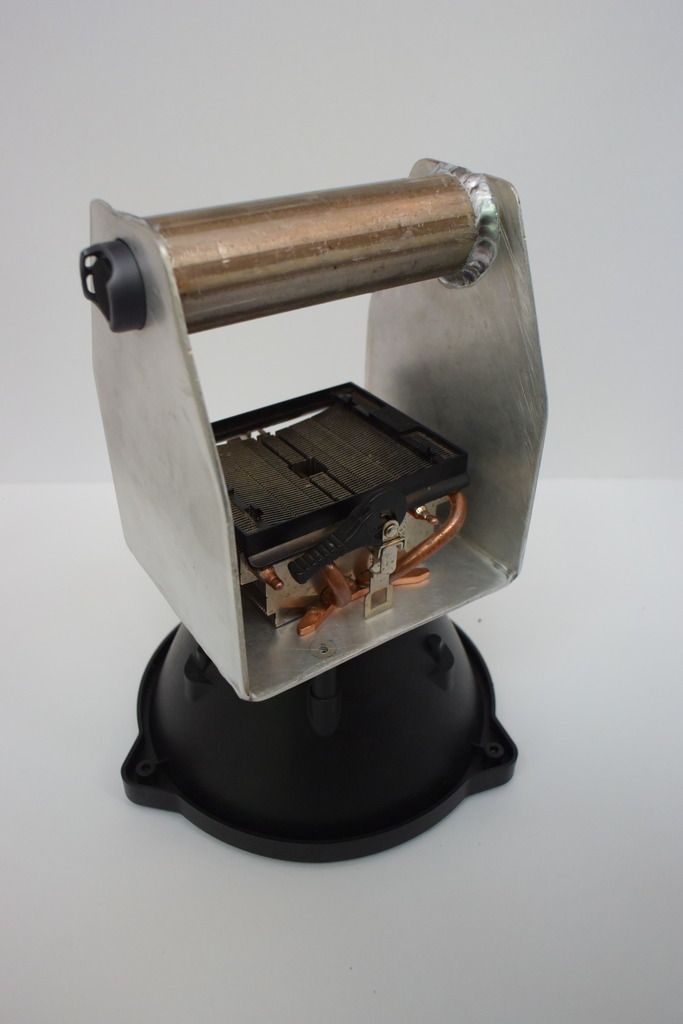
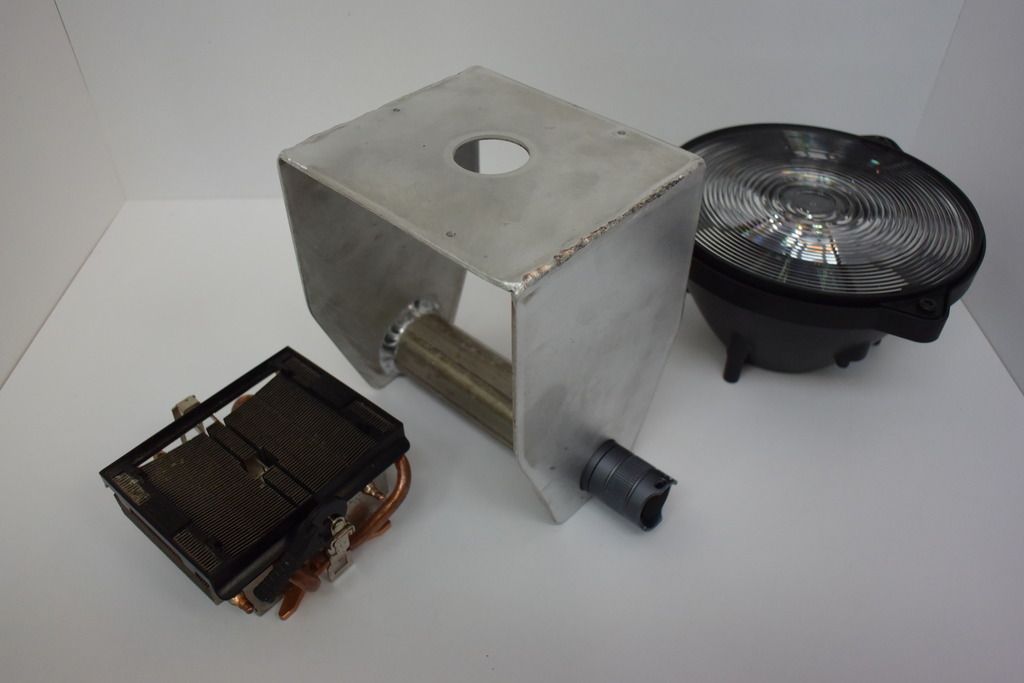

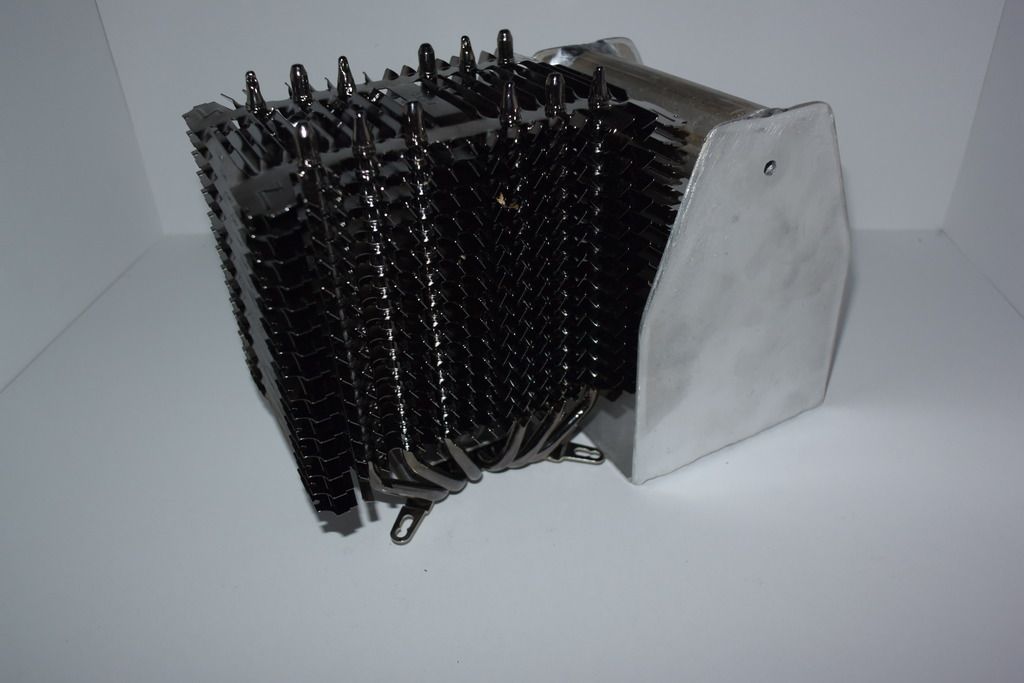
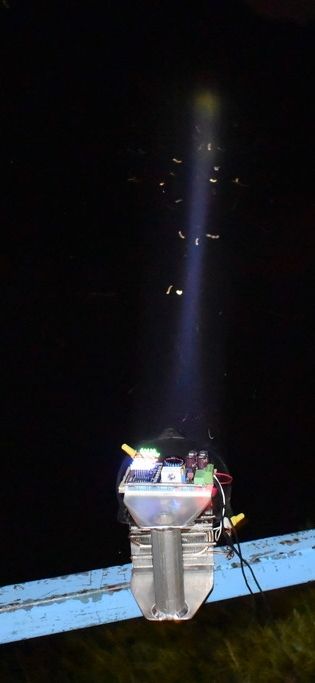
There is a hole on the side (not shown) that I plan to have wires coming from out the front of the Convoy. The Convoy will be used to hold the buck driver. I was going to notch the side, of the Convoy, for wires going to the switch. Thinking about adding tabs and holes to mount different cheap cpu heatsinks. This way I can just glue the led star to the heatsink. No plans on a fan yet. Has anyone used these cpu heatsink for leds? This will be kind of like a test bed for different setups. Where I can switch out different convoys, leds, reflectors etc… All the while being sturdy enough for some outdoor fun.
I order the 18650 battery holder with PCM not knowing much about it. It could be mounted on the side. It is spec to run anywhere between 3-5amps, so driving a XHP35 at 2.5 amps should work. ???
Thanks for any help.
Inkidu - Your idea has already been attempted by another member with fantastic results (Active cooled Ledil Sieanna + XHP35) but he seems to have abandoned it. You’ve definitely got the right idea for cooling the XHP35 and focusing the beam with that awesome Sieanna. Ive considered building a triple or quad 35 HI, but the size and weight made me think twice. I have several of the same cell carriers you listed. I think you’ll do fine at 2.5A if you clip off the stock wires and leave the nubs, then replace them with 20 gauge wires in their place. Just be careful not to melt the plastic carrier and use leaded solder over the stock lead free trash they used. 2.5A is the sweet spot for the XHP35. The PC’s usually work on the carriers, but I certainly dont rely on them. In a high powered bike light build, I ultimately dumped the carriers and built my own 20 x 18650 pack (direct soldered wires) becasue the shitty cold solder joints and lousy construction of the carriers kept failing at multiple points. Granted, the bike is subjected to rather high G shock loads that probably wouldn’t be encountered in a hand held light. You’ll find a great single mode driver towards the end of my X7 thread. for the 35. The supplier builds the driver to deliver the amount of amperage that you request. PM them and ask about a 4 x 18650 in series for @16.8VDC set at 2.5A and they should be able to provide. There is also the use of another highly touted, multi-mode driver earlier in the thread that can be dialed in at 2.5 A for the 12V XHP35 emitter.
I cool a large 100 watt Bridgelux emitter (8 hours a day for over a year) with a large heat-pipe fan forced-air CPU heat sink, and it never ceases to amaze me. The heat pipe cooler you show in your pics is actually overkill for your application, but Im a true believer in overbuilding a custom light meant for sustained max amp with burn times until the cows come home. You’ll still need to add a fan to prevent it from overheating. Since you’ll have the room for it, I might suggest a separate 2 x 18650 carrier in series (8.4VDC) so that you can undervolt the 12V CPU fan and isolate the critical cooling power supply from the main pack.
Unless you go high watt HID (55W or above), you’re far better off perusing your project for this mega-thrower, becasue it will likely be several years (if ever at all) before our selfish, narrow minded Chinese manufacturers can create something that comes anywhere near the performance levels you will realize in this build. Especially in a mega XHP35 that can continuously maintain the drive currents (around 32W) that you will be employing. I have relationships with several able manufacturer and they never listen
Good luck and please dont give up. The Sieanna guarantees incredible results with the XHP35, and I assume the HI version will deliver at least 50% greater lux than the domed 35 version in the same reflector.
I’ve got a Seanna attached to a Courui D01 body, Really makes a potent hot spot but there’s artifacts from the Fresnel. It’s big, and clumsy, but it does do the job of putting light downrange.
Which emitter? The XHP-35 w dome + Seanna looked nearly like a huge aspheric beam with some spill.
I’ve got an XP-L HI in this one, running off an FET driver with 7 levels, reversible. The hot spot is square, it actually does use an aspheric of sorts inside, a proprietary TIR pre-lens that focuses the light into the Fresnel.
Just took it outside, easily see the green leaves on a tree 574 yds away.
Shining it up into the night sky, you can see the rings of the fresnel joining into a beam that is almost a funnel leaving the lens, then that tight beam punching into the darkness. Pretty cool.
I’m only running about 1500-1600 lumens, at 2.5A the XHP-35 is going to be in the 2200 lumen ball park, or at least mine is running on the LD-2.
Thanks for the reply FlashPilot.
Those beamshots are definitely motivating.
I just messaged the man in Russia about the driver. I got one of Richards buck drivers arriving soon. Had planned it going into a L2 (4s) but this reflector has been collecting dust. Although the driver you mention would allow an easier path for just switch wires.
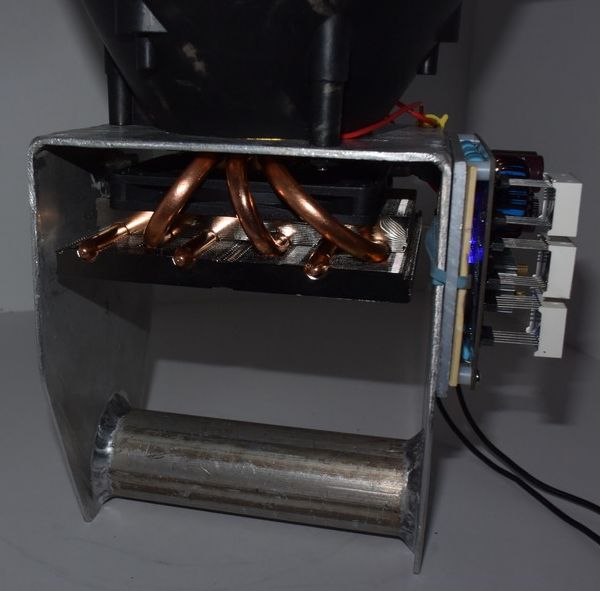
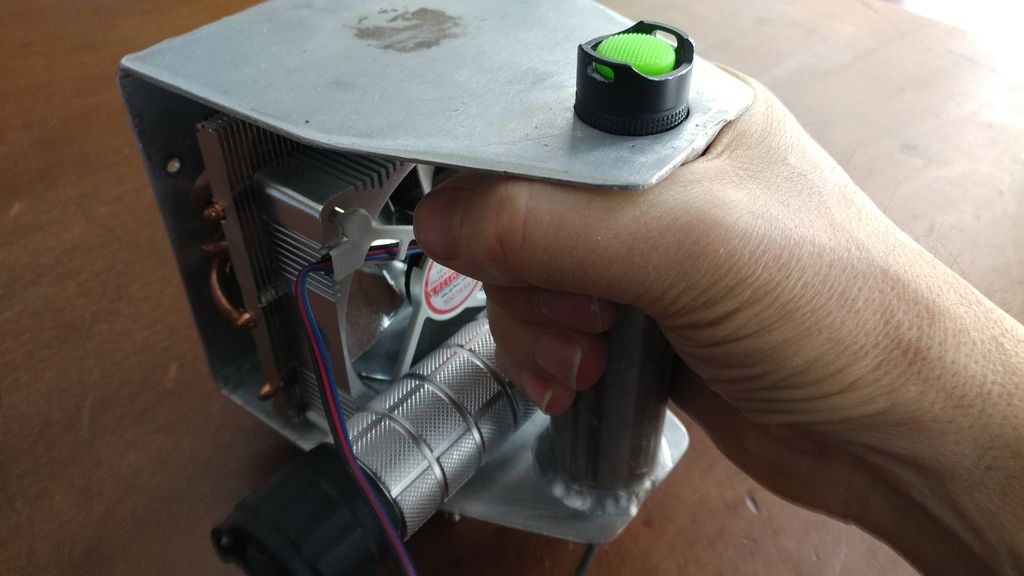
I was debating getting the handle made longer. I wanted to go fanless. I have this ZALMAN FX70 Fanless CPU Cooler for a another project. (XHP70 for a metallurgical microscope) I didn’t want the handle to become to combersome and that heatsink is rated for over 80watts. Right now the handle is a good size and weight. I will be on the hunt for a good size heatsink. The nice part of this setup is its versatility. Exchange one heatsink with another in seconds.
Plan on posting to see what size screws M4D M4X used for reflector.
Also concerned with attachment method of cheap AMD heatsink. The aftermarket heatsinks tend to use some stronger gear.
Forgot to mention I have a collection of just ordered Cree XQ-E That is if I can get them mounted to the Noctigon MT-G25 + 4 x XQ-E Advanced 25mm Copper MCPCB. Those things are small. I planned on cutting the mcpcb up into pieces if I can track the traces. Then glue on any cheap heatsinks. I am curious how they will differ. XQ-E sim: 1.1 Real spot - sim: 1460.000 will be something to see
Thanks for encouragement and I hope to post follow up soon.
Hi!
Well - frankenlight has moved to V0.5, but my metalworker has not finished a part i wanted to be lasercut (since my new jobprevents me from sitting in the mancave a lot)
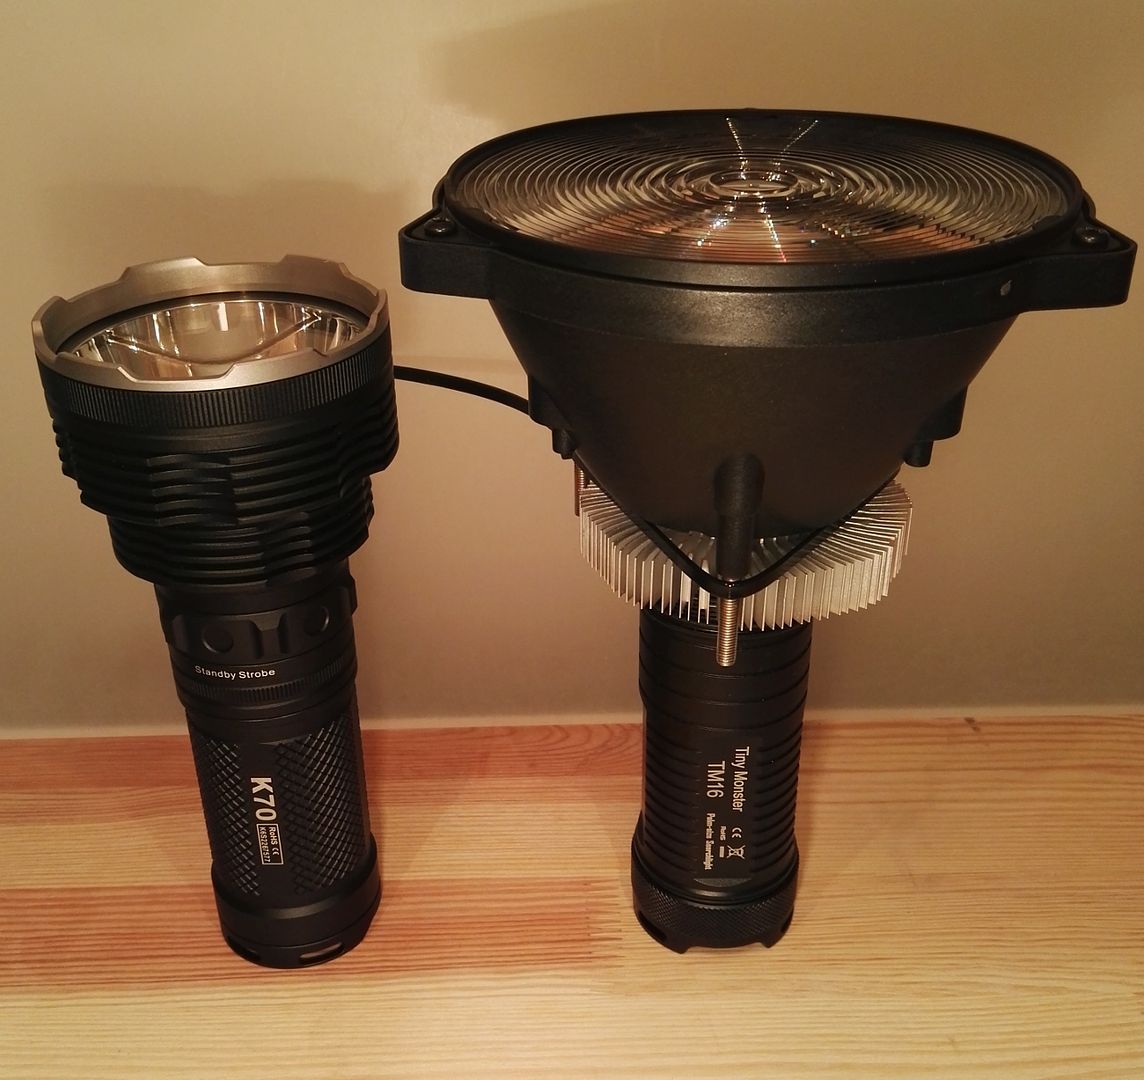
- i use a decapitated TM16 to drive the XHP35 (on a Aluminium Heatsink)
- driver is stock atm (~2A), but i hope it can be get up to 2.5ish
Heatsink is still floating....
![]()
beside a acebeam K70
Great build M4D M4X,
Half the fun is making a mod work the way you want. Makes you wonder who LEDil had in mind when they produced this lens.
Do you recall what size and type of screw you use for the lens posts? thread cutting, machine screw etc… I am curious because I am about to make a purchase through ZORO for some thread forming screws. (Zoro #: G0662234) They have an interesting Tri-roundular shape. No more tapping Al. Hopefully. Anyways they also have something specifically for plastic and if I get to $50 it’s free shipping.
Thanks for any help.
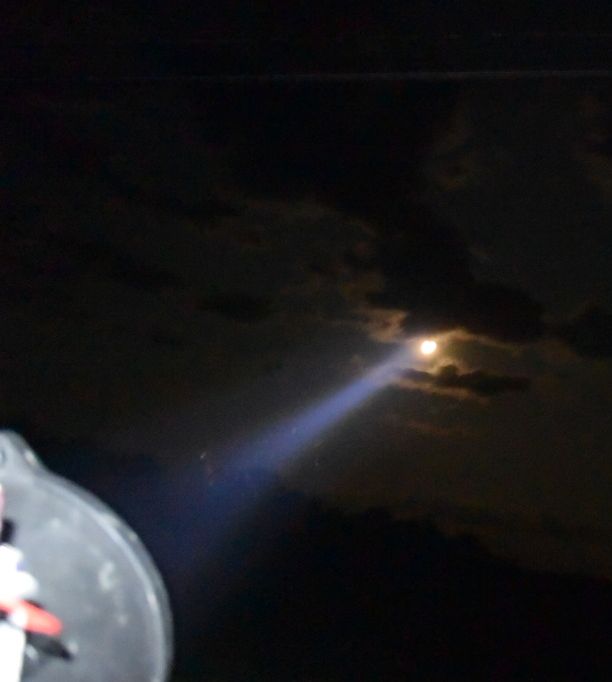
I had to try one of those moon shots.
Still a work in progress. Going with the test bench theme, I picked a rather versatile 8A buck converter 7-26V in to 1.25-25V out. I tried some cheaper ones but I heard mostly whines. I have tested this to 5A with a XHP70 but I think the 12 resistor version of this would be better suited for over 3A. This is the 6 resistor flavor with the lower input voltage.
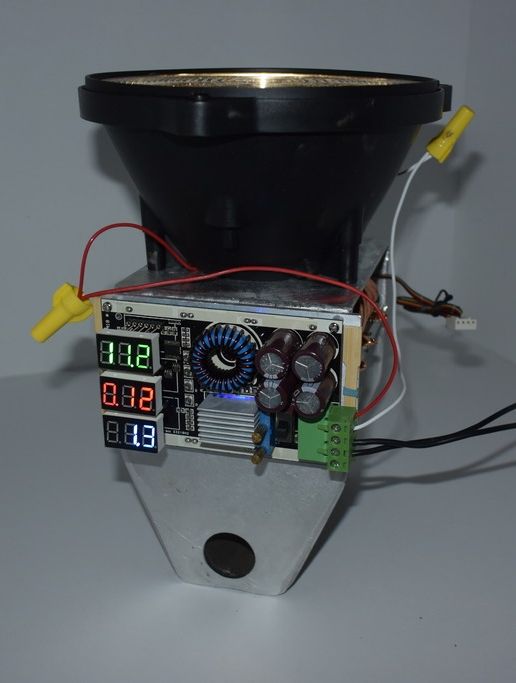
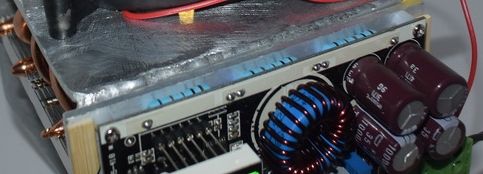
3 blue resistors on each side. While the other has 3 on the front and back and on each side. (Total 12)
There is also a higher volt version with the same 6 or 12 resistor option. How good any of them are time will tell. The voltage is reading higher than it should by .45v according to my $20 volt meter but there is a way to adjust. Waiting to test with a Fluke. I just like the ease and flexibility it offers. It also goes with the project where I intend to change led, heatsinks, lens etc… Or anything else that needs power. Maybe a radio.
I also upgraded the heatsink. Scythe Kozuti Light small and also the (3) 300mm heat pipes which happen to come in contact with the case. Also the face of the heatsink seemed to be customed made to be flush with the front face of the handle. Allowed me to squeeze it all together with the happy bonus that a XPL gasket fit onto the lens.
Notice the cone.
More to come.
Hope this helps.
Wow. What a sweet optic. What a sweet build! O tempora o mores!

Speechless comes to mind. What a creative build. ![]()
Thanks for the replies. I have to order the matching colors to give the whole flux capacitor look. The 3 post base does look familar.

Can anyone explain in layman’s terms the significance of the big resistors? The cheaper buck converters have nothing that large.
Once I get the voltage reading accurately, can I use that voltage value to then drive that particular led with a constant voltage driver?
Thanks for any help.
Edit:
After watching a youtube video, I think I am getting a better understanding. Are these the feedback resistors to improve efficiency or pull up resistors? The description mentions the 6 resistor is best for continuous use of 0-3amps, with an ammeter resolution: 0.02A
The 12 resistor best for 0-6 amps, ammeter resolution: 12 resistance 0.04A (XHP70?)
So, I think I got the right one (6) for the 2.5amps I am planning to run. Only up to 2amps now just to be on the safe side untill I get it dialed in.
I think I get the gist of how a linear driver is good if match well, and the buck can be effecient but has noise problems. Is that the whine I hear with cheaper modules?
Before I start typing myself smart, any links or comments for a layman’s lesson would be appreciated.
Thanks for any help
The flux capacitor is no more and now a different slimmer heatsink.
As single digit temperatures persist, my thoughts have turned to mods. I’m thinking about cutting the head off a Convoy L2 I having laying around. Adding a 2S 5A buck driver to power a single OSRAM KW CSLNM1.TG (white flat) centrally located on a NOCTIGON XP32. I’m using a Convoy S3 (2X 18350) in the handle to “direct drive” the aluminum case fan. (undervolted and quiet) I’m also going to add a remote pressure switch. As cable management is out of control already. It weighs 3 lb 14 ozs with batteries and soon to be missing head. Not light but manageable. Maybe a slingshot brace would be easy to weld on? The available boards for the Seanna are few. I used a 26mm with a XHP35 which fit between the black case opening. It centered it in one direction and allowed the lower lens, which has separate retaining screws, to press down on the led. This is all that holds the led to the heatsink. The XP32 will extend out further and hopefully align well with the centering pegs. One problem with this is that now the three footings will also be raised 2mm. A nut as a spacer should most likely correct this but I lose how well it sat flat on the handle. Who this lens was made for to begin with is beyond me. Anyone know? The need to adjust the height of the led is also a bit of an unknown. Wondering if anyone has some suggestions and/or comments? I know I don’t know. None of this is your typical light. It isn’t what could be considered a clean build. But, if it is anything like the specs for the Black Flat it should have some reach.
LED Oslon Black Flat
FWHM 1.2°
Efficiency 94%
Peak intensity1196.000 cd/lm
 OSRAM KW CSLNM1.TG