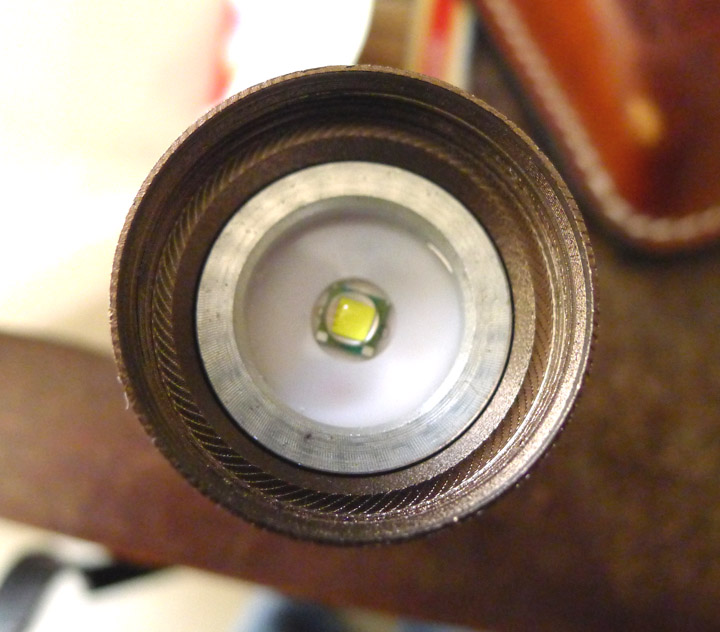
it is not a spacer - it actually keeps the Cree LED on its aluminium star-shaped board in place.
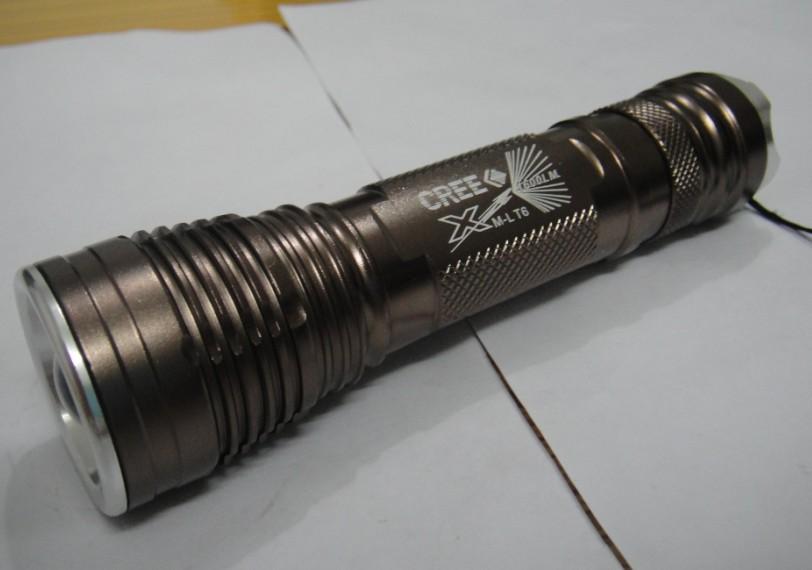
Looky there, lots of good reading: ITS HERE! SIPIK SK98 - A 18650 based Sipik SK68 with an XML!
it is not a spacer - it actually keeps the Cree LED on its aluminium star-shaped board in place.
Looky there, lots of good reading: ITS HERE! SIPIK SK98 - A 18650 based Sipik SK68 with an XML!
I'm guessing you mean to hold the star down as the LED is already re-flowed onto the board. Even that isn't always true on my Marsfire STL-V2 there is a white plastic spacer for centering it.
Just to clear up any misunderstandings, MY pictured pill is NOT from a 98 clone. It is this light, which is actually pretty good zoomwise execpt for the HORRIBLE PWM flickering on the lowest settings.
This is the one I would like to change out. Too much happening in this thread for my molasses-filled head to keep it all straight.
So somehow, this white spacer thingie has to come out? Kayrect?
The pill looks like this from the front:
So the consensus is that after somehow blasting out the white spacer, there will be notches under here to twist the pill and extract it?
That is my best guess as to what to do. I doubt it is press fit so they have to have a way to screw it in.

Either that or you have to unscrew it from the back? Are there any threads in the back. (I'll post pics in a few minutes)
Like this.

Take the pill out, pop the driver board off the bottom, and push the star out from underneath.
He is trying to figure out how to do that.
Hmmm, I’d be drilling a couple of indentations in the top, where you usually find them (and being very careful of stray bits of aluminium of course). Could even do that with a tiny screwdriver with a little patience.
I'm sure there is a way to unscrew it the question is whether it is under the plastic spacer or at the bottom of the pill.
>>>>>>I’m sure there is a way to unscrew it the question is whether it is under the plastic spacer or at the bottom of the pill.
Well, it ain’t at the top o’ the pill under the spacer, at least nothing I can see.
I carefully sliced and sliced and sliced and sliced until I was able to cut a chunk outta the washer; which was like cutting depleted uranium or something. I think it was delrin or some other super plastic.
If I look through the battery compartment, I can now see the front of the alumnium pill, i.e., there are NO ridges, notches, holes or ANYTHING that would allow me to turn this thing. Unless youse guyz can see sumthin in there? No threads in the back.
Tried (VERY hard) to push the pill through from the back. Didn’t budge. Before I start whacking on it with a little hammer and a mini chisel (from the batt compartment, trying to push it out the front), has ANYONE ever heard of one of these being press fit? Could it be glued in? I don’t see em welding aluminum; that ain’t gonna happen.
So oh great BLFers with tons more experience than me, how does it come out?
Well, at least I don’t have to worry about the PWM flicker any more! ![]()
NOTHING is ever easy, you know that right
Wow, that is surprising. In that case the thing to do would probably be what cainn suggested either that or try to wire up the driver without removing the pill.
I expanded a pair of hemostats INSIDE the pill, applying as much pressure as possible to the inside walls. Doing that, I was able to back it out.
Too lazy to take a picture now. The pill is threaded not press fit.
There are NO notches or ridges to help in turning this thing to get it out.
NOW — since I am new to this — what do i need for measurements to get a replacement that won’t flicker and where is the best place to get one.
I have to get a replacement now. I spent all afternoon on the &*&&%&* thing.
Thanks to everyone. Would have given up hours ago.
Completely off topic, just rescued my three handheld light meters from a closet last night, so I will be doing some lux readings when it’s time! I’m getting serious now.
Congrats! Did you measure the driver?
>>>>>>Congrats! Did you measure the driver?
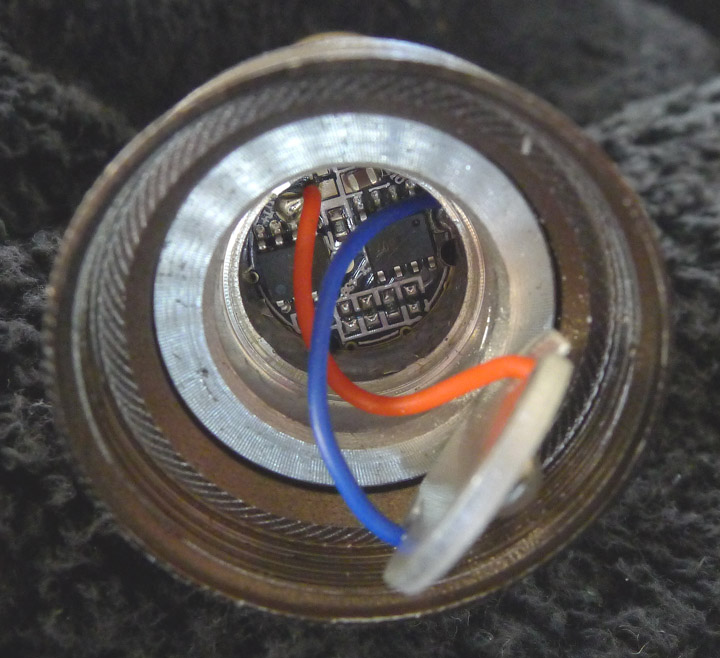
I have read much on BLF, but i’m a little hazy what measurements I need here …. The circular PCB is 17mm in diameter.
1. That is the driver, kayrect?
2. I reuse the threaded aluminum “pill?”
3. I can reuse the xml emitter? Just resolder that to the existing wire leads or ……
4. I read somewhere that I should use heavier wire for the emitter to PCB? If so, what gauge?
5. And the best place to get the new driver?
6. Anything particular I should look for in a new driver?
I am SO psyched to get this flash working with a non-flickering beam!!!
Thanks you everyone, especially scaru, who is now in my will, which means a mickey d’s FULL dinner could be his when I cash out. We’re talking BIG BUCKS inheritance! No charge for as much extra ketchup as you want! It’s the least I can do for all your help!
I like this little light. Very light in weight, sturdy, good machining, nice color, good zoom, etc. …. So I don’t have to get a new light at all. I can use this one with a good non-flickering beam!! YEEEEE HAAAAA!!!
Ok, so yes 17mm is the driver size.
1. Yes.
2. Yes, however it may be smart to add some more heatsinking in there. You don't have to but it looks like it could use it.
3. Yes, you can reuse the xml.
4. I'm not quite positive on that so I'll let someone else answer that. I'm guessing the currents wires would be fine.
5. You could order it from any site that sells drivers.
6. Since you don't want flickering you want something with a high pwm frequency. For that you should read reviews of drivers to find that out. My personal recommendation is a driver from E1320 it uses a high pwm frequency and has 5 modes. Firefly-lo-med-high-turbo and it has memory. It also ships from the US so you will get your hands on it sooner.
Glad to have helped. :)
Here a link to E1320's account is.
http://budgetlightforum.com/user/869
Edit: You definitely need to add some more heatsinking. The easiest way to do that would be OL's method using copper fittings.
I'd avoid saying "flickering " that generally means something else ..You had me very confused.. flickering means a bad contact problem .. usually in the tailcap or head ... what you're talking about is low PWM or bad pwm ..
The most obvious answer was to have taken a little drill and drilled 2 small holes in the edges of the pill ...
the hollow pill is a horrible lack of heatsink material and the fact a light gets hot is a good thing .. it means it's working ... the entire light should become the heat sink .. or it means you're overdriving the hell out of a light..modding a cheap light is somewhat problematic since they use cheaper materials and are cutting corners .
I'd be looking for a better host to work with ..I like edi-t lights .. the emitters are older but the bodies are generally pretty nice
they have maybe “outdated” emitters, and maybe they are underdriven, but from what i’ve seen they are probably the best built zoomies for the price.
>>>>>Edit: You definitely need to add some more heatsinking.
>>>>>The easiest way to do that would be OL’s method using copper fittings.
I will try to find a copper rod for a slug.
>>>>I’d avoid saying “flickering ” that generally means something else …You had me very confused…
I stand corrected. I’m a newb still getting the lingo down ![]() Thanks for the correction. I read all about PWM in various threads but wasn’t sure that was exactly what I was seeing.
Thanks for the correction. I read all about PWM in various threads but wasn’t sure that was exactly what I was seeing.
>>>>>The most obvious answer was to have taken a little drill and drilled 2 small holes in the edges of the pill …
That would have been the next step. We were hoping there were holes under the spacer, which had to come out anyway.
>>>>>the hollow pill is a horrible lack of heatsink material and the fact a light gets hot is a good thing …
This light doesn’t really get hot. That was another one in the original list. But I will try to press fit a copper heat sink in there.
>>>>>I like edi-t lights …
I/we were trying to save a host here that I liked. It may not be one everyone likes ![]()
Still a little hazy on these points.
1. What do I use to replace the white ring I mangled trying to get the pill out? If I can’t find a copper slug. Is there some material I can use to cut a new ring? Where can I get it?
2. The current driver PCB (still trying to get my lingo right here) seems to be lightly glued in. Any trick getting the old one out? Use a heat gun to melt the glue?
3. Is there some glue that will conduct heat that I can use to glue the new driver pcb in place?
Thanks again to everyone for their help.
Thermal glue could help you. Arctic silver can be found any place near you, Fujik from DX is also pretty popular.. or something else, just search for thermal glue. You wouldnt need the white ring then.
Another cheap way to improve heatsinking is to fill the pill with tin or solder. Copper might be easier to find in the plumbing section.. there are nice things.
>>>>>Arctic silver can be found any place near you, Fujik from DX is also
Obviously, you wouldn’t recommend it if it didn’t work, but I just looked on ebay …. and having coated many a cpu in my life with thermal paste …. This AS looks like thermal grease? Does it dry like cement/glue?
Normal gooey thermal paste will not keep these components in place, well at least the thermal paste I use on cpus won’t keep these components in place. It’d be like trying to glue a quarter to the ceiling with 3-in-1 oil.
You can get those white LED protector things at Kaidomain or Int'l Outdoor Store.
-Garry