My cusom SRK driver has a nasty random strobe mode (intensity and pulse rate). I use the CRC16 function as a random number generator. It doesn’t use much memory. For some true-ish randomness toss in the low order bit from a few reads on a floating input on an ADC channel.
I just made a quick test firmware based on Mike C’s post earlier… seems like it’ll be pretty easy to get the code working (especially if you only need one mode), but the hardware could be tricky depending on what you’re doing.
FWIW, here is the random strobe function I put together as a quick test… only took a few minutes while I was in a voice meeting, so I’d imagine a “real” version wouldn’t be very hard either:
    while(1) {
        // turn the emitter on at a random level,
        // for a random amount of time between 1ms and 20ms (* 4/3)
        uint16_t randTime = rand() % 19 + 1;
        PWM_LVL = rand() % 190 + 10;
        while(randTime--) {                   // _delay_ms() can't take variables that can change, make loop with variable instead
            _delay_ms(1);                     // and delay_ms with fixed value within loop
        }

        // turn the emitter off,
        // for a random amount of time between 1ms and 1000ms (* 4/3)
        randTime = rand() % 999 + 1;
        PWM_LVL = 0;
        while(randTime--) {
            _delay_ms(1);
        }
    }
Slightly OT, but I have seen this "_delay_ms() can't take variables" so many times that it's time to do something for it:
#define OWN_DELAY #ifdef OWN_DELAY #include <util/delay_basic.h> // Having own _delay_ms() saves some bytes AND adds possibility to use variables as input static void _delay_ms(uint16_t n) { while(n-- > 0) _delay_loop_2(1024); } #else #include <util/delay.h> #endif…main…
#ifndef OWN_DELAY
uint16_t randTime;
#endif
while(1)
{
// turn the emitter on at a random level,
// for a random amount of time between 1ms and 20ms (* 4/3)
PWM_LVL = rand() % 190 + 10;
#ifdef OWN_DELAY
_delay_ms(rand() % 19 + 1);
#else
randTime = rand() % 19 + 1;
while(randTime–) // _delay_ms() can’t take variables that can change, make loop with variable instead
_delay_ms(1); // and delay_ms with fixed value within loop
#endif
// turn the emitter off,
// for a random amount of time between 1ms and 1000ms (* 4/3)
PWM_LVL = 0;
#ifdef OWN_DELAY
_delay_ms(rand() % 999 + 1);
#else
randTime = rand() % 999 + 1;
while(randTime–)
_delay_ms(1);
#endif
}
In this example, using own delay saved us 16 bytes (with -Os) and made the code cleaner.
Enjoy! :)
Thanks!
This code improves several things:
- It accepts variables and expressions instead of just hard-coded values.
- It compiles to a smaller binary, especially if you call it several times from different parts of the code (I saved about 140 bytes!).
- Its timing can be calibrated in one central spot to provide relatively accurate results. I found that 890 worked pretty well instead of 1024, and now I can use _delay_ms(1000) to make it blink at the same speed as a 60bpm metronome.
I tried briefly to make a custom _delay_ms() function but after half an hour of trying random ideas I didn’t have anything better than the original, so I went back to the default. This one works much better! ![]()
(and now I have another 140 bytes to fill… the possibilities are endless!)
I haven nothing to add to this thread but this is one of my all time favorite dilbert strips.

Not all ATtiny13As have their clocks calibrated. Different voltage and/or temperature will also have some effect => I have seen +-10% results with my drivers, but values around 1000 should be "near enough".
It could also be because I’m using avr-gcc 4.7.2 instead of 4.8.X. It seems to produce bigger binaries, and I suspect it might run a little slower overall (though I’m not sure).
Even just trying two different drivers though, I’m seeing an execution-speed variation of about 5%. I calibrated one so that it’d flash at almost exactly 60bpm, and on another driver it seems to be going at 63bpm with the same code. Maybe I’ll have to calibrate it for each unit, when I have timing-related stuff in the code. I’m not mass-producing anything, so I think I can do that.
I definitely am impressed with the responsiveness of this forum.
I took an extensive look at the reply provided by Wight, thank you for the very helpful links.
The whole subject matter is pretty convoluted for a beginner with a relatively tight deadline however. :~
The ATtiny13A MCU appears to be a bit of a piece of work with somewhat shaky hardware and pretty confusing code involved. I don’t mean to be timid, but I have to have a functioning device by August 15th, otherwise my project will fail to be visible at night and become a safety hazard.
Texaspyro’s SRK driver looks perfect however, thanks for your post. It wasn’t quite clear though if this driver/board has been made available for purchase yet, has it?
It seemed there is a lot of people interested in simply buying this board and I would definitely count myself in there for three boards.
The random strobe effect will really help breathe life into my installation, thank you for your help.
So, you have about three weeks to go from zero to fully-working product?
That might be difficult since some of the parts might need to be shipped from China, and that alone can take longer than three weeks. Most parts can be found within the US (RMM’s store has most of the good stuff), but other pieces might not be available without a wait.
Do you have any idea how much actual light you’ll need? How long it needs to run per charge? Does it need to run from batteries or an external power supply? These all affect the choice of host to use. I mean, at a guess, a 1x18650 tube light might work, assuming it’ll be viewed at night and you’re lighting up a reasonably small area. You might have to change the battery once in a while, depending on the settings you use.
Also, do you know more details about the strobe you’re looking for? I mean, yeah, random, but what kind of speed range and do you want the pulses to be short (freeze motion) or long (looks brighter but has motion blur and eats the battery faster)?
In any case, I’d probably focus on acquiring all the relevant hardware for now, and hopefully it’ll arrive in time.
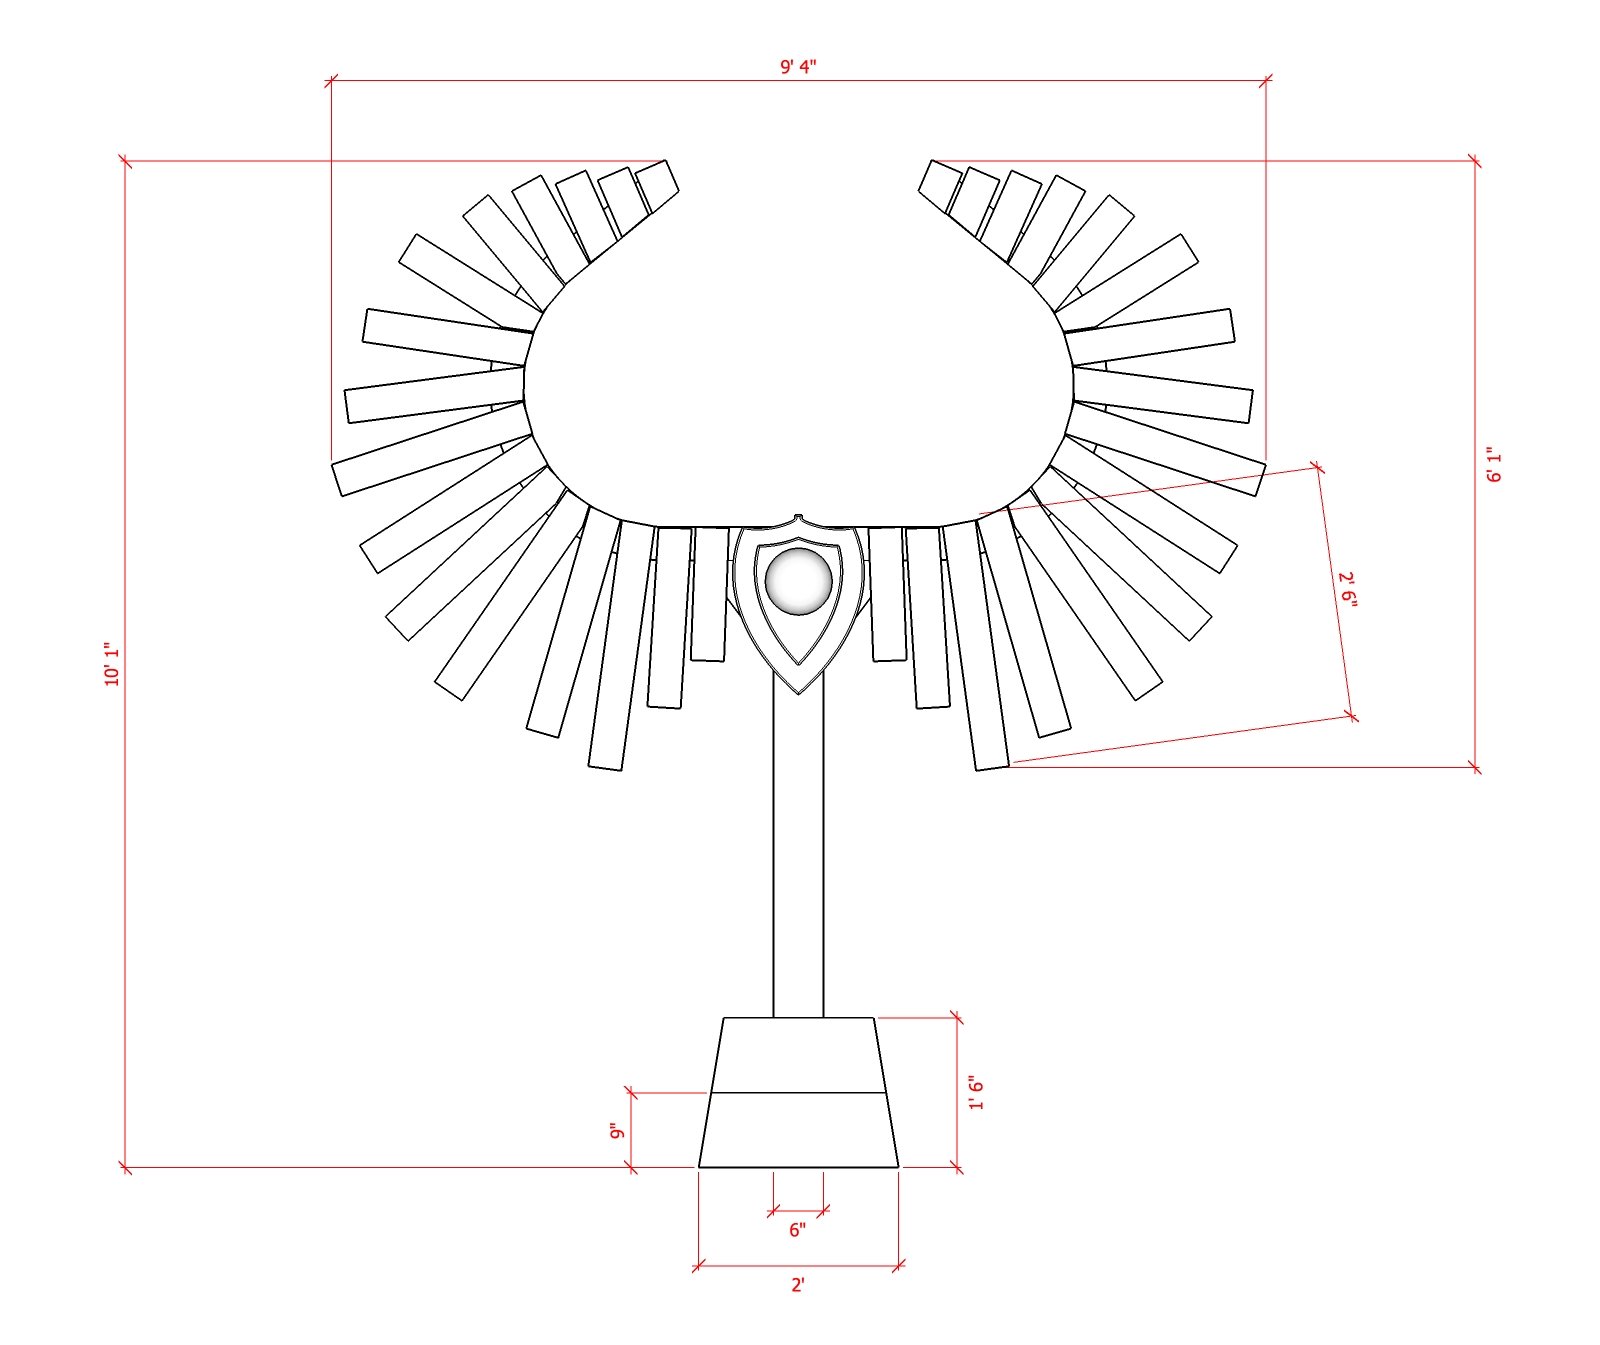
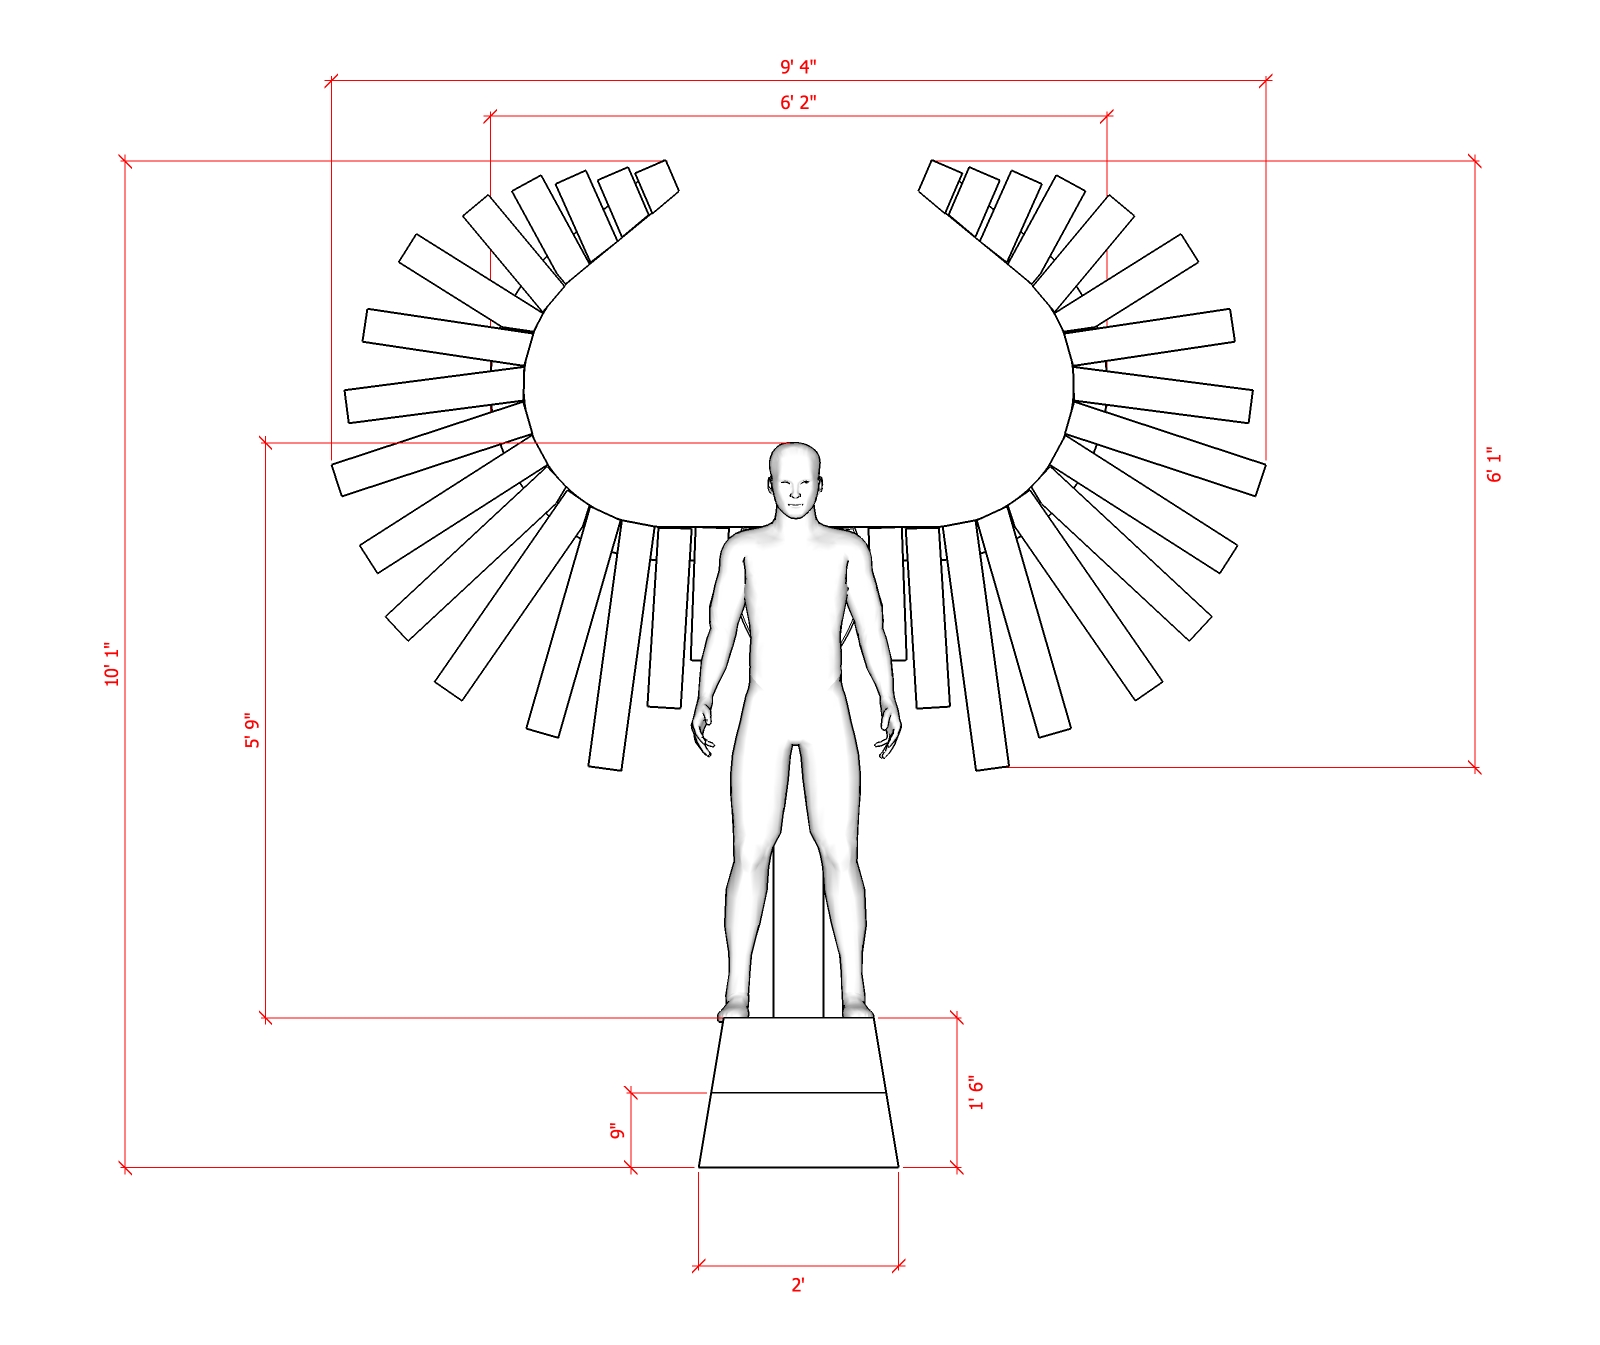
I attached a drawing of the installation, the strobe effect will be housed between the wings and should feel like a wild heart/energy source,
I intended to house a 12v car battery in the pedestal, (which should be recharged by a solar panel ideally), but would not mind bringing batteries and changing them out throughout the night, which lasts from ~8pm to ~5am.
Why not set the strobe to the beat/melody of your favorite song?
The installation will live far out in the deep playa with nothing surrounding it but open desert. Sometimes there will be sound from passing by mutant vehicles and sometimes it will be eerily quiet. The explosive strobe will be equally at home in both scenarios.
What about using several separate lights in a single group, each with a different strobe timing? The patterns do some really interesting interactions when they're running at different frequencies.
Most of the customizable hardware we've been working with are for low voltage inputs, mostly meant for a single 4.2v lithium rechargeable cell. You could of course use a step-down converter between the 12v battery & the flashlight drivers. You can get a 10-pack of adjustable voltage DC-DC converters off ebay for dirt cheap, each one can supply up to around 2 amps without needing anything special for cooling. Search for 'LM2596 converter' or something similar, limit sellers to US-only if you need them quickly (though doing that will severely limit your options).
Example of the board version you'll want: http://www.ebay.com/itm/251575972513
For the LEDs you can mount several LEDs each run by their own driver onto a single smallish heatsink, effectively creating one strobe unit-thing.
So, I took a video of the random strobe thingie I made. Really less of a strobe and more like a fast random lightning effect.
http://toykeeper.net/torches/random-strobe-mushroom.avi
It’s easy to modify the timing. For example, to eliminate the longer pauses and cut the maximum off-time in half, basically just change a single value in the code. I just wanted to see if this was even anywhere close to what Swissmountain had in mind.
I haven’t measured the current draw (kind of hard to get an average to get a runtime estimate), but I suspect this would probably run all night on a single 18650 battery. I mean, it’s off most of the time… so the battery should last quite a while. It’d need protected cells though, since it doesn’t do any low-voltage detection.
Based on this and your other responses, I’d say you’re in the wrong place!
“Random strobe” and “heart beat / energy source” do not reconcile well for me. likevvii’s suggestion of synchronizing with a song is probably much closer to what you want than a random strobe, but that still may not do exactly what you want.
FWIW there’s absolutely nothing shaky about the ATtiny13A that I’m aware of. Sometimes what we try to do with it can be a little shaky; this applies to many uses of different MCUs by hobbyists.
This is my strong recommendation:
I’d look at the Arduino community for control purposes (programming stuff) and pickup a ready made driver which accepts PWM to actually drive the LEDs. Both real and (OSH) clone Arduino hardware is readily available in the US. Using an off the shelf driver will allow you to choose any input voltage you want (car battery) and more or less any output you want (big/small LEDs, arrays of LEDs, etc). Look at Sparkfun or Adafruit for Arduino boards (specifically such as the Uno or Leonardo). Look at TaskLED (among others) for buck drivers which accept a PWM input: H6CC & Hyperbuck. There are many other commercially available buck drivers which accept PWM input, here is another option which was recently discussed.
I’m sure that code snippets to pulse LEDs using PWM (the “analogwrite” command in the Arduino environment) are readily available, you’d just be hooking that output up to a buck driver’s PWM input instead of running a tiny 5mm LED.
Again, I do not think that “random strobe” is going to look the way you describe. For an oscillating heartbeat type thing you’ll probably need bigger code (which won’t fit on a MCU with 1K of space like what we are dealing with here). You may want to attach potentiometers or other inputs in order to quickly adjust variables and meet your deadline. The Arduino will readily facilitate that.
EDIT: One more thing, because I didn’t specifically address this in the post above. I don’t think TP’s SRK driver is available for sale. Even if it was available it really is not ideal by itself. His driver is built using the AMC7135 chips which do not expect a large Vin/Vout delta… they’ll burn up without an additional stepdown like comfychair described, assuming you want to use a 12V battery. And the ones comfychair linked are not big enough, TP’s driver is about a 9A driver so you’d need a big stepdown to put in front of that. Like I said, there’s lots to learn around here and it sounds like you have higher priorities right now than jumping into this with both feet and burning stuff up. A lot of the stuff you see discussed here is intended for hotrodding only and works only in special circumstances (specifically “FET”/”DD” and 7135-based drivers). Off the shelf components like the stuff I mentioned earlier in this post have a stronger focus on reliability and functioning across a boarder range of conditions.
Oh no, I must have missed the part about using a single big driver... my idea was a bank of DC-DC converters, each one running a single ~1.5A driver flashed with custom strobe stuff and each driver running one or a group of LEDs. Each group running a strobe mode with different timings.
An oscillating heartbeat should easily fit into the 1024 bytes on an attiny13A. I never touched any MCU code until a few days ago and I managed to fit the following all into one 1008-byte ROM: Moon mode, low, medium, high, higher, moon-med flasher, low-high flasher, med-higher flasher, heartbeat strobe, 10Hz strobe, 24Hz strobe, 60Hz strobe, smoothly-constantly-pingpong-ramping 6Hz to 18Hz strobe, and another ramping 16Hz to 100Hz strobe. And low-voltage detection and step-down, and short-cycle mode memory with write wear leveling.
I suspect an oscillating heartbeat would only take about as much room as the two self-ramping strobes, with room left over for other stuff if desired.
The random strobe thing I posted a video of used 680 bytes of ROM, and most of that was because I used the stdlib rand() function instead of writing my own. Simply using rand() adds about 500 bytes to the ROM size.
swissmountain:
Let me add to the effects confusion. How about the Motel buzzy, blinky neon sign effect. Surely an oogle would come up with something on that. For me, the ramp up/ramp down over different/random time frames wouldn’t be so jarring an effect that a simple on/off has.
FWIW, I think this could probably all be done for about $50, including the development kit (assuming you already have soldering tools and maybe a bit of spare wire). If I recall correctly, with shipping it’s about…
- $9 for a Convoy S2 host
- $4 for a bargain-bin XM-L2 on Noctigon
- $4 for a qlite driver
- $15 or so for a chip clip (holds leads onto the chip for flashing)
- $2 for some ribbon cable
- $4 for a USB firmware flasher
- $9 for a decent 18650 protected battery
- $5-ish for shipping for parts
- $0 for all the relevant software
This is my firmware testing setup, using the above parts. You could reuse the host in the end product, so only one host and driver and emitter would be needed.

I had to order the USB programmer from China, but the rest was available inside the US. It might be possible to get everything semi-locally though.
While testing, I simply hold the red/black leads onto a battery to provide power and simulate button presses. I gave it extra-long leads and a couple extra wires to facilitate this.
(edit: I realize the battery in the pic isn’t protected… it was just the first one I grabbed for the picture)
I don’t think you really missed anything. Swissmountain mentioned that TP’s SRK driver looked perfect, that’s all. Since this is an art installation it probably remains unclear exactly how much light is needed!
Good point! I’m sure it’s absolutely possible to produce awesome effects in a tiny firmware. That said, I still think that Swissmountain is looking in the wrong place for this! Based on the level of experience this person has and the timeframe they need this thing in, I’m pushing COTS hardware. It’s all readily available from USA outfits with fast shipping and it’s… flexible in a beginner’s hands. It really wouldn’t surprise me if you shunned Arduino stuff, and I totally understand it if you aren’t into that. It’s still a good place for people to get their feet wet while getting great results at the same time. There’s nothing like knowing you made something, unless it’s knowing you made something and it turned out really great. I’m assuming that this person does not have a lot of coding experience, but probably does have big dreams. (If all he wanted was an attention-getter strobe from a single 18650 he’d throw a stock Ultrafire on there and be done.) With the extra IO from a larger MCU (like what’s on the Arduino) you can easily implement superior things like multiple strobes which interact in unique, not-truly-random, ways. (eg in the vein of what comfychair suggested above but … fades that follow the wings, pulse out from the center, etc).
Basic things like BMS and a few big unoptimized functions (Swissmountain is on a schedule!) will blow him past 1k. Why would this guy want to battle with that when he’s got a deadline to meet and no significant physical size considerations? IMO the Arduino platform is widely used for this sort of thing for a reason. There are a plethora of examples, the code is purposefully simplified to make it easy for non-programmers to adopt, programming the board does not require special hardware, and there is tons of space on the MCU to handle the ballooned code that beginners often create.
When it’s time to get-r-done on a project like that I need to hook up a couple of pots, write some code with variables in it, and flash it, and then start twisting knobs. Not keep hooking the driver back up to the clip and reflashing with different values. I’m not saying you can’t do any of that with the ATtiny13A… but hopefully you see where I’m going with this.
A lot of this may come back to how we’re interpreting Swissmountain’s (somewhat vaguely stated) vision. I’m taking it as a fairly grand vision. If so, he needs all the help he can get - shoehorning code into a small MCU would steal time from other aspects of creating the installation.
I love flickering, stuttering equipment effects. The Ancient Saber sound font for example.